Lessons
Class Introduction
06:11 2Types of Charcoals
07:44 3Demo: Stumps for Charcoal
05:48 4Demo: Erasers to Create Lines in Charcoal
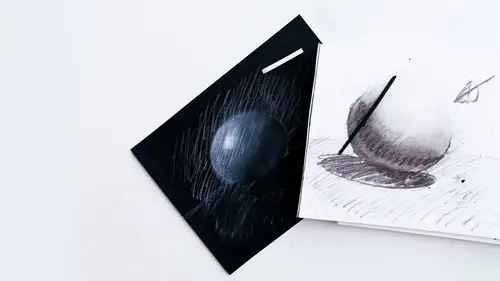
05:48 5Demo: Add Chalk to Charcoal
06:10 6Surfaces for Charcoals & Chalks
11:42 7Demo: Tonality on Spray Fixed Surface
07:01 8Demo: Pull Pigment From Non Spray Fixed Surface
06:22Lesson Info
Types of Charcoals
So let's start with the vine charcoal. Vine charcoal is what, typically, people use when they're in the classroom, working for, to draw a live model with quick gestural poses. And the reason why is, and I've done some testings, and I'll show you my sample over here. Is that this medium is very, very fluid and moves with a kind-of ease. It's super soft, I mean, this creates a lot of dust. It also moves really, really easily. So vine charcoal doesn't get particularly dark, that's the only trouble with it, unlike a charcoal stick. This is about as dark, if I rub it into the surface, I'm using my finger as a kind-of rubbing tool, it's probably as dark as you can go. And that's not really dark, it's pretty gray. So as you're drawing, you're not trying to get a strong value range with this tool, you're just trying to get the immediacy of this mark-making. So, I like vine charcoal, but I don't typically use it for making finished pieces because it doesn't have the value range of, for example,...
these, what they call a stick charcoal. The compression of and difference between this and this is this is, it's more loosely-pressed charcoal and this is very concentrated charcoal. So just to see the difference... Look at the blackness of this versus the blackness of the vine charcoal. This is as dark as I can make this vine charcoal, and it's fairly gray. So this is a great tool, it's the tool that I used to make the charcoal pieces that I showed you. Again, if I rub this in, I can get a super-black tonality, and it's really, really dense and really, really rich. So it's quite wonderful. And so this tool, let me just show you with another piece of paper, this is newsprint, by the way, I'm just gonna flip it over, save paper, and I'm gonna show you basically how this tool works. And it's a little bit different than the vine charcoal because you have these beautifully rigid edges, it's really, really crisp. You can get a texture, you could actually do a rubbing with this, and I'm actually creating a rubbing in a way, with the table underneath. You can push it around with your fingers. You can see it's holding on to the color where I pressed really hard and it picked up the texture of the table. If I were trying to make a very smooth gradient, like this, I would probably put a thick piece of paper or something really smooth underneath. This table has a texture to it, so I'm obviously picking it up when I do this kind of thing across the surface. What you can also do which is really nice is you can make very solid square-shaped marks, and you can use the edge of this tool to make a thinner line. Which is really nice. Or a line that undulates. You can also softly smooth out that line, and you can create, I'm gonna show you a little gray scale, here, and I'm actually gonna put, just so I don't have quite as much texture, I'm gonna put it on the back of this newsprint pad, so we're not picking up all the texture of the table. But I've created, over here, a kind-of value scale, I'm just gonna show you how I did that. This is the value scale I'm talking about. I'm just gonna show you how that works. And I'm adding lighter-to-lighter amounts of charcoal. So this is the darkest, pretty much the darkest it can go, which is very, very dense coloration. A little less color and tone, I'm pressing less hard, and there's literally less charcoal sitting there. And then here I'm creating an even lighter tonality. Lighter. Lighter. Now one of the things that you can do with charcoal, and which I've done, is I use an exacto-knife, or I just create a little pile of color by pressing a whole bunch of color on the surface, and then pick it up with my finger and then rub it on the surface. And the difference between doing that and pushing the charcoal down and then rubbing it, is that you can still see a little bit of the streak of the charcoal itself. By creating a sort-of pile of color... I grab it on my finger. If I press really hard, I can make a dark tone. Or I just lightly grazing, I can make a light tone. So for this medium... See my finger have a lot of black on them, but these ten digits are really great for moving the color around, and the reason why is because you actually have oil in your fingers that's helping to adhere that powder to the surface. So it's just a wonderful thing to have fingers, but to use them for this as a tool is really great. So what I also wanna show you, and I'm gonna do this on a slightly different sheet of paper. Is, I'm gonna show you how the mark can be really refined, but we're using pencils instead of... Oh, you have it... Okay. So this is a standard pencil eraser, but we'll make use of this. I usually use a pencil eraser that has a little point on it, that has even more refinement, but we can improvise, that's totally cool. So what I've got here is basically the gradation, I'm showing with the charcoal stick, but I'm also gonna show you, with a charcoal pencil, what we can do which is a little more refined. And we will use some sketch paper to do that. I just wanna switch papers because it's a little bit wider, easier to see. So, unlike the stick, which is a larger, unwieldy tool, great for making, and I'll show you in a minute, like, a large area of tone, and making a big area of black like this. With the pencil, you would never use that tool to do that, it's too small. So this tool is meant to create sort-of refined marks, a little transition, you can get thick and thin, thick and thin. You know, you can get fairly large with the mark, but you can make really, really small adjustments. You can also get into a very tiny area of a picture, if you work really small. You wouldn't wanna use a charcoal stick. Like this is too big a mark, I mean, that's as small as you can get that mark to be. And it's less controllable than the pencil. So this can also be sharpened with a traditional pencil sharpener. You have to use the correct side, it's the smaller side. And when I'm working with charcoals and chalks, I do try to create a fairly fine point because I work really small. But look at that, that's almost as small a pencil mark as a traditional pencil. So the difference between this tool and this tool has to do with the size of the mark and how small a mark you want to make. This, still, even if you press down, is also moveable, malleable, with your finger.
Class Materials
Bonus Materials with Purchase
Ratings and Reviews
Student Work
Related Classes
Illustration