Demo: Erasers to Create Lines in Charcoal
Lesson 4 from: Getting Started with Charcoal & ChalksMary Jane Begin
Demo: Erasers to Create Lines in Charcoal
Lesson 4 from: Getting Started with Charcoal & ChalksMary Jane Begin
Lessons
Class Introduction
06:11 2Types of Charcoals
07:44 3Demo: Stumps for Charcoal
05:48 4Demo: Erasers to Create Lines in Charcoal
05:48 5Demo: Add Chalk to Charcoal
06:10 6Surfaces for Charcoals & Chalks
11:42 7Demo: Tonality on Spray Fixed Surface
07:01 8Demo: Pull Pigment From Non Spray Fixed Surface
06:22Lesson Info
Demo: Erasers to Create Lines in Charcoal
I'm gonna to show you one of the techniques that I use to create tone like this. And I'm going to do it actually with a paper towel, which is over here. As you can see, you have tremendous coverage across the surface with the stick. The stick is, this is what I primarily use whether I create a little pile of powder, whether compressing it on the surface and picking it up with my finger. Or shaving it with an X-ACTO knife. Or just pressing it across the surface like this. I could use my fingers but that will take a little time. So what I tend to do when I'm doing a large surface which I did for those illustrations I showed you, which I did for this. Actually for this tone that I created, that I'm gonna draw on. I covered the whole thing with the charcoal. And then I spray fixed it. Now spray fixative, you can get it any, Blick art supply store. I should say Blick Art Materials. You can create this texture and then spray fix it, which means the fixative is holding the tone of that charco...
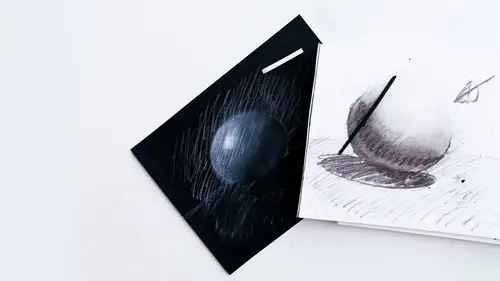
al onto the surface. I can't, this isn't gonna move. This is on there. I might pick up a little, but it's pretty much held onto the paper. This is literally on the surface. (blowing) If I blow it like that, there's dust all over the place. So I'm gonna use a paper towel. You could use a rag, a shammy cloth. To push that tone into the paper. And the reason why you do this is you're trying to create, if you're trying to create a value tone and then you're going to create a value picture. Starting with black or gray instead of white is a really nice option. Especially if you're gonna use what we're gonna use next, which is chalks. Now if we talk about the chalks, there's two things you want to think about. Which is using the white of the page and erasing out versus sitting on the surface. Now I think here I have an example of the chalks sitting on the surface. I'll replace it with this little picture here for now. Which is on a Canson paper, I'll talk about that in a bit. But what I have here is the charcoal on the base and the chalk on the top and erased out. So I'm just gonna replicate that so you can see how I got there. Actually I'm gonna take my glasses off. Okay, so here we have the charcoal over the whole, pretty much the whole piece of paper. And I have another sample test that I can use here. I cannot erase out of this surface because it's, it's so densely sprayed with fixative. It's held there on purpose to keep it from moving around. Whereas on this surface, I can actually erase right out to the white of the page. Which is really kind of amazing. And I can do, I'll do a little square here. This is a square tipped eraser. It's Staedtler Mars, it's really stiff, it's rubbery. So I can get right to the surface of that paper quite nicely. (blowing) I could also use what's called a pink pearl eraser to pull a mark and you can get like an edge with that. So it's really, it's quite a beautiful tool to have a surface which you can just pull the color right off of. And you could do it in a modulated fashion. Or you could do it really cleanly, like this. But this tool has an edge just like the square tip brushes. You can utilize that edge for mark making. The third kind of eraser, is called the kneaded eraser. I've been using this so it's got charcoal on it. It comes in a package like this. It's meant for you to be able to formulate. You can make a little point with this, or you can make a rounded shape. But it's meant to have a kind of softness about the mark making as you see I can pull back color but not quite as much as with the stiff hard edged erasers. So it's a more gentle, subtraction of color. And that's what this is called. This is subtractive color. You're pulling the tone off the surface of the paper. And that's how I created my images that I showed you. So that's the eraser method. And I also have a, this is just a regular pencil eraser. You can shave this to make a point out of it. You can use the edge. But again, this is to get an even finer, almost like a pencil mark, to create the lines. And it's really, erasing off is very very immediate. The biggest question and issue is getting some of this pigment onto your hand. I often will put a piece of tracing paper or, and we could do that now. A little piece of trace paper so I don't smear my drawing. Let's just get it. And when I'm doing this, I use the least expensive kind of trace paper. Just your standard quality. I'll do that now. And Blick has that as well. And all that I'm trying to do, if I'm working on pastels or I'm working on charcoal is I'm trying to keep from getting my hand to smear the whole surface. But this is a wonderful, wonderful kind of way to create tonality and form with couple different types of erasers and none of it is very expensive.
Class Materials
Bonus Materials with Purchase
Ratings and Reviews
Student Work
Related Classes
Illustration