Lessons
Class Introduction
10:48 2What is Meaningful Lifestyle Family Photography?
15:37 3Settings for Shoots
10:50 4Light, Composition & Location
10:47 5Settings Q&A
08:54 6Why Connection is Important
15:11 7Connection Q&A
09:36 8Session Experience
10:43Marketing Strategy for Lifestyle Family Photography
09:34 10Family Preparation
14:11 11How to Get to Know Families Fast
12:22 12The Actual Shoot
08:10 13Considerations for a Photograph
11:43 14The Family Session Workflow
07:38 15Shoot: Start Standing
05:49 16Shoot: Money Shot & Siblings
05:08 17Shoot: Time to be Seated
06:41 18Shoot: Portrait of Each Child
02:09 19Shoot: Laying Down
04:25 20Shoot: Mom & Dad Alone with Child
06:50 21Shoot: Movement Poses & Everyone in The Frame
04:07 22Shoot: Parents Together & Mom Alone
04:40 23Additional Shoot Considerations
04:38 24Review Images from Shoot
07:17 25Shoot Q&A
08:23 26Pricing & Business Strategy
21:15 27My Editing Strategy
04:54 28How to Cull Images
03:44 29Outsourcing Post Production
12:53 30Image Gallery Delivery
08:42 31Pricing & Business Q&A
11:00 32Finalize The Client Experience
05:20Lesson Info
Settings for Shoots
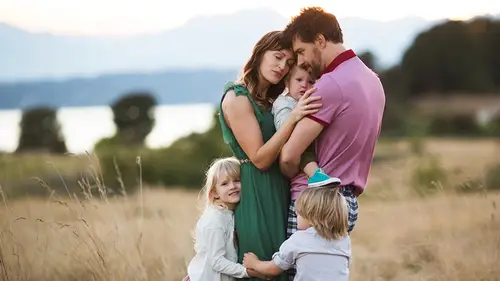
So, we have to talk a little bit about the basics. Now, I am not here to teach you the technicals of photography for many reasons. One, I'm not good at teaching that. I don't shoot from a technical standpoint. As you can tell, I'm a super lovey-dovey person. I teach from an... I shoot from an emotional standpoint, but we do have to talk about the basics and if I don't talk about them, we're gonna... People will be confused when I ask. So, one thing that people often wanna know is what my gear is. So, I'm gonna tell you that I am a camera gear minimalist. I am not that person that's out with the new lenses, and I still have the Mark III even though we've... I know that there's a new body out there because I just really don't care about getting the next body. The camera is just my medium, it's just how I connect with these people. So, I can shoot with a 5D Mark III. I have three lenses. I have a 35mm 1.4L, a 50mm 1.2L, and a 135mm 2.0L. What often happens, to be honest, is I get one on a...
nd I never change it because I forget because I'm so into the session, but usually I start with the 135 because it's a longer lens and it allows the family to kinda warm up to the idea of what we're doing, that we're taking photos, and kinda give some space from me and them. And then I usually move into the 50 or 35, usually the 50. You'll see when I work the family I am all up in there. I touch everybody and move them around. I sit myself where I want mom, and I usually move to the 50 after that. The 50 is just, it's a beautiful lens. It's true to life, I really like it. I usually end with the 35mm because then it allows me to get the wider angle shots to kind of include some of the amazing elements that we have here in Seattle, we're very very lucky. So, that's it, that's my gear. Don't use lights, don't use reflectors, this is it. What you see is what you get. So, we're gonna talk a little bit about the exposure triangle. Like I said, I am not gonna teach you what aperture is, what ISO is, what shutter speed is. What I wanna talk to you about, though, is my thought process behind why I choose the settings that I do because people often ask me this stuff. So, I'm gonna just... We're just gonna lay the foundation and then we won't ever have to talk about anything technical again because (farting noise) I don't like talking about it. Okay, so as we know, the ISO is your camera's sensitivity to light. And you'll hear, when you're starting, a lot of people say don't push the ISO up too high, don't push the ISO up too high, you're gonna end up with a ton of grain, all of those things. I push the ISO up really high all the time. I live in Seattle. It is gloomy here a lot. I shoot back at golden hour, so that kind of deep back light like this. And so, it's usually actually sort of dark and I shoot in home sessions for my newborn work and so it is like cave town here in Seattle, right? I mean, sometimes the sun doesn't really come out. So, I wanna show that I will push that ISO up really high and my reason is is I really want a fast shutter speed. So, we're gonna get there in a second, but... For instance, this is 1250 which, for some people, that's very high, and it was golden hour, the sun was dipping behind the horizon and this is... It was actually quite dark right here under this tree, but I wanted that really beautiful warm backlight and mom and the little one were moving a lot, so I needed my shutter speed to be really fast. So, I went up. If you're exposing properly, your grain is gonna be very minimal, and I actually don't mind a little bit of grain. There I am breaking the rules again. I think it's actually very beautiful. So, these cameras were made to push the ISO up. That's what they're made for. Here's another example. This was a really cloudy day. We were out in the forest and we were under a bunch of trees in the fall, and so I had to push the ISO way up to 2, in order to get the exposure proper. And then just to show you, this is inside. I think I shot this whole session at 4,000. We had just one window. There's like no grain in this picture at all. Maybe if we zoomed really way in we would see some, but don't be afraid. Push the ISO up. Break the rule, it's fine. It's gonna be just fine. Your camera can handle it, I promise. So, shutter speed is, for me, in family photography I like my shutter speed to be super duper fast, mostly because I use a lot of movement in my direction, but because we're working with kids. They don't hold still ever, not even for a second. So, you need a really fast shutter speed, and so a lot... A common misconception is that... We're gonna get to aperture in a second, but that if you shoot wide open you're gonna have a lot of trouble with focus. But the truth of the matter is is if you're shooting with a really fast shutter speed, everybody's gonna be in focus, everybody that you want. So, this, I'm at 3,200, really fast. This is dad, he was crouched down and everybody was on top of him and they're fallin' over and movin' all over the place. There's a ton of movement happening here, but it froze it. Froze it solid because it's really fast, 3,200. So, a really fast shutter speed is gonna help with focus. You are gonna get your images in focus if you do that. Same thing. She's whippin' her hair around. I love to use movement with hair, I have a thing for hair, and super fast shutter speed, 1,250. Same, mom's spinning her around. We were able to even freeze her hair in the air and they were movin' constantly, right? Fast shutter speed, 3,200. Okay, so the final little exposure... The last technical thing we're gonna talk about is aperture. It is no secret I love shooting wide open. I rarely rarely close down more than 2.0, 2.5, and people will often say, how do you get an entire group in focus when you're that wide open, and I know that that doesn't seem to make technical sense, but here, if you think about it, my people are usually very close, I'm... We'll talk about that in a second, but I get everybody really close, and so they're all on the same focal plane here. They're all on the same line. This is with my 135 as well, which is a pretty forgiving lens. I was far from them, but... So, everyone's in focus because they're all in that same plane, and then my shutter speed was probably pretty fast too. But sometimes I do it on purpose. I only want part of the image to be in focus. I love it that the only thing that is really in focus is his face here. I love that dad has fallen soft. That is the point for me on this one. I think that a wide open aperture allows you to tell the viewer where you want them to look. So, I am just showing, I'm like, this is it. This is what I want you to see. I want you to know what he's back there, but this is where I want you to focus. So, that's what a wide open aperture helps you to do. And sometimes I'll go even more wide. I'll go to 1.2, and this, to me, when I do this, this is all wrong. People, like there's people that are super technical that'll be like, oh my God, this is not in focus and you've got all this stuff going on. I don't care. This feels like a memory to me, this is what... I have little girls. This is little girl hair that you just wanna remember that, and so I will open up all the way like this to make it be more soft, to make it feel a little bit more artistic, to make it a little more interesting. So, I use aperture in that way. Question for you from Shiela Rivera and I'm so excited that we're gonna see you photographing later in the class, but what focus method are you using? And another question was do you use back button focus? Yeah, so I use all servo and I don't use back button focus. It never worked for me. I know that that's... A lot of people are really big fans of back button focus. I'm not, I just toggle. So, yeah, pretty simple. Thank you. You're welcome. Let's see. You mentioned it earlier, but from... Question from Marcia is how long would your sessions last and how many shots would you go... Would go in your galleries? Are you gonna talk to that later? I'm gonna talk about that. Yeah, we're gonna go into galleries, but my sessions are usually about 45 minutes to an hour and 15 minutes. They're really fast and that's because kids don't last much longer than that. So, you have to be fast, and I usually take about 800 frames at a session and I include a lot in my gallery. You guys are gonna fall over. My galleries are usu... I say that I will have minimum of 75. My galleries are usually about 100 to 150 pictures, and I'm gonna show you a full gallery, a couple later today. So, you'll get to see that. Awesome. I love this comment already from Angie Biyu. Says thank you so much. You've made me realize that my fears are okay and just keep the dream alive, I've had all my life, and to stop continue... Coming up with excuses and to let it go. So, so many great comments coming in, yes, for sure. Let it go. We saw a dog in one of your pictures, but a question from Molly was, do you ever include pets in your photography? Yep, absolutely, yeah. If they want... I don't have dogs, I'm not a dog owner, but if people wanna bring their pets, of course. Yeah, and there's a lot of dog owners in Seattle, so a lot of people actually bring their dogs usually. Sometimes the dog is harder to work with than the toddler. (laughing) So true. Yeah. Okay, and one more for now and then we can keep going is do you ever do this in the studio? And if so, that seems like a whole other thing to be able to get people to interact in a natural way in this type... I know we saw people in their homes, but do you do studio work? I don't do studio work. I do not own a studio. I am going to be shooting a family today in studio here, but it's in the garage and so it kinda feels a little bit more like an outdoor environment. I don't, and it's... But the truth is is that what I'm gonna show you, how to guide and direct, can be done anywhere. I do do a lot of in home. I just really really enjoy including environmental elements in my work. I'm a true Pacific Northwester. I love being outdoors, and so, that's why I don't have a studio. And I like to use light, like the sun, creatively, so... And then one more question from Katrina Lynn who says, how far away are you from your clients at that wide open aperture? And, I mean, we've seen a variety, but does that matter? So, it depends, like this one for instance. This is definitely with my 135, and so I was probably pretty far away, but as you can see, dad's not in focus. I don't care. It doesn't matter to me because there's so much action happening here and you can still feel his emotion from him being up there kinda framing his family. So, with my 135... I mean, if anyone knows the 135, you have to be pretty far from your subjects. You're probably about 20 feet away, but when I put the 50 and the 35 on, I'm in their face, couple of feet away, and you'll see that today. I won't be using the long lens. There's not really room in the garage. So, I get right in there and I don't worry too much about everyone being tack sharp, and I know that that's against the rules of photography, but, like I said, I'm not here to teach you the rules. And clearly it works. And it works! It turns out it works out just fine. Alright, thank you. Okay, you're welcome.
Class Materials
Bonus Materials with Purchase
Ratings and Reviews
Sandra Kay Hayes
I am totally in tears watching this, and think that every person going into Photography should watch these. She is a great teacher, and helps us to understand our "why" so much better. I also LOVE that she helps one feel confident with the non-perfect, (or so called) shots, Thank you so much for giving me more confidence to shot what I love and not worry about "rules!!". Best class I've taken I will recommend her to every group I am in!!!
Julia Khris
Elena is a great presenter. Delivers information in a very fun and engaging way. This course would be good for a beginner photographer. She shares the basics, but unfortunately doesn't quite provide advice on the more tricky questions. She shares a lot about her current state of business (10 years in and making enough profit to afford hiring staff). This is great to know what to aim for, however, it would be more beneficial to hear more about HOW to get to this stage. The main idea that I took from this course is: outsource as many processes as you can. Elena doesn't have a very distinctive style (no offence, but there is a huge competition in the style and editing that she works with), I would love to hear her advice on how to win in such high competition, how to convince clients to choose you and pay higher price tag for an equal quality of work. This is a fairly inexpensive class, so I would recommend it to the beginners, but not to the more experienced photographers.
Deb BUckingham
Oh my gosh! I’m speechless, which is not me! #extravert I absolutely love that she talks of everything i want to do with my business, but i thought it was taboo. I’m seriously in awe of Elena. She’s not afraid to be authentic. I admire her style and workflow. This class gave me so much hope in designing the kind of business i truly want to have. I highly recommend this course for anyone who loves the idea of an “online” business catering to families who love the lifestyle look. Oh my gosh! I’m so happy I pressed BUY. YOU should too!