Building the Body & Adding Gestures
Lesson 6 from: Fundamentals of Adobe Character Animator CCTony Harmer
Building the Body & Adding Gestures
Lesson 6 from: Fundamentals of Adobe Character Animator CCTony Harmer
Lesson Info
6. Building the Body & Adding Gestures
Lessons
Class Introduction
07:44 2Sketching Out the Character
11:52 3Building the Face and Head
16:32 4Developing the Eyes
06:17 5Phonemes and Visemes
09:55 6Building the Body & Adding Gestures
17:46 7Checking the Hierarchy and Structure
14:33 8The Best Way To Test and Fix Problems
11:07Lesson Info
Building the Body & Adding Gestures
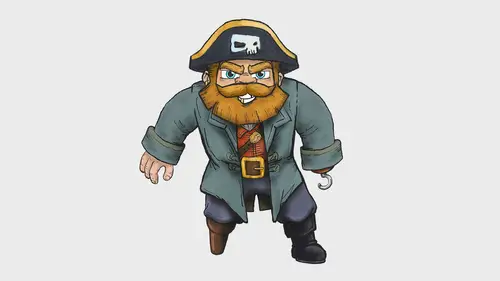
So, let me show you the structure for Gold Beard here, okay. So first of all, I've got the coat on top, right? So, Gold Beard's coat there on top like so. Okay, and if I just bypass the arms for a moment, then I've got the legs there. So, that's all of the leg components. And I've drawn that so it's slightly a more balanced stance than you would have, maybe, if you had a chair leg for a leg, which he's got there of course, modified chair leg like so. And I've also got this chest component. Now this chest component is called Breath. And that's because you can actually map that to a behavior inside of Character Animator. Which uses position and scaling to give the impression of breathing. So if you think about your breath, what you're doing is, as you draw breath in your chest is rising and widening as you do that, right? So, you actually compute by dragging the slider in here. So you haven't got to sit there and go, "alright, calculation of X over N is this and...", just dragging slider...
s. You just change the scale on the breath to make the chest maybe 110 percent or slightly narrower than that, maybe wider, and also raise it by a certain value. And Character Animator just raises and lowers that. And then you can change the frequencies, it's expressed as "breaths per minute". And then you can change how Gold Beard is breathing. If you get a chance, we can activate that. Maybe we'll get a chance to do that. If I turn on the right arm here, so this is a very very simple right arm, it's also drawn behind the body here. Sometimes you draw these things on top because, typically, you might want the hand to come across onto the body. This one was drawn behind mainly because I need to do this fairly quickly and I needed to get that kind of joint right. Now, there are ways I could've worked that. I could've put other layers with this joint on here on top of the jacket and had an extension. Now, I'm a little bit worried that that might not be desperately clear. So, in another new document, I'm gonna show you what I mean by that. So, if I get the brush here, just make sure I'm on my happy HB pencil. So, let's draw the body in yellow here. So, I'm just gonna draw, no that's actually a bad bad color to show you that in. Let's go for this sort of dark blue then, like so, towards purple. So, here is generic body, there like so. Okay? At which point we'd have shoulders connecting here and here, for example. Now, what I could've done, if I change the color to draw one of the arms here, is I could've draw this on top, like so. And then for the bits where I want the jacket to join the arms, I could've added another layer on top of that. Now, these would've been separate layers anyway, just to be clear. I could've added another layer on top of that, and if I draw this in green here, like so, I could've then drawn that texture there. So the texture would've stayed, but this over lap for the arm would mean you won't get gaps if the arm raises. Because if you draw it directly to the chest and the arm moves up, you're going to end up with a gap underneath which is undesirable. So, you sort of do this thing, imagine it as actually being like a socket fitting in to something and you need to make sure that would fit. So, bring that across, like so. Hopefully that makes sense. Let's swap back to Gold Beard just there. So, I could've made those textury marks on a separate layer on top. And of course buried those as well. But, that is the arm there really simple. And the other component I've got there is just one single hand. So, the hand on that one, very straight forward. Let's have a look at the left arm. Remember, it's his left, yeah? Not our left. So, let's just turn on the left arm. So, the left arm there, pretty straight forward. It appears that Gold Beard got into some trouble at some point there and he's got the other part of the chair leg, the other chair leg there, fused with his arm. So, on the plus side, Gold Beard doubles as a nice coffee table in his down time. But, there you go. So, he's got that. And typically, being a pirate, he's got a hook at the top there. So, I'm just gonna zoom in here on this area actually, just to make that a bit easier to see. What I might do, just for the minute, I'm just gonna add another layer here, down at the bottom, and I'm gonna fill that layer with a light gray. And I've gotta remember to turn that layer off. I'm only thinking about if you're watching this on a small device and you're actually trying to peer at this with that lovely transparency checkable patent going on underneath, I might be making it a little bit difficult for you. And that, of course, is the last thing I'd want to do. So typically, he has a hook. But here's the thing, Gold Beard has got some other attachments for his hook. These things just screw in. Let's have a look at how that works and we'll talk about how this is achieved a little bit later on. But, I'm gonna go back to Character Animator and go back to the record space here. So, what you need to be looking at right now, take your attention down here, in fact if I turn the green screen back on... Here, let's bring him back to the middle of the screen area here, change his scale just a little bit, and also bring his y-position up. There we go. So, pretty much in that position just there... Like so. Okay, so what you're looking at here is the hook. Keep your eye on the hook, okay? So, a bit of a whir and there you go. Suddenly, he's got a food mixer. So, if Gold Beard thinks "oh, do you know what? I've got friends coming across to the ship tonight, gonna make a nice souffle or an omelet." So, he'll get a bowl and he'll just whisk that up like that like so and then just take that off, put that in the sink to wash that off. I know, it's a bit of a stretch to the imagination but there you go. And you see, if I just take him back to his hook, like so, so what you're seeing there is really just layers being swapped around. This is something we're looking at in the next segment in much more detail. But if I just change here, there's the whisk, and there's the hook, and there's just a little animation that runs in between just like a whir so you can see those things change. Or it helps to build the illusion of those things changing. So, popping back to photo shop. So if I pop back there, let's have a look at this. So, I'm gonna turn the hook layer off. You can see it's just the layer just there. And a couple of layers above, I've got the whisk. There it is, like so. So, there's his nice whisk. And then I've got a layered group here called "whirl". And in that, I've just got a shape, like so, and another shape, like so. So, just things I'm drawing. Maybe I'm over simplifying that a little bit. But, really that is what it is. These are just things that I'm drawing. And if you look at that, it's not in any particular detail. But, you're going to see it for about a 30th of a second. Yeah, potentially, yeah. So, that suddenly swapped over with that, you're gonna get this vibration and your eye fills in the gaps. We're actually seeing what we want to see rather than what's really there. I'm not thinking about the mechanics of that going on, thinking about the suggestion of it going and drawing shapes like that. But, it is just a layer. And you can definitely do this. If you can operate this software already, you can definitely do this. And you can draw, you can definitely do this. It's just not that difficult, I promise you. So, that's what that structure is there. And that allows me to add these different gestures and similarly, if I wanted to, and I'll show you how I'd work with this. I'm just gonna copy Gold Beard's right hand across to that empty document. So I'm just gonna drag that layer up, over there, and drop that there. I'll get rid of the other two layers here. So I'm just gonna shift click those two, I've turned touch off 'cause I've got a zooming problem just there at the moment with the way it's hooked up. But this is a touch enabled antique, but I've just had to turn it off, disable it, for a minute. How I go about doing this, I get my basic hand structure, and it's not the best hand I've ever drawn in all honesty. Also, it has got three fingers and a thumb but cartoon characters generally tend to have three fingers and a thumb. And this is something that Walt Disney discovered early on in his animation career, is that drawing in the four fingers we actually have is really difficult. Well, not really difficult from a drawing point of view, but really difficult in representing it in 2D. And it sometimes looks a little bit awkward. You do get it in higher end stuff, but in cartoon animation typically limited to three. And again, we see a hand, that's all we care about, we're not worried about the number of digits on there expressly. So, I'm going to add another layer, I then typically make the top layer there transparent to a certain degree. So, if I come across now and change the opacity for that, like so, which I could also do by the way, quickest way to do that is to tap "v" on your keyboard, that gets you in the move till, and then tap a number between one and zero. So, if I tap three there, for example, it drops that layer opacity down to 30 percent. If I tap five, it makes that layer opacity 50 percent. I'm actually gonna tap six and in fact I might go to 65. So I'm gonna just tap six-five really quickly and that's just about the opacity I want. I sometimes copy the layer upwards as well and change that. In fact, that's, let's do that one there 'cause we're looking at time here. I'm just gonna make a duplicate of that, turn that one off. So, that's the background I've got there, if I turn this one on, and they're both on at 30 percent at the moment. Now I'm gonna erase some stuff here. So if I go back to my brush, with my wack on pen I can just turn this over, and it works as an eraser, like so. So, I'm just erasing. Let me turn off that layer there. I'm just erasing the bottom parts of these finger joints here, like so. Typically, by the way, I'd be working with-- I'm gonna turn the underlying layer on so you can just see that for a moment. Typically, I'd be doing all of this at the same time. So at the moment, I'm gonna be finding brushes and making them fit, but typically I'd have the same brush. So, it'd be really really easy for me to work with that. And then I kind of get the colors that I need to, I just need to bring the opacity up for this particular layer so I can actually sample those colors. So I'll get a brush, just gonna go for one of the general brushes at the top here, a soft, round, pressure brush. Because I'm using that, hold down the alt or option keys, sample that color, and then sort of paint in the shape of one just there, like that. So, it's pretty much gonna be that and, of course, you wouldn't see that whole finger in the second thing though, you'd just see a part of it. So, draw that segment there and then a part, like so. Know what, maybe if I just sample the shadow color there, maybe that that's drawn as a shadow. It's not very often I do that, in all honesty. What I typically do when I'm working with tones like this, is I type 'o' on my keyboard and use the dodge and burn tools to darken and lighten the tones. So, let me just show you. If I just come along with this, way way too big of a brush there so I'm just gonna bring that right down. Dragging left and right allows me to change the diameter, up and down allows me to modify the hardness. If you'd rather it modified opacity, you can actually do that in the preferences, but that's what I want from there. And I'm in burn at the moment, so the tones will be darkened. And I typically start to brush in there, like so. Now this is reddening these, so those ones were actually done. Let me change that to mid-tones, I think that might be where the problem is. So, let me just undo those strokes just there. And come out and brush that, there you go. Then start to add those shadows. If I need to create highlight, I just hold down the alt or option key and that swatches it, swap not swatches it, swaps it over to the dodge tool there, like so. I'm gonna go back to the brush tool and actually paint this-- Whoopsy daisy. Actually paint this how it was. So, let me just make the brush there a bit bigger. Gonna come out and add some shading like and then, because I'm not drawing the whole thing, in reality I'll kind of pace that up a little bit there. Let's get, I'll definitely use one of the Carl Webster dry media brushes here, I think, for that. In fact, I know where it is, it's in my creative cloud library. And it's down here, it's blot bolt one, which is exactly what I'm after for this. And then I do the line work on top of that, I sample that, maybe flick the layers on and off so, you know, so I can check that they kind of work between those two things. And draw that up, like so, add in the bits that will be there so there'll be some creases along there. Hopefully that's looking alright. Whoops, made a couple of slips there, but I'm not gonna worry too much about that. There we go. And once I've got that, then I've got my other hand and I move on to the next gesture. So, you might do things, you might have four or five different things go through, you might have to move things... through there two or three times, it might be several different gestures. You might have ones where you flip the hands over. So, for example, my hands aren't always in the backward position that they're in here, right? So, you're seeing them from that sort of angle in this cartoon and along that plane just there, that imaginary plane there. Of course my hands aren't always in that position. It might be that when I got to a certain point, like here, it flips over and you're actually seeing the inside of my hand. So, you can draw all those things. But, while you're getting started, just keep it really really simple. Don't start building in too many tones and adding complexities for yourself. Get yourself used to actually working with these things. Extend them a little bit at a time. Keep dreaming big, keep thinking "I can actually be the next whatever", definitely do that, definitely do that. But, and in fact, crude or more raw animation is very very popular and it has been for a few years and becomes more so. Some of my favorite cartoons are so roughly drawn and so mixed media, it's unbelievable. But, you can do that as well. And this enable you to actually make those things. So, what I'm gonna do is turn that layer off. So, you get the idea, I'm sure. You do that, give it a different name. So you might, for example, call that, you might call that "O1" there. Doesn't matter what you name that particularly, I tend to carry on the naming thing there, but I sort of do "RH01", "02", "03" and so on. Or it might have a name that responds to that particular gesture. But, that's how you work with it. And then you just include it in the group. So, we'll go, actually I'll keep that top document open. So, here in going back to this particular file I've got to, pardon me, turn off the right arm here. So, just going back to the left arm, okay. Remember, you've got the left arm itself there, which you couldn't, in fact, segment to. I don't, because I'm gonna use something automatic to move the arms, which you'll see in the next half. And then you've got the whisk here, so this is where it gets into the hands of course, as far as Gold Beard is concerned, I've got the whisk. Then I've got this little effect, just in there, the whirl effect and then I've got the hook. So, see how they're nested, okay? You've got that just there. So, the hands are in there, okay? But this is separate, and you can actually nest the alternates down as well. If you was watching when we were doing the bizeams, if you remember the 'r' shape there had two alternates nested inside of the actual shape. So, there was an 'r' group and in there, there was one and two, if you recall. If not, wind back, have a look at that at a later point from the recording.
Ratings and Reviews
Gary
Great Class! I am just beginning to learn Adobe Character Animator and this class was a great starter for me to learn some of the background on how the program works.
Student Work
Related Classes
Design Projects