Lesson Info
17. What Gear Do I Need to Get Started?
Lessons
Class Introduction
10:34 2How Photography Skills Translate to Film & Video
16:46 3Terminology
07:58 4Concepts
06:43 5Opportunities Within Video & Film
24:33 6Crew Roles
14:34 7Interview - writer & Producer, Julio Vincent Gambuto
29:13 8Phases of Video - Pre Production
14:37Phases of Video - Story Color & Design
16:36 10Production
05:57 11Post Production
08:01 12Camera Rigs & Gear
10:05 13Camera Movement
21:18 14Camera Placement: Interview Set Up
15:46 15Communicating Your Vision & Expectations
11:36 16Production Protocol
25:57 17What Gear Do I Need to Get Started?
27:12 18Photo Lighting Techniques that Translate to Video
08:58 19Shots You Need for Coverage
26:20 20Planning Your Shots
05:09 21Moving into Post Production
08:41 22Available Tools & Assets
12:01 23Understanding Continuity Basics
11:08 24Editing and Media Considerations
07:32 25Video Examples with Final Post Production
06:59 26Opportunities to Start Incorporating Film & Video
09:53 27Lone Wolf vs. Collaborative Approach
05:23Lesson Info
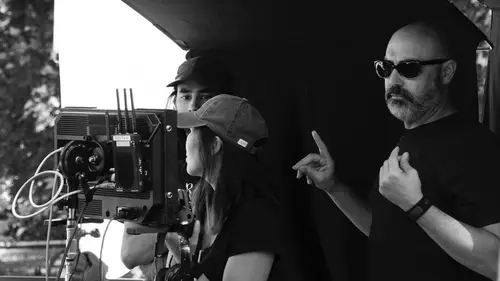
What Gear Do I Need to Get Started?
a lot of the questions that came up even in discussion afterwards. Ah, and some of the commentary on on the Web was interesting to me in that Ah, lot of it was talking about the idea of what I need, what I need to start, What do I need to start? And I think that in terms off ah, basic starter kit, we're gonna talk about gear in about a minute. But what I wanted to reiterate which I've said a couple of times and I'll say again is that the piece of gear you have with you is really powerful, this thing. And if you have the opportunity to create some storylines that you're interested in and you want to go about just going through the process is that we're talking about here, the basics. You should do that. And we're gonna talk about that a little bit later today. And I'm also gonna talk about a basic starter kit of things that you could help you improve that filmmaking. Ah, going forward from the phone to the next step and beyond that, but by But it's really important to understand that un...
derstanding the concepts is much more important than the gear you own. Teoh execute those concepts because if you have any piece of gear that can help you tell a story visually, you should use it and use it well and do things the way we've talked about in terms of and the things we'll talk about today as well. Creating shots, looking at thinking about editing techniques, thinking about the kinds of storytelling you want to engage in with visual language off cinema. So with that, we're going to start to talk a little bit about gear and the kinds of things that you could use to start. So one of the things that obviously a lot of us is photographers have to start with is a DSLR camera. So I think what we do is, ah, if we have ah, basic kit of things I have here in front of me, and then we have some stuff off stage that we're gonna bring on to talk about. Uh, the first thing I want to talk about is that DSLR because even with the thank you, even with the cameras we have here in Studio, which are considered cinema cameras, their cannon based cinema cameras the ones were using right today that you could see me on are the candidacy Siri's, which are excellent cinema cameras. And one of the great things about these cameras is that it's an E f mount and you can lock this lens on any of the cinema cameras in this room, and this camera obviously does the same. This is not that level of cinema making, but there are people making full feature films on these cameras. So if you have a camera like this, a DSLR with a video component or even a muralist camera with a video component, you will be able to make some quality looking cinema style cinematic visuals. So I want I want to encourage you to understand that because and then this. Of course, some of the pictures we've seen with things like steady cams and easy rigs were also rigged up with cameras like this. So there are plenty of really talented filmmakers out there who also don't have the budget to go out and shoot full fledged cinema cameras with would cinnamon like with cinema lens packages, and they're doing the best they can, whatever they have. And again, the skill set that you have. I'm gonna go back to Powell from yesterday. We met him on screen and he was the guy with the crazy easy rig in the back of the truck. He made a full feature with two actors, a crew of three people, including himself, on IPhone or two IPhones, some some mechanisms to move the IPhone and a quasar tube, which is something else we're going to talk about in a minute. Weaken. Bring that out as well. A quasar tube is a very simple tool that can be used in and off by itself. This comes in different lengths. They also come color temperature balance so you can change him around. It's a great tool. Andi used something like this pretty much as the Onley light throughout. So he used this toe like the inside of a car. He used this toe light actors in a small hotel room and then, of course, using natural light and filtering natural light. So this you think about what he made a movie with. There it ISS made a whole movie on basically that. So you need to be encouraged by the ideas of the knowledge to how to make a film is much more important than the tools to make that film. So I want to be clear about something like this, which is a relatively inexpert in expensive piece of equipment that you can use multiples off. But I could tell you some of the ways that I've used this, so even in in my work as a food photographer this we see the back of this so the light is only coming out of one side of this. So if you mount it on a stand, an angle that light down all of a sudden that becomes very much like window light. So knowing that also what I've done is in some video projects. We've used this to mount in the top of a window frame at night to make day for night, which basically gives me the illusion that there's light coming out of a window. So even if it's off camera, you can kind of feel like it's coming in. So these kinds of little techniques you can put a gel in front of this and change the color of it. If it's one of those rainbow ones where you can actually change the color of the light coming out of it. It's a simple technique that you can utilize over and over and over again for for sort of guerrilla filmmaking, which is a lot of what we're talking about here, right, you could light. Um, you can light an interview subject with something like this, right? So you could be as creative as you want to be because there is no rule as to how you're gonna light up any given city situation, because delighting techniques that we're going to talk about later are also, you know, a matter of choice. Now there's better practices, of course, but you can always do what you can, what you have on hand. We're going to talk a little bit about practical lighting as well. I'll talk about what that means. Um, one of the other lights that we utilize that's a relatively inexpensive piece of equipment and comes in many sizes is something called a call the light, Matt. Now, this is a pretty small version of a light, Matt. They come, they come pretty big. This one sandbag to my God, um, thistles. A pretty small version of it. But it's a super light piece of equipment that's really versatile, and it comes with either a power pack that you can plug into the wall. Or you can also adjust this to a battery and put this anywhere you need to be. Now, the back of this has the receiving, um, material for Velcro. So because it's so light and I'm sure I could demonstrate a little bit of how light it ISS, I mean, it's it's super light and you could see it's super thin. And all of this is Velcro material. So if you basically want to, let's say, like the inside of a car at night, you could Velcro this to the ceiling. Now this obviously comes off, so this could be completely flat. You could Velcro this to the wall, to the top of window to the side. I've used it in a video. I'll show parts of it later. We live with this, plus the other thing about this. It is completely adjustable for light temperature, so it's super super versatile, and they make these in all different sizes. So this is a this little package that we have here at a DSLR camera, a small light Matt, a quasar tube. We're talking about a package of equipment that a lot of photographers probably have most of anyway. But it's you, it's it's so useful in the idea of executing a lot of the things that we've been talking about so far in this class. I want to go over a few other things as well. I love these things. These of just you could play with them all day. They knew that if acting came out here on sandbag, that would be it would be hell to pay. So that's the visual component, right? So obviously, let's say you got a DSLR. You have several lenses, right? Because as a photographer, you probably have a full lens kit. Great. So then, if you decided to do something like what we looked at yesterday with that handheld rig with the collars to do a follow focus on rails, you put a mat box on this that looks pretty professional. It looks like a pretty professional set up. You put that on a set of sticks or even the tripod you have. You know, you connive actually moved my camera with my ah, my focus stand, which you've all seen me work with here. I creativelive at one point in the year we had a camera standing here during my first class. I actually used it because it actually had a smooth tracking motion, and I used it and did like a faux dolly shot with it, you know? Or did a slider shot with it or did of overhead slide with it. And so basically, you can hack a lot of different things with the photo gear that you have and, of course, hand holding your camera. You have plenty of opportunities to stabilize and move your camera the way you want it. I would recommend that if you are trying to pull focus on your own with a DSLR camera, you should be using some type of a monitor because I think of you very. It's very, very difficult to pull focus off the back of one of these cameras on their honor on their own. So that's something that if you're gonna build out a basic rig, one of those things you should have is a monitor, so that when you are even holding the camera in this position, you can have the monitor here so that you can actually track and watch and use your body as a tripod and move the camera in a panning motion. Move the camera in a tilting motion. So you know, this could be a ZZ are as complicated as you want it to be. And based on your level of experience, it's really good to just start to try to make the shots with whatever you have moved the camera moved the phone in ways. Oh, look, I always do that and turn my light on design flaw Apple fix that, um, you know, holding your camera this way. Now, this vertical kind of video that we see a lot of, um, I think you clearly as someone who's interested in more cinematic look should always be holding your camera like this. This will also help you when you're trying at it video together to make it look like something more cinematic with vertical video. Even though there is a place for vertical video, I think should be like mawr in app kind of stuff. You're gonna be on Snapchat or you're gonna do something in that vertical space that is definitely mawr appropriate. But if you are thinking in terms of how you're gonna make cinema shots, you should be holding your camera in this position. Um, from a visual perspective again, lens selection. Setting up your rig, All of these things lighting using even other types of lighting. Practical lighting. Meaning lamps in your house are lighting lighting the room the way you want them. You may need to adds lights like this on subjects. But if you're looking to create depth and room and creating some kind of atmosphere, the practical is that are available to you in your own home or great, because you want to start with the basic ambient lighting technique you know, in A in a room setting. And then you can always add to that with the other lights that you want to build into the scene. Um, OK, then we're talk about sound. Now, this is this is a basic sound recorder. They make him all different kinds, and this is very, very basic model that we would use to do like interviews or whatever, but because it has input jacks, you can use this to record audio with something like a lab. Mike. Now, this is a lab. Mike, like the one I'm wearing right now. And basically, you would mike up your subjects the way I'm miked up where you have the microphone here. And then you would run the kick, the cable in the court under the clothes and Mike the person behind. Now, when you're on a set and you're actually filming people who are miked, you want to hide the microphone to where you can't see it. Now they have these these types of microphones that can be kind of mounted inside of the clothing that will still pick up sound very, very well. And then this can be wired into this or remotely. So there would be a receiver because this is a remote and there would be a receiver that would be wired into your quarter. Now, these obviously get super complicated, the more you go up in in quality and, you know, in budget wherever whatever kind of money you have. But the thing is, is that if you're shooting with DSL ours and you have a decent set of love, Mike's you have a decent recorder, you're gonna be ableto get some quality audio that will go with your project rather than just try to record with the microphone that's on here. Okay, but there should be some redundancy to your audio capture and one of the other things that I would recommend. Oh, look, is that my Freddie Mercury set up, um, is a boom mike. So if you were setting this up in a situation where you were recording somebody who is miked through love and then you have the scene miked over the top, um, this will boom out. It's fairly far. I can. It's spring loaded. It is for spring loaded, huh? So, basically, you would have sort of this up and over your out of frame right out of frame, like, really tight, because you want to get it as close as possible. And then Or you could mount this on on on a C stand or some other kind of ah, rig with the mike. It's kind of sitting right where you need it to sit. But if we're in a moving situation, you're gonna have to have a sound, a sound. He kind of be moving with the action. And then you have the you know, you have to also be watching that the mike doesn't drop into your friend. So, um, this is a good This is good redundancy. And this is good. Crack this when it comes to capturing audio. Thank you. So that you have somebody miked their person miked and then also miking the scene. And depending on how you're capturing sound, this should be at the goal. Is at every level is that if you have some kind of audio redundancy, you're gonna be much safer. You're gonna better quality audio. And also, if Mike goes down, you don't lose the scene, which is, you know, that is the sort of nightmare scenario with any of the things that we do like in photography, that if you end up losing any, any footage or any, you know. And there's so many different elements to filmmaking beyond just taking the picture and having a captured on your digital media, you need to be very conscious of all of the pieces and parts and how they go together. So there is a lot of of the protocols that we talked about yesterday are kind of aimed at making sure that everything gets very systematized so that they're nothing gets lost in the shuffle because stuff happens. But stuff will happen less if you are really organized about it. So the other thing that you might want to have, especially when you're capturing your own audio, is a decent set of headphones, which most of us have, even though you might be running around with your ear. But your pods on airpods on right now, having it's still having a good set of cans, as we say, Um uh, toe where while you're on set is really helpful, because if you're either, if you're hopping the camera yourself, you also want to be tracking that that audio is recording properly, especially if you're kind of working either alone or one man, crew or two man crew. Three man crew Having all this stuff set up and again. Ah, lot of times when you will become a one man band, your rig that you're carrying with your camera on it also has your audio also has a different type of a battery power. So some kind of a big mountain battery that has a lot more power to it that empower your monitor power, your camera power, your audio everything plugs in, and your rig is heavy but functional. It's all doing the things you needed to do. You push the button to start your audio, you run your roll cameras, you got your monitor. You have your cans on and you go so you can be the one man band. And it's not a night ideal situation, because clearly you want help. But as much help with you can enlist. But with that basic, um, gear package and the build out that you have, you can either be a small crew or act or gradually grow that crew out and start delineating different people to take on different jobs. But Mike stands help when you don't have an extra person or something to that effect. Light stands. When you don't have somebody toe hold the light or hold something, they'll move something that you need to move so you have to work within the framework of the things that are available to you. But you also have to keep in mind that as you grow, you keep pulling more people into the equation, and that makes the whole process easier and flow better. One of the other two things you always have to remember is, and I encourage you to do this if you're in charge of camera on your job and this ghost says photographer as well. But you make sure that you have all your batteries, you make sure all your batteries are charged and you make sure you have more media than you're going to need. And if you don't feel like you have enough media, you make sure you bring a computer to back all that media up as soon as you're done and then cycle your cards back because there's nothing worse than forgetting something and then being in the middle of nowhere and not having what you need. And I've heard nightmare stories about even bigger productions where that's happened, you know? So you got your kit. Check all your gear before you leave. Have all your batteries charged before you leave. Havel. Your media wiped before you leave. Have a backup device. Bring your computer and that's your kit and that stuff. Most of the stuff that I handled here on this scene couldn't be put in a rolling case. Put on your backpack and you're ready to roll, right? This is this is assuming you're not doing something like just this thes things right? So I have a friend who's been watching. I'm hoping he's watching today. Hi, Casey. Um, so Casey and a good friend of his They do a, um, a sports show about the Yankees, and it's basically called Section 4 20 which is the section that sits right over home plate. And they talk about basically the state of the Yankees on a week to week basis and tow. Watch it on YouTube, or to watch it on public access TV, which is where a lot of it is published. You would think that there a multi person crew with really good gear and you know, a pretty professional workflow when in fact, it's two guys, the guy behind the camera and the guy in front of the camera. And it's because, technologically, they have worked out how to streamline their workflow to basically on IPhone. A lot of Mike a three Axis gimbal and some pretty good editing and and it's stuff that's running on YouTube and Facebook. It's running on public access television in New York, and it's fun and it's great and it's so simple and that should be encouraging. So we've talked about two people in my inner orbit that have made a movie with an IPhone and somebody who's doing a television show with an IPhone. So there is no excuse to not try to do the things that we're talking about in this class because of gear. So we started. We started with this for that reason, because I want a hammer home, that particular message that you were not leaving here with any excuses. We're going to go out with the knowledge that we've learned, and we're gonna use the gear. We have to do something cool with it. And here's the other thing. You don't have to worry about it. Publishing platform uploaded to your social uploaded to YouTube or Vimeo, and you have an audience to, and you can get feedback and you can get coverage. And you can get all of this stuff that you want to get in terms of the professional workflow of building cinema. He's including other people, including your audience. So that's where I want to leave at with year. But I also have obviously, we're gonna have some time for questions here, so Let's Ah, let's get to it. Um, so there's a great question. I think, um, there's a photographer. I shoot most mostly natural light for photo Right now, what type of lighting is best to invest in That can help my photography, but I can also carry into video work. So I'm guessing there's a lot of people watching this who are photographers and would like to be able to use the light. Well. I have completely transitioned into led lighting like I do not own strobes anymore. I shoot daylight and I shoot constantly. Yep, I should daylight and I shoot constant light and that's it, Andi, I have adjustable like those light mats. I own two of those big ones. I only know I own a starry sky panel, which is adjustable for light temperature for intensity. It does all kinds of fun, funny tricks for filmmaking, but it's amazing for photography, so I mean, on the higher levels they are is a very expensive piece of equipment. But the light mats are not so. Those are things that you know, and there are other adjustable light, temperature balanced kind of led lighting that's pretty affordable, and I would say It's super versatile, and I think that going with things that a super light as, well, portable. But I think that's a great question to start with, because it's clearly represents my workflow and all of this film equipment that I've acquired over the last few years has made its way into my photography and is changing the way I shoot as a photographer. It's changing a lot of the concepts, and the things I think about is a photographer. So, um, that's a great question. So hopefully you can. Anyone out there who's thinking about making that syringes and have versatile gear like that would be a really good, really good choice. Yeah, um, for smaller teams, uh, in quotes, doing everything myself. OK, can external mikes that are flash mounted produced good enough audio, or is a separate audio reporter recommended? I think a separate audio recorder is recommended for sure. And it's also for safety, too, because you know, you wanna you wanna basically have something that is dedicated to that particular capture. I think you're gonna get more quality sound, but also, you're gonna get a better file and something that is easily kind of married to what you're doing. I mean, obviously, you should be slating and time coding everything so that you can actually pull it into post and marry everything up together. But that's how I would recommend you work for sure. Okay. Ondas Faras using boom Mikes versus Love Mike's or on camera Mike's. Yep. What do you recommend there for people just starting Now, if you're just using one if you don't have the ability to use many, um, I would probably say a boom mike is more versatile than just a lot of Mike. I mean, a lot of Mike's a little bit of a luxury in that situation, but if you have a quality boom mic, that is, and you know how to operate it because clearly it takes a little bit more skill to kind of get that mike in the right positions when people are speaking. But there's a lot to learn. Would audio capture as well? I mean, it's it's not just throw the mic up and figure it out. It's good to start that way and then start to discern what's different. And then, like I said, I have photographer friends who started that way and then moved into audio as a sort of as a profession. Because then that is something that they took the deeper dive on start to really understand about audio capture. Um, it's clearly, ah, highly skilled thing that we can start with and learn a little bit about. And then as we want to get better at it, we have to add to that skill set. Cool. Yeah. Cool. I think we're good questions here. Okay, great. So I don't mind this stuff on my table. It actually makes me feel very at home. Maybe I'll even wear my headphones later. So OK, so let's Ah, let's move a little bit. And then we went through all of those things. Sorry. I should have had that up on the screen the whole time. I didn't want to give it away, you know, I didn't want to give it away. Now you have it, right? Okay. There it is. Okay, So start whatever you already have. I'm gonna come to keep saying that. I'm just gonna keep saying until everybody does it. So we're back to this boom pole. But now you notice that I have this little fuzzy thing on the end, and the question was about wind. And when you're outdoors and it's windy and what is that going to do to your audio and basically these little things, which are affectionately called a dead cat? You would put it over your microphone, and they make them all different sizes. They're also adjustable and have Velcro on the bottom, and this will definitely cut down on any kind of wind interference that you have. So you will see these a very inexpensive and you can get him to fit over any type of a boom microphone, and they're really great. They also make them very, very tiny. They look like little foam caps that would go like those old cut style earphones. They go over the top of your love Mike's as well. So those air great. And they're really helpful in cutting down on that wind noise when you're trying to record audio. And also Lay had a question and she's gonna ask me that question now so everybody understands what we're talking about, and then I'm gonna get back to it. So the question was the difference between an insert a close up in an extreme close up, right? So, um, the insert that I think the mean crux of the question you asked me was about the idea of what if you're really, really close on an insert shot? Is that an extreme close up? And it's not because an extreme close up is usually referencing a person or something, living like the eyes of Even if it was an animal, it could be like if there was a confrontation between an animal in a person, there might be an extreme close up of the animals face, but when it comes comes to an insert shot. An insert shot is usually an object or something non living. So the idea is it could be something, you know, like Oh, we we insert with a deer running across the street or whatever. But the reality is that most of the time we're talking about a person versus an object in those kind of situations, and in a close up in extreme close up, I think we talked about a little bit earlier in that one is from the shoulders up, and one is really close on weak eyes or nose. So hopefully we all are on the same page at that point because I want. That's a really good distinction that I wanted to make sure that even if you're super close on an insert shot, that wouldn't be considered an extreme close up because it close up would be on a person.
Ratings and Reviews
Nev Steer
A very well explained class on starting in film production from the viewpoint of a person with a successful photography background. Thanks Andrew.