Lesson Info
7. Retouching With Skin Files
Lessons
Lesson Info
Retouching With Skin Files
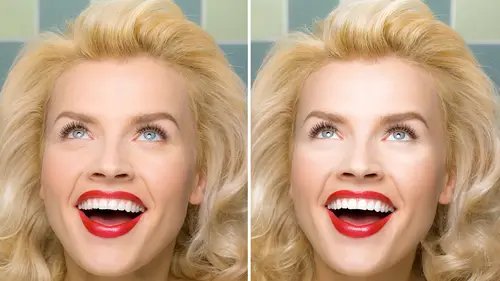
Someone retouched this stock shot and it's all perfectly porcelain pore-y things. Not my cup of tea and that's fine, but this is an excellent resource file. ♫ For someone like me (audience chuckling) Alright, so, what do I mean by that? We're gonna talk about using someone else's skin to fix this skin, right here. I do it on myself so I'm not insulting you first. This file's not as retouched as some of the other ones. It was kinda basic. How do you do this wondrous trick you're talking about? Well let me tell you. What you do is drag the beauty skin file in that you bought off Adobe Stock or you get your credit, you can do it from there, when I do that, I put it on 50% opacity and I get it more or less in the right position. Obviously we have some different bone structure here. Another class I will show you how to cheat people's chin lines. (chuckling) I know how to do that too. Alright so I'm not gonna worry about the lips so much 'cause the chin area's not too bad but it's really for...
areas like this right in here and where this is super good for is when you have an image that's slightly blurry and you've got no skin texture and you need to add some skin texture. So what I do is I put it in position and then I run my basic recipe. Basic recipe, right? You guys are following me 'cause you're very bright people. I know you're following me and here's where it gets a little tricky. What you wanna do is take that skin from her and bring it down and give it to me, okay? We've taken her skin, we have no more use for her. She can go away at this point. Do you see that haloing? That haloing around the outside is because her gray layer came from her blur layer and there's gonna be a halo. We don't care about no haloing because we're gonna put a black mask on this and we're gonna go in and paint this only where we need it. (gasps) Right? (chuckling) That Heidi Klum shot I'm gonna pull it out of my basement and I'm gonna, I'm gonna use it. Uh-oh, we got some trouble here. Why do we have trouble? Because, the image did not go all the way to the top. (gasps) Don't fear, I'll show you how to fix that. So let's get here, I'm believing you are following me quite clearly on the process. Sorry it's jumping around a little. Hang in there with me, my friends. Jumpin' around like I am. So let's say we painted in this area, and then we see these eyebrows popping up. Oh crap! No oh crap. Everything's cool. What you wanna do is take the clone tool, your rubber stamp, you wanna make sure it's on Current Layer, and keep in mind, all I am working on is skin texture, right? So I'm gonna pick from her ever-so-smooth forehead and I'm just gonna clone over, cause all I'm taking is the texture. Oh, it didn't go high enough, there's not enough skin up here. Calm down. It's all good. Pick your rubber stamp tool from down here Down below, on the forehead, and start cloning in. You know what I have in my bag of tricks. I have a gazillion skin files. I would suggest you make them-- once you've retouched an image perfectly, save your skin--you probably can't see that, can you? Let's go ahead and open it. This is a little pebbly, this I use mostly on men. I'm not makin' a judgment when I say that. Um, and it's a pattern layer. So I've even saved skin textures in patterns. And what that means--it's not gonna be right for this, but I'll go ahead and drop it on here so you can see it. I'm gonna make a new pattern layer. Think I have it in here. Oh, I totally lied; I don't have it in here. Don't worry! I didn't load it into my pattern presets. Lemme take a moment to say you might wanna load these things into pattern presets. Once I put it in my file, I'm gonna put it in the top for a second. I'm gonna rasterize that layer. Rasterize the fill content. Put a little mask on it real quick. Just so I can see what I'm doing. I'm gonna put it on Overlay mode. I know I'm going very quickly. You can pause this. Alright, on the mode called "Overlay," 50% gray disappears completely, okay? You can see that this has lightened the image so it's not 50% gray. I need to make it 50% gray. And before you make the pattern you might wanna do this, by the way, because I have to do it every time, and I keep thinking Ahh, I should go back and fix this! So I'm gonna go to my levels, command + L, Lisa loves her some levels! And you wanna bring that down till it's basically disappearing. All you have is the texture. Okay, and let's just say for giggles we like that, we think that's a decent texture, we're gonna go back down to the skin. We're gonna put it on here-- this is one of those ones where you might not want to link it. You might wanna put it on on top. Do you see how soft it is? And then put it at a lower opacity, like 30, 25. This is really good for problem areas, again this texture is better for men than women because it's chunky monkey. But I know y'all have those shots where it's blown out and there's nothing there. You just paint this in and bada-bing, you've got skin. And it's really, really, really super handy. Alright, so that's using some model's skin on my face, not Heidi Klum's, someone else. And it's using a pattern layer all on top. So we're doing some pretty advanced stuff here. It's pretty complicated, but it's pretty fun. I'd like to show you, I've got a couple more minutes, some other tricks you can do. I think you're getting the idea that this is not a one-shot pony. Yes, darling, excuse me. Just a question on putting other people's skins on-- It sounds weird, doesn't it? Yeah. Yourself or somebody else. Is that the same technique, or would you use that same technique if you wanted to put, say, a scar from somebody-- Hell yeah! Or maybe even lizard skin, or-- Absolutely! Or is that something else? Absolutely! I recently on a job had to do, it's a Dino Dana on Amazon--coming out soon! Um, they had Tyrannosaurus Rexes that were CGI, which, you know, computer illustrated. They looked pixelated. I took a shot off a stock shot I bought of a frog. I frequency separated the frog skin, and I put it on the dinosaur. I know that is very random from what the question you just asked, but it's actually the exact same technique. True confessions, I did a job and it was a starlet lady who needed some assistance in the cleavage area. I got a stock shot that I certainly paid for. I ran the frequency separation. I took the blur layer, the blur layer, right here. Instant boobs. Instant! Right? It was fantastic. So if you need some boobs... (laughing) Alright, couple really quick things that I really wanna show you, again, I'm sorry I feel like beatin' this horse till it's dead, it's the basic recipe at all times. There's the basic recipe: a blur and a gray. You're gonna make a copy because you're good little chickens and you know to do it, and because I said so, you're gonna make a copy of both the gray and the blur, please, I beg of you. You may or may not choose to do that dust and scratch. She may need it, she may not. This girl's just stunningly beautiful, but everyone needs a little sugar now and again, right? So I'm gonna do the dust and scratch. Ah, look, I did the dust and scratch on the blur layer. On the blur layer, not the gray layer. Do you see that? I just did a little dust and scratch. I just wanna soften those lines down a little bit. Ah, there's a little texture in there. I still need to fix that. That's okay, I'll go up top. Now, on this one I did some paint under her eyes. And, look, I over-painted it into her irises. So that kinda sucks. I shoulda moused that out. Here, look! Ain't no thang. Nothing, sorry about that. There you go. And her eye, what did I do in her eye? I just did the corner of her eye. They wanted it a little whiter. It's such a minor little correction. Now, let's go back up to the gray layer. That ubiquitous dust and scratch that I've been using? Look how crappy your mask can be. You don't even have to do a great mask. That's what I love about this. You can do it fast, it doesn't matter. No one's gonna see this. That's why you merge your layers. No one sees anything. It's all cool. Except for when you teach, and then you have to go (snorts) yeah, that was a good mask I did! Anyway, that was again, let's look where the mask is, that was just to smooth out the skin tone on the side. Just a little bitty bit. Ooo, I didn't do the blur enough. I don't know if you can see that slight fragmentation. That's alright. Even right in front of you, I can do a point three blur to take that down. Alright, I feel better now. Now, here's something really cool I wanna show you. Watch this, you guys. So! I wanted to add some volume to her. And what I like to do when I'm adding volume-- and what I mean by that is I wanna direct the eye. So I wanna add some contrast. I try not to do it on the gray. That's all detail. You try to do it all underneath, that way you never lose your skin texture, right? And it looks a little less retouched, I think. So I often paint with white to do the highlight. And how I do the highlight is is it's a channel pull. So, 'cause I love channels, I did mention I started in Photoshop in the dawn of time? When dinosaurs were still around? And channel pulls were the only way you could make a selection. This was back in the day. So what you might wanna do, what you do is you look at your image, and you gotta be really clear on what your goal is. My goal is to get some highlights on her face. So I'm gonna go to the channels and see which channels give me the most separation. Alright, the white--excuse me, the red channel's gonna be virtually white because there's so much skin, so you're not gonna wanna use that. The green channel--mm, it's still pretty light. Almost without fail the channel you want for skin tone for highlights is the blue channel. Almost without fail, because it's yellow, and the opposite of yellow is blue, and the channel'll be darker. And what you do is you wanna pull it down and make a copy--oh look. There's a blue copy already there. There's throw that away, pretend it wasn't there. Blue copy, you do levels. Lisa loves her levels! And why are you doing levels? Because you're trying to make a channel for a selection. What're you trying to select? This is where you've gotta know where you're drivin' to. What're you doin'? I wanna channel that selects. Well what are you tryin' to select? Oh, I'm tryin' to select highlights. Okay, well then what do I do? Oh, well I need the highlights to show and not the rest of it. So this is how you know where you're driving. You can be calm and you know where you're driving. I'm gonna make a suggestion: do not crank up the highlights. It'll look chunky. Leave 'em where they are. Leave 'em where they are. So once you've made your channel, or selection, you load it, put your cursor over the icon for channel, hold the command key, click-- bada-bing, go back to your layers, make a new--Highlight from-- I'm not gonna sing, because that would be really-- from blue channel, that's really good labeling. Fill it with the color white. Commanders are in the back, command + delete. Now I wanna say a phrase that sometimes freaks people out. I'm gonna command + H that for a second so you can see it. Oftentimes when you do a highlight pull it's a little too heavy, a little too much. While you have the marching ants active, and you're on your layer palette, click on the add a mask icon and you will choke your selection, choke your selection. And it'll make it tighter. Look, before. After. Before. After. It just makes it just that nice subtle thing. It works a treat on hair, to add highlights to hair. Oh my god I have to hurry! Okay, and the final really groovy thing, I think, about this is I wanted to add some tone to her face, so what I did is is I copied that red channel again, and I put it on top of the blur. I'm gonna put it on Normal real quick. That's the red channel with a little Lisa love. I'll show you that in a second. And I put it on top of the blur layer. I put it on Luminosity, which means it'll affect tone. Luminosity will affect tone. Do you see this? Oooo, look at that! Let me do it real quick for you. What you're gonna do is--and you probably wanna do it with the highlights off-- Maybe. Go to the red channel. Why the red channel? I wanna add tone, darkness, I don't wanna add highlight, so the red channel has the biggest separation from the highlight to the skin tone. Do you see it? I don't want the white, so here's what I'm gonna do. Command + all, I made a copy of the red channel, Command + L, Lisa said layers, levels, pardon me. I wanna darken her up. This one I do wanna probably increase the lightness. Now here's a different thing. I'm on the channel. Command + A, command + C to copy, select all, copy, go back to your layers palette, command + v to paste. There she is; there's my channel inside my layers. Put it on Luminosity. Whoo, that's kinda look. It's a little much, right? I don't want that--oh, you might like it though. Put it on 50% opacity, 20% opacity, 10, whatever, It's a Red Channel Levels Luminosity, 40%. Wouldn't it be just a beautiful thing if people layered their layers like this? Oh my god, I'd be in heaven. And then put a black mask on it, and paint it in where you see fit. If it needs to be isolated. White, paint with white. Volume. All of this is in frequency separation. All of it.
Class Materials
Bonus Materials with Purchase
Bonus Materials
Ratings and Reviews
Sean
Magic Lisa is the best teacher. She makes learning Photoshop fun. Great course. Lisa has a great teaching style. She mixes in a great speech cadence, great voice up and down and pausing, jokes, and is extremely knowledgeable and fun to watch. Awesome course.
a Creativelive Student
I thought this course was absolutely excellent; Lisa's style of teaching worked perfectly for me. I loved how she related what she was doing to how a professional might incorporate the methods into their workflow with clients (and without, when they're doing it for themselves only, such as a photographer). She mentioned at the top of the course that this is an advanced workshop, so she wasn't going to be detailing all of the shortcuts, assuming that those who are taking this course either (a) know them already or (b) are savvy enough to look up the basics via the help topics in PS. (Super easy to do.) Lisa demystified the process for me, made it very approachable and doable, and I had fun listening to her. Would highly recommend.
Sonya Messier
This technic is awesome. I do not do portrait, but I use it to clean pave roads and trucks. It save me a lot of time and I can be so much more creative. Lisa is wonderful and I love her teaching. Congratulations Lisa, good job!