Lessons
Lesson Info
Demystify Frequency Separation
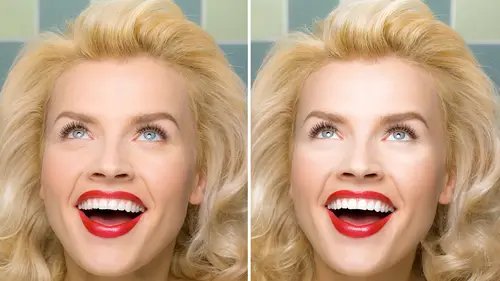
So let's talk about what frequency separation is in general. The image on your left, camera left here, is just a regular retouched image. The image on the right is what happens when you use the function called frequency separation. You separate the blur and the color information from the detail or the gray layer. And what happens when you do that is it allows you to work on each section separately, which allows you to go faster and... well, faster, that's probably the best... and probably more exacting as well. I have to tell you I've seen many folks say they use frequency separation for a little tiny bit. You understand now that frequency separation is separating color and detail, and I'm gonna show you how to do it. Here's the other thing I really want to stress. When you've done your frequency separation as you can see here on this piece, the file will look exactly the same. This is really important. Once you run the basic recipe and you turn the folder off and on, if the image jump...
s at all, you haven't done it right. This is very important. So when you run your frequency separation before you've done any retouching at all, it's gotta look exactly the same when it's on or off. For this class and for the existence of my life, I will never call the gray layer high or high frequency and I will never call the low layer color layer low. I don't know what the hell that means. I know if means something to some people. I don't know what it means. So why am I telling you this? I'm telling you this cause if you look up or watch any other tutorials on frequency separation, I assure you they're gonna say high and low. And you're gonna know "Lisa said that was gray and color." It doesn't matter. I don't want you to get freaked out by the terminology. I wanna make this really accessible for you. So on the fore front I'm telling you my gray layer is high and my blur color layer is low. Okay? I'm trying to make this not scary. And I will tell you, I've been retouching as I said for a gazillion and ten years and it took me six months to get into this because I was so freaked out by the terminology. I didn't know what it meant. So I would like you to not have that pain. The basic recipe for those of you watching live, you may want to write this down, I'll try to scroll very slowly, although I'm gonna say it about seven times, is you're gonna have an image that you want to retouch. I happen to have an image here of a couch because that's very exciting. You're gonna duplicate the base image you want twice. Command J Command J. You're gonna have two copies of the base image. One the bottom copy you're gonna blur it. That's why we call it the blur layer. See, I gotcha, it's already easier isn't it? And then on the second layer you're gonna call it gray. It's not gonna look gray when you first make it. It's gonna become gray after we apply the basic recipe. The first recipe, part of the recipe is the blur layer. You're gonna go to... you're gonna be on that layer, you're gonna go to filter, blur, gaussian blur. How much you blur it, I can not tell you because it depends on the pixel size of your file, but I can give you a guideline. I would say an image that is anywhere from one megabyte to lets call it 50 megabytes, you're probably gonna use five. Okay? That would be my recommendation. It doesn't really matter. That's gonna be my recommendation. You have some choice in here and as you get more proficient you will choose. Anything 50 megabytes and above, it's gonna be seven or more. So when you're starting out, that's a basic recipe for you to have. Now the second part of the recipe does not change. Never never never. Which makes it really easy. Except for the 16 bit file, okay, sorry, I made a liar of myself already. Alright 16 bit you will change it but we can talk about that at another time. So the basic recipe for the high frequency switch to gray is gonna be image, adjust... apply image, excuse me... image, apply image and it's gonna be... and we're gonna go over this 100 times, worry not, you're gonna select the blur right here. See this apply image, this source window? You're gonna select the blur layer as your first layer and then you're gonna go to subtract under blending mode and you're gonna put scale at two and offset 128. That will not change. That will always be the way it is. You're always gonna pick the blur layer, and you named it blur, that's how it knows it's blur, you're gonna name it. Okay and it's always gonna be subtract and it's gonna be two 128. On the handouts if you download them, you can have a handy little thing that'll tell you about what add means and what subtracts means if you're interested. Okay so let's get into it shall we? As I said, I like to use pictures of myself because if you're gonna be cruel, be cruel to yourself first. Before is on the left, after on the right. This is just basic skin work and we're gonna take the lesson this way. I'm gonna do basic frequency separation, just pure and easy, what most people use, and then we're gonna take it further and go to the advanced. As I said, I do... I'm gonna say... I do most of my retouching in frequency separation now. Almost I'd say 80%. 80% of my job I do in here.
Class Materials
Bonus Materials with Purchase
Bonus Materials
Ratings and Reviews
Sean
Magic Lisa is the best teacher. She makes learning Photoshop fun. Great course. Lisa has a great teaching style. She mixes in a great speech cadence, great voice up and down and pausing, jokes, and is extremely knowledgeable and fun to watch. Awesome course.
a Creativelive Student
I thought this course was absolutely excellent; Lisa's style of teaching worked perfectly for me. I loved how she related what she was doing to how a professional might incorporate the methods into their workflow with clients (and without, when they're doing it for themselves only, such as a photographer). She mentioned at the top of the course that this is an advanced workshop, so she wasn't going to be detailing all of the shortcuts, assuming that those who are taking this course either (a) know them already or (b) are savvy enough to look up the basics via the help topics in PS. (Super easy to do.) Lisa demystified the process for me, made it very approachable and doable, and I had fun listening to her. Would highly recommend.
Sonya Messier
This technic is awesome. I do not do portrait, but I use it to clean pave roads and trucks. It save me a lot of time and I can be so much more creative. Lisa is wonderful and I love her teaching. Congratulations Lisa, good job!