Lessons
Lesson Info
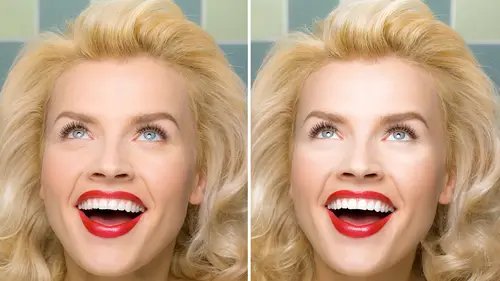
Add Tone & Volume to Skin
Adding some tone and volume. So what I like to do is, I like to paint, paint volume in on the face or direction and how I do that is, I make a new layer, call it whatever you end up doing it. I'm just going to call it volume for myself. I will pick, for example, the color black and white. So what you'll see is, I hit the D for Default Color and then X to flip it to whatever is on the top and I'm going to take the Paintbrush tool and I'm going to click on the top of my nose and then click on the bottom and back up and then I'm goin got maybe spread that out a little bit and then I'm going to blur it. Maybe five. There's no formula for this. I'm just playing, I'm painting. So so however you like to paint, you know, like in the old days in art school you got to paint? That's what you want to do here. Now I'm not going to Australia in the sun and need some nose guard. This is just a little highlight, so I want to make that a different opacity, so I'm going to send that down to let's say, f...
ive, meaning 50 and then I get maybe 25. I'm going to leave it at 50 for now. So this is a way to start. I lied, I can't stand it. Let's make it smaller. (students laugh) All right, so now it's at 30. So this is a way to start adding volume to the face all the while the texture's on the top. I don't ever have to worry about the texture and why folks retouching, it looks fake, that painted, overly painted, is because there's no skin pores. I've got pores for days and I'm going to keep them, all right? So that being said, I might want to add light to forehead. I'm going to use the gradient tool. One of the things I think you might have noticed with my favorite tool for this function because you can be sloppy on the blur layer. Have you noticed? I'm not exactly painting perfect. I'm like ah, here you go. Okay, it's a little too much. (students laugh) Maybe 20%. Do you know when you guys get a shot, a photo shoot and the lights are on the wrong side of the head? This is a way to start getting it right. You just need to have it warm on that side. Cheeks, little cheeks. Should we put a little shine on the cheeks? Now you might start feeling a little more comfortable putting it on one later, but I wouldn't suggest it when you first start and then know that your tendency is going to be to heavy and you want to reduce the layer of opacity by a tremendous amount. Let's find that nose. Please label your layers so that when you look at them and you realize that you lost your mind and it was too high, the volume, the opacity, if you hold the Control, Control + Command key, you can click on a file, on the layer, by clicking on the picture and that was Paint Volume. Yep, there it is and it's too much. Let's take it down. It's at 50%. Let's go to 20. You all following? Cool. So let's recap for a second what we've done besides give me a head lift. We have painted on a blur layer. We have done a super blur. We have used dust and scratch on the texture layer, we've done texture two different ways, face and chest. We sharpened the eyes by just making a duplicate of it. You can sharpen skin if you've got a slightly blurry photo. Just duplicate that whole gray layer and you can sharpen pores if you need to. And we did the 50% gray. So that's a lot, that's a lot of stuff you can do and that's just a few filters. I'd like to open up a couple different files real quick if you all are clear on this. Isn't this fun? You're going to run home and do it. (students laugh) You are. Guys, we can be a little more forgiving. Aw. (students laugh) All right, so this is just an iPhone camera, so the fidelity is not great. This technique even works when your shot is blurry and not real great. And again, it's the same idea, it's always the same recipe. So what do I have? I have a blur layer and I have a gray layer. I was nodding and I didn't write the amount I put in here but y'all can figure that out as you go. I always make a copy of my retouch layer so that if I've screwed up, I can go backwards. And let's look at this on this image. I was smudging on the retouch layer. I straightened your nose out. Just you know, just in case. A little nose straightening. A little bag reduction. So I'm showing you this because one, it works on low-res files. Two, the technique is always, always the same and three, you can use different techniques like blurring, smudging. You don't have to just paint. And if some of you all are painters, this is a great technique. You don't have to be as exacting. I do want to share another little trip that you can do. Trick, not trip. It might be a trip, I don't know. Is colorize, so because all the texture is on the top layer you can colorize underneath and still have a sense of dimension and not have it look too flat. So in this one, I just painted with color to take some of the gray out. And all you have to do is, you make a blank layer. When you make a blank layer, you'll probably have it be on normal first. I'm going to just select a color and I'm going to paint with 100% opacity. Thank you. Normal, oh. My layer's locked. Sorry, there we go. That's not what I want. I don't want that. Why is that looking like that? Because in the color layer, there's still tone and variation, right? Do you see how that's the blur layer right there? So what you want to do is switch it to color mode. Okay, and now it's the lion from the Wizard of Oz, so that's a little heavy. (students laugh) So why don't we just take the opacity down to 50? Do you see how flexible it is? But I didn't have to. It's got a variegated color now. You're not all one color, but it's closer and the texture's all still there. So that's another kind of quick tip you can do. And as I said, you can sharpen. This is not the best example in the world, but it does work. If you make a, so that's the original. It's your typical iPhone photo. But if you copy the gray layer and if you do that, you probably want it after you've retouched so you've done all that work. You don't want to copy the blotches. Copy the retouched one and put it on top, put it on Linear Light. When you put it on Linear Light, it's going to be strong. So that's normal, that's Linear Light. Do you see how strong that is? Holy Jesus, you might want to come back to like 50% opacity. When you're sharpening, pay attention to this. When you are sharpening, this is really important. You can either leave it floating on top if you picked the retouched one. Well, you can leave it floating on top no matter what, actually. Or you can clip it. If you clip it, it's a different result. Look at that, that's more sharp. Sharper? That's less sharp. This is one of the few times you cannot clip a gray layer, okay? So I love sharpening through frequency separation. Again, only time that's problematic is if you are delivering to a client and you want them to be able to take the sharpening on and off. If they want to take the sharpening on and off, take it outside the folder and don't merge it, okay? This is some very nice gentleman, I'm sure, from Adobe Stock and again, it's a pretty standard recipe here. There's your blur, your standard blur. Then there's your super blur. That's probably a 20. Do you see the Cybill Shepherd filter? Does she get a royalty every time I say that? She probably should. Paint it in just selectively. Oh! Just selectively. I didn't like how it looked on the nose. I did want to tell you something. Let's see if you can see this. I'm going to Shift + Click off the mask. When you do the surface blur, the super blur, your darks will blur into your lights, your highlights. So oftentimes, pay attention here. When you paint your super blur, you don't paint it over your hot highlights without knowing you're going to have to go back and put them back on. Okay, because the darks blur into it. Okay. You can also use Surface Blur on the color layers if you'd like. And then the nose. On my face, I wanted to bring out my nose. On this one, I thought it would look better if I darkened the camera left side a little bit and then lightened the camera right side, okay? Eyebrows, ah, that's my favorite. It's not my favorite. It's my favorite for the moment. See when you get a little coloring issue? Break out, might we say? You can fix that in 30 seconds. I've got a blank layer there called Eyebrow. I just deleted it. I'm going to select the paintbrush. I'm going to Option + Click right next to it and I'm going to first try it with 100% opacity. I'm just going to paint that in. Maybe I'll go to 50. So if you have blotchy skin, like legs, stubble on legs, the stubble you take care of on the top layer, but the red that's underneath you can take care of right here and it's two seconds. Can you imagine having to clone that? It would be a nightmare. Eye sockets, ah. Eye socket. It's just paint. I like to paint. Have you noticed this about me? It's paint. I'm going to put a gray layer here. That's all it is, that gradient tool and a little bit of paint. So what I like about, I'm probably a frustrated illustrator. I probably wasn't very good at painting. Photoshop in this method makes me be able to paint without too much skill. You can retouch. I know a lot of people don't do this, but you can just retouch basic stuff like hairs. If you're on the detail layer and it's a highlight, like the white hairs on his chin, I'm just clicking with the Option tool on current layer, always current layer, excuse me, on the heal tool. Always current layer. I'm going to say that 110 times because most people screw up on that. And I can take down the texture. Little nose hair removal? Ain't nothing to it. So again, as I said with men, you can be a little more forgiving. You often can do less work and it's all in the blur and you leave the skin texture because they usually want to look a little more rugged, shall we say? On the dust and scratch I did a 66 before. After. The dust and scratch, you got to be really careful on the highlight areas. Like, if you have a more white head-y, that's disgusting, looking things, you'll want to use it. But if it's a highlight, you don't want to use it, okay? All right, so it's painted in in certain areas and then again, the eye sharpening. So again, basic, basic, basic stuff but you can do non-basic stuff with it. Does that make sense? It's an easy recipe, but you can get really involved. I'm going to keep going. You all good? Cool. More of the same. This is one of the things about frequency separation that I find a little mystifying for myself as well, is how, dare I say this? That we make it so complicated. Like, it's really hard, but it's actually not that hard. I want to show you this file too, but here, what I want to show you, my friends, is actions. So coming with the course, I'm going to throw this away real quick. Coming with the course, there are actions that you can run for frequency separation. I'm going to put it in Button Mode and I believe we can view three of them. And when you click on it, it will run your actions. Now I had a job where we had 500 head shots. 500 head shots to do for CBS in a really, yeah, in a really short period of time. I'm sorry, not even head shots. It was full-body gallery shots of the shows. We had this action set up. It automatically did a dust and scratch on 40/0 blur for the color layer, a blank paint layer, it made the basic recipe, it made a copy of the basic way to retouch. It had a dust and scratch on seven, seven for the skin. You guys notice the blur for the dust and scratch for the blur layer is different than the dust and scratch for the skin layer because you're trying to do different things. You're really trying to blur the tone out for these wrinkle areas. You do a big mass of dispersion. When you're on the gray layer, you're just trying to get the little bitty granular bits out, okay? And then it had the blank gray. And then if you notice how the files look, pardon me, how the layers look, there are black layer masks on there. Why? Because you don't know if you need it. And as I said before, and I'll say it 100 times, you want to mask in where your pen is so you can see what's happening so you don't have a mistake on the outside. Cool? So those actions come. There's three of them that are with the program, three different levels of retouching. One's basic and the other two are a little different.
Class Materials
Bonus Materials with Purchase
Bonus Materials
Ratings and Reviews
Sean
Magic Lisa is the best teacher. She makes learning Photoshop fun. Great course. Lisa has a great teaching style. She mixes in a great speech cadence, great voice up and down and pausing, jokes, and is extremely knowledgeable and fun to watch. Awesome course.
a Creativelive Student
I thought this course was absolutely excellent; Lisa's style of teaching worked perfectly for me. I loved how she related what she was doing to how a professional might incorporate the methods into their workflow with clients (and without, when they're doing it for themselves only, such as a photographer). She mentioned at the top of the course that this is an advanced workshop, so she wasn't going to be detailing all of the shortcuts, assuming that those who are taking this course either (a) know them already or (b) are savvy enough to look up the basics via the help topics in PS. (Super easy to do.) Lisa demystified the process for me, made it very approachable and doable, and I had fun listening to her. Would highly recommend.
Sonya Messier
This technic is awesome. I do not do portrait, but I use it to clean pave roads and trucks. It save me a lot of time and I can be so much more creative. Lisa is wonderful and I love her teaching. Congratulations Lisa, good job!