Transferring Your Earring Design to Your Metal
Lesson 5 from: Foundations in Metalsmithing: Statement EarringsMegan Auman
Transferring Your Earring Design to Your Metal
Lesson 5 from: Foundations in Metalsmithing: Statement EarringsMegan Auman
Lesson Info
5. Transferring Your Earring Design to Your Metal
Lessons
Prerequisite #1: Basic Metalsmithing Tools
18:10 2Project Overview: Statement Earrings
07:55 3Designing Your Statement Earrings
24:03 4Choosing the Right Metal for Your Statement Earrings
16:12 5Transferring Your Earring Design to Your Metal
10:39 6Sawing Basics: Putting the Blade in the Saw Frame
10:54 7Sawing Basics: Bench Pin Setup and Hand/Body Position when Sawing
13:04 8Troubleshooting & Student Hot Seat
10:18Drilling Holes and Cutting Interior Shapes
09:11 10Drilling Holes for Jump Rings and Ear Wires
04:22 11Proper Workflow for Cutting Out Your Statement Earrings
30:02 12Finishing Your Metal: Filing the Edges
09:46 13Finishing Your Metal: Sanding the Surface
18:40 14Finishing Your Metal: Choosing a Finish and Polishing
08:23 15Finishing Your Metal: Sealing Brass and Copper to Prevent Tarnish
05:27 16Making Jump Rings to Connect Your Metal
06:31 17Making Ear Wires
09:05 18Assembling and Evaluating Your Statement Earrings
13:34 19Alternative Step: Soldering a Post onto Your Statement Earrings
14:16 20Adjusting your Workflow for Soldering & Hot Seat
08:46 21Taking Your Earring Design to the Next Level
06:13Lesson Info
Transferring Your Earring Design to Your Metal
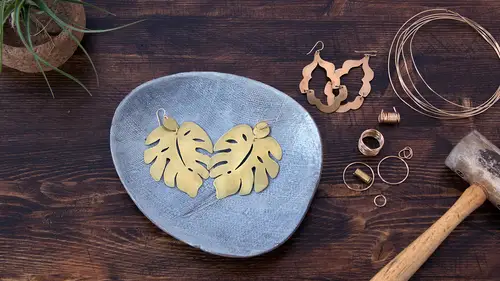
So now we've got our earring design and we've got our metal. So now it's time to actually go ahead and put this on here so that we are ready to cut. And as we just talked about with scrap, we wanna actually make sure that we're putting our design on our metal so that were really making the most out of our metal in terms of having the least amount of scrap, but also in terms of minimizing our cutting. And so what that means is we want to nest pieces kind of close together, and we also wanna start at the edge of our metal. So even if I had, say I had this piece of silver, I'm not gonna cut my design out of the center. Right, I wanna stick close to the edge. So, there are a couple of different ways to transfer your designs to metal, and I'm gonna walk through one of them. But, I want you to know that it's not the only option. So the one that I'm particularly a fan of is basically drawing your design on tracing paper and then using some rubber cement to glue it to the metal, which I'm gonn...
a show you guys in a minute. A strategy that I know a lot of other jewelers use when they're in more of production mode, say where you're cutting out a lot of the same shape over and over again, is you can print or photocopy onto full sheets sticky labels, and stick those right to your metal. The third option is just to draw directly on your metal. So you can take a Sharpie, or you can take as scribe, and a scribe is just a sharp pointed piece of metal that's gonna mark you metal and you can draw directly on. Now the problem with drawing directly on your metal with a Sharpie is that even though it's a permanent marker, it's not actually permanent. So as you're like touching your metal and moving it around as you're sawing, you're design's gonna smudge off. So unless you're just doing something really quick, I do not recommend drawing directly on your metal. I always recommend drawing on paper and transferring it over. So let's go ahead and get our piece prepped and ready. So what I'm gonna do here is grab a sheet of tracing paper. (paper crinkling) And let's grab a design. So we're gonna grab this guy here. Get some stuff out of our way. So, a couple of things to think about. Make our desk nice and clean here, so we can see what's going on. Obviously if we are cutting out of a new piece of metal, we can just start with a corner of our tracing paper, because we know it's gonna line up. But a little trick that I like to use as I've started to work on my piece of metal, you can see here, this is something where I've cut from it over time. I will actually take this and I will lay my piece of tracing paper on here, and I'll trace this edge, and that way I can match up my design as close as possible, so again, I'm wasting as little metal. So you'll be amazed. I don't have them here, we're gonna pull them out in segment four, but I as cutting some pretty tiny little (faint speaking) leaves out of like every little corner of silver I had left, just to make it work. So you can really get creative on using the different sizes and the different pieces. But what I'll do here is now I'm gonna go ahead and if we can maybe do our top-down shot, so we can look at some planning. So, if I'm doing something like this shape, there's not a lot of options on a shape like this. So pretty much my best bet is to stick it as close to my corner as possible. And I like to trace this with a Sharpie, because again if I use a pencil, it's gonna wanna smear while I'm drawing. So I'm just gonna go ahead, and if I were in my own studio, I would take like three times the amount of time to trace this, because I would wanna get it perfect, but you guys are watching me, so I'm just gonna do it really quick. And I'm gonna make this mark. We're gonna talk about putting marks for drilling holes a little later, but I already had this one here, so I know that's where I want my earring hole to be, so I'm just gonna put my little mark there too. And then, in this case for my second one, I might see if I can kind of schug it a little bit, but at the end of the day, with this type of design, there's not a lot that I can do to kind of save material. So I'll just go ahead, trace my second one on there. Again, if I was doing this, I would make it much better! But you guys got the idea. But, what we wanna think about now, let's say I'm doing something like this other design. So this design has multiple parts. I'm not gonna cut this out of my metal, in this configuration, because that would be really wasteful. So instead, I'm gonna get a little bit creative here, so I'm gonna say, okay, and I know I need two of all of these shapes. So this guy kind of fits in this little space here. Gonna put that right there. I'm gonna go ahead I'm gonna trace him. And I know I need a second one, so I'm gonna see if can nest that in there. That seems like it's kind of wasting a lot of that space, so let's see if I can fit my smaller guy in there. So I'm gonna go ahead, put him, and now in this case, I'm just gonna have to remember which one's I've already traced (laughs). So I've got him, then I'm gonna go ahead and say, okay let's probably do this guy again, 'cause again I need two. So I'll put him here. Go ahead-- While you're tracing Megan-- Yes! Can I ask you quick question? Absolutely! Awesome. Do you ever cut your tracing paper to be the exact size of your sheet metal? I do, so when I was talking about where I kind of trace that edge. Yeah. That's what I would do. Here I, no, actually. Let's make sure, see. We got a little overboard here. (laughter) I tried so, this is what's really funny about that, is that I actually have mostly been working off of this brass which is eight inches wide instead of this six inches wide, so clearly in my head, we are cutting this design out of brass. So look, we're cutting this design out of brass now. It's a great question. So I'm gonna go ahead and just... See I didn't do this guy yet. See, what I mean. I need him. So that'll fit in there. And again, there's no law that says the stuff has to be lined up perfectly. So I'm gonna do this. Now as we just discovered, we're gonna run out of room on our brass, so I'll go ahead and put, we did two of that guy. We'll add one more of this guy up in here. And then once I've got this, we can go ahead and start to think about putting it on our sheet. Really, really bad cutting. Here we go, that guy fits on there like that. But our goal is really to get this as well stacked as we can. And there's no rule that says you can't just start your configuration over. Like sometimes I'll draw it, and I'll be like that could've fit better a different way. So I'll just go ahead and redraw it. So now that I've got my design drawn and we know it fits on this side. We have our brass here. Now I can go ahead and put this on here. So I probably will cheat to this side, 'cause that's where it fits. So at this point, I'm gonna go ahead. I don't need all of this tracing paper. So I'm going to cut this out. (paper crinkling) And now what I like to do is I wanna make sure that I know exactly where I'm gonna put this on my paper so I'll just take my Sharpie and kind of draw on here. So I don't know if you guys know this about rubber cement, but rubber cement works best when you put it on both surfaces and let them dry, before you stick it together. So that's what we're actually gonna do now. So I'm just gonna take my rubber cement and I'm gonna go ahead. So a couple of things to kind of know about this process is that over time, rubber cement like wants to stay gooped to your metal, so I would not do this process and then wait six days before I cut something out or leave the metal in, because it's going to actually want to stick to your metal and not come off easily. So, what I always recommend is get this on here and then get it off as quickly as possible. Whoops, don't drop your rubber cement all over your piece. That would be really bad. So what I will do now, is just let this dry, and once these two pieces are dry a little bit more, and I always put it on my metal first because it takes it longer to dry on the metal. So I'm just gonna let this sit for a few minutes and then I'm gonna go ahead and stick them together. And once we've done that, now we've got our design on our metal ready to cut out. So you guys have questions about that? Yes, Megan, two questions on this process. How difficult and maybe you're gonna show us this later, is it to clean, after the fact. You know, you want your earrings to be beautiful. Yeah. Cleaning up the rubber cement as well as writing directly with the Sharpie on the metal, what process do you use for cleaning. So, we're gonna use sanding for both of those and we're gonna talk about those. The Sharpie on the metal is like nothing. Like a quick brush of sandpaper and it's gonna take that off. The rubber cement, again the longer you leave it on there, the harder it's gonna be, so I think like this guy here you can see it's a little bit, there's some rubber cement gunk on there 'cause it was sitting in my studio for kind of a long time, before I peeled it off and actually like if I were to peel this off now, it's really, it's not gonna wanna come off, because this has probably been sitting in my studio for like a month, two months, so that still comes off with sanding but the longer the rubber cement has been on there, the harder it is to get off. You could probably use something like Goo Gone, and get it off as well, but if you put this on here and peel it off right away, you can actually then just sort of rub the rubber cement off with your finger. So that's why we wanna get this on, but then get our pieces cut out and get them taken off right away. So that is actually what we're gonna talk about for this first lesson, because I wanna give you guys a little bit of design time. I know some of you are working along at home which I'm very excited about, and hopefully you guys can share and post on Instagram as you're working along, but we're gonna let this go, we're gonna let our glue dry and then we're gonna come back in our next lesson to get to exactly what you guys are here to learn which is now how to take this guy and cut out your designs.
Class Materials
Free Bonus Material
Bonus Materials with Purchase
Ratings and Reviews
user 1398976626171314
One of the most special things about Megan, is that though she is a creative, she is extremely good at business. Her organized way of thinking and presenting material, and her genuine joy when empowering her students with the tools needed to be successful, is charming and so much fun. Somehow there is such seamlessness and flow to her class structure and explanations, that I can absorb what she says and easily retain it. I really can start a jewelry line just with this class. She is amazing and LOVE her style!!!
user-172aa6
I really enjoyed this class! Megan provides a great foundation for using metal sheets to design/make jewelry and using wire to make unique findings. This was a great class for learning the fundamentals and sparking inspiration for new projects
Vernell Bevelander
I LOVED this class! Megan is such a detailed teacher. She leaves no stone unturned. So much fun! Can't wait for my next class!