Prerequisite #1: Basic Metalsmithing Tools
Lesson 1 from: Foundations in Metalsmithing: Statement EarringsMegan Auman
Prerequisite #1: Basic Metalsmithing Tools
Lesson 1 from: Foundations in Metalsmithing: Statement EarringsMegan Auman
Lesson Info
1. Prerequisite #1: Basic Metalsmithing Tools
Lessons
Prerequisite #1: Basic Metalsmithing Tools
18:10 2Project Overview: Statement Earrings
07:55 3Designing Your Statement Earrings
24:03 4Choosing the Right Metal for Your Statement Earrings
16:12 5Transferring Your Earring Design to Your Metal
10:39 6Sawing Basics: Putting the Blade in the Saw Frame
10:54 7Sawing Basics: Bench Pin Setup and Hand/Body Position when Sawing
13:04 8Troubleshooting & Student Hot Seat
10:18Drilling Holes and Cutting Interior Shapes
09:11 10Drilling Holes for Jump Rings and Ear Wires
04:22 11Proper Workflow for Cutting Out Your Statement Earrings
30:02 12Finishing Your Metal: Filing the Edges
09:46 13Finishing Your Metal: Sanding the Surface
18:40 14Finishing Your Metal: Choosing a Finish and Polishing
08:23 15Finishing Your Metal: Sealing Brass and Copper to Prevent Tarnish
05:27 16Making Jump Rings to Connect Your Metal
06:31 17Making Ear Wires
09:05 18Assembling and Evaluating Your Statement Earrings
13:34 19Alternative Step: Soldering a Post onto Your Statement Earrings
14:16 20Adjusting your Workflow for Soldering & Hot Seat
08:46 21Taking Your Earring Design to the Next Level
06:13Lesson Info
Prerequisite #1: Basic Metalsmithing Tools
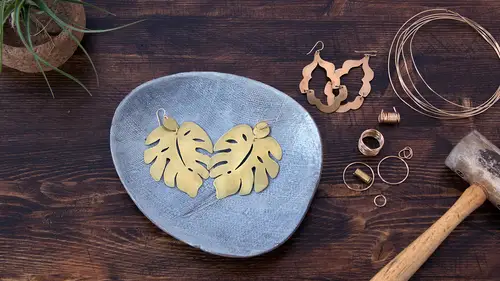
Hey everyone, I'm Megan Auman, designer and metal smite. And in this lesson, I want to show you guys all of the tools that you need, to get started in metal smiting. I know that one of the biggest misconceptions is that you need a ton of tools, or maybe even a torch, to get started, and that is totally not true, in fact, all of the projects that you see here, were created using just the tools, that I'm going to introduce you to, in this lesson. Now if you happen to purchase or RSVP for one of my hands on classes, you will also get a PDF with links where you can buy all of these tools, but fro now, I just wanna show you guys so that you're really familiar, and comfortable when you start working with them. I'm gonna show you some basic tools first, and then I'll show you a few extra things, if you wanna dive in and get a little more creative, but as I mentioned, everything here, you can create with just the tools I'm about to show you. So lets go ahead and get started. Now the first thin...
g that you're gonna need, is a saw frame. And this is really, the most important tool for creating all of this work, because it lets you cut out all of these shapes, anything you can imagine, you can do with a saw frame. Now saw frames come in a couple of different depths so this is a 3 inch saw frame, this is a 4 inch saw frame, and really the only difference is how deep you can cut into your metal, I think when you're starting out, unless you wanna make something completely giant, and lets face it, you're probably not going to make something any bigger than the earrings I'm wearing here, you can get away with a 3 inch saw frame, its gonna give you a lot of control. So is our most important tool, but it doesn't work without our saw blades. So saw blades are tiny, they come in usually these packs of 12, and they come in a lot of different sizes. So the way that our saw blades work is they're numbered. They go up from 0 to, I don't know, something pretty high like 8, and in those cases, the higher the number, the thicker the saw blade. But the also go down from 0, in something that's labeled 1/0, which is actually pronounced one ot. Don't worry if you've never heard that before, but now you know, if its 1/0 its one ot, if its 2/0 its two ot, so from there, they get thinner the further you go down, so an eight ot is gonna be much much thinner than a one ot. Now most of what you see here, was created out of either 20 or 22 gauge metal, so were working with a fairly thin gauge of metal here, and we'll talk about that more in the classes, because choosing the right metal, really depends on the project that you're doing. But for all of these kinds of projects, I usually recommend about a one ot saw blade. What you're looking for is something that's not going to break too easily for you, but you also don't want it to be so thick that its hard to make these really delicate shapes. So something like this, you want a thinner saw blade, so that you've got room to maneuver. Now were not going to get into actually how to saw here, but I do want to talk how to put your saw blade into your saw frame, so that you're not totally clueless. So we've got our saw blade here, and you can't see this because its tiny, and actually quite frankly holding it up to my face, it pretty hard to see as well. But if you run your finger nail down your saw blade, you can feel that its directional. Our teeth actually point in a direction, and what I want is for these tiny little teeth to point down, which meals when I run my finger nail across it, I'm not catching, if I were upside down, my finger nail would catch and it would do horrible things to my nails. So I'm gonna make sure that my teeth are pointed down, and then, when I'm putting it in my saw frame, I'm gonna make sure that they're also pointed out, so down and out. Then I'm just gonna go ahead and, put this here into the top piece of my saw blade, now, if you're watching this, and you've tried to saw in the past, and you've broken a lot of saw blades, its probably because you had the tension wrong. So before I tighten the second half, I like to make sure I've got a little bit of room here to flex my saw blade. So this, doesn't hit the end of this piece. I've got about maybe, a little under half an inch there. So then what ill do is I'm gonna go ahead, lean on this a little. Some people like to put it right against they're sternum, and that hurts, so I like to hold it in my hand and actually then push my sternum against my hand. Push this in here, and get it nice and tight. If you feel like its not tightening for you, we can take our pliers, which we'll get to in a second, just give it a tiny little turn. Now what I'm looking for is if I hit it with my finger nail, I've got this nice little high pitched ping, that means were all set up and ready to go. Now to actually make your saw frame work, you are going to need a bench pin. So there are lots of different kinds of bench pins, and in a jewelers studio, you might find that its actually mounted in the tbale, but I like a clamp on bench pin, because you can use it anywhere. So this is one example of a bench pin, its got a a nice little metal plate for it, saves you some time, the one thing with this one, is we really want a v etched into our bench pin, because that going to alow us to get in and make those intricate cuts. So if you get a bench pin like this, you'll just need to take this to a band saw, and out a notch. But I've got a second bench pin set up here on our table, and you can see this bench pin, which is very inexpensive, is also pre notched, and just clamped right to our table. The most important thing when you're getting set up to saw, is that you wanna try to put your becnh pin at a table, so that you're sitting about chest high. And the reason for this is, we're actually going to saw vertically. I actually has someone tell me, that the first time that they tried to saw, they were sawing like this, we don't wanna do that. We're gonn ahold this nice and vertically. And again, we're not getting into how to do that in this video, but if you've got your bench pin mounted chest hight, a counter, a bar, something like that or just make your chair lower now we';re all set up and ready to saw. Now 2 more things that we're gonna want for sawing, first of all, we're gonna want a lubricant. I like Burlife, there's Cutbur, there's all kinds of different things that you can use or in a pinch, I like to steal a bar of soap from my hotel room. So that'll work in a pinch, but these actually do work a little bit better, because its what they're designed to do. If you find that you're sawing, and it seems like you're having to do a lot of hard work, just give this a little swipe, and that's gonna be really easy. The other thing I always recommend for sawing, are safety glasses. In a second were gonna talk about drilling, because sometimes we have to put holes in things, but I like to wear them also when I'm sawing, because occasionally your saw blade breaks, and that last place we want it is our eye. So speaking of drilling, you'll notice, that in some of these projects, we have holes that are cut, right out of the center. Even if you're not planning on piercing designs out of the center, you can see that these are all connected with jump rings and I had to drill a hole in those as well. So at some point you're gonna need to make a hole in your metal. Now the best ting to use is anything you can drill with, and then actual drill bits. And these guys are tiny, cause we're drilling pretty small holes, but you can see I've got some drill bits here. Some nice, tiny little drill bits, that are gonna do the size hole that we need. So in order to use our drill bits, we're either going to need a drill, or something like a dremel, so if you already have a dremel on hand, you can totally use that, or the other tool, is a flex shaft, which is basically a fancy jewelers dremel. Its got a little bit more power, and that's why people like it, so with this, I can simply mount my drill bit in here, use my chuck key, tighten it up, and now I'm ready to drill. So when you drill with a flex shaft, even thought I can be held at any angle, you always want to hold it vertically like a drill, and again, always with the safety glasses. So when I'm using my flex shaft as a drill, I like to just go ahead, hold it vertically, and you just wanna drill into wood, conveniently your bench pin is made of wood. So we can just drill that right in there.
Class Materials
Free Bonus Material
Bonus Materials with Purchase
Ratings and Reviews
user 1398976626171314
One of the most special things about Megan, is that though she is a creative, she is extremely good at business. Her organized way of thinking and presenting material, and her genuine joy when empowering her students with the tools needed to be successful, is charming and so much fun. Somehow there is such seamlessness and flow to her class structure and explanations, that I can absorb what she says and easily retain it. I really can start a jewelry line just with this class. She is amazing and LOVE her style!!!
user-172aa6
I really enjoyed this class! Megan provides a great foundation for using metal sheets to design/make jewelry and using wire to make unique findings. This was a great class for learning the fundamentals and sparking inspiration for new projects
Vernell Bevelander
I LOVED this class! Megan is such a detailed teacher. She leaves no stone unturned. So much fun! Can't wait for my next class!