Drilling Holes for Jump Rings and Ear Wires
Lesson 10 from: Foundations in Metalsmithing: Statement EarringsMegan Auman
Drilling Holes for Jump Rings and Ear Wires
Lesson 10 from: Foundations in Metalsmithing: Statement EarringsMegan Auman
Lesson Info
10. Drilling Holes for Jump Rings and Ear Wires
Lessons
Prerequisite #1: Basic Metalsmithing Tools
18:10 2Project Overview: Statement Earrings
07:55 3Designing Your Statement Earrings
24:03 4Choosing the Right Metal for Your Statement Earrings
16:12 5Transferring Your Earring Design to Your Metal
10:39 6Sawing Basics: Putting the Blade in the Saw Frame
10:54 7Sawing Basics: Bench Pin Setup and Hand/Body Position when Sawing
13:04 8Troubleshooting & Student Hot Seat
10:18Drilling Holes and Cutting Interior Shapes
09:11 10Drilling Holes for Jump Rings and Ear Wires
04:22 11Proper Workflow for Cutting Out Your Statement Earrings
30:02 12Finishing Your Metal: Filing the Edges
09:46 13Finishing Your Metal: Sanding the Surface
18:40 14Finishing Your Metal: Choosing a Finish and Polishing
08:23 15Finishing Your Metal: Sealing Brass and Copper to Prevent Tarnish
05:27 16Making Jump Rings to Connect Your Metal
06:31 17Making Ear Wires
09:05 18Assembling and Evaluating Your Statement Earrings
13:34 19Alternative Step: Soldering a Post onto Your Statement Earrings
14:16 20Adjusting your Workflow for Soldering & Hot Seat
08:46 21Taking Your Earring Design to the Next Level
06:13Lesson Info
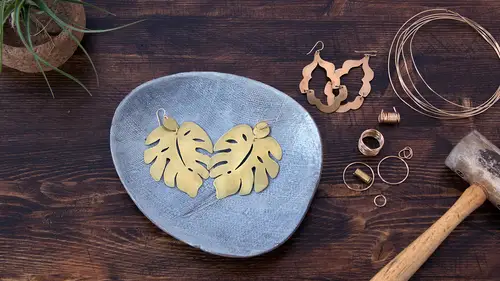
Drilling Holes for Jump Rings and Ear Wires
The other thing that we wanna think about now is actually where we wanna place any holes that we need to drill for our ear wires or our jump rings, as we're actually assembling our earrings. So we've done some practicing, now it's time to kinda get back on track and start working on those statement earrings. So, um, when we're doing this we also have to think about drill bit size, so this is where we do need to get a little bit more specific, because we're actually dealing with a specific gauge of metal as well. So first thing's first, though, let's talk about where to put holes. So, really when we're talking about either jump rings, or we're talking about our um, ear wires, basically, close to the edge is pretty much the general rule of thumb. Again, I like to incorporate it in my design whenever possible, but if for some reason you didn't, what I'll just go through, do, is go through and just mark with a Sharpie, this is where I want my design. And I think, let's see, this one, this ...
was our top piece here, so these get ones for ear wires, but then I also need them for my jump ring connectors, and then these guys get them at the top. So, again, if you can put this in your design, it means that it's gonna be more consistent, but worst case scenario, I just like to go ahead and make a little mark. Now let's go ahead and talk about our drill bit size. So, what we need for this, because we are gonna be putting jump rings in here, is a drill bit that's slightly larger than your wire gauge. So I know I told you guys that I want you to make kind of your own decisions, but in this case I'm gonna tell you that for your jump rings, I recommend 18 gauge wire. It's thick enough that it's gonna have some meat on it when we make little jump rings, but it's not so, you know, but it's not too thick that it's gonna be overwhelming for your design. So I recommend using 18 gauge wire to make your jump rings, and we're gonna talk about how to make jump rings in a later segment, but you're gonna use 18 gauge wire, and that's about .04 of an inch, or 1.02 millimeters. Those of our friends in the rest of the world who use the metric system will be happy to know that actually a lot of jewelry things happen in the metric system. So I have no idea what .04 inches looks like, but I can visualize 1.02 millimeters pretty easily. So in this case what I'm looking for then is a drill bit that's just a little bit bigger than the 1.02, so our number 56, this guy here, says it's a 1.18 millimeter, um, that's pretty good, it's gonna give us a little bit of play, we want our jump rings to be loose. So I wanna use something that's a little bit bigger. Now, I'm gonna use 20 gauge for my um, for my ear wires, but in this case, I'm not gonna worry about using two different size holes. that 1.18 is gonna be just fine, um, so I'm gonna use that to drill all of those holes as well. And then the process is literally identical. You're just gonna center punch and drill the holes, just like we just did. Questions about that? Yes, we did have a question over here, um, from one of our students, who said, would wanted to know, what kind of material is the drill bit made of, and does that matter? That's a good question. So the drill bits are made of steel, and what you wanna look for is something that'll say like a high-twist steel drill bit. I don't think you can get them in anything else, but what you ideally wanna look for is a drill bit that's designed to drill metal, and not wood. So that would be the one thing that you're looking for. I do recommend ordering drill bits rather than just wandering into your local hardware store and trying to buy one, because what you're going to find in your local hardware store is that A, most of them are too big, and B, they're mostly made to go through wood. So you wanna actually look for specialty things, and if, in the PDF that you guys get when you RSVP for this class, I have links for where to buy those drill bits. So I recommend buying them either from a specialty jewelry retailer, or online, rather than just walking into your hardware store and saying, I need a number 56 drill bit, because odds are they're not gonna know what you're talking about, and they're not gonna have it.
Class Materials
Free Bonus Material
Bonus Materials with Purchase
Ratings and Reviews
user 1398976626171314
One of the most special things about Megan, is that though she is a creative, she is extremely good at business. Her organized way of thinking and presenting material, and her genuine joy when empowering her students with the tools needed to be successful, is charming and so much fun. Somehow there is such seamlessness and flow to her class structure and explanations, that I can absorb what she says and easily retain it. I really can start a jewelry line just with this class. She is amazing and LOVE her style!!!
user-172aa6
I really enjoyed this class! Megan provides a great foundation for using metal sheets to design/make jewelry and using wire to make unique findings. This was a great class for learning the fundamentals and sparking inspiration for new projects
Vernell Bevelander
I LOVED this class! Megan is such a detailed teacher. She leaves no stone unturned. So much fun! Can't wait for my next class!