Adjusting your Workflow for Soldering & Hot Seat
Lesson 20 from: Foundations in Metalsmithing: Statement EarringsMegan Auman
Adjusting your Workflow for Soldering & Hot Seat
Lesson 20 from: Foundations in Metalsmithing: Statement EarringsMegan Auman
Lesson Info
20. Adjusting your Workflow for Soldering & Hot Seat
Lessons
Prerequisite #1: Basic Metalsmithing Tools
18:10 2Project Overview: Statement Earrings
07:55 3Designing Your Statement Earrings
24:03 4Choosing the Right Metal for Your Statement Earrings
16:12 5Transferring Your Earring Design to Your Metal
10:39 6Sawing Basics: Putting the Blade in the Saw Frame
10:54 7Sawing Basics: Bench Pin Setup and Hand/Body Position when Sawing
13:04 8Troubleshooting & Student Hot Seat
10:18Drilling Holes and Cutting Interior Shapes
09:11 10Drilling Holes for Jump Rings and Ear Wires
04:22 11Proper Workflow for Cutting Out Your Statement Earrings
30:02 12Finishing Your Metal: Filing the Edges
09:46 13Finishing Your Metal: Sanding the Surface
18:40 14Finishing Your Metal: Choosing a Finish and Polishing
08:23 15Finishing Your Metal: Sealing Brass and Copper to Prevent Tarnish
05:27 16Making Jump Rings to Connect Your Metal
06:31 17Making Ear Wires
09:05 18Assembling and Evaluating Your Statement Earrings
13:34 19Alternative Step: Soldering a Post onto Your Statement Earrings
14:16 20Adjusting your Workflow for Soldering & Hot Seat
08:46 21Taking Your Earring Design to the Next Level
06:13Lesson Info
Adjusting your Workflow for Soldering & Hot Seat
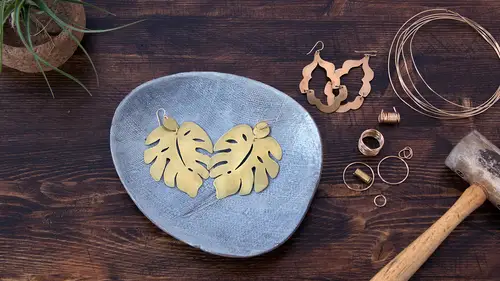
So a couple of other things to think about now if you're doing this process is just adjusting your workflow for soldering. So we went through the workflow, making and finishing your earrings. So it changes a little bit if you're going to solder a post on. So first things first, you will go ahead and saw and pierce just like you did with everything else, you'll get all your shapes cut out, everything cut out including your drilling holes. So you'll notice in the little sample I did it had the hole drilled for the jump ring already. All right you guys all caught that, yeah? Then you go ahead and file and sand just like you would everything else. So you want to sand your pieces that you are going to solder, you want to sand them up to like four or even eight hundred. You want to get all those scratches out, get them to a nice even surface finish. They'll require more finishing after, but that's a good place to start. Then you'll go ahead and solder your post on. Then you'll go ahead and p...
ickle so before you put it in the pickle, it's going to look all gross with our little flux bits stuck to it and then the pickle's going to clean that off. So you can go ahead and pickle and then once you take it out of the pickle, you'll need to go ahead and do a little bit more sanding and finishing. So you'll sand off any extra surface oxidation. You'll through your finishing. And then once you've got that done, now you can go ahead and assemble this so just like we did before, I'll go ahead and grab a jump ring here, and I'll assemble my piece with a post on it to any other pieces. The shape of this is so tricky to get jump rings in. You'd think it wouldn't be hard but there's something about this little what is it concave shape that makes a jump ring almost impossible. There it is so now I'll go ahead and assemble that, put that together there, and now you can see this gives us like a different kind of clean look without the ear wire. Any questions about that? Who wants to try? I know Toni wants to try; we're going to bring her up here. Come on up! All right so first things first, you're going to grab one of our little pieces here. So it's really important when you're soldering that you're piece is clean which means again just taken through some sanding. It's already clean so you're ready to go so you can go ahead and put that on there. Just be careful because our board's a little warmer than it was. And now you're going to go ahead and flux it. Perfect and here are tweezers, might need those. Make your life easier to move things around with tweezers and the paintbrush. All right and now you're going to go ahead and add your post. And so what I like to do is when I'm picking up the post I like to make sure I hold it at the bottom not the pinched part. OK The pinched part has to go in the tweezers so hold it at the bottom. And then you can go ahead and just dip it in your flux. Probably a little more than you needed there. And those are cool so you can go ahead and pinch them a little bit. I was testing it for you so I got burned and not you. That looks good, touching, think so. Feels like it. Feels like it, perfect. All right and then you're going to go ahead and add your piece of solder. Some people will use the solder pick which is that other tool that you saw me have to pick up. But I personally prefer, you might actually prefer the solder pick so let me show you if you want. This just had so much flux on it it isn't going to come off. Too much flux on it and you can actually use that as a trick so if you want you can dip a solder pick in and use that to pick up that way as well if that's more comfortable to you. I personally am a tweezers girl most of the time but everyone has kind of their own method when it comes to soldering. Some people like to preball their solder before they put it in the seam. All right, so what have we got? Where is your piece of solder, where'd it go? I see it, all right we're good, OK. So now you have to light the torch. We're going to move this out of your. Plastic melts, move that out of your way, plastic melts. I'm going to give you that. OK All right so a little higher, you don't need to turn it on quite that high, just a little twist. OK There you go! OK, so you were saying kind of the middle. So yeah, kind of come down there. I'm actually going to stand on this side of you because it's a little easier if I have to grab a torch. Perfect so what you want to make sure is this is just kind of a thing to pay attention to if you dry your flux too fast, see how it bubbles? There's a chance that your solder piece will go flying so can you see is your solder piece still on there? Yes OK, perfect all right so now as it's starting to clear now you can kind of stop moving so much and hold still. OK Hold still, hold still, there you go. And that's it, and now you turn your charger off. You did it; you have officially soldered. Good job. All right, so then we will just get this guy out of our way. So one thing just to keep in mind is if you, come on let go, you always want to quench in water not pickle. So if we had pickle set up we would still through this in our water first and then throw it in our pickle. Just because pickle is acid and so we don't want to throw hot things into acid and make it splash, right, not good. All right, any questions about the soldering process? Yes, Hazel would like to know, Megan do you harden the post after soldering? So I don't because I find that this little moment here, it's still pretty tough if we were to look at, let's put our little magic guy back here. I did not harden this one and you can see like it's still pretty tough because most of our heat was happening on the base piece and not on the post, So my post is still pretty work hardened and buying those premade posts, they came work hardened to begin with. If you really wanted to work harden it if it felt soft, you could just throw the whole thing in the tumbler and that would work harden it. Great and in your opinion is chip solder easier than solder paste? So I find, so solder paste just for anyone who's unfamiliar with it is literally it's like solder suspended in a paste. And what I have always found with solder paste is that it's very messy because you end up usually with way more of it than you need so the only time that I have found solder paste to be really useful is if I'm putting like a cap on something where I really have to get solder inside something and then you'll never see it again so it doesn't matter if it's messy, but for something like this, I really prefer the chip solder because it's the tiniest piece of solder you can get and you can see even with that tiny solder like how much overflow you got. So I always prefer chip to paste. And Gina would like to know your opinion on soldering irons. So soldering irons are actually a completely different type of soldering so it's a really good question. Soldering irons are actually designed for low temp lead solder not the silver solder that we're using here. So a soldering iron will not actually get you what you need in terms of the heat to make silver solder flow. If you are trying to get into soldering with less of an investment, and we talk about this in the prereq video as well, what you want to look for is there's something called a butane micro torch. Depending on the size it might run you somewhere between 50 and 70 dollars versus an acetylene tank set up which is going to be closer to 200. A butane micro torch will do a lot. It won't do everything that an acetylene torch will but it will do a lot of what it is for less of an investment so if you're looking for a way to get started, we'll skip the soldering iron, you can go with something like a butane micro torch.
Class Materials
Free Bonus Material
Bonus Materials with Purchase
Ratings and Reviews
user 1398976626171314
One of the most special things about Megan, is that though she is a creative, she is extremely good at business. Her organized way of thinking and presenting material, and her genuine joy when empowering her students with the tools needed to be successful, is charming and so much fun. Somehow there is such seamlessness and flow to her class structure and explanations, that I can absorb what she says and easily retain it. I really can start a jewelry line just with this class. She is amazing and LOVE her style!!!
user-172aa6
I really enjoyed this class! Megan provides a great foundation for using metal sheets to design/make jewelry and using wire to make unique findings. This was a great class for learning the fundamentals and sparking inspiration for new projects
Vernell Bevelander
I LOVED this class! Megan is such a detailed teacher. She leaves no stone unturned. So much fun! Can't wait for my next class!