Lesson Info
12. Making a Hinged Bracelet
Lessons
Prerequisite #1: Basic Metalsmithing Tools
18:08 2Prerequisite #2: Tools for Soldering
14:21 3Prerequisite #3: Soldering Basics
21:14 4Class Introduction
09:39 5Design Considerations for Bracelets
10:33 6Choosing Your Materials
16:12 7Sawing Bracelet Blanks
26:47 8Forming Cuff Bracelets in Wire and Sheet
21:41Determining the Length of a Riveted Bangle
08:11 10Creating a Standard Rivet
16:26 11Creating a Tube Rivet
09:25 12Making a Hinged Bracelet
21:02 13Drilling Holes Cutting Interior Shapes And Finishing Your Clasp
10:33 14Soldering A Basic Round Or Oval Wire Bangle
28:56 15Soldering Other Shaped Wire Bangles
35:17 16Soldering Wire to Sheet to Create Bangles
08:44 17Soldering a Basic Round or Oval Bangle from Sheet
14:09 18Soldering Other Shaped Sheet Bangles
05:59 19Pickling Metal After Soldering
05:42 20Filing, Sanding, and Basic Finishing of Bracelets
11:50 21Patinas: Achieving a Dark Finish with Liver of Sulfur
08:37 22Patinas: Creating a Heat Patina
05:21 23Patinas: Green and Blue Liquid Patinas
08:56 24Sealing and Finishing Patinas
08:35 25Taking Your Bracelet Designs to the Next Level
03:45Lesson Info
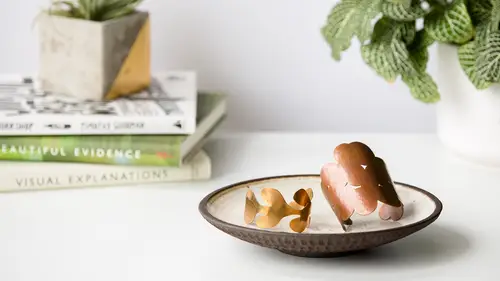
Making a Hinged Bracelet
So as I mentioned in our opening introduction, hinge bracelets are a great way to sort of get that all around like you would with a bangle, but they fit so much better because you don't have to get them over your hand. So there are actually two ways that you can create hinges. One is this kind of by bending sheet metal. We're gonna come back to that in a minute. But the first one is very simply that you can use jump rings to create rivets-- to create rivets, yeah. My brain is still back on the last one-- to create hinges. Really a hinged bracelet can consist of two or more segments. So I can have two segments that come together, but if I wanted to I could split this again, have two, three, four, continuing on so there's no rule about the number of segments that you can have in a hinged bracelet. You can kind of keep going from there. The most important thing with this is that you always wanna use at least two jump rings to make your hinge, but really three or more is even better, and t...
he reason for that is if we're not soldering these jump rings, we want a little bit of redundancy in case one fails. In case it gets caught on something or it bends, we want to make sure that there are still a couple other ones here. Part of that decision will be aesthetic, and then part of it will be how long your surface is. If I was taking a bracelet like this and doing a hinged connection I would probably put, you know, something like, seven, 11, 13. I like odd numbers, so I would probably do a pretty serious amount of jump rings along a surface like this. In a design like this it's a smaller connector so I'm using less jump rings. I recommend using at least 16 gauge wire for jump rings wherever possible, or thicker. You want something thick in here in order to, you know, again, have enough structural stability, thinking about this is gonna live on someone's wrist. And when I cut this pattern I cut it teeny tiny. But thinking about you want this to live on someone's wrist so you want something that's got a little bit more stability to it. So in terms of making a bracelet like this, you know, the first thing that you can do is just think about pretty much any shape you want, and cutting a pattern. So I actually just drew a pattern in my sketchbook for this that was literally, I drew it two versions. I just wanted something that I could actually, you know, use for both jump rings, and then in a minute when we get to our bent hinge. So I just drew a pattern, made sure that my edges were the same length, and then went ahead and cut it out of our metal just like-- those don't match. One of the sides match. There we go. So cut it out of metal just like we would anything else that we did in the first segment. So then we have to figure out where we want to put the holes for our jump rings. And again your level of precision is up to you. I am basically going to eyeball this. So let's say I want one, two, three, one, two, three. I recommend leaving-- you know, that looks like about two millimeters-- a millimeter or two between where the whole is and the edge. If I spread that out you can probably see the distance a little bit better. It's so glaring, I know. It's so bright. But kind of leaving about a millimeter or two between where I'm drilling the holes. So if you're going to do this you can drill the holes exactly like we did for rivets, but I alluded to our little friend the hole punch plier. If for some reason you don't have a Dremel, or a flex shaft, or anything else to drill holes, these little hole punch pliers here-- I think I have two different sizes-- they're a really, really nice investment. They're like $12, and as long as you're working with 22 gauge or thinner you can actually just use them to punch holes for jump rings, or holes to cut out, as we'll see in a minute, without having to have a drill. So that's what I'm gonna do for these. I'm just gonna go ahead and put holes in them. And I do recommend putting on your safety glasses for this just because you're about to pop something little out of metal so there's kind of no way of knowing where it could go flying. Generally it should just go on the table. But I can't predict that, so I'm gonna put my safety glasses on. So I'm gonna go ahead and just punch these holes. And again, you can drill, there's no rule that says-- Either one is fine. So I'm gonna go ahead and punch these holes. Oh actually, I did use the right size. So I'm gonna punch those. The other thing that I want to do is before I bend this I'm also gonna put in one hole on the other end that I can use to put my clasp in then, because we're gonna need a way to hook this. Obviously this, in its current state, not an effective bracelet. We're gonna need to put a clasp on it. So I'll go ahead and put those holes in as well. And then just like we've done with everything else we can go ahead and bend this on our mandrel to get it to be the shape that we want. If we need to go ahead and hammer the ends, (tapping) we can do that. (tapping) (tapping) (tapping) So again, I'm pretty-- I have a tendency to just bend a lot of things with my hands so if I don't like what's happening on the mandrel I'll just go ahead and bend it. All right. Now I'll go ahead and play with my shape, get that to where I need it to be. And again, for some reason I cut these patterns really, really small, I don't know why that was. So now I've got this ready to go. I can go ahead and connect it with jump rings, but that means we need to make some jump rings. For those of you who were in my previous classes, you're gonna be pretty familiar with the making jump ring process, but we're gonna do it one more time for those of you who are new to jewelry making. You can certainly buy jump rings premade, but I personally really like to make my own because it gives me a lot of control over the size, the gauge, I don't have to wait for an order to come in. So jump rings you can make by pretty much putting around any kind of mandrel. I like dowel rods because you can cut into them. You can use round jump rings for this, but I actually think ovals are really nice for this process because it actually helps it lay a little bit flatter, you can get a little bit more space between-- See I've got a little more space here, but they lay nice and flat. So in order to make an oval jump ring what I like to do is-- I really like painters tape, which I use in everything. I'll just go ahead and painters tape two round dowel rods together and now I've got that oval. So when you're making your jump rings you're just gonna cut off some wire here. We're only making three jump rings, so I don't need crazy amounts. And then I'm just gonna go ahead and wrap this. Because you're working with 16 gauge or something thicker, I have a pretty easy time wrapping this with my finger, but if for some reason you were really struggling, what you could actually do is put the end of this, clamp it in a vice, and then roll towards the vice. That actually makes it a little bit easier if you don't have freakishly strong fingers like I do. But I'm just gonna wrap it with my hand. And then you can certainly cut jump rings with wire cutters but the problem with cutting jump rings with wire cutters is that now you've got pinched ends that you need to go back in and file. So the best way to cut your jump rings is to go ahead and cut them with your jeweler's saw. What I have found is that it's easiest if you cut still on the dowel rod, but the dowel rod is a little bit hard to like hold and cut, it wants to do this. So I recommend either taking a little bit of painters tape. Surprise, surprise. I know. And actually just taping it to your bench pin. Or if you have something that's got a little weight to it, like our steel block here. You just have to be careful with this because it's gonna want to slide off. I can put that on there, and that's just gonna make this easier to hold. And then I'm just gonna come in here and I'm gonna cut. So when you're cutting jump rings, there's no need to keep it vertical like you would when you're cutting out metal because if you actually kept it perfectly vertical you would cut through both sides of your jump ring, so instead we're gonna go ahead. (sawing) And it's okay, this is why I like to use wooden dowel rods because then I can just cut into them and not worry about ruining them. I know a lot of people like to use knitting needles for their jump rings, which you can do, but then the problem is you can't cut into them because knitting needles are aluminum, and aluminum will contaminate your metal. So cut my jump rings. Like I said, we only need three so we'll just stop there. And now I can just go ahead and take some pliers. If you don't have really strong fingers you can actually take your pliers. Twist open, you always want to twist open jump rings rather than pull them apart. Pull them apart, they deform. Twist, they're really easy. I know in the last class someone asked me why one set of pliers was thick and one set of pliers was thin. It's just because that's the pliers that I own. So now I'm gonna go ahead and just thread these through. I did not say this, but obviously you want to use a size hole that is slightly bigger than your wire. We need our wire to fit through, and in this case it's okay if it's a little bit loose. So now I'll just go ahead and put my jump rings in there. Does that make sense? All right. Any questions about that from anyone? Perfect. Yeah. I noticed you put the join on the outside. Is that... Yeah, actually in a perfect world I would put it on the inside because it'd be more aesthetically pleasing. I was actually thinking about that as I was doing it. I was like, "This should go on the inside." I was thinking that too, like-- Okay. Does it matter that you're using your saw blade in wood? Because I know like with the scissors thing, you never cut cloth with paper scissors and vice versa. But because your saw blades are kind of disposable... The saw blades are disposable so it really doesn't matter. It's definitely going to dull the saw blade to use it in wood. So there is a chance that your saw blade will become dull before you break it, but chances are, more often than not you'll end up breaking a saw blade before it ever gets too dull to use. Okay, thanks. All right. Any other questions about that? So then the other thing that we need to do is we need to make a clasp for this type of bracelet. And I recommend just using a simple S hook for this, which I'm gonna show you guys how to do. I like an S hook just because it kind of repeats the idea of the wire from the jump ring over here to the wire of this. If you wanted to you could also, I'm gonna show you guys and we'll talk about creating our tabbed hinges. I'm gonna show you guys how to do like a folded over clasp, you could certainly do that as well. The one challenge with using an S hook style clasp on this is that some people find S hooks a little bit hard to finagle when they're putting on a bracelet. Not everyone has a lot of coordination for that when you're doing something like that. The thing that I always tell people is put your arm down and do it. Don't do it out in the air, it's really hard. If you're having trouble keeping your bracelet in place while you're putting it on, just put it on the counter, put it on the table, put it on the vanity, whatever it is. It's one of those painfully stupid things that no one does but I happen to tell people that a lot because people will be in your booth at a craft show with their six purses on them and then they're like, "This bracelet is too hard to put on." Not in your house, when you're not carrying all your stuff. So that's the downfall of an S hook with this type of thing. That's why also even though I'm using multiple jump rings for hinges, I'm only putting in one S hook because if try to make people hook three things on a bracelet, they're never gonna do it. So unless the bracelet would be particularly long, I would just stick with one hook for a clasp just to make things easier. What we're gonna do in order to make an S hook is we're just going to grab some wire. And again, I like-- You can either use the same gauge of wire that you're using for the jump rings, so 16, or a lot of times, in this case I don't have it, but I would probably use one gauge thicker just so that it felt a little bit stronger. So I'm gonna take my wire and the first thing that I'm gonna do is cut it to length. There is no magic S hook length, and in fact in my own studio I use a couple different lengths. So what I recommend is just measuring, writing down how long you measured it for, and then making a practice one, seeing if you like the dimensions, and if you don't, measure, cut again, make another one. For this I'm gonna say let's go about 1 7/8 inches. I just happen to know that's a length, an S hook length I use a lot in my own studio. And again clearly there was a lot of precision there because I just held my hand, probably moved it a little bit. It's the reason I like an S hook clasp, it doesn't really require a lot of precision. So then I'm gonna go ahead and, I've still got a little curve to my wire so just to make my life easier I'm just gonna flatten it out with my pliers so that I'm starting with something nice and flat here. And then I'm gonna ahead, come back to my bench pin and actually file the ends of this round just like we did-- We don't need our jump rings anymore. So I'm just gonna go ahead and like we did when we were doing our cuff bracelets I'm just gonna file this round. If you were in some of our other classes I've also talked about a tool called a copper burr and it is in fact what I took out of the flex shaft a few minutes ago. It's basically a tool that's got a little cup on the end, you put it in your flex shaft, and that rounds the end of your wire for you as well. But you can see it took me about three seconds with my file, so it would have taken me longer to change the tool in our flex shaft so we're just going with that. Now to make our S hook, what I'm gonna do, I'm gonna start with my flat pliers and I am going to go ahead and I'm gonna bend one end of it up. I think the other end I don't want to bend, I'm just gonna leave it a loop. So I'm just gonna bend this end up, then I'm gonna take a pair of round-nosed pliers. I personally prefer these half round half flats for making things like S hooks, but round on both sides is totally find as well. So what I'm gonna do is I'm just gonna take this, I'm gonna bend one side so that I've got-- this is why it's called an S hook-- I've got that little hook. And then I'm gonna bend the other side. And truthfully, as I'm doing this, it occurs to me that I wanted to kind of make the shape a little bit more rounded to sort of echo our jump rings, which clearly in my own studio I like to make more elongated S hooks so my muscle memory kicked in and I kind of made this long. So I might come back and just make this a little more round if I can. So now I'm gonna go ahead and just put this on, and I actually find with bracelets that people have an easier time if the hook is coming out and away from the wrist instead of having to hook onto the wrist. And I'll show you guys why I think that is in a second. So I'm just gonna open this up. Again, I'm twisting, I'm not pulling. I'm gonna put this in here. And I didn't really check kind of the distance of my S hook so it's very possible that this may need to come open a little bit or closed a little bit. But now-- Okay, this bracelet is too small for my wrist, but if it wasn't too small for my wrist I could just fold that over there. Make sense? Yeah. This is why you should actually check your measurements before you just start cutting things out in your studio. But that's how that works. Does that make sense to everybody? Perfect. All right. So now let's talk about our other kind of hinge, and get to our Wonder Woman cuff here, and talk about how to make hinges by bending sheet. I really like this option because again, it lets us do a sturdier hinge. I think in a perfect world-- This is not perfect, right? It will work, it does the job. You can probably design it to be a little more interesting than I did, but it's got some flaws I think in terms of stability, it's a little floppy. So I like cutting and bending sheet because I think it creates a much more stable hinge. So when you're thinking about possibly doing this it's important to keep in mind that thinner gauges of sheet are easier to bend for hinges than something thicker. This is 20 or 22, it's pretty thin. If I were trying to do this out of like 18 gauge, it would be really hard to bend our hinges here. This is really a fairly simple process where we're just creating-- I'm gonna show you guys my sketchbook here-- Where we're just creating tabs and then slots. So if we look at, this is this piece of metal cut out here. All I'm literally doing is tabs and then I'm cutting out slots that the tabs go through. So in this case one tab becomes our hinge, one tab becomes our hook for our clasp. If you want to go more, more in depth you can see this is the initial pattern that I drew for our Wonder Woman cuff. And so if I show you guys this here there's a couple things that are different from my initial sketch. So in my initial sketch I drew one pattern for both halves, but if we look at this here you can see on our hinge I actually alternated sides, and the way our tab comes out, and the reason for that is if I were doing a traditional solder hinge with tubing you do offset the sides and that's to keep things balanced. So if I'm doing multiple hinges like this this actually just keeps this whole thing a little bit more balanced instead of relying on all the tabs coming from one side. That said, if we look at our other side, the clasp would be too complicated if there were clasps on both sides, so all of those comes from one side. So if you look at my sketch here, what I actually did when I drew this out is you'll see little notes that say like one, two, one, two. That's so I know which halves of the pattern work with each. For those of you who purchased the class, you don't have to figure out which is which, there are two different sides to the pattern and you can just cut them out. So I made your guys life way easier than I made my own life when I drew this pattern. If you are just trying to figure this out on your own, generally a pretty good rule of thumb is figure that your tab dimensions on either of these are about 3/4 of an inch long by about 1/4 of an inch wide. That's what I find gives you enough material to really bend around and get into that slot. And then our slots are just slightly longer. And I would say, for the hinges themselves I kept the slots fairly narrow, about two times the thickness of the material. On the clasp side you want them to be a little bit bigger so that it's a little bit easier to get on. Make sense? And this is one of those that's really, you know, a little bit of it is trial and error. I basically just sat down in my studio and I was like, "How do I make these hinges work?" So a lot of it is just sitting down and playing.
Class Materials
Bonus Materials
Bonus Materials with Purchase
Ratings and Reviews
user-d7f7ae
This is a great addition to Megan's metalsmithing series. She makes the topic really approachable. Bonus that metal patinas were added in to the class. I loved the class!
a Creativelive Student
I really enjoyed this class! It was very informative and gave me a lot of ideas for expanding a jewelry line to include a variety of bracelets and finishes.