Lesson Info
5. Food Styling Props
Lessons
Day 1
1Introduction to Food Photography Class
11:54 2What Is Food Porn?
37:14 3Food Photography Lighting
21:14 4Food Photography Props
58:45 5Food Styling Props
16:39 6Food Styling Tips
37:49 7Food Styling Tools of the Trade
08:31Camera for Food Photography
30:26 9Food Styling Tutorial: Spaghetti and Pudding
20:06 10Food Styling Q&A
16:16 11Gear Q&A
16:56 12Food Photography Camera Settings: Do The Math
23:48 13Understanding Light Meters and Settings
29:08 14Shooting Demo: Dessert Photography
31:33 15Student Shoot: Bread Photography
15:54 16Student Shoot: Soup Photography
16:31 17Student Shoot: Pastry Photography
13:08 18Student Shoot: Sandwich and Soup Handheld
17:43 19Workflow Prep to Post
45:16 20Post Demo
27:07 21Food Blogging Tips with Shauna Ahern
36:59 22Q&A With Shauna Ahern
29:57 23The Top 10 Questions for Every Food Photographer
28:32 24Food Photography Business Q&A
33:43 25Photo Copyright
19:22 26Advertising Your Photography Business
36:57 27The Artist vs. the Business Person
36:21 28Tips and Tricks for a Budget Shoot
23:07 29Tips for Food Photography with Phone
38:59 30Student Critique
12:16 31Facebook Contest Winner Critique
16:11 32Q&A and Parting Wisdom
16:05Day 2
Day 3
Lesson Info
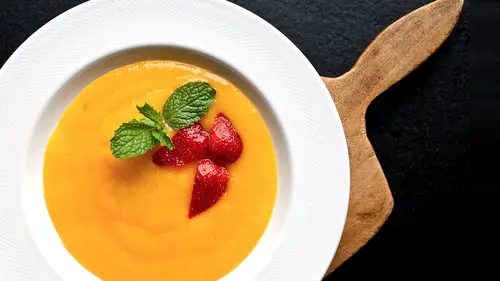
Food Styling Props
You know, in real life, you want to kind of envision the difference between maybe what we're talking about between what you might think it is and what it really is. And the reasoning behind the difference between something like this, which, this isn't out of the question. It's really not. This isn't out of the question, I actually own this bowl and I've used it and there is an application for it, but the idea is that if you're trying to create a set, if you're only shooting the soup, or the bowl of noodles or whatever you might shoot in here, this works by itself. But if you're trying to put other elements into something this big, now all of a sudden you have another big item, and another big item, and all these big items, and now I have to get further and further and further away just to incorporate them into the shot. So the idea with down-sizing to something smaller that has the same shape now all of a sudden I have the opportunity to pull a lot more, and this is what we were talkin...
g about earlier, is to pull a lot more into the frame. So if I do have a small shaker or a small, you know if I have something like this I want to pick up the edge of it, right? I think that when we talked about having the need to fit the whole of the thing in the frame that's where it's not necessary and that's where it's down-sizing everything you use. So if you're thinking about using a dinner plate, use a dessert plate. If you're thinking about using a dessert plate, use a tea saucer. Always keep getting smaller and smaller. If the food just doesn't appropriate, isn't appropriate for that size vessel, then you gotta go with what's traditional. But I wouldn't go bigger. Because bigger is definitely much, much harder. So we wouldn't be serving it in this. (audience chuckles) You know, it's just not gonna work. The other thing you want to try to talk about is the idea of neutral, right? When you talk about, we were just talking about storage, the idea that you want to use things that are able to be used over and over again and the way to do that is to keep it neutral. We also keep it neutral so it doesn't challenge the food. The prop, unless you want the prop to be the star, which we've talked about, there are times where that's appropriate, but the majority of the time your food is your star, and you want to make sure that your props don't compete with the food. So, if you're doing something like this, which I've seen a million times on Instagram, or something where people are using like patterns and wild colors and other things, unless the food you're putting on this plate is completely neutral, that's crazy. That's just gonna be really distracting for your viewer, and it's gonna detract from the food. So it's sort of that kind of idea of a balance between maybe being a little different and maybe using something that's kind of playful, and doing something that completely distracts the viewer and then all of a sudden you don't know what to look at and it's taking away from the food. You don't want your propping to distract from your food. So, as a solution to that, one of the things you do is kinda bring color into it with other elements. So let's say the food is kind of plain and your bowl is kind of neutral, but then all of a sudden you have the opportunity to kind of bring some color into it and how you kind of fold and bend these things. And of course, iron your linen. You want to look like a professional, you need to iron your linen. You know, if you're gonna kind of fold it and use it in a way that's kind of geometric and kind of brings color and kind of texture to what you're doing, and that's where those nice folds come in. Instead of just doing this, putting it next to the bowl, and putting your fork there. Use some creativity in the idea that your props are there to kind of make your overall image better, right? So if I kinda do something a little creative with that, with this kind of little fold, I put the spoon or the suggestion of a spoon somewhere near there. And now I've got sort of a plain color in here or something that's not that bad. And then all of a sudden I drop a little bit of everything on the table and break stuff, why should this be any different than every day? And obviously we're propping here, so we're not playing with real food. But let's imagine the fact that I have a white soup in here, and I've brought some color into it and then I drop that right in the middle of it. Now all of a sudden, the whole thing comes together. The other thing you want to remember is that you dress your plates the way you dress yourself. Right? If you go and look in the mirror and you're like, okay my top doesn't match my pants and my shoes look really bad and I'm not gonna wear that hat, 'cause forget that. You have to think about that in terms of style. This is as much about your personal style as it is they way you dress, your clothes. One of the people who works with me is a makeup artist, who's learning food. And her instincts on color are so honed, and so good because it translates, it's about color and balance, right? And that's what propping really is. So if you've got lots of color here, and you've got lots of color here, and kind of neutral in the bowl, now you've balanced out your whole approach. So if you're wearing a really loud top, then you want to put some neutral pants on. So that's the whole idea of balancing all of the things you're working on, is timeless, elegant, classic. All of those things work. When you start to be really temporal with your choices, where this bowl could be now, this bowl could be 20 years from now. Not gonna make a difference, it's a white bowl. But if you're using something that's really modern unless you're going for modern, and that's the whole idea of the shoot or it's what you're trying to portray, that might not be appropriate for other things, because then if you look at that picture 10 years from now especially if you're thinking in terms of resale, now it's dated. 'Cause styles aren't always just dated in styles of photography, meaning like if you look at food photography from 30 years ago your head would explode. I mean, it's awful. It looks like everything is fake. Nothing looks real. And that's because most of it was. But you can't use any of those pictures anymore, they're gone, you can't use them for anything. But if you can create timeless images and classic images, things that will last and give some legs to your imagery that really helps. I want to talk about surfaces. 'Cause these are some of the things that take up most of the space, right? On my studio I put the saw horses up and I build a table and then on top of that table the surfaces. So everything I have in the studio is relatively the same size. So like what we have over here These are all relatively the same size, and this is reflective really of kind of like what I have in my studio. Darker wood, lighter wood, maybe lighter even still, flat neutral black, flat neutral white. This is sort of the basics to start with if you have, you know, if you're going with really bright colors and other things like that, it's gonna limit what you can do with your surfaces. So if you start with a basic palette of light wood, dark wood, black and white, all the same size, all interchangeable, easy to store and move around that really helps with how to build with, start with your table setting. Then when you get, you know, once you've kind of built your basics and then you get beautiful things like this. Where it has this kind of natural aging and patina and some cracks and some different things on it and then you can even go even further with your surfaces and start to sand them out or add some whitewash, or streak them out or do other things with cutting boards. You can start to create a lot of different things to use just by experimenting with what you already have. But the other thing that great about surfaces like this, is they have two sides. So most of my surfaces in my studio I paint on both sides. So I actually have an assistant whose only job, really, is to make surfaces for me. I hand him a picture that I like from a magazine or a newspaper or something that I found that I like, I hand him this piece of paper and I go, "Make me that surface." And then he does a pretty good job of making that surface. So if I want a particular wave pattern, or I want to see a streaking or I want to see the grain of the wood bleeding through, or crackling, or something like that, he knows how to do that. That's his skillset. And I think that's also one of those things where I think that's one of those things where if you're involved in a community of people who are creative, you can trade surfaces, services not surfaces, (audience chuckles) You could trade services with each other, you know? So it's one of those things where you can use all of those, the people around you to kind of create different things in my studio. Like I said, one person is a makeup artist learning food styling. One person's a painter who makes me surfaces. So I have a lot of different people who do a lot of different things. One's a food blogger who's a tremendous cook, and a pretty good stylist. So, we've got a lot of people who kind of come in and out of my operation. You know. So Then This is one of those, these are one of the, these are kind of those that problem shape. I'm glad that we've got this shape. Because this is one of the most problematic shapes in food photography for some reason. I don't know if you've had this experience, but this particular thing creates all kinds of problems in the camera. So I think once you kind of start to learn about the different things that could create problems for you in camera, then you start to eliminate those things from your collection. You start trading those things to other people. (audience laughs) All right, so I'm covering ground here, but I want you to also remember things that are particularly ethnic, where you have something like this which is obviously kind of Asian in nature. It doesn't necessarily mean, I think this goes both ways. You don't always have to serve Asian food on this, but don't always serve Asian food on this. Meaning you don't want to be really super literal with things unless it's necessary or needs to be part of the story. Stir-fried does not need, or sushi does not need to be served on a sushi plate. It might look nice on a sushi plate, but it doesn't necessarily have to be. And things like this, you know, again, use it once, it's gonna be pretty hard to use it again, Because once you've seen this in an image and if it's very dramatic, it's gonna be hard to kind of get away from that. So you will see repetitive things in my work, you'll see props that reappear. But they're usually not props that kind of jump at you. They're something you have to look at, like the bowl with that little etch on the side. Years ago when I first got it, I shot it quite a few times. And I ended up taking pretty good pictures with it. So it's a good representation of that particular prop. I don't use it that much anymore because I know already I have a bunch of stuff in my portfolio and there's a couple of pictures of the same bowl so you have to be really careful about that. Let's go to a question, so I can think about something for a moment. All right Absolutely Perfect Okay, so a lot of people are asking how long do you spend shooting one dish? Is there one answer to that question, or? I have an answer to that question. The one question, the initial reaction is it depends, of course. But that's not a real answer. I can tell you what I do on a let's say a cookbook. So on a cookbook I look at the entirety of the project. And I say okay we have 30 recipes. And I'm not comfortable in this setting doing more than five a day, let's say. I don't want to do more than five a day. Okay, and a shooting day is gonna be from 11 a.m. to four, right? So you've got five hours. You've got five dishes. I'm gonna allot an hour per dish. Now, that's a really that's a long stretch. You don't want to commit yourself to more than that. Because when you say "Oh yeah, I can do 20 in a day, it's no problem, we can do as many as you like" then you're stuck. Because you've gotta remember you're not just taking food out of the kitchen, throwing it on the table and shooting it. You're creating a new environment for every shot. So I would say if you allot yourself an hour per dish, that's a safe bet. 'Cause it gives you the idea that the food is coming out, you've already got your set set up, and you have some time with that food before it starts to look dead. So I would say 45 minutes to an hour, especially if you're planning out a job for somebody. Say okay we've got five dishes, we got one day. Okay, that works. We have 10 dishes, well that's two days. Or we have 50 dishes, Well, we're gonna be shooting all month. But it's true, because there are sometimes when a client will come to me and say, and this is always somebody famous, I think, always. "I want to shoot a hundred dishes." "Okay, you ready to hire me for eight weeks?" And then it's like, "Eight weeks? Well I can make 20 a day." "Yeah, well you can make 20 a day but I can't shoot 20 a day." See and I think that's the idea, it's trying to educate your client base to understand what food photography is. You see, we've been talking so far, since nine o'clock this morning, has anybody taken a picture yet? No, because the idea is that the process of food photography is about so much else before we actually take a picture. And making clients understand that it becomes your job, it becomes your job to understand what you do, how much time you need to allot to do those things, and what it's gonna take both financially and you know, timewise, to make it happen. And then you gotta think about the back end. But we'll talk about that later. Sort of like painting a room, right? It's all about the prep. That's right. It take you five minutes to Yeah, putting tape around the room takes longer than painting the room, right? It's the same thing. Actually I love that you said that, because when you think about food, if we think about when we eat, it's just kind of fueling our bodies, but there's so much more that goes on culturally, and emotionally for us that have to do with food, and the same with photography. It's true, it's true because if you want to share that part of it, right, you want to share the idea that food is part of our lives, and it's part of our culture, and it's different everywhere. You want to be able to plan and prop and get the food perfect to make that picture. Because if it's not, it doesn't ring true for people. There's a particular story I had to shoot about Cajun food, right? And it's, I know, you know from the picture I told earlier that I'm familiar with the culture And the people, and if you got it wrong, the whole thing goes out the window. Because the core audience who you're trying to talk to, because they're going to talk it up if it's good, is the people it's about. And we did this pic, and we got all the props and everything and I wanted it to kind of look, because my experience when I went to these parties and I met these people and I was in their home, was it had this shabby chic kinda feel, eclectic and mix-and-match and it was old and new. It was really cool, and it was very specific. And we designed the propping and the styling and the table tops and everything to reflect that. And then there was this one last element. Oh, we're gonna put some beer in the picture. No, no, no, no. You're not gonna just putting beer in the picture, you're putting Abita in the picture, because that's the beer that's affiliated with that particular part of the world. And if you get that wrong, and put something else in it, tell me, Steve, how bad would that be? That would be bad. Yeah Steve is from Louisiana. So the idea is that the idea is that you have to get those things right. And the time it takes to get them right is the thing you have to tell the client about, because if you don't, then they're not gonna be happy either. Everybody wants to get done now. But it can't always happen now, it has to be something a little bit more planned.
Ratings and Reviews
Brendan McGuigan
This was one of the best workshops I've ever taken in my life – in person or digital. Andrew is a fantastic teacher – if I hadn't known his first career was as a professor, I would have guessed it based on the quality of teaching. He had a casual attitude, sense of fun, and easy-going manner of speech that made him immediately accessible, and a joy to watch for the entire sixteen hours (which I completed in just under three days). For me, the main value of the workshop was to be found in the first day. Andrew went through his artistic process, dropped tips along the way, and gave a real sense of how his brain works when thinking about a scene – everything from creating the food, to styling, to composing the shot. I happen to love his use of light, and getting an insight into how he crafts his backlighting and bounce was very useful. Day two had some nuggets of wisdom – and some great hands-on – but much of the tool tutorials and post-production workflow aspects will be less useful to those who are already professional photographers looking to branch out into a new discipline. Still, one of the standouts to me was seeing just how little he does in technical post – a good reminder that incredible shots can be captured 90% in camera. The segment with a food blogger, although not relevant to me, was captivating and insightful, and the rapport between Andrew and Shauna James Ahern was delightful. Day three was great for anyone needing a refresher on the business aspects, and some of specifics of the food photography business were good to hear in detail. For those already selling their work, who are familiar with licensing agreements, copyright, stock, etc., this may be redundant, but it's always good to be reminded of these things by an expert at the top of their game. Andrew's conclusion nearly had me in tears. He is obviously an incredibly passionate, giving, and humble artist, who not only feels blessed in his own life, but feels compelled to pass on some of his good fortune. That's a wonderful thing to see, and honestly gave me a nice boost of motivation to up my personal game. Throughout the workshop I found Andrew's lesson plan spot on. His in-studio students asked great questions, and the questions selected from the online audience filled in a lot of the blanks. While I may have liked to have seen a bit more hands-on from Andrew – just to get more of a feel for his process – all in all I felt like this covered everything I was hoping to gain from it. I would highly recommend this to anyone looking to get into food photography – whether you're a complete novice or a seasoned professional photographer who wants to explore food. Whether it's for advertising, editorial, stock, or blogging, he really covers it all, exploring both broad concepts and very specific practical applications. I can't rave enough about this. If you're at all on the fence, buy it. You'll be glad you did.
a Creativelive Student
Day one was a good investment for me. After that... not so much. Not sure this is really about photography. For sure, Andrew is an artist, he's great at communicating the art of the food, the art of proping, but explanations about how to make images is very simplistic. For instance he makes a pretty big blunder explaining the "math" of photography. He says his favorite setting is f4/125th, at iso 100. His grasp of lighting beyond window light and reflectors left me a little flat. He does a good job of explaining his style -- which in spite of it all -- I like. And to be fair, Andrew is an editorial food photographer. If you're interested in opening a food photography studio and doing product work -- this may not be the class for you. I think this is a good class for cooks and bloggers who want to make images of their food. If you're a beginning food shooter, you will find the information about styling and proping useful. Having watched some of Pennhy de Los Santos and Andrew, the editorial people seem to over simplify lighting and camera and lens work. At the same time, there seems to be a theme emerging in photography and that is that it's really almost better to be highly versed in another discipline and come to photography through the back door... (e.g. a rock climber who picks up a camera, a conservationist who decides to document the changing landscape and wildlife, a cook who just so happens to like taking images). Photography, for its own sake, seems to be a thing of the past. At the end of the day the class is $129 -- so... not like you have to take out student loans to get something out of it. This guy is likable, and sincere, and makes a huge effort o be helpful to anyone interested in shooting food -- and it's hard to ignore his personal success.
Ben Adams
Andrew's class is excellent, through-and-through. The mere handful of negative reviews focus on the underwhelming results of his test shots in the class -- they're kind of missing the point. The instructor's test shots aren't about the final product, they're used to tell about the process, and boy does he do that. This course is comprehensive and concise. Scrivani talks about the ins-and-outs of the job itself (how much is styling, how much is buying the food or preparing it yourself, how much is just pure photography) and furthermore gives insight as to the nature of the business and pricing. He is clearly a strong teacher with an ear for student input, and it shows. He explains things in stages so that he doesn't 'lose' a novice student, but doesn't dumb it down so much that he's wasting the time of veteran photographers. Within each lesson (let's say he's describing the function of aperture, something most photogs already know) he's keen to pepper in little details about equipment, styling, or lighting so that there's useful information for a broad scope of the audience. The other courses, taught by Penny De Los Santos, are a joke compared to this one. De Los Santos I'm sure is a nice person, and she produces wonderful work, but her course provides little practical information and she effectively ignores her audience saying only "yeah this isn't good", making some unnamed adjustment, then "yeah okay this works" while the audience just sits there wondering what's even going on. Andrew Scrivani is very different. In one student-photographed shot, he recognizes that a more experienced pupil can easily snap his 'handheld' photo challenge, and so he throws them a curveball -- take an additional shot with a different background or styling -- and communicates clearly to the audience why he's changing the task and what the significance is. For a novice pupil, he assists her with the camera and explains to the audience the importance of getting settings right. All told, I had been unimpressed with CreativeLive's tutorial offerings until I stumbled upon this fantastic instructor. Yes, some of the information is dates (iPhone photography has taken giant leaps forward since 2013) but the practical information (lighting, budget options, business advice) is all salient and relevant. Andrew, if you by chance read these reviews, I'll say once more what was true the moment I started watching -- this course is excellent.
Student Work
Related Classes
Commercial