Lessons
Day 1
1Class Introduction
20:40 2How to Find Inspiration
1:01:21 3Image Compositing
1:12:27 4Shoot: Creating a Senior Portrait
26:40 5Shoot: Senior Portrait with Bird's Nests
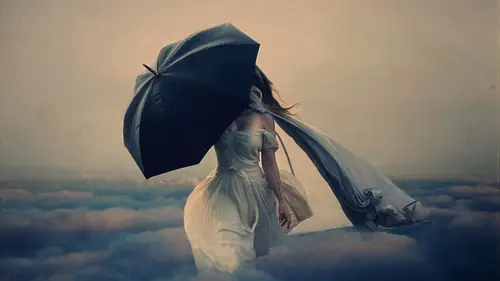
16:52 6Shoot: Senior Portrait with Rain and Umbrella
25:02 7Shoot: Storytelling with a Bride and Groom
31:38Shoot: Bride and Groom with Sticks and Dirt Floor
13:23 9Shoot: Bride and Groom in a Nest
44:57 10Shoot: Environmental Portraits
1:21:48 11Pre-Editing Recap
1:01:51 12Editing
1:20:52 13Shoot: The Surprise Challenge
1:04:56 14The Business of Fine Art Photography
1:35:58 15The Business of Fine Art Photography - Continued
52:29 16Interview with Tayler Murphy of Laguna Gallery
19:24 17Creating an Elaborate Image
28:20 18Shoot: Elaborate Set-up using a Boat with Flowers
34:38 19Shoot: Elaborate Set-up using a Sail
19:20Day 2
Day 3
Lesson Info
Pre-Editing Recap
So we're gonna be doing editing now and I'm not going to get into the live you know, using the tablet editing yet that will be the next segment but we're going to be going through the images that we shot over the last um day in a quarter and we're also going to be looking through a bunch of photoshopped files that I have of edits that I've done previously so I'll be walking you through my thought process of that of why I chose those pictures and how they came to be constructed a lot of them are composited images, but a lot of them were dealing with very specific types of edits that ideo so for example, I've I've got some in here for expanding the frame I've got some for changing color things like that so I want to just jump right into how I choose my images because I was saying earlier that you know, I usually don't have that many pictures to choose from even if I'm doing a shoot that requires you no more shooting that tipping is typical for me I'm pretty much only going to come out of...
it with about fifty pictures or so I don't know that I've ever shot more than that so I don't have you know, two thousand pictures like from a fashion shoot or something to choose from so when I'm narrowing my pictures down it's not is difficult but let's just go ahead and open this folder we're going to take a look through the last couple of days now I have not seen these pictures all I have never even glimpse them on my camera aside from when I snapped it so so this is my first time viewing as well and I wanted to leave it like that because I wanted to really show you fresh what my first reaction was and however you go about picking through these images so this was the very first day uh right in the beginning first shot that I took and I'm just going to sort of zoom through these a little bit and show the progression of the model so I had her up against the blank wall there's my hair shots so you can see that this is when we're testing out how is the model going toe look best and how can we create drama in this picture now the fact that I am in this shot is not a big deal because we're on a tripod so from one to the next my camera isn't moving the models moving a little bit but not my camera so if I wanted to choose this shot as my main shop that I was going to work with that would be just fine because I can edit myself out of this picture really easily and I'll show you guys how to do that in a bit so as I'm going through, I really did like this set up a lot better shooting from the other side instead of shooting from where the light was because you can see how much more flat that is compared to this side there's a lot more interest going on now if I were choosing images, you know, because I was doing a senior portrait shoot, then I might go for them or even lighting because it's about who the person is, but in my case, I'm not so I'm going for this shot where you have the white that's a little bit more dynamic, so she's turning into more of a character, we started posing her in different ways. She had her arms above her head, but hear her chin was still kind of sunk down into her chest, so we had her archer back and then we created this shot we tried to get some hair shots clearly I wasn't on my game with this side of her head. Oh gosh, but we do have a shop that's fairly usable here with my finger being in the picture, and then we moved on so let's, just talk about this first segment now this one was obvious to me what shot I'm going to choose I just went through them for the first time, but as I was going through it was that shot that caught my eye. So why do I like this picture? For several reasons? I love her hands, they look very graceful, and yet she looks still very stretched out and elegant. I love that about this, I think that the light is much more dynamic, much more interesting. We can go ahead and darkened down the wall a lot, whereas from the other shots the wall is a lot brighter and so that's, what I don't like about, um, I don't like that you don't really have the jaw line defined because the light was hitting her from the side. So these are some of the things that I'm thinking about, even though I liked the hair on the side better, I would still choose light over here, so I would probably go with this image as the picture that I was going to edit, so let's, go ahead and just zoom through here. We'll move on a little bit. We had the bird's nest pictures and we started out okay, we brightened it up a little bit and I remember that, but I couldn't really see the eggs, so I had her tilt the eggs down, and that way I was able to see what she was holding and everything made a little more sense. So I think, yep. From one to the other. We have her arms pulled into her sides and we just had her pull her arms out a little bit. So then it looked a little bit more elegant and childlike. Very innocent to me. I liked when she was looking off to the side. I thought that was really nice. But then we had to bring her eyes back to the camera a little bit more. And we did that because I didn't want to see too much of the white of her eye like we see here. So I had to bring her eyes back. We teased her hair, so that was fun. And then I really liked the shots, because now she looks like the character. And so this is the shot that I would choose. And I'm choosing that because the light on her face is beautiful. Her eyes are not staring directly at the camera, but we can still see the brown of her eye and the catch light in them by zoom in here, we can see that a little bit better. So we have a nice, sharp image. We can see the light in her eyes. Which I absolutely love, and we've got the hair so you can see what I zoom in a little bit more how the hair does stand out from the background, enough to the point where there is separation and we can change that even more when we start to edit the image. Well, just zoom out there that was random. This okay? So then we moved on to the umbrella shots, and these were really exciting, obviously, because we had water going everywhere. So I kind of walked you through this process yesterday, and this is why I tend to not have a lot to choose from because as I'm going on fixing things, so I pretty much know that the last shot of whatever I did is the one that I'm going to use because that's, what I'm working towards. So when I'm shooting in these situations, I'm not shooting, okay? We're going to do the umbrella here and then here and then to the side, and then I would have a lot of usable shots to choose from, but I'm working towards that one end goal is the lighting perfect is the umbrella nicely places the water looking good, so we moved the umbrella to the other side theory, the ominous water glasses moving into the frame we all know what's gonna happen next and so we had the water, and so I didn't really like this water shot that much because it looks very much like it's just hitting the top in back of the umbrella, so he moved on and I liked it when it was a lot more subtle like this where it looked that gives actually raining instead of like a giant thing of water was falling on top of the umbrella. Here we have that again, so I loved this picture. I remember when I shot it thinking that that was really beautiful. I love the spray of the water down here, I thought that was really interesting. So now here we had her sort of blinking, so we can't use that face, definitely, but we did get a couple of shots there were interesting like this one where the water spraying in front of her face, but we can still see her face behind there so I might use a shot like that. It just depends on what you're going for, so I would be much more inclined to use the shot like this that's much more subtle instead of having a baby all about the water hitting the umbrella, so this would be my pick, I'm just going to go ahead and mark these very quickly. So I'm in bridge right now just looking through all these images if you haven't used bridge it's a great resource, you could just browse through all the pictures that you took hit space bar to make an image bigger click the picture to zoom in um so I'm just going to label right click and then label select on the images that I want to work with believe it was this one right click label select on believe this one is the one that we took and select I like to go through and select the images that way I just know for sure which ones I chose I get really confused when some of the pictures look the same so we moved on we did a bridal shoot and that was the first thing from that second setup that we did we had the bed in there and what you can see is that I was framing this very intentionally so I wouldn't have to move all around the shot later on so you can see that I have this little center point of interest lined up exactly with what the headboard is doing there so it's all in a perfectly straight line then I had the subject sit down so these were the boring shot these were the shots where we just were trying to get them in the set trying to figure out what we want to do with them so then we have them actually posing and these are the images where here we have them sort of looking at each other engaged looking really elegant and then we had them at a different setup, so I think I like this once remember remove those pillows so that was really nice and I'm going to go ahead and select ok now we had this setup where he was almost too tall for our backdrop, but we made it work and I'm just looking for the light now I'm looking for the white I'm looking for how elegant the bride looks and so we can go ahead and choose one of these images if we wanted I would choose this one because her hand looks really nice and she's leaning into the white and I'm just going through and picking out any images that I might want to read it later. So we added the vines and I really liked when we did that, so I would probably actually choose this picture if I was going to edit any one of these from them sitting up in the bed and then we had them laying down and it took a little while to get them in a good position here, so I'm just going to move pretty quickly through these we added the vines and I loved when they turned because then there was such nice light on both for them I'm going to go ahead and choose this one because of the jaw line on the on the uh bride here so we had her chin kind of pulled in and you can see how it's shortening her jawline so when I extend that, that looks really awesome and I'm going to go ahead and choose that one label select all right? So moving on from there we had our sticks and they were pretty awesome by they I mean the students who held the sticks not the sticks themselves but the sticks were great tio so we had them walking and as we're shooting this, we're fixing little things like sticks hitting the backs of their heads and stuff like that we had the smoke bombs going off so it wasn't until those smoke bombs we're set down to the sides of them that I really started liking these images I'm just going to see where the bride and groom look best, you know, like that one I think that one looks really nice. I like the bride's expression I like how he's looking at her very natural so I'm going to go ahead and choose that one all right? So let's get through these birds nest pictures they looked so beautiful sitting in here we have the smoke bomb again because I insisted on smoking everybody out of the room okay, so let's choose one of these these are all very, very similar I was really just gathering them for the smoke in the background, not for the models and I like how this one's very nice and even so I'm gonna go ahead and choose this image and select okay let's move right along we had them laying down, looking at each other, I just loved her profile in this picture, so I'll go ahead and choose this as a little extra, so this would not be something that I would consider to be super fine art in terms of, you know, seeing the whole setting stuff, but it's still a really nice picture to give them, so I will go ahead and choose that. And then we had the laying down together, and this is going to be more a matter of when did I actually get them all in the frame rather than what they're doing so much? There we go, so I'll choose this one that we shot from when they were both facing the same direction, and I'll go back to that tell you why, so here we have them. I like that you can see the white on the model's face really nicely and his face is an obscured, whereas in this one I had his face or that he was looking at the bride, but it did hide his face a little bit so here we go to the next set we had them holding hands in the center here and you can see her feet were really close to his face and I didn't want to make it look like he was sniffing your feet we talked about foot fetishes yesterday so I liked a lot more when we had her legs push back so I'm going to go ahead and choose that one and you can see I'm really not taking that many pictures from each set it's only maybe five to ten images per set select that was just a test that we did and I believe this was just another test we were not doing anything in particular there s o I am going teo just make sure so we did this final shot that's right? We did that we had the sticks then these look nice even working a little funny so maybe I'll choose this one because I'm looking up the groom and not want to making sure we get in my shot of him so we have thirteen pictures picked out from those two sessions that we did yesterday and I'm just going to back it up here take a look at what we just shot and this is going to be really great for seeing the different posing styles that we did today because we started out she was flat on her back that does not look good at all so here we have her flat not what we want so we started posing her and you can already see how much better that looks she's not open up to the camera so she doesn't look no wide or anything in these shots but we did have the poofy fabric some seeing how that changes you can see it's more flat against her body exactly what I'm looking for more talking and just changing her position slightly so here we have her hand that's moved on I love this shot because of that because of her little pinky just being up in the air a little bit so I'm gonna choose that picture from the set uh label select okay and then we had her do her back bend and she was just fantastic at that look I only shot two of that one because she was so good so now I'm looking at these they are very, very similar and I kind of like this hand but her feet aren't has pointed as they are in this one and I love the pointed toes so I'm going to go ahead and choose both of them and I'm doing that because I can actually take this hand and then put it on this image if I want teo so I'm going to select both just then I remind myself that that is an option select and select so moving on this was the next setup that we did. We got her all muddy and I really loved when she did this pose again when she was all muddy. So I'm going to choose one of these. Now, these are very similar. Just me trying to make sure that she's in the frame so we'll just go ahead and choose the last one there and select ok. And now, running through these, we have her laying flat again. We can all agree. I think this is a very flattering posed to put a modeling, so don't show them that if you're going to shoot something like this, I had to make sure to tell her to point her feet as much as possible. Then I had are just moving a little bit, so we had her arms back. Okay. So now, from this set, I remembered I was looking very closely at her chin to make sure that we had shots that were nice and elegant. And I liked it better when she pull her legs together. More because she's so tall along kind of helped tohave are a little bit more compact, so I'm gonna go ahead and choose this image, uh, table come on, okay, so then we had this image where we had her sitting on the trunk. And I loved when she gasps for a little bit and I love being able to zoom in and see her eyes here because they were just so nice and blue so here we are just going to choose the best image I loved when she put her hand up so I'm going to go ahead and assume and make sure that we've got her and focus and everything I'm gonna go ahead and choose thought shot okay now we're in the water and it didn't look as nice when she had her hand outstretched so I had her puller hand in I kind of like that she's still all muddy and stuff that was a very nice touch but I liked and I put the strands of hair over her face a lot so I'm definitely going to sort of ignore the shots before that and on lee look at these images now this is where her arm was still against her body so you can see that it's really smushed so we went ahead and changed that and then we added the milk and I think that's definitely the shot but I'm going to use I think we can agree on that one if nothing else and I keep forgetting where label is and there we go so I'm going to leave those for now but do we have any questions about how I'm choosing these images? Anybody in the studio audience I think people are pretty much getting it awesome I'll let you know the perfect I'm gonna move on to editing that in the fun stuff okay, so um I have one last little demo here of how I choose an image and I wanted to choose something where I have actually edited this and this is how I chose the images so I'm just gonna open up the psd file here it's a very large file so hopefully it'll open quickly for us um and I'm just going to go back so what I did was I shot in an abandoned hospital I did this very recently and just released this image earlier this week and what I did was I shot very very close to the bed and this is a really great example not only of how I chose these images but also of a really extreme frame expansion like we've been talking about taking extra pictures all around the shot all around the frame so that we can expand it and make it much larger so let's see if our file has opened so this is what the shot ended up looking like and if I just zoom in here sorry I'm not completely converted to mac yet so bear with me so what this image ended up looking like was this we have this outdoor space being brought into the image we have the hospital bed me posing there on the bed and then we have this big room you can see all around that space, but if I zoom out and then go back to bridge, we can see that I was actually shooting really close to the bed. You can't see all of that space all around. So I took a test shot of somebody just my assistant that day were helping out on a workshop. She sat in for me so I could focus. And then I went and sat down. Now I shot this in two different ways. This was one of those things where I change my mind. Once I got there, I had planned on shooting it where my face was completely obscured. And I thought that I would like that better. But I started thinking as I was shooting about the emotion of this image, and I wanted this picture really to show that it's about this girl who is in a dream world, she's sick she's in a hospital bed, but she's imagining that she's somewhere else. So I wanted to show her reaction to that scene. So I did a bunch of pictures like this where my face was sort of obstructed. I have my hair flipping around, but I settled on this shot, and I settled on that. Because after I did all these pictures, I went back, I looked in my camera and I thought, you know, the emotion really isn't there for me yet, so I went back to the hospital bed and I just sort of looked down at the floor and it gave the sense that I was trying to get off the bed a little bit like I was going to lean forward and hop down, so I use that as my main shot we've been talking about the main shot that's what I'm building everything off, so when I'm choosing an image for a composite, I am choosing the shot with as much happening in it as possible. I also took a shot like this where I had my dress moving and that was just an option for me if I wanted to make it look like there was a breeze coming through the room, I had that, but I decided that I liked it a lot better as a still image, so I started tilting my camera. I tilted my camera down to get that floor in the shot. I told him my camera up to get the ceiling and the walls in the background and then I just kept going with it so every one of these images that I'm flipping through these were all used in the final image, so you can see I've got the windows in there and then I went back to those windows to get under exposure because I was doing a manual hdr so instead of using a program that stitches it together for you I just took these under exposures of the windows and then I was able to add the men with wire masking which we're going to talk about after lunch so let me just back out of here for a moment and in fact since we just talked about that let me head over to photo shop and let's see so I'm just going to show you a little bit of what has been added to this picture you can see that that was the original shot so you can kind of see if I take that away too you can kind of see here what the original looked like eriko so we've just got this little tiny image in this big frame and so everything where it's white and black up here that's where you can see the that has been expanded so images have been added into that space and also you're definitely a better example of this in just a bit don't save okay so going back to bridge I'm going to keep going on that route and show you some more of the frame expansions because we just started talking about that so if I go in here for this frame expansion I'm going to show you the image that resulted so this is the image that we're talking about yes question yes brooke I have a question about the um the canvas size are all of your campus eyes is the same not at all nope s o I am expanding just based on how many images I need to fill the scene s o I start with the one image always and it depends on where I'm going to expand how much I'm going to expand and I'll actually open up one of these files to show you that specifically how much I needed to expand and why so I'll show you that on the next shot okay, so how do you know is that something that's planned before you go to the shoot because you'll you'll want to know how many extra photos you would take right? I don't usually plan that ahead of time so much I plan how much of the subject I need to get in the initial picture and then once I'm in the space I figure out how much of the space I want to see so for this picture in particular I wass this was the before shot there so that's how close I was the subject and I knew that I wanted to expand the frame but I also knew that I just loved this floor going out of focus down here and I wanted to keep that so I didn't really want to pull any further back so what I did here was thes air all of my shots that I took as you can see, I told you the camera down until to the camera up, and those were my extra shots that I ended up putting into it, and it became that now the funny thing about this picture is that I actually used to different shots for her body in the tail, so for this shot, I used the tail and this shot I used her body because my camera angle changed a little bit, and as I was shooting, I realized in this picture that I couldn't really see the dress as well as I had hoped because I was down to low, so I fixed that and I shot this tale, but I knew that I could still use this angle of the body. It was so very, very close that it didn't really matter, and I was really close to drowning my model, so I didn't wanna have her continuously co underwater. Okay, so let me open up this file and we'll just deconstruct this for a moment here, and then I'm going to show you in a much more extreme frame expansion and why I had to do that, can I ask a question when we wait? Absolutely irene jones, twenty nine, says, brooke, why do you tilt the camera instead of pan? When creating frame expansions would not be easier because he wouldn't have to worry about the lines converging. Okay, so yes, in this situation, you're going to have to worry about that no matter what because you have lines going this way and lines going this way, and so it can be easier if you are panning instead of tilting depending on what the lines air looking like in your shot. But in this case I've got the lines of the door, the lines of the bars lines intersecting everywhere. Now in this particular shot we have a subject that's, very horizontal in the frame and it's important to me to try to get as much of the subject in the picture is possible from my main shot once I have that that's the point where I will start to pen I'm sorry tilt up and told down because I have the shot of the model all in one picture. If she was standing, I would've shot this vertically I would have shot it portrait style with my camera and then I could have panned left and right to get the extras so whichever orientation of my camera will allow the subject to fit in the frame that's, how I shoot it and then I pan or talk from there and sometimes I do both okay, so let me just dragged this layers panel up and make that a little bit bigger so we can see what's happening here. I'm just going to zoom down, okay? So this was what we started with. Like I said, we have the tail shot and I use that as my main shot, and then I had to switch out her upper body. Let me just zoom in here a little bit so you can see there's her upper body switching in so it's not so much a matter of cutting her out and pasting her in it's a matter of blending the background as much as I can. Okay, so we have the tilt down so you can see that is all of this space below. And then we're going to move to the tilt up, which is right there, and you can see that the bars moved a little bit, but everything is still in place. Everything matches up. There aren't any weird, jagged lines happening because I'm pasting a different image in it's all lining up really nicely. So there was that shift that we've been talking about that parallax shift. Some lines got distorted, and I just had to use the warp tool to tuck them into place. So I'm just going to run you through the rest of this edit since we have it open and please feel free to ask any questions about what else is happening not just what we're on topic with, so I made everything a little bit darker so you can see that change here I wanted the subject to stand out and I wanted everything to look truly grungy and dirty and old, so I made the background much, much darker and in here I'm adding light to the subject and changing the colors drastically so if I keep going here, let me just pop all of these on since they're just very subtle changes happening, you can see if I zoom in here that I'm changing the water as well and this is a great thing to talk about when it comes to believability of an image. Now let me just go ahead and undo some of these layers so you can see here the water's very clear it didn't have any color to it, but I wanted it teo so I added a blue color to the water that way there is a clear differentiation between her out of the water and her under the water, so I made sure you select this box of an area where the water wass and I added a very, very cool blue huge that and I did that by adding science and blue to this portion of the image, I made sure to keep the rest of her body very warm. So there's a very clear differentiation between these two, so I'm just going to pop the rest of these layers on, you can see it just gets a little bit more extreme in there, but that was generally the process for this image. It's a process of making sure that I composite first, you know, switching out the body, doing what I needed to do and then expanding the frame, and once I have all of that done, then I start changing the colors and the light. So yes, are you always schwinn shoot? Do you always expand every image? Or do you ever crop just crop in? Just use what you have times? I would say it's, I crop about twenty five percent of the time and expand the other seventy five percent and it's just my personal process. I don't really think there's a huge need to expand the frame or anything it's, just something an effect that I like to do, and I like to be able to print large so as much as I can, I do, but it can also make for complications sometimes if something doesn't stitch together the right way, so if I have a shoot that I need to do that absolutely has to produce an image that I'm probably going to shoot it my way first of expanding and then just pull back and shoot it that way. So then, in case something doesn't work, I can crop it, and I've got the shot. Any other questions about this image before I pull it down? I have a question from sachin from bakersfield who would like to know if you ever use a photo stitch feature if you always do it manually, I always do it by hand, you know, that's one of those funny things where I just like, forget that those exist, you know, and I've never looked into it, so I never remember to do that, but I'm also just so stuck in my ways, of how I edit that, I just I tend to do it myself, and I like that process to of being able to match things up and make sure it's perfect. And so once I'm done compositing, stitching things together and things like that, I will always go in and zoom in very, very close, and then I go through every little thing, and I just zoomed through the pixels, and I make sure that there isn't anything weird about it, that things aren't, you know. Out of line, because I have learned my lesson far too many times from doing that, or from rather not doing that that my prince come out looking very, very terrible. If I have weird lines in my pictures, I have an image that I did once where uh, there was I had composited three different people into the shot, and there was just a line super straight line going through the whole image that I never noticed ever, and then I printed it, and I printed it forty inches giant, and this line was like, it looked like somebody drew a black line across my picture, so I learned my lesson ever since then, and I try to not make that mistake. So one more question that just came in from the internet, ashley w says, brooke, did you do a brain storm activity for this shoot in particular? And if so, what were your words? Ah, good question. So I kind of did I I used theme for this one, because this is part of a series that I'm working on this year that has to do basically with nature, in a way and sort of putting people in situations, so then their fairytale characters, but in a very distressing way, so I've been thinking a lot about this theme of having somebody in a situation where they're struggling in some way and what different situations could that be? It would still tie into fairy tales but still have somebody struggling at the same time. And so I was thinking about how much I love water, how much I love that sort of ethereal look that water gives and then all of a sudden it popped into my mind that I would love to do something with entrapment. So my theme for this one that I thought of before I thought of anything else was entrapment, and I started building from there and I thought, okay, how can I use water and this theme in a way that would really convey that emotion? So I said, why not put a metaphorical mermaid, as I like to call her in a fish tank in an abandoned pool? Because there's so much juxtaposition within their where you've got a pool not filled with water, you have a fish tank holding a human, you have a girl dressed like a mermaid and she's struggling to survive, and so I was trying to work with all of those themes, you know, inside one image and so that's kind of where my mind went when creating it. One more question you have a lot of questions sammy lane would like to know. How do you give the photo that dirty look? They're using herbs or plug ins or what I am using textures mostly so an overlay of texture, and that will give it that really gritty feel, and this place was already awesome because it was an abandoned pool in a mansion, so it was really, really gritty, really dirty, so once I darkened it down, that already pulled out a lot of that grit, and then I added a texture on top of that. Okay, so I'm gonna go ahead and close this one, and I'm going to open the next frame expansion image. Um, I've actually never showed this to anybody. I don't think yet. So let's open it's a two parter because the file was so gigantic that it wouldn't save his one picture, so I'll show you why in a second s so now this image was done in audio question I'm sorry. How do you find these places? Like abandoned mansions with pools? Yeah, and defended with special medical buildings, so that one in particular? Well, mostly they're for workshops. I teach a workshop, I get the best location that I can, and then I try to shoot something personal if I can call them in that space. So I used, uh, what was it called? I can't remember the exact name of the site, but it's ah location scouting agency in new york city and so I went through them and it was fairly inexpensive for what you're getting so like that particular location was twenty five hundred dollars for the day, so it was a very pricey location and that's why I make sure to have a workshop there at the same time because I'm not about to go out and spend that much money on a location, but the great thing about locations like that is that oftentimes though allow a group of photographers to come in, split the cost and then you can go shoot whatever you want so I've done that before at an abandoned hospital in los angeles we got I think it was like twenty or thirty photographers together and then it only cost something like twenty or fifty dollars for the day to go shoot so I do that from time to time if there's a location that I absolutely have to have okay, so we have this image open and this picture as you can see is looking a little bit wonky right now there's a lot of white showing because I expanded the canvas but wasn't able to fill it in completely yet and let me just open up the other finished image here, then you can see what what it turned into and I'm going to go and peel these layers back so I mentioned this briefly yesterday but this was a shoot this was also the poor guy that I didn't tell that we're getting in the creek and then we got in the creek that he was ok and so so we got in this creek and I had broken my leg so I didn't have a wide angle lens to use so I had to use my fifty while just standing above him like this and he is a very very tall guy I mean, he must have been like six foot for something and you know, my fifty millimeter lens trying to fit a six foot four guy into my shot isn't really gonna work so let me go ahead and take you through what was needed to create this so this is how this picture started its this one little dot in the middle of my canvas and that's all I could fit in at the time that was as far up as I could get without climbing a tree that was as much as I could fit in the shot so I started expanding some adding limbs and he has three hands but he won't stay that way I'll get rid of that hand I brought um okay, so I'm just at it hang on I got rid of that hand changing little things about it changing the hand again I'm very picky trying to fit his whole body in there obviously by taking multiple pictures of the scene adding in the umbrella and this was all done just by holding the camera like we've been shooting, just holding it up and then doing this and tilting the camera and moving it all around the scene. Harry, oregon, and I'm just constructing this picture as best I can. Now. I did miss some spaces, so there were parts of this image where I just did not get a shot of that space of the water or the surrounding area. So I had to reconstruct that largely by cloning a lot of it from taking other shots that were very similar, that were placed in other portions and then overlapping and trying to change it a little bit. So I am just filling in as much as I can here. Okay, so that was what I was able to achieve with the shots that I had taken and it's really hard to know if you've taken enough shots or not, not to mention the water's moving and riff elections are changing and things like that. So I had to shoot quick and he was really cold, so I did what I could with what I had, and then I ended up here with this image, so I filled in the rest of the shot. I reconstructed some of the water and the land made sure it blended together, and then I started making the overall changes so I don't have those changes saved into this file because again it was so large that I was having trouble saving all of my layers into this one but through cloning through things like that through just placing different pictures on top of the blank spots and trying to blend it in a little bit I was able to reconstruct this image and then you could see also how I had changed this handout I changed this handout I change the bottom of his shirt so I was doing little things to add details into this image that I felt would make it a more cohesive picture um I added these water droplets in at some point because I really liked that and another thing that I wanted to dio if I just flipped back here was pull out the colors that were naturally in this picture so if I zoom in it's it's really hard to see right now actually but you khun oh I'm drawing on my picture very unintentionally oh hold on let me find my history here were a little bit frozen okay? I'm just going to go to my history sorry guys, I did not have that pulled up already so I'm finding my history and just going back to open there okay? So what I'm trying to show you by clicking my space bar is that we have some red here it's barely barely visible but it's there and there was also read happening all on this side of his body again very, very hard to see but it was there to pull out. So what I did was I selected these areas where I could see a faint hint of red in the water. And then I pulled out that red color because I wanted there to be that really nice and interesting detail of having the blue, purple and red flow together in the image. Ok, any questions about this shot in particular there's a question from go ahead after you, when you were talking about pulling the read out, are you using like, a curves gym? Amazing curves. Yeah, and I will definitely talk about that in the next segment. I have a question from suzanne g from vancouver who said, how does brooke deal with reflections in water when trying to expand it in the frame? Yeah, that was a difficult one, but luckily, I mean, I shot it very, very quickly so it's not like the sun's changing or anything like that. It's the reflections made pretty work work pretty consistent, but him moving in the water changed the ripples in the water and stuff like that. So what I did was I tried to blend at a lower opacity, so what I mean by that is an overlap think images enough to where I can erase this picture and then not have the edge show through of the other one so if I'm erasing this picture, I'm going to do so at a low opacity that way the two different reflections are blending together instead of just partially erasing one over the other one. I don't know if that made total sense, but I'll definitely try to show that later when we're editing life how'd you keep your reflection out of the water while standing on the light was coming from that direction from behind him so it wasn't like I wasn't I couldn't see myself in it yeah so eh? So if you stand you know, out of the light source then you're not so much going to see your reflection in the water just really quickly but can you tell people at home about the tablet that you think I have no idea? Oh, it's a welcome yeah, okay like this isn't my town. Yeah, this is a walking tablet and I am absolutely in love with them it's really funny because I was I'm very stubborn so with lots of things and editing and I was so against getting a tablet and everybody was like, you need one, you need one because I edited everything with um alice up until last year on dh it was incredible when I got it everybody said, well, it's going to take a while, you know, people don't adjust to these things right away, and I swear I was like, with my pen like, oh, man, I love this editing within minutes like, I I love it, so I'm using a walk? Um, right now, I'm using the mouse because I'm not doing any real editing, but if I worked at it, which I will be doing, I'm going to use the pen, okay, can I ask another question? Yeah, alright, um, dan, from the faroe islands would like says now when I see a black umbrella, I think about you and he would like to know what symbolism the umbrella is for you. Well, I love that question it's really funny, I've been asked that probably five times this week because I keep talking about umbrellas with everybody so umbrellas to me, it it has to do with shelter and protection and the idea that you know, you're using an umbrella because you're scared of something you don't want to be in the rain, you don't want to get wet things like that, but I personally hate umbrellas because I love being in the rain and I love getting wet in all about stuff and so it's, really exciting to me. So it's, sort of a personal prop because I have these personal associations with it. I love using an umbrella in the wrong way. So I have a lot of shots where the umbrella sort of turned upside down and not, you know what I think, there's one right behind me, but there it is. So I've got that, you know, that sort of thing going on in my work, where I want to use an umbrella in an unconventional way, same with a lot of different props, you know, to show that you don't always have to take the safe route. And so I thought it would be really interesting, you know, to have an umbrella in this picture where he's already in the water he's already wet, but he is still dead set on holding an umbrella above his head, as if something worse is going to happen to him. I do have a sense of humor. So cheryl, in the chat rooms, wondered how long it took you to do the river photo shoot. Uh, the actual shoot that was, I think, ten minutes or so he was getting really cold by the end of it, so so I took me shocked as fast as I could, and I don't want him know what he'd be doing beforehand, you know? I said you'll be holding the umbrella you'll be laying flat, you'll have your handouts so he knew what to dio once we got in the water that's when I realized just how much I couldn't see of him so I could have probably finished it in last time if I had the right the correct lens, but I didn't, so it took a little bit longer to make sure I had all the extra shots and we also did a little third is tiny we did a little bit of posing for him well, they're both tiny we did a little bit of posing for him with fixing the umbrella in the water tio be able to see it correctly he had it sort of pushed for words that I couldn't see his face than it was pushed too far back, so then it was looking awkward, so positioning the umbrella, but aside from that, it went pretty quickly, okay, I'm just gonna get out of here now something that's really important talk about what you can fix later and photo shop in what you can't, so I'm just going to open this up and I want to show you some different images that I knew I would be able to fix them later, and so I shot him the way that I did so let me go ahead and just open this picture first, and this is going to be a lot of fun because I'm going to show you it's a great example of changing facial expressions as well. Um, I was in the woods with my cat this day that's nyah, she has three legs and that's that so I was in the woods with my cat and it is during this photo shoot, and I was on these really, really prickly leaves, so every time I would step, I would get a bunch of leaves stuck in the bottom of my foot, so I was doing that and thinking, well, jumping isn't really working for me is that I wanted to jump and leap, but it was hurting so much that I couldn't I was startling the cat, so let me just go down to the before image here, we pulled us up so we can see that, and so the before image is me standing there, so you see, I'm just in the pose with my leg of how I know that I'm going to want to leap later on, so I stood there, I have my cat and you can see that the cloak isn't moving at all, I saw that myself, it looks terrible, so the cloak isn't moving at all my hair isn't moving and I start to add all of that on, so they're I've gotten rid of my foot. Now I have taken a blank shot here like we've been talking about the plate because I had that blank shot, I could easily just remove my foot from the picture there's my other foot, so now I'm in the air, essentially leaping forward, and I shot that knowingly, knowing that I would have to composite that together because leaping wasn't working, so here we have the cloak being added on, and I just thought that was a nice bit of movement, and I spit emotion because the cloak probably wouldn't look like that if I was actually in the motion of jumping into the air, here's the hair that I added on just a little bit of money, ocean from the hair, just to show that everything is sort of being blown by the wind, expanding my frame a little bit to make a square, just making sure that it's all cohesive by cloning and then changing the lighting dynamics. Now, I knew that I could change that later, you can see that I'm pretty dull down here, it's really, really bright, and I don't like that, so I'm making sure that I add light to my face overall, darkening the image, making it a little bit bluer again, darkening and darkening again so that's a lot of my process is adding light and taking away light so you'll see in a lot of my edits where the backgrounds get progressively darker and the subject gets progressively lighter and I'm doing that to make them pop from the background so there again I think that's the final change and then adding some texture so you can see that background is almost unrecognizable now you don't really see the detail in it but you still know that it's a forest there's really no question when you look at it that you know that's obviously not shot on a black backdrop for anything like that there is something some detail in the background so let me just zoom in here really quick oh forgot her she's so sweet okay so that's my face and I'm just gonna go back in history here to the point where my face doesn't look like that someone in the chat room said I wonder what her nightmares look like they're really frightening okay so there they see my face change you see that okay good let's just zoom in there a little bit more all right so we've got the face changing I am pushing my eyebrows up to make a sad face and pushing my lips down then we'll just stay zoomed in on the face to see how that changes so there it's getting a lot brighter and adding brightness to it changing the color, adding these layers on and then you'll see that my lips are starting to change they're getting a little bit more vibrant because the issue with a picture like this is that the subject faces so tiny in the picture you have so much else going on so I want to make sure that if this gets printed large that there's going to be nice to you told there is well so I'm always zooming in on the picture making sure you can pull out some details in each little bit of the image and there you see the lip changing very drastically I also added some red in my eyes here just around the edges because that makes me look very sad like I was crying so those are the little things that I'm thinking about one of editing and image I guess there was just one more change there in the texture okay? And my cat did a beautiful job of looking sad the whole time that's always her face okay, so any questions about that image? Okay, so is your cat always come with you to the woods? No, I wish she didn't, but she was very, very tolerant I only had a couple scratches okay, I'm going to open a question that came in from david g who asked do you prefer to work with a model or be your own model I like both equally it just depends on the mood I'm in I think if I'm going to show someone's face very clearly in an image, I typically don't do a self portrait just personal preference, but it really depends on the character I mean, I think about what should this character look like? And if I don't fit the role that I'm not going to use myself for that image so you know, if I have a picture where a redhead would just look brilliant, then I'm going to get stacey and, like, go to a picture because she's got beautiful red hair, so, you know, I try to think about that and my actually appropriate to use or do I just want to do a self portrait because it's really easy and convenient to grab myself and go out on a shoot? So sometimes I create characters for myself just because I'm in the mood sometimes I will specifically need a model and then still searching for that character before you move on. I have a request from national photo who would like to know if you will show the layer that used to add the hair blowing in the wind? Uh, yeah, you mean the actual picture that I used or the layer specifically ok from that same picture so I can open that again or I'll just pull up a different one but from the same one yeah. Oh, yeah. Okay, let me open that real quick. This isn't as big of a file suit should pop open here? No question while we're waiting another one? Yeah, yeah, have a good one from riesling. How does brooke know that she has done enough to the image? Sometimes a person can overdo an image when you uh yeah, I think that pretty much sums it up. Yeah, definitely stop. Yeah, there I showed a picture yesterday, which was my least favorite picture from the exercises that we did, and I thought that picture was finished when I did it and then I looked back on it and I thought, oh, no that's way too overdone, you know, was not really what I like overall in my portfolio. Typically I just have a sense about it. I just I get to the point where it looks like I envisioned it from the get go, and if it looks like that, then I feel like I have done my job and there are a few things that I sort of take off my list where I am looking for, you know, in this image in particular, I'm looking for that dark background, so I'm not going to stop until the backgrounds dark I was looking for that sort of yellow highlight blue background coloring to it and I knew that from the start so I knew that I had to do that I knew that I wanted to pop the red from the cloak so I did that so there are little things that I knew that I wanted from this image typically once I get to that point where the background has the right light on the subject has the right light and the coloring looks really nice that's what I'll pretty much say that I'm finished but I never will release an image at the same time that I finish it I always sleep on it I go overnight with it look at it the next day and I typically find that either I have gone too far with the d saturation of an image or too far with the saturation and so one or the other I typically go overboard and then I have to pull it back brooke do you um excuse me when you say you release your images? Do you send the images to copyright before you release him? I do not know don't ask me about copyright uh, no, I don't I'm really bad with that, but no that's my short answer and I don't even have a long answer, so I thought I'd leave it there, okay um I was just wondering what kind of texture using with such a textured photographs already yeah so the texture and this one that's a great question because if you're adding texture on top of basically another texture which is what this picture is it's like one big texture it's not very easy to see so oftentimes I used textures just too dark and down an image even more so if I go up here you can see that the texture is really just darkening the picture on the outside and it's not really doing much else and now their specific parts of this picture like in the lighter portions or it's probably making a little bit of a difference in here but it's the kind of thing that I wouldn't even really see until I printed it so this texture is almost solely being used just to dark in the background I'm going back to releasing the images can you explain what you mean by that? I mean, I just you're sharing online, so by releasing I just mean putting them on the internet I don't mean like revealing in a gallery or in a magazine or anything like that. I typically don't reserve my images for things like that, but there have been times when I have taken a picture and saved it just for a gallery debut or something like that but typically just put it on facebook yeah, I'm very particular about that because you know, I've seen artists before who will sort of go through a process of where they put their images online and then they get feedback and they take it down and they put another one up and they take it down and that's fine to do if you're looking to get feedback, you know, if you're looking to grow and try something different, but my process is that, you know, I know what I want out of the image and I'm going to release it when I love it, so I'm not really putting it online. I love feedback and that's great and I can definitely learn stuff, but I'm not doing it to, you know, try again, you know, that's not the end goal for me, okay, so I'm going to go ahead and put the hair back on this picture zoom out okay? So the hair where is the hair? I see it there. Ok? So let's zoom in on the hair, his hair one of the more difficult things that you do or do you think it's just a z z as other tends to be just a z z, but only if the backgrounds the same. So this is the key to me is shooting everything on location now if I'm shooting hair on a separate backdrop and then I have this force that has to go behind those individual hairs that's not what kind of editing ideo you know, I do not have the patience for that I don't have the technical skill for that, so I'm shooting at all in the same background so when I'm adding this hair on, you'll see I'm not at all cutting out hairs you can see that they're sort of like a blending line through here where that's where the background is being blended the hair itself is not being cut out that's how I deal with my hair and it just sort of sits nicely it blends in with the rest of my hair you know the model isn't going to have her hair pulled tightly back and then have a hair shot so it's going to blend very naturally so if I can in the same shot I'll try to do the hair flip in the main shot so I don't have to worry about the hair but it's really not much different than blending fabric or something like that. Okay, so um I want to make sure before I close this did I answer a specific question about the hair or okay under guard and clothe us again? All right, so let's open this one real quick because I know that we're not running low on time and let me just look through this these files in case I wanna pull one up really fast do to do oh golly, I had so much I wanted to say okay uh all right, maybe we'll just extend that a little bit into the next segment if we can. So I want to show this picture because this also deals with a lot of what we have going on. I had to tilt the frame a little bit, I had to expand the frame and the change colors drastically. We're just discussing this last night me and the students in our little party and in the hotel room. S o was a great one to talk about, all right? So I've expanded the frame just by tilting the camera been adding that in here I've tilted everything because I had it a little bit crooked, which I did not notice and most of the reason why I didn't really notice in camera was because we didn't have a lot of straight lines, they had a jumble of leaves, so in order to make sure that all worked out, um I tilted it in photoshopped so here I'm adding some dead dragonflies in they weren't e I didn't like it kill it or anything. I found a dead dragon fly and it made me really sad and but I really wanted to use it at the same time because it was so beautiful, so I decided to photograph it and put it in this image and the whole point was to add some magic to the shot where I wanted, I titled this picture the protector of magic, and so I wanted everything about this image to be very magical, so I created an atmosphere where, um, everything was kind of not quite right, so we had these dragonflies flying around his head and making everything darker, and then, obviously, I turned the leaves purple later, so they're the dragonflies again, just popping a little bit more in the scene when they stood out, and here, I felt like the image wasn't quite square on to the subject, so I actually changed the perspective a little bit and brought the right side a little bit closer to my camera, just like that. And then a big color shift is happening clearly on dh that's done with replaced color, so I will show you that in the next segment, how I use replaced color, but that is how that was done by selecting that green color and changing it. Now, here is also a big shift, because I'm changing the light, so I've done that just by selecting little portions of where I want the light to fall, and then making that much brighter and adding some contrast to it and then a texture, um, let's, go to this picture, because this is one that I get asked about a lot it has the flowing fabric, innit? Reconstructing the fabric and I want to show you how that got built. This is also a good one to talk about because we have a sky. And so, like we talked about earlier, if you buy the class, you get some stock cloud images with it, and so I want to show you how to use that in case you don't know how to blend the sky into your image. So this one that I'm opening was created in two thousand eleven, and this was a really fun one because I was shooting this is a self portrait I was alone in a sort of park area and a family came walking past and they had little kids with them and the kids want to know what I was doing, so I was looking really strange, so I said to the little kids that they could push my my shutter on my camera if they wanted, so they came by there taking pictures and stuff, and it was so great, so help awful, and I wish that I had their names so I could, like, give a shout out and say, hey, thanks for taking my picture, andi this one's funny, too, because I look super lazy for not moving this tripod out of the way but like I mentioned yesterday, when I do self portrait, I often have an extra tripod with me that I focus on. So I use that to focus when I threw it out of the frame. Now, this is weird editing, but that's a shadow. Okay, it doesn't look like it yet, but it will be, I promise. So here we have little bits of fabric being added on to the image and that's just I showed you yesterday the before pictures, which I do believe I have in here. Yes. So these were some of the images, I think all of them actually that went into creating the shot. We have the main shot, the hair shot and then fabric moving. So I knew that I wanted to create a dress that stemmed from my hips and moved outwards, knowing that I started moving the fabric from my hips outwards. So here we have that fabric and in the tilt up, so that was really quick, but I'm trying to get through this fast, and so I'm going to come back here. And so the fabric that you just saw from where I was flinging it is being added on so there's that shadow making a lot more sense now there's the tripod, getting rid of that because I had a blank shot there's, the hair being added on. And now that was on the same white background, because it was a sky white sky. So there's, really no blending to do, just masking it off of the hand and now making this dress address so you can see how it's coming in at my waist. Very important. Same way that I changed my facial expression. I just tucked in those pixels to make it look like a dress, and then there's the sky. So if I click over to that sky, I used the layer mode. Multiply most often when I am blending a sky so that's, right here. And then I continued, darkening the image, changing colors and then adding the texture and, of course, making that red pop.
Class Materials
bonus material with purchase
Ratings and Reviews
Wesley Carr
Thank you Brooke for an amazing experience. I appreciate your ability to transmit your passion for your art and fantastic ability as a teacher. Even though I was watching online you kept me as fully engaged as if I had been in the studio with you. This is one of the most outstanding courses I have taken. It is rare to find someone who is so genuine and engaging. Fine Art Photography is a difficult subject to teach in a logical and comprehensive manner. Really learned a lot from watching you do the studio shoots and how your technique resulted in easier post-shoot editing. Your presentations were logical and easy to follow, your talent amazing. Thank you for sharing yourself and your art with us. You are a unique and extremely talented artist as well as a gifted and inspiring teacher. wacarr@icloud.com
a Creativelive Student
Brook's work is fantastic and I can't wait for her class to begin. This is going to be another class I will be adding to my CreativeLive courses. What a great deal, 3 days for just $99.00. We are so spoiled here at CreativeLive to be given such fantastic Photographers to learn from for such a pittance. Where else could you find prices like these, and get it for free as well! What a Gem CreativeLive is, we must remember to thank them over and over again so that they will keep providing us with such opportunities! We can do this by spreading the word on Facebook, Tweeting it and Pinning it and posting it to Google Plus! Please remember to share the love people, they provide us with the best education on the Internet! So lets pay it forward for CreativeLIve!!!!!
Gallagher Green
I started photography nearly three years ago, and came across Brooke's work a little over a year ago, and loved it. I have been leaning more into Fine Art ever since. I was gifted this course by a friend, and it is outstanding in everyway! Not only does Brooke do a great job in this in every way. But the Creating Live crew does a wonderful job, and the filming is done very well! Even though this was a gift, I am so impressed that I will definitely buy more Creating Live courses in the future, they are worth every cent!!!
Student Work
Related Classes
Portrait Photography