Nude as Fine Art (contains nudity)
Lesson 12 from: Fine Art Nude PhotographyLindsay Adler
Nude as Fine Art (contains nudity)
Lesson 12 from: Fine Art Nude PhotographyLindsay Adler
Lesson Info
12. Nude as Fine Art (contains nudity)
Lessons
Class Introduction
14:28 2Etiquette and Preparation
30:21 3Fine Art Nude Posing Essentials
24:44 4Posing to Accentuate Shape (contains nudity)
31:24 5Classic Poses for Nude Male (contains nudity)
15:35 6Classic Poses for Nude Female (contains nudity)
15:12 7Sculpting with Light and Shadow
18:05 8Lighting: Definition and Separation
20:54Lighting: Low Key Male And Female (contains nudity)
28:22 10Lighting: High Key Female (contains nudity)
14:45 11Patterns and Projection (contains nudity)
19:31 12Nude as Fine Art (contains nudity)
24:32 13Nude as Creative Canvas: Male Statue
17:23 14Nude as Creative Canvas: Female Statue
11:25 15Nude as Creative Canvas: Splatter Paint Torso
16:30Lesson Info
Nude as Fine Art (contains nudity)
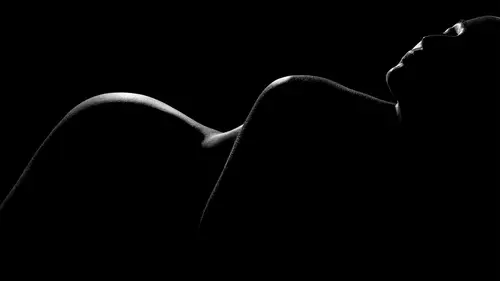
I often talk about the nude form as being a canvas, and that's what we have here. So I've decided that, in conjunction with my body paint artist, we decided that we wanted to try something where the body was a solid colored canvas, and then have dripping paint on it. But that's been done a lot of times. Just paint splatter. So we were trying to figure out what could we do, that takes it another level? And the fact that the subject is nude, is not really even part of the consideration. The nude is the fact that they are a canvas, and it allows something for beautiful paint and textures, and having beautiful posing, but it's not about them being naked. It's about the nude form. So, we're really excited, and what we ended up thinking, or deciding upon, was to paint the torso solid matte black. And therefore, if shot on a black background, it would appear to emerge out of the background. So let me just start with that part of the equation. Shooting a subject all black, on a black backgroun...
d, they may disappear a little bit. So what I chose to do, is I chose to use a three foot octabox from above. And it will carve out my subject's features a little bit. Give a little bit more definition to the bust. But then still, there's no separation from the background. She'll blend right in. I don't want a ton of separation, but I do wanna see her beautiful curves. So we've used two back strip softboxes with grids. And so when you look at this shot, what you'll see is a little bit of overhead soft light, carving out her form, and then you'll just see a little bit of separation on the sides of her body. We very subtly used those two back strip lights. Then, what we decided to do is alright, what do we do for the pop of color? We decided to paint one of her hands in rainbow color. And then we'll pose with that around her body, take a few shots, and then drip colors of paint off of her fingers. So it'll be interesting color, interesting texture, interesting shape, all of that together. So there's one more thing you'll see additionally in this lighting, and that is a silver reflector below. When I tested this out with her hand on her stomach, it fell a little bit too much to shadow, and I wanted those colors to pop. So that silver reflector, what it's doing is it's catching just a teeny bit of light from that three foot octa, and bouncing it in to fill in the shadow, so it doesn't get too dark. So I'm gonna take a shot before we add the paint. I'm gonna show you my pose, what I'm thinking. And then we're gonna build from there. Alright, so we're gonna build kind of with one of our go to poses, because why not? I use them all the time. So I'm gonna have you put your left foot up on the apple box. Great. So that raises the leg closest to the camera, as I said. Alright, now give me a little bit of that arch. And I'm not gonna use this arm, so if you wanna tuck it above your head. So I don't really need to see it. I don't need to see all of her limbs, this is abstract. So I can just put it above her head. Got that back strip light giving her that beautiful shape. Great, and then I'm gonna have you put your hand somewhere around here. Maybe a little bit higher. And try to make it flat. Great, a little higher for me. Let's try this. That looks great. Let me shoot a couple more. So I've got that beautiful curve. Just enough separation. Definition to her chest. And that gorgeous pop of color. I'm gonna try one more a little higher. I'm thinking maybe if the paint can drip a little bit more. And then bring the elbow back in. Because I don't want my composition to be too far out to the sides. It's gonna be kind of a vertical composition. Alright, good. And let me just try for my own sake, try one here. A little bit lower. Good, yeah. That'll be pretty. And kind of put the fingers out a little softer, yeah. Pretty, let me close down a little. Great, okay. So I definitely think the composition that I want is with the hand here, so that paint can drip down. So, let me get that hand in place and then I'll bring in our makeup bodypaint artist. A little higher, little higher, little higher. Good, and then put the hand flat instead of the wrist out. The wrist out gives me a little bit of shadow. Causes a little bit of darkness there. Alright. And then turn your torso towards me just a little. Yeah. Alright, try it down a little bit with the fingers. And then up just a little bit with the hand. And then flatten out that wrist. Alright, I think this is it. And then bring out your index finger just a little. And then real soft hand, good. Alright. I'm ready for paint. Okay, so we might need some multiple hands on deck for this one. Let's make a mess. Okay. And I'm going to continue to shoot, so that if the paint drips off, I can catch pieces of it. I can always composite. It really means just pick the best paint drips from multiple shots, so that it brings the whole concept together in the best way possible, because especially if the paint gets messy the further on we go. Alright, so I'm gonna get a quick picture of that. Arm up for me. Let me just get what we got so far. And turn your torso towards me just a little. And bring that elbow in just a little. And pop up your knee just a little higher. Okay good. Got a good blue drip there. Purple's getting there. Right below the fingertip. Do you wanna get that? This alright? Alright, hold on, I'm gonna grab a little bit of that yellow. Okay, continue. Doing good. Good. And then flatten out that hand just a little. Good. (laughs) Good. Cool. Beautiful, let's see. And flatten out your hand just a little bit more, you can raise your elbow if you need to. Yeah, good, that's better. Alright. And let's see, can you do ... Oh, it's the red mixing, that's why. Purples don't really get all- That's okay. I'll grab the little pieces. Alright, so we created a mess. I like the paint. But they actually painted her other hand gold, and so I'm actually gonna put it against her back for just a couple shots, because I like the contrast there. And that's beautiful. Just tuck one knee over the other. On the other? Yeah, so I'm just gonna give myself a little more form. Perfect. That looks great. And then put your hand a little lower for me. Ah, a little bit lower, little bit lower, and a little bit more relaxed. Because right now it looks just a little clenched. And then put your hand soft on your bottom. Just right there. And then pop your elbow out to the side. This way? Yeah. And turn your torse towards me just a little. Let's see. Good, beautiful, stay right there. Beautiful. And put your right hand, you can pull it off your body, it's fine. Good. And you can pull it off to the side, so it's not in the shot. Just pull the right arm up, great. Perfect, and one more. And I lied, can you do one more where you just turn towards me a little bit? Great. And kick your bottom this direction. Like that? Perfect, yep. And then slink your hand just towards me just a teeny bit more. Great, right there's perfect. Great, thank you. You're welcome. That was great. So, I'm looking at it. I still think I like the color pop of the rainbow better on the body. Definitely gonna take a look at these, but the body is a canvas, and so we kind of call this color blocking, and I think it looks elegant. Thank you, my dear. You're welcome. I have a mini obsession with gels. I love gels. I gel backgrounds, I gel shadows, I gel peoples' faces, I gel for rim lights. If used correctly, it can be so beautiful. I like to gel a lot of times, just for something a little bit subtle. Maybe a little bit of blue in the shadows, to make it a little bit of a cooler, more mysterious image. In this one, I'm not going subtle. I am just throwing as many gels at this scene as humanly possible. So for this fine art nude, the concept, what is this shot all about? It's all about color. And so, what we decided to do, is we have one, two, three, four, five different lights. And the reason I had to count them, I mean I did know, but the reason I had to count them is, because it doesn't exactly matter how many lights. I'm just trying to throw gels in a bunch of different places. Now, the idea of this, is that if I have a gel on either side, perhaps as a rim light, you'll see rim light color. If I have one gel on the face, the face will be a certain color. If I have two lights crossing in the front, either side of her body will be a different color. So, it's about restricting where the light is hitting, and then each different area having a different color. So, here's how it works. Wherever you use a gel, it's going to show up most in a shadow area. So if I were lighting this scene with a big softbox, and then adding gels, you wouldn't really see it so much. So in this scene, I actually don't have a single un-gelled strobe. But I wanted these colors to really sparkle, to really show up, so what we've done, is we've just used plain old baby oil, and we've covered our subject from head to toe in the baby oil. And so, one of the things that I usually do is I have the baby oil right off set, because a lot of times it'll dry, and soak up in the skin. So what we're going to do, is we're going to keep applying it, to keep it nice and wet and shiny. Which, it looks great. So, let me just run you through actually what each light in this scene is doing. It doesn't particularly matter. The point is, it's meant to be creative, so you should experiment. You should try it out. But I'll walk you through this real quick. Alright, so the main light that I have. I have a 10 degree grid, with a magenta gel. And so what that means, is it just lights here. This part of her face is going to be illuminated with magenta. Alright, so then we've got a lot of shadow areas. We've got her full body is going to be in shadow. So I've chosen one light from either side. Both of these are just bare bulbs. One is blue, one is green. Which means the light on the left will be blue. Light on the right will be green. It'll be crossing in the middle. So, pink, blue, and green. Then, on that back left-hand corner, I have a purple gel. And that gel is just to give a little bit of an outline to her body. A little bit of separation. I could do another rim light on the other side, but what I decided to do, is to add a greenish teal gel to light the background. The background is black, so even though I have the light turned up very, very high, it's just going to be a kiss of color in the background. What's important for this shoot, is that I'm definitely shooting tethered, so each time an image comes up, what I can do is I can see if I need to readjust the location of the lights. I also am applying a preset. So when it comes in, I'm pumping up the vibrance. I'm pumping up the contrast, and I'm pumping up the clarity. So all of this is going to help that color look even richer, and for everything to shine even more. So I'm gonna start off with just really elegant poses. I'm watching to see where she turns, so that she's picking up each light on her body. And then I might try a couple shots with movement. For metering these, I hate to say it, but it doesn't really matter, because if the light looks too bright, you turn it down. If the color is a little washed out, you layer on another gel. So, my point is you need to experiment. There's not going to be a formula that you can go ahead and recreate at home. This is going to be something where, use a bunch of lights, use a bunch of gels. So let me give this a test. Alright, great. So I'm gonna have you pop that knee up. Great. And I'm gonna have you turn your torso just a little bit that direction. Reason I'm doing that, so she picks up some of the backroom light, as well as all these colors. Perfect, let's just get a generic test here. Looks beautiful. Something else that I will recommend that you do, is play around with different white balances. John and I were joking that, he's like, oh, what's the correct white balance? There isn't. There isn't a correct white balance. It's whatever colors you want. So if I try this on tungsten white balance, everything will go really blue, and it looks really mysterious. Or I can try it in fluorescent. So let me just see how this looks. Let me get that preset applying. Looks cool. Super saturated, really beautiful. Alright, I'm gonna have you pop up your left knee this time. And turn a little bit to that side. Great. And then I'm gonna have you tilt back this way. Perfect. And turn it so the pinky sides of your hand are toward me. Great. And elongate your fingers, and lean, lean lean. Beautiful. That is perfect. I love that. John, can you turn that backlight in, just so it's behind her a little bit more? That backlight on the background is a little too far to the right, so I'm just having him angle it across, so it'll be more behind her. Beautiful. And stretch, soft fingers, wiggle, wiggle them, real long. And that back, the thumb of your right hand is sticking out just a little bit, good. Just wiggle them real soft. Love it. Chin down a little. Great. Let's take a look at the tethering. Alright, so I love that. I just need to raise up my main light. When she raised her head up, it was more on her chin. Because it's a grid, I'm lighting about here, so if she moves, she's no longer in the light. So it's one of those things you have to be careful of, if you are using grids. So let me get that same pose again, so he can position the light. Great, thanks John. Perfect, and wiggle those fingers real soft. Real ballet, beautiful. Great, I'm gonna pump it up just a little. Good. And wiggle those fingers so they look a little softer. Good. Little less posed. And bring the hands together a little bit more. Right there, perfect. And turn your chin a little farther to the right. And lower your right shoulder. I want to get rid of the merger that I have there. Beautiful. And bring up the elbow a little more. Little more, right there. And wiggle the fingers, real soft. And make them look a little more natural, spread them out just a little bit more. And kind of maybe bring down the center, middle finger. Yeah, right there, beautiful. Okay. Ah, they're so beautiful. Alright. Look, this is in camera. That's cool, right? Ooh, yeah, that's really cool. I love it. Okay, cool. Let's do one turned around to the side again. Just like that. Pop up a go to pose. Turn around a little bit more. I'm gonna have you do the over the shoulder one. Great. Turn a little bit more away from me. Right there. Let's try how this looks, and see. Oh, so cool. Okay. We're going to attempt, because I want a little bit of movement, I love that pose, I'm gonna attempt to flick her hair. It's wet, so watch out in the splash zone. (laughter) Alright. And I'm ready. Super cool. Okay great. I'll do a couple more. That's great. Great. And try, don't lean quite as far over. Okay. So keep your chest up just a little more. Perfect. Perfect, let's do two more of those. Great, and then try with your head towards me just a little bit more. Maybe this three quarters. Okay great. Perfect, and one more whip it to the side. Like towards you? Yeah. Oh, that's so cool. Okay, do it one more time. Okay. Looks really good. Alright. And then the last one, just keep, the pose got a little off, so keep the back arched, and this back arm up. Perfect, okay. Perfect, okay great. I love it. Great, so, I know that I got really good shots in there. I would love to shoot this forever, but as far as educational purposes, what you really need to know is, I got the colors set. I can always move them if I decide, you know what? The pink that I have on her face, I'd rather try it in cooler tones. Have all the front be teals, and blues, and greens. And then move the pinks to the back. I can, there was no formula. It's just experimenting and having fun. You always wanna ask yourself, what is this photograph about? And plan ahead. So for this photograph, we wanted to emulate some of the feelings of a renaissance painting. And we're not trying to recreate anyone in particular, but kind of just harness the essence of kind of a renaissance nude. So, I took a look at some old paintings, and tried to figure out what a lot of them had in common. And one thing that I would see very often was luxurious, draped fabric, often on a chaise. And then a lot of times there would be little props like fruits, and ferns, and things like that. So, for this shoot, I needed to get ahold of those, and so I got some scrap fabric from a fabric shop, and we went to a craft shop, and were able to get some of the fruits. And so, we also styled our subject in a way that had kind of a more luxurious, and flowing hair. So, this is the set that we have. We've got the chaise, we've got the fabric, and then as I looked at a lot of renaissance painting, it was sculpted but soft light. So the light wasn't harsh. The transitions were gentle on the face. But, it was at enough of an angle, to sculpt out the form, to cast some shadows. So we're going to shoot on a dark background, and we're gonna go for really rich tones. And posing, I looked at these other photographs, or I looked at these old paintings, and I tried to channel some of the posing that you would see. So a lot of it was curvier. A lot of it was very loungy. Very, very comfortable. So I'm gonna make sure that I create curve, but I also get the look of comfort and power, because when you look at these women in many of these paintings, they look comfortable, but they also look in charge. They look very powerful. The light on this setup, super easy. It's a three way, four foot softbox, off to the side, but also raised up. So, giving us some sculpting. Giving us some shape, off to the side. Creates shadows across the body, higher up. Gives sculpting underneath the chest. And also on the left-hand side, I've got a white V flat. And all this does is just open up the shadows a little bit. When that three by four foot softbox hits the V flat, it just bounces back a little bit of light into the shadows, so they don't fall to complete darkness. So from here, all it is is shooting and adjusting the pose. So, what I'm gonna have you do, I've already put her kind of in part of our go to pose that we talked about. Where the subject's on their side, with that top leg bent over, and then tucked behind the bottom leg's ankle. So we've got that pose there. I have her lounging with the arm up, and then we'll try different poses with the top arm. So let's try this first. Great, so I'm gonna have you roll that knee over even more, so you're on your side. Perfect. And push up just a little bit. So that's giving me a more attractive line to the thigh. Beautiful. Great, and push off just a little bit. And, for that hand, can we get a little softer? Yeah. Let me see the pinky side, rotate it just, remember the pinky side is the most attractive side. That's perfect. I also am gonna take a look, and analyze this fabric. For the most part, I've got it draping pretty good. I think I will move the fruit just a little bit, so that her hands lead to it. Is what, right there looks good. And I'm also gonna take a look at the colors that I normally see in a renaissance painting, because I'm gonna try to integrate those colors in my post processing. So a lot of times, you see the yellows in the skin tones and jewel tones. So I'm gonna be playing with that as well. Okay now. Oh I'm gonna have you put your hands like this. And push up just a little bit. There you go, great. And now look your head over to me, kind of rest your face on there. Perfect. Beautiful. And that pinky, let me see it again. Perfect. Great. Now what I would like to have you try for one, is, yeah, super stretching. But turn both of your pinkies towards me. Great. And I think, can you brush your hair on your right-hand side behind? Yeah. So it was just kind of covering up her neck, and we think that necks are beautiful in shots, so I wanna make sure I can see it. Really stretch. Everything elongates, so that makes a beautiful shot for her form. And turn your head this way just a little bit when you do it. Great, and close your eyes. Beautiful. Beautiful. And this time, do that exact same pose, lean everything, but put the right hand out. Great. And put it on your thigh, real soft. Great, and stretch, put that big stretch again. Beautiful. And push away from the chaise. Great, and head to your right. Perfect, let me try a couple more poses. I'm gonna try one where you lean back, so not on your side this time. Let's test. And raise your front knee, exactly. So whatever's closest to the camera, your raise that knee. And you may have to push away just a bit, so that you can give arch to the back. This is a, kind of an awkward way to do it, because of the chaise shape. That's good. Perfect, and kind of lean back, and major arch. Beautiful. Perfect. That looks great. Can you put your hair on your shoulder, even a little bit more? Yeah, and set it right on top. Beautiful. And I want you to turn your torso when you arch, just a little bit towards me, it'll make the chest look fuller. And pinky, beautiful. And then put that back hand, yeah, to your ... Can it reach your knee? Yeah, that's beautiful, like right here was nice. Right across your body. Beautiful. And close your eyes. And now try raising the front arm. And, can you push away on it? I don't know if that's possible. Let's try that. Perfect. Okay great. So, I have plenty of shots to work with there. I'm gonna try a little bit of toning in post, and then I might also try some compositing. By compositing, I mean I might try a painting in the background, but I'm kind of pre-visualizing, based on my angles, what would look good in this shot. So, I'm making sure I have all the pieces I need. I got some good poses. I have some good expressions. I like the set, so I think we're all set here. Thank you.
Class Materials
Free Download
Bonus Materials with Purchase
Ratings and Reviews
ccPhotography
Amazing speaker, instructor and great photographer. The lighting and posing technique is imperative but she gives a lot of small tid bits and tricks that have already set me apart from other photographers. I love her work but I love her teaching style more. I recommend all her classes!
user 0256e5
It is a delight to watch someone who has so much passion for her art and Lindsay exudes passion and accompanies that with a great teaching style. She shares her knowledge and has a lot of great tips. I think this class makes a great intro to the subject. For me, this was time well spent.
Flavia
I love Lindsay's teaching style and all the insights she gives. I did my first fineartnude photoshooting applying everything I learned on this course! Thanks Lindsay you are a true inspiration and a great help during my photography journey.