Nude as Creative Canvas: Male Statue
Lesson 13 from: Fine Art Nude PhotographyLindsay Adler
Nude as Creative Canvas: Male Statue
Lesson 13 from: Fine Art Nude PhotographyLindsay Adler
Lesson Info
13. Nude as Creative Canvas: Male Statue
Lessons
Class Introduction
14:28 2Etiquette and Preparation
30:21 3Fine Art Nude Posing Essentials
24:44 4Posing to Accentuate Shape (contains nudity)
31:24 5Classic Poses for Nude Male (contains nudity)
15:35 6Classic Poses for Nude Female (contains nudity)
15:12 7Sculpting with Light and Shadow
18:05 8Lighting: Definition and Separation
20:54Lighting: Low Key Male And Female (contains nudity)
28:22 10Lighting: High Key Female (contains nudity)
14:45 11Patterns and Projection (contains nudity)
19:31 12Nude as Fine Art (contains nudity)
24:32 13Nude as Creative Canvas: Male Statue
17:23 14Nude as Creative Canvas: Female Statue
11:25 15Nude as Creative Canvas: Splatter Paint Torso
16:30Lesson Info
Nude as Creative Canvas: Male Statue
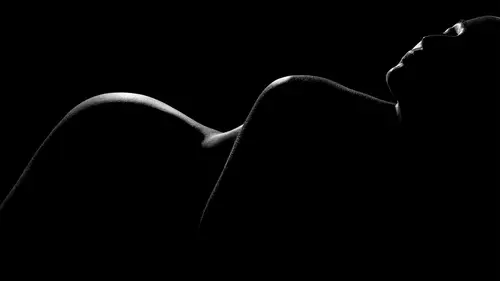
Now, we're going to make a mess really soon. But first, I wanted to talk about really my favorite parts of photographing nudes. I mean, I love lighting. You guys know that, you've seen me talk about lighting. I love it, I love posing. But I like when it's the lighting and the posing for the purpose of a concept. Like there's a story I'm telling. Because I think that sure, I love figure setting. I love something that's a clean black and white, that's beautiful shape of form. But I've seen it a lot, and there's nothing wrong with it. I have plenty of them. I've gotten it because I want it for myself. But I want to do something that's different, that's true to me, that's unique, or something that I can experiment with that maybe I'll use in my other types of photography. So I'm gonna show you a couple of images that I did on the pre-film day, and then we're gonna talk about retouching, and then we're going to get into shooting. So for example, one of the things that I just love to do and ...
I can't get enough of, is projecting patterns onto the body. And this is what I did in the pre-film, but each one of these were done in a completely different way, one with a special modifier, one with a tool that a lot of people have, and one with a single light. So I will demonstrate that, but I love to see patterns wrapping around the form, and I, like, if you watch the video I'm super excited. Like I love it the whole time. Body paint, it's great to collaborate with other artists, because sometimes they give you ideas that you would have never have had before. These two pictures, I do demonstrate that in my pre-film sections, which you guys can watch. But gels and oils and colors, and that excites me, and I shot, this is the first time I'd used so many gels. I can guarantee you I'm gonna use this again in something in my fashion work, for sure. I don't know what it'll be, but that's kind of what excites me. So I'm positive I'm going to use that again. Or the Renaissance example. So this is actually gonna lead us into the retouching, 'cause this is what the raw example looked like, but it was my little extra retouching that takes it to the more interesting level. So let's talk about retouching for nudes. I think it all comes down to what is the purpose of this photo? Like I'm not going to say retouch out wrinkles, or rolls in the skin if you were going for that look, if you're going for a Rubenesque painting, then don't do that, and for me, sometimes if I'm going for something that's clean form, I'll retouch out a tattoo, because I didn't want it there in the shot. But otherwise maybe the tattoo was exactly what you wanted. So it really depends on the purpose of the shot. And so you have to figure out if this thing in the shot is adding to the photo, leave it. If it's not, remove it 'cause that's what it comes down to, But I do this in all of my photography, like anything that I do, so it's not special to nudes. Here's an example, though, of the toning and the compositing. This was the raw shot in camera, so this is what it looked like. And so what I looked at is, I thought she looked great. There wasn't really that much else that I needed to do. I wanted to smooth out maybe some of the transitions on her legs, brighten up her face a little bit, maybe just smooth out-- I mean, I look at it and there's nothing I really particularly see as distracting. So this was the retouch version. So you look, I smoothed out the texture on her leg. That was a big one. I ended up lightening up her face a little bit so the attention was drawn to her face and her chest and a little less towards the bottom of her body, 'cause I'm not trying to draw attention to her feet or her legs. It's more about her torso and her face. And then I composited in the background. And so the background that I have is an old Renaissance painting landscape, and if you take one of the many compositing classes on Creative Live, they'll talk about what you're trying to achieve is matching the hues, the colors, the contrast and overall exposure and tone of the background to help unify it. But if you look, my image overall, I put some cyans in the shadows, and a little bit more yellows in the highlights. And when you do that to the top level of the picture, it unifies the whole picture. It tricks your mind into thinking, "Oh, they must have been shot together, 'cause there's yellows and cyans everywhere." So anyway, one of these compositing classes will walk you more through that. But for retouching the nudes, for skin, I'm not going through this in depth because I have many retouching classes, but I'm just gonna add to your brain of what you need to look up, or maybe a Creative Live class to take. For skin overall, I use Imagenomic Portraiture, to maybe smooth out if there's maybe cellulite in the leg, or if there's, sometimes when people get hot or cold they get the blotchiness on the chest. So that's a good plug-in that sometimes helps me smooth that out. But usually I'm using Frequency Separation or localized dodging and burning. Those are the things that are the high level retouch that makes it just perfect. But for the body shaping, the liquefy and warp. If you notice, I didn't liquefy or warp her, 'cause it wasn't necessary. 'Cause I asked myself what adds to this photo? What takes away from it? I didn't need to change the shape. It wouldn't help me with anything. And the last part that you really, really, really, really have to look up is contouring. I use contouring all the time in all of my shots, so for example, there's the shot you saw in the beginning. Here's before contouring, here's after. So see how I can make her chest look fuller, her leg look tighter, her abs look more defined? Even the clavicles and the lines on her neck, the muscles in her neck. So contouring in Photoshop is painting highlights and shadows. When you paint highlights in the center of arms and legs and shadows on the sides, everything gets tighter and firmer, which is typically something we're looking for when we're shooting fine art nudes. So every single nude that I take, that's kind of lit in this a little bit more broad lit situation, I contour it. And notice I don't need to liquefy her chest. Not necessary, I just put a little bit more shadows. The more shadows, remember how we raise the light to cast more shadows, which makes it look fuller? Do the same thing in Photoshop. More shadow makes it look fuller. So that is it for retouching. I'm not actually going into retouching, but I'm just telling you it's an important part of the process. In the Renaissance example, I had in mind that I would probably composite it, and so I was thinking about that. And for some of these shots that we'll be doing now, I already know what I'll be doing in post, 'cause I planned the concept ahead of time. All right, so with that, I am going to start with John as my first subject. So remember how I kept saying over and over and over again, when I'm posing guys I think of them as Greek statues? Like that's kinda how I'm posing. So what we decided to do is make him kinda Greek statuish. And the reason I wanted to include this one is this is a little less complicated than my other setups for the look. Some clay in the hair, or you could do water soluble white paint, just to add a little texture to the skin and give a little bit more firmness to the hair, 'cause I'm gonna make him look statuesque. I don't know exactly what I'm gonna do, so I'm gonna shoot a couple different things. I'll play around with it in Lightroom so you can see the ideas that I'm running through, and then we'll keep building. So I'm gonna start you with your usual base pose. Would you face this way for me? And raise the first one, great, perfect. So I've got the light roughly raking to the side so I can see abs. I'm just gonna turn you a little more. Great, and I'm gonna tell him periodically to tighten up so I can have definition, but you're good right now. So let me take one quick test here. Now I'm kinda short, and I might want a little more attention to his hair and to his chest, so I might elevate just a bit. He made kissy faces. That's very Greek statuesque, I like it. Okay, did it come in? I don't see it, no. Ooh, okay, all right. Well, we'll restart that. What I really want to pay attention to, what I'm kinda looking for is I want enough light to rake across to show his form, but I feel like the Greek statue, like I don't know if it would be really dramatically lit. Like I might want to fill in the shadows, but not enough to get rid of the shape. So we'll play around with it. All right, so the same pose for me, please. Perfect, let me do one where I, right there. Okay, now I'm gonna turn your chin that way. Look your eyes here, perfect. And on the count of three, I'm gonna have you tighten everything. One, two, three. Great, and now turn your torso towards me just a little bit. Great, you might need to pop up that leg, I don't know. Let's see, lean your chest back this way just a little. Okay, and bring that hand out. So I'm looking for separation, 'cause everything was kinda closing up. Great, and relax your shoulders just a little. Okay, so now, I want to have you puff everything up and tighten on the count of three, one, two, three. And now look this way with your chin. I feel like a statue wouldn't look right at you. So that's my, that goes to my thought. One, two, and tighten. Oh, let's see. So I'm gonna try this first. So rest for one second. I think I may add a little bit of fill light, but we'll see. All right, so taking a look at this shot, I don't want him to look yellow, red. Like, I don't want him to actually have his normal skin tones. So there's a couple of things I could do. First thing I'm gonna try is we're gonna go to hue saturation luminance in my Lightroom panel and I'm going to desaturate his skin tones. So I'm gonna pull out the reds, oranges and yellows. So notice how it gets him looking really in that pale, and it kind of matches him to his hair. So it looks like that could be an extension. So I like that, but I think typically what happens when you desaturate colors, it decreases the appearance of contrast. So basically when you increase contrast, if you've ever done that in Photoshop, increased contrast, it makes saturation look more vibrant. So when you do the opposite it does the same thing. When I pull out color a picture looks flatter. So what I'm gonna do is I'm gonna add a little bit of clarity, and maybe a little bit of contrast. And one of the things I can do to make this whole thing feel a bit more unified, is I think I want to cool it down a little bit, 'cause I feel like a statue would look stone cold, right? Like go a little bit more cold than this, so I'm gonna add, I'm actually gonna add maybe blue tones to the shadows, and you can do that in split toning. So I can go to the shadows, I can add blues, but of course not that much. Like something around there. So that looks good to me, as a before/after, to make it look a lot more statuesque, and it's really quite easy. I'm gonna try a couple more shots. Can I fill in some shadows? Actually, wait, I'm gonna lie. Can you turn that way and do the same thing. Oh, but then I lose the shoulder. Never mind, you have to go back this way. Can I take the octabox, and turn that into a main light, short light? So I'm gonna have it over there, short lighting him. So basically what I'm saying is I wanted to try the light a little bit more short lit, but I don't want to move this light over, so we're gonna use the octabox there, and then this I'll use as my fill light. So we'll test it and see if I like it better or worse. I mean, I like this as is, but I'll try a couple things. Of course, obviously if we weren't live, I would do it without the underwear. Okay, and then we'll turn that way down. Cool, okay, so same thing, and is that one on, just no modeling light? Correct. Okay, cool, all right, so same thing. Let's see if I can see the modeling light. So I'm gonna use the modeling light to watch, all right, so give me the arms again. Can you lower it, John? That's it. And then look your head this way. Great, and then turn your torso just a little that way. Good, and pull your arms out this way a little. So what I'm doing is I'm trying to make sure that that light's not being blocked by his arms. That's why I'm having him readjust his arms. So let's see, on the count of three I'll have you tighten, ready one, two and three. Okay, interesting, good. It's good interesting, I'm just not sure when I test it how it'll look. So it's a little bit more, a little bit more definition to the abs, but it might be too complex lighting to make sense with a statue. Like it might not quite work, let's test. I'm gonna turn this down a little bit more. Okay, and John, can you lower it even a tiny bit more? Power or height? Height, thank you. All right, let's see, and I want that light to be even dimmer. I've turned it down to it's lowest power, and I know it's gonna still be a little bright, so one of the things we can do is back it up. (John mumbles) True, the other thing we could do is bring up that power and then I close down a little bit and this will appear weaker. Studio lighting 101, right? Okay, all right, so anyway, same pose for me. Great, and turn your torso just a little bit that way. Great, one, two, and three, and chin a little bit. Oh, we probably need a little more there. Can you bring it up just a little bit this way? And I'm just tweaking. I think my shadows are a little dark, and then we'll test it in a second and see how I like it. Okay, here we go, good. All right, ready one, two, and three. And lean forward just a little bit. And then lean forward this way just a little bit, and shift your hands forward. Great, perfect, one, two and three. All right, so let me see if I like it. I think I like the first one better probably, but we'll test. So, I'm gonna play around with it, I'm gonna-- This time instead of desaturing those tones, I'm gonna devibrance everything, gonna make everything really, really pale. I know I'm hidden in this corner here, let me pop out, all right. So let's do, all right, decreasing the saturation and the vibrance, I'll lighten everything up a little bit. Fill in the shadows, and then everything looks flat, so I'm gonna play with my clarity and my contrast. So let's compare. And let me make this one cooler. All right, so comparing and I'm thinking I like, I think I like the-- I think I like the second one. I like the toning on the second one for sure. So I'm gonna do one more thing. I want to try one more pose, and then I'll, 'cause I like it, and it's good shape, dramatic, I like the toning. I definitely think this one looks more statuey in the toning. This one's a little too blue. And I see the pinks of his skin still, 'cause I desaturated the reds, yellows and oranges. So let me take one more shot of him. So I'm gonna have you do the go-to pose on the ground. So where you had your, the one that's uncomfortable. Remember that one? Kind of. Oh, I'll get it sorted for you. Okay, so basically you're kneeling. Great, let me lower this without knocking stuff over. John, will you lower that light for me? One more, you'll notice I use my go-to poses all the time and then I change it. You don't need a billion poses. Okay, so you put this arm, your right arm on your thigh there, and then you just kind of squatted down, all right? So let me test it, okay. I'm ready, so you're gonna put your bottom on your thigh, your calf. Like you squatted like all the way here. Okay, you can't see this, can you? There you go, so you kinda do this. Yeah, exactly, and then put your hand here. Yep, don't worry, I'll catch it. And then put hand in front more. Little bit more, now pull up real tall and then turn your torso towards me a little bit, I'll try to catch it. Good, and head that way. Good, and then that back arm give me more structure. Make it stronger, turn it in a little more. Turn it in more toward your butt, yeah, good. Ready, one, two, and tighten everything. Perfect, okay, relax. All right, great. All right, thanks, John, I appreciate it, you were great. So I think I'm gonna do the same effect on that one. You know, something like that. And now, imagine if that's not there, this arm hides 'cause when he has his knee down, things show, so we put the arm to block. We've got the short light and tighten to show his muscles, and I like that. So I think that looks cool, it looks statue. I could, you know, I can see that in a Greek and Roman statue.
Class Materials
Free Download
Bonus Materials with Purchase
Ratings and Reviews
ccPhotography
Amazing speaker, instructor and great photographer. The lighting and posing technique is imperative but she gives a lot of small tid bits and tricks that have already set me apart from other photographers. I love her work but I love her teaching style more. I recommend all her classes!
user 0256e5
It is a delight to watch someone who has so much passion for her art and Lindsay exudes passion and accompanies that with a great teaching style. She shares her knowledge and has a lot of great tips. I think this class makes a great intro to the subject. For me, this was time well spent.
Flavia
I love Lindsay's teaching style and all the insights she gives. I did my first fineartnude photoshooting applying everything I learned on this course! Thanks Lindsay you are a true inspiration and a great help during my photography journey.