Lighting: Definition and Separation
Lesson 8 from: Fine Art Nude PhotographyLindsay Adler
Lighting: Definition and Separation
Lesson 8 from: Fine Art Nude PhotographyLindsay Adler
Lesson Info
8. Lighting: Definition and Separation
Lessons
Class Introduction
14:28 2Etiquette and Preparation
30:21 3Fine Art Nude Posing Essentials
24:44 4Posing to Accentuate Shape (contains nudity)
31:24 5Classic Poses for Nude Male (contains nudity)
15:35 6Classic Poses for Nude Female (contains nudity)
15:12 7Sculpting with Light and Shadow
18:05 8Lighting: Definition and Separation
20:54Lighting: Low Key Male And Female (contains nudity)
28:22 10Lighting: High Key Female (contains nudity)
14:45 11Patterns and Projection (contains nudity)
19:31 12Nude as Fine Art (contains nudity)
24:32 13Nude as Creative Canvas: Male Statue
17:23 14Nude as Creative Canvas: Female Statue
11:25 15Nude as Creative Canvas: Splatter Paint Torso
16:30Lesson Info
Lighting: Definition and Separation
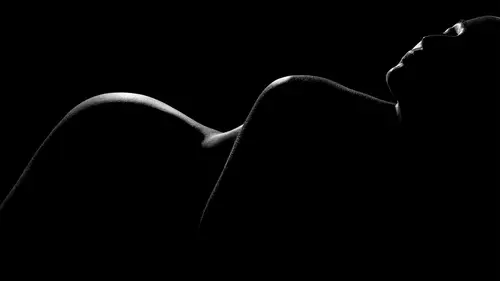
So far, we've talked about shadow sculpting, but now we're gonna talk about what highlights do for you 'cause you have to work for the two of 'em. Let's get our pose right first, though. I'm gonna have you do the one with your left foot this way, but turn, basically put your bottom towards me. Yeah, a little less, like right there, good. Perfect, and raise your right arm back and your left arm forward. Perfect, great right there. Okay, so this is what we're gonna be working with for playing with light and shadow. Actually, you can relax I'm gonna put up the Keynote real quick. Give you a break and download it. Okay, so highlights, shadow sculpting, you saw that. I could carve out her muscles. I could also raise it up the way that, that angle's quite high for her right now, but that's the angle I like for showing her chest. If I had it lower the chest is going to look much smaller. Got my shadows, awesome, but now I'm gonna use highlights to separate. All right, so let's take a look her...
e. In the picture on the left you lose the curve of her lower back to shadow. It's a nice pose, but you really just sort of see the chest, which I mean that's fine for a shot but what happens if you want to see that extra curve? So, in the next shot over all we do is take a reflector and pop it into the shot. Pop it in from behind and it adds a little separation. So, here's the difference between the two. One with the Optibox from behind, the other with the silver white reflector. When you add that now I can see the curve of her lower back and her bottom. So, the purpose of these highlights are so that we separate and define. We show a curve that was hidden, separate them from the background. Also, there's a difference between fill light and rim light. Fill light makes shadows less dark. A rim light is another light source that carves out part of the body. And, you can create rim lights with reflectors, or you can create it with another light all together. So, I'm gonna demonstrate this all for you. But again, it's posing and lighting, all of it has to work together. So, let me switch back over to Lightroom. All right, so I'm gonna do this without and then we'll add it in. All right, I'm gonna have you actually come around this way just a little bit more. Put your foot there for me. Great, now arch your lower back and pop your toe up just a little more. Perfect, and then pop out that back a little, sorry towards me. Great, right there. And, I'm actually gonna have you face a little further the opposite direction, other way. Yeah right there, perfect, great. All right, now relax your shoulders, relax, relax, nice low shoulders. And, you're gonna look you head up towards the light, beautiful. And, can you take your hand and can you put it on your side so it's just on your right hand on your side. Yeah, just raise your arm, perfect. And, bend your front arm just a little bit, great, and tuck it into your side a little more. So, the reason I'm having her bend her arms is if you can bend it, bend it, if you can curve it, curve it. Lots of straight arms doesn't work. And then, can you take this arm and just bend it back just a little? Okay, the reason I'm doing that is it was hiding her chest, it was hiding her curves and we wanna see that. Perfect, so lets try right here, perfect. (clicks) Okay. All right, so we've got the light and short light position which means shadows fall towards camera. And, I have a beautiful light on her face, nice curve to her chest, beautiful curve to her arm. You see the separation in her lower back, in her bottom, barely 'cause there's a little bit of light spilling on the background, but hardly anything. So, let's say I look at it and you know what I want to see the curve of the bottom of her back and her bottom. So, what we're gonna do is let's add a silver reflector. Now, it's hard for me to actually see in this room because we have a lot of light illuminating me. But, what I recommend you do is you have to use your modeling lights 'cause you have to see what the light's doing otherwise it's gonna do you no good. So, that means in your space you have to close the curtains, turn off overhead lights, like really pay attention to how light's shaping the form because then I'll actually be able to see the silver reflector will kick a highlight onto her back. Do you think that's the angle? I think it is. All right, perfect. Pop out the right back arm just a little bit more, perfect, great. (beeps) (clicks) Okay, we've got a little bit. So, watch the separation. Just those two, so it doesn't need to be a ton of highlight. It just can be we were losing her bottom, too light highlights, make sure we don't lose that curve. But, notice the placement. What Lee's doing is he's catching the light there. I'm gonna have you bring it up a little closer. The closer he gets it it should get a little brighter, a little stronger. You think right there, maybe? Perfect, arch your lower back more, pop out your right elbow just towards me a little bit. (beeps) (clicks) Okay, so watch, he moved in closer. The closer he is the brighter it'll get. So, now it's a brighter highlight. What we wanna be care of is that you're using a rim light, notice it's from a backward angle. Can you do a fill light for me? If he comes around front what this does, same arch perfect. What this does is it just fills in the shadow and it's a lot less elegant, I think. It's filling in shadow not creating a new highlight. There's a difference. So, I prefer the latter. What's really nice about this set up is that this is beautiful. You see the curve of her bottom, her back. Everything's carved out, it's dramatic but it's only one light. It's one light and a reflector so it works great. However, what we're gonna do is we're gonna add a Strip Softbox. So, you can add a second light if you have one. And, what's nice about it is you can have a little bit more control. With the reflector it's a little harder. It's a little harder to get the power right. It's a little harder to get the direction right, but for having another strobe you just dial the power up and down. The modifier that we have on there right now is a Strip Softbox. And, Strip Softboxes work fantastic for fine art nudes 'cause what they do is they give you nice, even long highlights. So, I can put one Strip Softbox on either side and have a narrow highlight that carves out the front of her body and a narrow highlight that carves out the back of her body. And, it's just luscious and beautiful and wonderful. So, I tend to use Strip Softboxes more for nudes. Something else that I more in fashion is I tend to use barn doors. And, barn doors let me get like really, really narrow, narrow highlights. Just a little bit harder to use. It's not as even. It's not as consistent. So, let's try this. Great, arch real hard, lean your chest forward a little bit. Great, so all of that, when she arches real hard and leans her chest forward it's making her bottom look fuller and it adds another curve there. Great. (beeps) (clicks) (beeps) So now, with our, see how it's kind of similar with the Strip Softbox but it's more defined and it's easier to control. And, if I want that highlight to be dimmer I just turn it down. If we want it to be brighter I turn it up. But, I think it's a really nice separation that we have. Okay, so we notice shadows sculpt, highlights separate and define, but there's another way to add a highlight. And so, let's say, you're like you know what I wanna see the curve of her back but right now that highlight on the bottom maybe you think it's not as elegant as you want. Like, you want it to be a little more mysterious and you don't wanna be such light on her bottom. So, the other thing you can do is you can add a grid onto the background. So, what I'm gonna do is if I light the background the shadow side will show up and I don't need the rim light anymore. Their different shots, but the same idea. Great, and again, this is when using a modeling light's useful, however it's really hard to see it with the ambient light on. So, turn of your ambient light. I think right there should be good. Arch, lean forward for me. I think that's great. Chin down a little. (clicks) Yeah, can you angle it just a little further right and a little bit lower? That's pretty good. Okay, cool. (beeps) Can you turn your whole body? I'm just gonna do one, can you turn your whole body a little bit further to your right? Just a little, right there, and bend you front arm just a little more, great. (beeps) (clicks) Great, okay. So, taking a look at the differences here. Take a look here. This is when we light the background versus when we light her. There's not one that's right or wrong they just do different things. But, the point is if we do nothing, I believe that's this shot, we really end up losing a lot of this curve and this interest. That being said I also do a lot of figure study where I'm cropped in real tight and it's just here. Okay, so I'm gonna pause 'cause I haven't taken questions in forever. So, do you guys have any, first? You're okay, he always have good questions. All right, I would love one. About how many shots do you take in a session, nude versus fashion versus portrait. Interesting, actually I am so much more purposeful when I shoot nudes. When I'm doing fashion I have 'em moving around, and they're kicking and like, and I don't think about it as much. But, I think that's, I mean honestly it's probably a bad thing. When it's a nude I pay a lot more attention to where the highlights are falling. I'm like, okay, like that pose but I want the back to be arched more. So, that's why I actually think it's good for me slash everyone 'cause you have to slow down and pay attention. So, I would say I take less than half as much when I'm shooting a nude as I do for fashion. I would probably say it's more like 30 to 40% 'cause I'm a lot more purposeful. Unless, they're jumping and bouncing and I'm throwing paint and stuff like that. In this example, everything we've been doing here we did this it was all low key, short light. This is another example of short light playing with light and pose that you will see in the go to lighting set up session. But, if I don't turn her body towards the light there's no light that wraps around. So, just know if you do a pose and you go, "Wow, this doesn't look the way Lindsay said," it might be because the light isn't sculpting the way that mine was. But, if you do a lighting set up and, "God, this is "the exact same lighting and it doesn't look the same," it might be 'cause the pose didn't work well with it. So, it's the interplay of the two together. So, this is just to give you an idea of some of the setups that we're gonna have in the go to, gonna look like that. All right, so I'm gonna take this one. First one is a two light set up, a one light set up, a two light set up, but doing different modifiers and light placement. So, what I'm gonna do is I'm just gonna take, I'm gonna take five minutes and I'm just gonna take a couple different shots of her moving the light around and talk through how I'm seeing the light on her body, what I would do differently, where I think I might add a reflector just so you can see kind of how my brain's thinking as I pose her, okay? All right, so John I'm just gonna have you moving some stuff around. All right, so I'm gonna have you pose. One or two? I will eventually have two. Start with one? Yeah. Okay, great. So, we're gonna do some of my go to poses and some lighting. So, let's start and just leave it where it is and I'll let you know my thoughts. All right and I'm gonna move this for you. All right, so for this shot you can do me a favor and I'm gonna have you pop your hip out to the side and lean your shoulders that way. Great, and now tuck that knee in if you can. All right, great. Now, good, perfect. All right, so if I do this (beeps) and make it hurt, okay good. (laughs) It's true though. It's true. She's like yeah, yeah it totally is. Great, perfect, okay. So, if we take a look here what I'm looking at is, okay I like the dramatic light from behind, but I wanna see more of her chest. Right now, it's only hitting the top. I actually want it to wrap around enough that I'll see more. So, I'm gonna bring it over to the front and I'm watching it. Keep going, right there, right there. So, this is gonna be very dramatic and make it hurt one more time. (clicks) Okay. All right, looking good. So, I see a little bit more there. I'm going to have you do that whole pose, same thing, just rotate a teeny bit to your right. Yeah, just a little bit, good, cross, cross, cross. All right, and I'm actually going to switch your legs. Good, perfect, just like that. (beeps) And, I'm gonna have you lower your right shoulder. So, remember when I said the lines meet closer to the body it's more dramatic. So, keep lowering that shoulder even more, perfect. Great, and look up to the light with your chin, this way, good. (clicks) And now, drop that arm just a little bit. Perfect, put it more to the side of your face and then bring it back just a little bit, great. Let's take a look at the light here. And just a teeny bit forward I wanna see just a little bit more, so it gets the center of her stomach right there, good. All right, now take a shot and hand instead of being on your, like here. Perfect, and then pull your elbow back just a little, great. Okay, now tuck that knee in real hard, real hard. I need to see more curve so that's what we got there. And, eyes down a little bit. Okay so, I take a look here. I'm fine with that but I'm gonna turn you around now. And, I'm gonna try the other way. Perfect, pop up that front knee, the other leg, that one, great. Bring your hand back, perfect just like that. And, I'm gonna have you put the back arm up, great. (beeps) (clicks) And so, that I've turned her back to the light it flattens things out. So, I'm gonna need it just a little bit more that way. And, tighten everything in the stomach everywhere. So, notice that I say tighten, I don't say suck it in. 'Cause I mean, it's not, it's about engaging the muscles which is different than sucking it in. So, if you see that everything will be real tight. Arch your back real hard, lean your chest forward. Right there, good. (beeps) I can do more figure study. I'm gonna have you put your hands above your head. So, this is gonna be figure study and I don't need to have the face or the hands or anything. Turn just a teeny bit this way. Can you back it up a little, I know those apple boxes are in the way. Good, okay, great, perfect. So, lean your chest forward, super arch, tighten everything. Beautiful, right there. (beeps) (clicks) So, I love how this looks on her body. It's the next one, okay so it's like a beautiful line, beautiful shape, however I'm losing the curve on the right. So, I can a pick a couple different ways to do it. John do you wanna just pop on the Strip Softbox? So, I just want like a little bit of curve. So, every time make it super difficult to do. She's up on toe, arch, tighten everything, perfect. Turn your body to the right more, though. Great, reason I'm tuning her to the right when she came back towards me I lost the light. So, it's like it's that little of changes. All right great, tighten everything, perfect, super arch as hard as you can. (clicks) (beeps) Great, can I have it, can you move it in behind. How it works with rim lights is the further it is off to the side the wider it'll be, the more it'll wrap. The more you have it behind the narrower it will be. All right, that's cool, let's try that. Great, and then can you turn it down a bit? Okay, and chest to the right just a little, perfect. Arch as hard as you can. (beeps) (clicks) (beeps) Beautiful, and I'm gonna turn you just a tiny bit to the right I wanna little more light, just a little left. Come back to me, right there, tighten everything super tight, great. (clicks) (beeps) Perfect, so I would do something like that. And, I can do a figure study black and white. All right, do one more. I'm gonna actually turn you to your right. And, I'm gonna do a super narrow highlight. With a Strip Softbox in short light, or with an Optibox in short light it wraps around more. If I use a Strip Softbox I can make it super narrow. So, let's do that. I'm gonna just turn this light off. And, I'm gonna step you forward a little bit, great. And, I'm just gonna focus on your chest, okay. Can you turn it towards us? Great. I'm gonna turn your body further to your right, keep going, keep going, right there. So, I don't know if you guys can see, I'm watching the highlights right on her chest. And, I'm gonna have you arch up as hard as you can. And, great, great nope turn back away from me. Right there, right there. Okay. (beeps) And so, I don't want to see the other side of her body. It's just meant to be a figure study. So, I've got the light that carves out and its so beautiful and so elegant and I had it just enough so that it lights both on her chest instead of just one. But, if I come around this way (beeps) (clicks) it's gonna be a different shot. She didn't move, I moved. And so, hold the same pose. And, if I come around this way (beeps) (clicks) I moved even further to the right it's even a narrower highlight. So, my point is a lot of times I'm like, "okay that's great, "that's a beautiful pose. "Here it's gonna be flatter, over here I can have "the most narrowest, elegant highlights." So, to kind of summarize all that, everything that's coming together is pay attention to the height of your light. The higher up it is the more that you will carve out abs and also the chest. Pay attention to where the light is from side-to-side but also sometimes it's just don't face your subjects straight on. It's turning them away and then what you want to be lit is what you turn back towards the light. So, you can actually create full shadow and then bring things back into illumination. So, that's moving a light and also moving them. Oh, and it's also moving yourself even those little changes made the difference. And, of course, the whole time if I have her put her hands, can you put your hands down and then put your chest towards me? Now, I don't have a pose that'll work with this light. So, you have to get the pose right, the light right, and your camera angle right. All of it works together, awesome. Okay, so do you have specific posing tips for working fuller body types? So, I guess you want me to sell my class that I just did on posing for curvy women. I mean, I just did a class on the tips and tricks. Really, what it comes down to is two things. For curvier women or fuller figured women remember that what you bring closest to the camera looks largest, what you put away from camera looks smallest. One of the things I think is interesting is if you look at Rubenesque paintings, right, with the fuller figured women they've got rolls in their skin and in their body, and guess what. It's beautiful and it's art. And, if you guys have ever studied Irving Penn, Irving Penn did abstracts of much fuller figured nudes and it was beautiful. So, it depends on what you're trying to achieve with fuller figured women 'cause you can have there be rolls and curves and like enjoy the suppleness of the body. You can do that in a nude. However, if you're trying to elongate the form and have smoother lines a lot of it has to do with elongating, tightening. It has to do with bending. I watch when I'm bending, sometimes if I bend this way it actually will introduce a roll that I'm not interested in. So, I have to find other ways to create curve. But, perspective would be most important thing. What you want closest to the camera, so I would do chest leaning or bottom back, or if you want the bottom to look fuller, turn around and push the bottom that way. It's the same thing, it's just figuring out what you want to draw attention to.
Class Materials
Free Download
Bonus Materials with Purchase
Ratings and Reviews
ccPhotography
Amazing speaker, instructor and great photographer. The lighting and posing technique is imperative but she gives a lot of small tid bits and tricks that have already set me apart from other photographers. I love her work but I love her teaching style more. I recommend all her classes!
user 0256e5
It is a delight to watch someone who has so much passion for her art and Lindsay exudes passion and accompanies that with a great teaching style. She shares her knowledge and has a lot of great tips. I think this class makes a great intro to the subject. For me, this was time well spent.
Flavia
I love Lindsay's teaching style and all the insights she gives. I did my first fineartnude photoshooting applying everything I learned on this course! Thanks Lindsay you are a true inspiration and a great help during my photography journey.