Masking in Lightroom
Lesson 26 from: Fine Art Landscape and Travel PhotographyPeter Eastway, Tony Hewitt
Masking in Lightroom
Lesson 26 from: Fine Art Landscape and Travel PhotographyPeter Eastway, Tony Hewitt
Lessons
Overview of Fine Art Landscape and Travel Photography
08:44 2Our Passion For Photography
07:38 3Looking For The Next Great Photo
19:05 4Peter and Tony's Photography
18:35 5What is a Landscape?
15:48 6Considering Color: What is Real?
13:16 7Shooting Travel Photography: Exotic Locations
13:33 8Preparing for a Travel Shoot: Research
16:35Who Should You Travel With?
12:13 10Photographing People
04:25 11Choosing Gear for Travel
21:26 12Overview of Aerial Photography
09:03 13Flying Machines: Planes, Helicopters, Balloons and Drones
18:05 14Shutter Speed in Aerial Shooting
12:48 15Manual vs Auto Focus
14:28 16Lenses for Aerials
13:14 17What to Shoot When You're in the Air
17:52 18Using Emotion to Capture Your Images
14:28 19What Stories Do You Want to Tell?
08:44 20Who Are You as a Photographer?
14:41 21Finding Your Creative Process
14:20 22Getting Your Vision Across
26:56 23Quick Image Enhancements Using Lightroom and Capture One
06:21 24Light, Color and White Balance in Lightroom
19:55 25Histogram, Hue and Contrast in Lightroom
09:16 26Masking in Lightroom
11:50 27Cropping and Aspect Ratios in Lightroom
13:19 28Image Adjustments With Capture One
13:38 29Further Adjustments With Capture One
13:44 30Advanced Editing Concepts With Photoshop
07:38 31Peter Eastway Enhances Landscape Details
13:08 32Tony Hewitt Uses Multiple Images to Build Texture
13:04 33Peter Eastway Aerial Edit
09:33 34Tony Hewitt Aerial Edit
15:40 35Part 1
10:31 36Part 2
08:18 37Part 3
09:31 38Part 4
07:08 39Part 5
05:50 40Part 6
24:19 41Sharing Your Vision: Exhibitions
11:54 42The Artist's Statement
10:17 43Preparing Print Files
03:39 44Framing Options
05:50 45Exhibition Space
06:43 46Once the Exhibition Is Up
13:11 47Making a Photo Book
18:49 48The Art of the Print
16:51Lesson Info
Masking in Lightroom
So this is all about the color of the balloon. Of course, the landscape for me, when I look at it. What was it about for you, when you took it? I think it was about about the patterns of the macadamia trees underneath there. And you know, they're just like little perfect pillows, and yet in the background, you get a little bit of sort of more generic bush, as we call it, forest. And so, I just like that distinction between the two. And yes, then I've got the advantage of that center of interest, that balloon, sitting over the top. So, the balloon, center of interest, that's about working with the color, perhaps? To bring that out. And the macadamia trees, and that sort of repetition of pattern is about the texture, maybe the clarity, the contrast in that area. So there's some of the things we can look at as tools in order to bring out the areas of the picture and tell the story the way we want to. Okay, alright, so where we gonna start? Well, I think that it's a little bit flat...
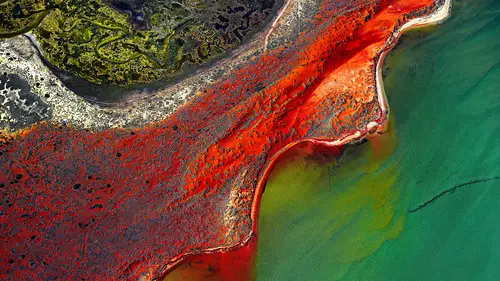
, in coming back to texture that we talked about. So to me, if we go to our contrast to start with, and just see what happens if we bring little bit of contrast into that picture. I like what it's doing to the macadamia trees, but I worry about what it's doing to the highlight in the balloon. Okay, well maybe we can add the contrast in first. So we've now got the base image, and they're going to be our whites, aren't they. So if we grab our white slider down here, and darken it down, let's go, we're putting quite a bit of detail back into the balloon. We're also, if you notice the highlights, because again, we're working globally at the moment. As we do that, we're also darkening down the whites elsewhere. Let's just go and do something a little bit different. Let's say, we'll leave that there. Let's get an adjustment brush. And let's paint with the adjustment brush over those white areas. I'm just going to reset everything there, and I'm going to grab the whites, and I'm just going to darken them down there on the balloon. So when you brush that in, that brush had a feather, it spilled over into the background. Why weren't you worried about that. Because when I'm, because I knew I was just going to use, because you're right. So, if I'm using exposure you're going to see everything there, but if I'm not using the exposure slider, let's just zero things out again, I'm just using the whites. It's just going to look for very light areas of the image, and it's only going to darken those down. So it's sort of self masking itself, because there are no light areas outside of that area of the balloon. So it's a lazy way of doing an adjustment. Does that make sense? Yeah, and it's and understanding, because you can look at the picture and see no highlights or no whites in that surrounding area, you don't have to worry about it. That's right, exactly. So I've darkened that, I think we could probably take that all the way down, it's not too bad. I'm liking, I think you could bring the saturation in that balloon up a little bit, get the colors to be a little bit more punchy, what do you think? I think that would be a good idea. And I'm going to add a new brush. Let's paint in the whole balloon again. And what, there are different ways of working it, because the last adjustment was said here, exposure plus, it shows what I'm doing. I double click on effect and that zero's it down. We come down here and look for our saturation, and we drag that up a little bit. It's also going to saturate the trees around the edge as well. But, perhaps not so much that it's going to be visible. So, if we bring that color right up, that's probably a little bit too much, even for you, Tony, now that you've taken over mantle officially yesterday. Still looking for the 200? Yeah, so is that about right do you think? Well, I think the idea here is not to make it jump off the page and look silly. It's just about bringing it away from the background by giving it some increased saturation. I agree. The red and the yellow is actually Already doing that, isn't it. It actually clashes with the background, which is a good thing. You know, it's kind of separating it out. Now we need to make sure we get those macadamia trees, having that crunch, or that texture that you were talking about. Because, not because that's what the picture, not because that's what should happen to the picture, but because that's what you said you wanted to bring out of the picture. Does that make sense? Because often we look at it and go, the number one question you get asked, what should I do with this picture. And the answer is, what do you want to do with it. What does it want to say. Because the answer can be different for everybody, so, you Pete, let's see the macadamia trees. Alrighty, well we can do that. I think we're probably going to be able to do that just by, well we've got the contrast already happening there, haven't we. What about clarity, can we use that? Well, if we use the clarity, you'll find that it's putting it everywhere, so maybe we need to go and put an adjustment brush so that we're just adjusting the clarity there. So add that in, and we can make that brush a little bit bigger. Oh, sorry, haven't I don't that now. So I could have done a bigger brush there, but that's okay. So, I just slip across there, soft edge there, we might have to come back and work that later on. And grab the clarity. Now I'm not a huge fan of clarity, I've got to say, Tony. I find that the clarity, it depends where I'm going. If I'm using, if I'm creating an image quickly, in Lightroom or Capture One, and I know that I'm just going to output it for 1,000 to 2,000 pixels for the internet or something like that, clarity is my friend. You can do some wonderful stuff. If I'm doing a big file and I'm going to do adjustments later on, then clarity is probably something I'm going to leave right until the very end. I might even use some sharpening or some high pass filter effects instead of clarity, which does a similar thing, and I'm very much more careful about how I do it because you can create halo effects that are possibly not intended, just a little note. Which is one of the reasons you might go into Photoshop, rather than try and do it here. That's right. And so, I just mentioned that because I know some people get wedded to the idea of clarity, because I love it, it's a real make me look good tool. Yeah, impact straightaway. But there are limitations, and sometimes when you see prints coming back, you go whoa. You didn't look closely at your clarity tool, so. So let's move that up and back, and certainly adding a little bit too much, I don't know whether that's really doing it for me. What I wonder, Tone, is let me just fiddle around with the contrast again and the exposure a little bit, just fractionally. Because sometimes contrast will do what I want it to do, more than clarity. And then I've just got those highlights, just going to darken those down a little bit. Another thing you can do with these areas, is push your blacks back a little, just a hint. I agree with that, let's just bring that black back, that's right. And maybe having done that, I need to come back up to my exposure. So, I hope you guys can see that the processes that we're doing, it's really an interaction with our monitor. We're making an adjustment to one slider, and then we'll go and make an adjustment to another slider, and suddenly the first adjustment might not be perfect because we've adjusted the other one, so you're going back. And that's what you need to do, that's quite okay. I know, some people when they're asking when we're teaching them say, oh but I've changed that one, and now I'm changing it back a little bit later. Yes. Well, if you know how else to do it, let me know, I'm interested. And I suppose experience on certain types of pictures will allow you to get there quicker, because you've seen this type of picture before, you go straight there. But often when you're doing an exploration of something, it might be a different type of image, a different type of location, you play around a little bit. That's what we do. And I know when people teach Lightroom, Capture One, Photoshop, there is a methodology that they'll use to teach, and this is how we're going to be applying it every single time, and that's certainly the way it should go. And I think you should learn that. I think that's a great starting point. Absolutely. Once you've got those tools under your belt, and we talked earlier about commercial, doing lots of pictures, you need a system. When you come to fine art, or perhaps coming back after a holiday and you're just working on a couple of travel pictures that you want to turn into icons or heroes, I'm a big advocate of having a bit of fun, having a bit of a play, seeing what you can do. One of the things I want to point out here, Peter, is by bringing up the contrast in the foreground, and by bringing up the saturation on the balloon, you may or may not notice that that whole part of the image has come forward. Maybe what's actually happened is because there's an increase in contrast in that foreground, the background seems to be further away, so we've brought some depth to this image. Which when the original file came up, it looked rather flat. Yeah, I agree. Remember we're talking about the light area at the top, maybe we should just add gradient filter. Drag down there. And then we just need to darken that down a little bit, rather, yeah I'll straighten him up, must have been the coffee I had this morning. Or the wine you had last night. (laughing) Oh, well I didn't have any wine last night. I had to be fresh for today, didn't I. Clear headed. What was that little flask that you had... That's scotch. Okay, I say that looks pretty good. So we've darkened it down. Okay, so I mean there's, yeah. And now that that's sort of all finished as well, I could come back and maybe just look at my overall adjustment, just lighten that whole image up just fractionally there. And, we're sort of there. Well Pete, there's a couple of good solid travel pictures that you've worked at. Have you got, maybe an aerial, something that you've done? I know you've been to some pretty amazing places. So, something that's a little bit different, like one of these sort of snakey salt lakey rivery type pictures, these abstracts. Yeah, well maybe this one might be a good one to show the difference. Well that looks pretty boring right there. (laughing) What are you going to do with this? Look at that histogram, yeah? Oh, look at that, just beautiful shape, eh? Well at looks as though all the information's there, there's plenty. (laughing) What made you take this picture? What is it about this picture that you looked at and thought, that looks interesting. Well, we're up in Arnhem Land Where's that? Which is the very north of Australia, and very warm. We go there in winter, which is July, August, because that's the coolest time. And it's only 35 degrees centigrade, so it's really nice. But up in the helicopter it's quite cool, and there are these huge tidal flats. And you will have flown over here in the not too distant past, as well I know. And this is the water just coming in, this is the tide just coming in. And it's so, when I say this, this shape here I the water just coming in, and it looks like an oil slick. And so, the shapes that you've got here are reflections of the clouds up above. And this texture around here is just sand, you know, damp sand. But, there is quite a lot of motion and mood in there, I think that we can get, at least I think there is. And there's a lot of detail that's been lost because it's kind of a flattish file. So, I'm curious what happens if you just go and hit auto. Alright, this is a magic button, you know. Is everybody under a cone of silence here? We don't talk about the auto button, because sometimes it works better than we do. Well that's a good start. Whoa, that's starting things alright. So the first things I've noticed is that the corners are starting to vignette, so we've got a bit of light drop off on the corners. See how the histogram's been expanded out by Mr. Odavey, thank you very much. And maybe if you go back to that histogram, what we do notice is that there is no solid blacks. No. Maybe there's a little bit, we could actually crunch those blacks. So there's a few things you could do quite quickly here to make this into a very interesting image. Yeah, I reckon. Quite, quite quickly. I probably wouldn't go that hard on that. There we go, there's a difference, is that alright? (laughing) I've seen you do this, I've seen you hang it, and I've seen you sell it. (laughing)
Class Materials
Bonus Materials with Purchase
Ratings and Reviews
Esther Beaton
Two Aussie blokes just having fun. Peter and Tone did us proud by representing the spirit of Australia, which is: don’t take anything too seriously. They hit off each other well, in fact, they are the best twosome I’ve ever seen on Creative Live, each giving the other respectful space yet not being shy about taking the micky out of the other guy when appropriate. The whole dialogue was spirited, informative, casual and fun. They also perfectly proved the symbiotic relationship between red wine and beautiful photography.
Swapnil Nevgi
Loved the positive energy of this class. Just finished watching it and I would definitely recommend it to someone who wants to take their landscape photography to the next level. This course is not about learning camera or software skills, but learning how to develop conceptualizing and composing skills. How an award winning creatives mind works is a lot more important than how to use camera. This is exactly what I was looking for and very happy with my purchase. Also it was good to see some of their raw vs post processed files to learn how far the professionals like Tony and Peter go with post processing (Something I have always been concerned about). Knowledge about exhibiting was also priceless. Thank you, I have learnt a lot in this class and I am sure it will reflect in my work in future.
Debra
This class is fabulous! One of the best on Creative Live. Peter and Tony share so much of themselves and their great art that you can't help but want to pick up your camera and get out to shoot. It was like watching two close friends. Thanks very much for a very enjoyable 2 days of learning and viewing.