Color Theory
Lesson 27 from: Fine Art Conceptual Photography from Shoot through Post-ProcessingBella Kotak, Pratik Naik
Color Theory
Lesson 27 from: Fine Art Conceptual Photography from Shoot through Post-ProcessingBella Kotak, Pratik Naik
Lessons
Class Introduction
04:47 2Artistic Vision and Inspiration
17:06 3Personal Projects
18:59 4Creative Motivation and Defining Your Story
15:15 5Organizing Your Inspiration
16:26 6Building A Character
03:19 7Creating Wardrobe and Props
33:59 8Location Scouting
12:55Resourcing a Team
17:52 10Working with Talent
06:39 11Building Community
05:06 12Scouting Location Pros and Cons
11:29 13Camera Gear and Modifiers
10:03 14Shoot Set Up and Styling
11:34 15Test Shots With Model
06:04 16Location Shoot: Model in Red Azaleas
26:04 17Location Shoot: Composite Pieces
16:35 18Plates Extending the Scene
07:11 19Set Concept and Design Overview
08:31 20Demo: Equipment Overview
04:39 21Shoot Set Up
08:12 22Shoot: Test Shots
15:08 23Shoot: Standing Against Flower Wall
06:47 24Composite Pieces: Hair
05:31 25Shoot: Overhead on Flower Wall
22:22 26Adjusting Images With Composite Shots
07:25 27Color Theory
11:40 28Capture One: Image Selection and Color Toning
19:42 29Moving from Capture One to Photoshop
17:01 30Compositing Hair
15:52 31Healing Brush Tool
06:42 32Dodge and Burn Tool
08:14 33Liquify Tool
12:01 34Adjustment Layers of Color Toning
35:05 35Blending Modes
10:44 36Channels and Channel Mixer
05:16 37Selects for In Studio Image
08:57 38Compositing Background
13:58 39Compositing Additional Elements
09:49 40Gradient Maps
15:51 41Color Toning with Controlled Light
21:32 42Adjust Skin Tones
17:27 43Retouching Skin
17:12 44Spot Healing Brush
06:11 45Clone Brush
03:47 46Dodge and Burn
18:49 47Sharpening
10:42 48Critique
15:40Lesson Info
Color Theory
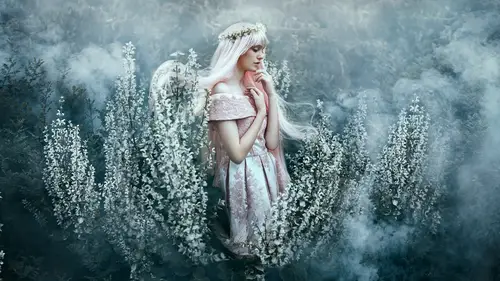
These are complimentary colors. We've got the color wheel over here. The color wheel is split into I think 12, 12 colors. You've got complimentary colors on opposite sides of the spectrum. We can see here that oranges work very beautifully with blue. Reds work very nicely with greens. You can just use that information to color tone your image. When I was color toning this particular photo I wasn't actually-- I didn't have a color wheel by my side but I did know what colors went nicely with the other. When I set up this scene I had several smoke bombs and I remember thinking the orange one would work in this scene because there's a lot of green heavy at the bottom. So, it might be a nice green and orange photo. When I edited this photo I actually amplified the orange to suit a shade that I really wanted as well. I wasn't just happy with the shade that was in front of me. I actually used Photoshop and my skillset in Photoshop to really tweak the nuance of that orange so that I felt that ...
it worked very beautifully with the green below it. Do you feel that whenever you study and work a color for so long it gets ingrained in you eventually? It does. Yeah, so I think it's actually helpful having a wheel like this by your side or like in front of you on like a board or something just so that when you are color toning you just have an idea of what works beautifully together. We're gonna go through five of these. This is the first one and we're just starting off very light. The next one is when three colors side by side work beautifully together. We can actually see an example of this in this photo that I took of my friend Sally in a lake. Again, I had this wheel in my head anyway. Just because I come from a very painting-- Well, a very painterly background. I used to paint when I was younger a lot. In art class they-- You know, we had to kinda know this. When it came to photography I think I just brought that knowledge with me. When I was going through my photos it was very interesting to see how much of that knowledge I had brought with me that was just lurking beneath the surface in my subconscious. This has three shades predominantly working with it. The light blue, the dark blue of the lake, and the green of the foliage around her. I use a lot of neutral tones for the girls whenever they're wearing dresses, whenever I had the choice. That's why yesterday I-- Not yesterday but earlier today I did say that if you're gonna buy something for a dress or a prop then make it a neutral tone. You'll get a lot more wear and tear out of it. I think the white ties it together and then I actually amplified the light on her face as well a little bit, so that it connected to the white of the dress, tying that scene together a little bit more. Predominantly the colors you see are three in a row. This picture will work. I guess any picture that you color tone will also work if you pick like you know for example the greens, yellow, and a little bit of light orange or like go in the other spectrum where you've got three different shades of purple. So, if for example if you're shooting a fashion tutorial or something like that or something where you can be a bit more color playful this might be something that you can consider. The next example I have over here is split complimentary. That is when you have two colors with a color in between and then the color opposite. Well, basically imagine those dots going different ways around the circle, but essentially you pick three colors that work really beautifully together. In this case I had the deep-- You can't really see it, but I did have some deep purples and then the orange in the-- The purple's in the shadows in the background. The oranges of the leaves and then the pink-- The greens. Yeah, the greens of the foliage below her and around her as well. I felt that those three colors worked really nicely together and actually made this image stand out a lot more as well. I also like to subdue my background sometimes. You can actually see that in this case where the background is subdued and the real highlight is really just on the model and the subject as she wanders in the scene. That's where I wanted the viewer's eye to go. The photo after that is one that I took in L.A. and this shows an example of triadic color toning. I've got the purples in. I've put the reds in her kind of hair and also the shade of kind of red hinted in the tail. We've got the blues of the water and then we've got the orange in the sky. Those three work really nicely together I feel. Now, did this happen as you were shooting or did you manipulate anything on this? This was manipulated in post. Yes, so I mean, I kinda of had a feeling that the orange and the blue would go very beautifully together, which is why I paired the blue with the-- The blue of the dress with the orange of the skirt, the tail. But I also picked the blue because it connected with the water. And then the red headpiece or orange red headpiece connected with her hair and the tail as well as the sky, 'cause we were still shooting in the sunset. I did amplify the sky a little bit more as well because in post production you have that control. You have the control of the shades that you choose. You can really push and pull them. And what's interesting is what I notice about your work especially this piece was that aside from the color palette you picked you always use neutral tones within the image to break it up as well to let these colors stand out. Like the mermaid was on a really neutral rock. That's right, even the rock behind her is neutral and the waves have white in them and there's a little bit more white in the sky as well. It really does break up the image a little bit more. Again, it's all about balance. So, it's the same way that when you're putting a scene together with a model or any scene you always leave a balance. That's pretty much what I do with my color toning as well. If I feel like something's a little bit too strong on one end I'll just open up a new layer and calm it down a bit, and then review it and then go forward from there. The last example is tetradic. Is that how you say it? I think so. I'm gonna quiz you on every one. Tetradic I think. It's perfect. (laughing) This is where you have four tones working harmoniously within a photo. In here when I was shooting this photo I actually could see the scene in front of me. That was really magical. She had a red cape which is why I set off a green smoke bomb. That's something that I chose very deliberately because I did know that red and green go quite nicely together. I anticipated that image would end up being very red and green heavy, heavy image. When I was editing in post production I noticed that the greens worked very beauti-- The greens in the foreground, which is a different shade worked really beautifully if I turned the green of the smoke bomb into a more bluey tone. I also noticed that there was a street lamp right above her and that was casting an orange glow in the corner of the image adding a sense of interest. All of those elements together, I felt made for a really striking photo. There actually isn't much neutral in this photo as you can see. There's no white dress. There's nothing like that to break up the color. The only thing that is neutral is her face. That's light, bright, and open. That's because that's where I want the viewer's eye to go first. Whenever I edit I always consider where I want the viewers eye to go and I edit around that kind of concept in mind. It's never where like let's just jump right into it and see it overall. I'm sure that works for a lot of people, but my personal preference is that I know that I want the viewer eye to go on the model, maybe her expression and then I kind of work my way around that concept. Does anybody have any questions from the audience about this topic before we go on to compositing? Yeah? Does the opposite approach work for directing the eye too? For example, making one part of the image darker, surrounded by more light areas? I think it depends. Essentially we're always drawn toward the light more than the dark and I feel like the light stands out more than dark. It could work in a very striking way. Yes, it really just depends how you do it. 'Cause then it's like a very contrasty photo, isn't it? At that point. I always think that we're just attracted to light. It's like when you take a step back from a finished piece or maybe take a step back from something in front of you visual, and then if you blur your eyes just a little bit, just have a look at where your eye goes to first. Or even another technique is just looking away and then looking at the photo and then just seeing where your eye goes to first. It's a really good indicator of what works and what doesn't essentially, when it comes to controlling the eye and I've noticed that my eye always goes to the brighter part of the image. One more questions from online and then we can move on. It's from Adam Bird who says, "Do you think of color "before you shoot or do you see it more in editing?" Okay, hi Adam. (laughs) I see it more when I'm editing, but I consider it when I'm shooting always. You have to, because when you're putting the styling together and when you're tying it together with the location, and the model, all of that does feed into the final. If it's aesthetically pleasing in front of you then you can amplify that beauty later in post production. If it looks a little bit mismatched in front of you then I feel that you're gonna have a little bit extra work and extra thought in post production. Ideally you wanna get things right in camera first 'cause it will just save you a bit more time and give you more room to play in post production, and you know you're on the right path as well. I think it's just a good habit to get into. But I do know Adam actually. I'm familiar with his work. He shoots with a lot of different types of, like one dress and maybe using it five times. So, yeah, there are ways that you can definitely manipulate the color in post production to suit your overall vision, but my personal philosophy is if you can get it right in front of you and get it balanced in front of you then yeah, you can take it any direction in post and you're on the right track. Yeah, so it's really important that we did that first so that everything we do now makes a little bit more sense too. Yeah, it's just a good foundation essentially. That's how I like to think of it. It's just like you got your base knowledge. We've covered that. We know what color schemes work and what don't work. Now we're just gonna play and actually the reason why I showed it to you is because when I was looking at this photo, looking at the shoot that we did on location, prior to it, I was very excited as you saw about the reds, the reds of the flowers, the reds of the dress and the green in the background was really striking to me as well. I know that red and green go very nicely together and when I brought in the colors such as the yellow of the flowers in her hair and the yellow in her hand, of the flowers she was holding in her hand I was thinking about color. That's all I was thinking about. I was thinking about the light and the color situation, what direction I could take that photo into in post production.
Class Materials
Bonus Materials with Purchase
Ratings and Reviews
Kathleen
Great class and great instructors. Genuine and informative. Practical tips to create stunning images. Seeing them work through the process from shoot to finished image was great and I loved that they shared the thought processes behind the creative decisions. Definitely recommended!
RoxSpiegel
Truly a remarkable duo. Bella is so down-to-earth and humble for a photographer with such a strong beautiful and ethereal voice. Her explanations of her process really inspired me--I was sketching concepts throughout the class. Pratik's process really opened my eyes to "smart" retouching--understanding what can be done in fewer brush strokes and slimmer PS files. All in all a really unique and inspiring class that makes me excited to realize my next conceptual shoot. They're also adorable together!
Mai Her
I've gained sooooo much from this I can't even contain my appreciation and excitement! So much inspiration and so much generous advice and tips to help me! Thank you so much Bella and Pratik and Creative Live!