Lesson Info
35. Intro to Color Correction
Lessons
Day 1
1Introduction
18:02 2Key Terms
27:06 3System Configuration and RAID Storage
19:22 4Q&A with Creating an Efficient Workflow
19:36 5Interface and Media Management
31:02 6Importing Media Part 1
30:40 7Importing Media Part 2
11:58Ratings and Keywords
32:21 9Reviewing Clips for Edit
25:13 10Importing Clips
19:26 11Editing an Interview Demo
33:20 12Replace Edit and Timeline Index
32:50 13Compound Clips and Auditions
18:27Day 2
14Editing Review
13:34 15Trimming Part 1
28:43 16Trimming Part 2
39:03 17How We Hear
21:51 18Audio Key Terms with Q&A
12:14 19Audio Basics, Meters, and Inspector
31:01 20Audio Q&A
08:55 21Dual System Sound and Audio Analysis
28:58 22Multicam Editing Part 1
27:08 23Multicam Editing Part 2
15:02 24Transitions Part 1
23:27 25Transitions Part 2
24:06 26Formatting and Animating Titles
30:18Day 3
27Additional Effects
12:36 28Editing and Trimming Review
11:58 29Changing Speed of a Clip
31:31 30Inspector Effects
36:35 31The Effects Browsers and Generators
19:37 32Blend Modes
17:10 33Effects Q&A
13:58 34Simple Effects
16:52 35Intro to Color Correction
18:20 36Video Scopes
19:25 37Color Correcting for Video
20:28 38Color Correcting Skintone
23:11 39Color Correction Q&A
08:54 40Audio Effects Part 1
26:20 41Audio Effects Part 2
23:08 42Exporting and Sharing
21:28Lesson Info
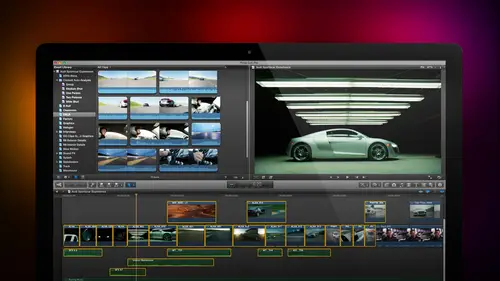
Intro to Color Correction
What I want to cover in this session is I want to introduce color correction notice the word introduced because it is a full time professional colorist and as ed will attest, you don't learn color in an hour and a half, a never ending process of self discovery. So consider this an introduction not everything there is to know about the subject. Part of being able to do color correction is an introduction to video scopes, how they work and how you read them, then we'll look at automatic ways to correct color, which are fast they're easy, they're not particularly great, but they will make your video look better than it does normally. Then we'll look at the color board, which is what apple calls its new color correction facility, and we look at how to correct contrast, which is technical speak for black and white, and how to correct color a limit of a math class first so r c p x final cut pro x uses a color space called rgb. Now rg b stands for red, green and blue and just by comparison, f...
inal cut seven used to color space called y u v well, rgb is actually better and more complete than why you ve and just so you can sound informed at parties high def video conforms to a color speck called wreck seven o nine there are four scopes inside. Final cut there's, a way for monitor the vector scope, the rgb parade in the history. Graham jim swears by the hist aground because he is a photoshopped guru. And for me, the history graham is one of the most useless scopes I've ever found in my entire life. If there was a vector scope inside photo shop, I would feel a whole lot happier ofthe way for monitor displays images based upon their grayscale value. The vector scope displays images based upon their hue and color saturation. We know everything we need to know about the grayscale oven image with the way for monitor, but nothing about color. With the vector scope. We know everything there is to know about color, but nothing about gray scale on lee. When we use the way for monitor in conjunction with the vector scope, can we actually accurately describe what any particular image it looks like? The rgb parade displays the amount of red, green and blue in an image and the history. Graham displays the distribution of pixels from dark to light, both the rgb parade and the history graham, our specialized scopes, which help us out a specific problems. But the rial, workhorses and video are the way for monitor for black and white and the vector scope for color. We talk about grey scale that's, the amount of lightness or darkness contained in each pixel, and there are seven regions of gray scale this looks at the the way for monitor inside final cut pro ten we talk about super white and white and highlights and shadows and blacks let me describe exactly what we're referring to super white are gray scale levels remember, gray scale is black and white grayscale levels over one hundred percent quite specifically refers to a grayscale value off one hundred percent at one hundred percent, the white value is legal above one hundred percent. The white value is illegal, it will work on the web, it will not work to tape it won't work to broadcast it won't work to cable highlights are gray scale values between about sixty six percent and one hundred percent. The upper third of grayscale levels, mid tones also called mids or mid grace. Our video levels between about oh thirty three percent and sixty six percent. The middle third shadows are video levels between zero and about thirty three percent now it's sloppy speech, but I'm afraid I fall into it, so I just want excuse myself now we often talk about adjusting flights and we talk about adjusting the blacks actually, what we're adjusting is the highlight information the upper third and the shadow information, the lower third because white by definition is one hundred percent and black by definition is zero percent. I try hard to clean up my speech because it's actually more accurate to say let's adjust the highlights and let's adjust the shadows. But I will slip today and I just want explain what the terms mean there's also an illegal level called super black. These are these are lad black levels below zero percent in final cut seven final cut seven clamped blocked super blacks. You can't get a super black level in final cut seven, but in final cut ten, the rgb spect allows it, and final content allows black levels to be squeezed below zero percent. This is his baddest white levels over one hundred percent. The general rule is you want to have all of here grayscale value between zero and one hundred percent, and we see those values based upon the way for monitor. When we are analyzing images, we evaluate the exposure, which is also called contrast, which is also called the grayscale value, which is also called the black and white portion of the image. Why should we call one thing one word? It would make it way too easy to understand. We evaluate the contrast before evaluating the color while changing one video setting always affects other settings, it's generally a good idea to adjust the grayscale settings first you want to make sure that both the way for monitor and the rgb parade are set to loma, rather than red or green or chroma toe accurately display grayscale values, and I'll show you how to do this. The vector scope shows color, but not gray scale. So just to reinforce again, toe analyze any image, you must use both the way form and the vector scope. We define color in terms of three variables, exposure or contrast, which defines its gray scale, its likeness or darkness color, which defines the shade, or the hue of color and saturation, which defines the amount of color. Now, I can't illustrate this on the whiteboard, because the ceiling is too low, and I injure my head when I stand up. But let me describe this for a second assume that I have a six inch in in the needle. The tip of the needle is painted pure black, and the head of the knitting needle is painted pure white and everywhere along the needle, from the tip of the knitting needle. To the head of the new needle is every shade of gray, from pure black to pure white, shading smoothly from one edge of the knitting needle to the other. Now, if I take this needle needle and I plunge it into a grapefruit and push it through the very centre of the great food. So the tip of the needle comes out the bottom of the grapefruit, and the head of the new needle is at the top of the great food. Now, every shade of black, white and gray runs through the vertical axis of the grapefruit from north pole white to south pole black. If I take a machete and I cut that grapefruit and I look at that grapefruit on its side, the great food itself is a circle at the very center of the circles that knitting needle, because that's, where I cut it on the kneading will now runs perpendicular to the center of the great proof as I look around the grapefruit there's, the color red right up there, magenta and blue and scion and green and yellow. The shade of the color changes as I rotate around the edges of the great group. As I move from the center of the grapefruit out, the color becomes more and more saturated if you think of color space as a grapefruit, where the height of the grapefruit between the north and the south pole determines its grayscale value. Its distance out fromthe center determines its saturation and its angle around the grapefruit determines it's you now you've got a really good example of what a color spaces and how we can describe any point in that grapefruit based upon where it is on the knitting needle, how light or dark it is, how far out from the center it iss its saturation and it's angled around the grapefruit, which is its color. Hume well, we don't use grape foods, but we do use vector scopes on a vector scope looks exactly like grapefruit that's been cut at the equator it's, a circle that allows us to see the hue and saturation of our image and the knitting needle. Although it's hard to put a needing needle inside the computer, that's what the way for monitor is the way for monitor describes pure black at the bottom, pure wide at the top of every shade of grey in between, as we look at all the different pixels that are arrayed on the on the in the image, and to do that, we're going to take a look at how we can work with color correction inside final cut, for instance, here let's, start with something really easy we're going to start with automatic color correction, which final cut calls looks here's a dramatic scene again it's from the john putsch drama called rob thirty two and we can change the look of the scene by clicking on the effects broads remember that's keyboard shortcut, command five and we scroll down until we find the looks category looks aura siri's of pre built color correction effects, which we can apply to our clip. For instance, something that's used in crime dramas all the time is a bleach bypass look grabbed the look grabbed the filter, drag it on top of the clip and all of a sudden we've got a much starker, muchmore harsh look, I'm not changing the way I shoot the video. I'm not even changing the way I edit the video. I'm changing the look of the video after the editing is complete so that the colors that I pick reinforced the story that I'm telling. For instance, here she is in a day pressed a depressed state, this serial killer about to explode in a rage. Well, that looks much more serial killer ish. The napped us, on the other hand, she's not really a serial killer, she's a ah housewife in the nineteen fifties and I want to be ableto have a black and white image, which is there somewhere, and I'm sure I'll find it so we just type the word black? Mmm, no, not there what's in the basic category, of course there it is and now this is a nineteen fifties drama of just before ricky comes home she has realised that the living room is a mess on a disaster is about to end well maybe it's not a nineteen fifties look instead I wantto have something which is a bit more oh I don't know a bit more romantic so I'll go down here and we'll find our romantic lead and find a spot but there's a good example grab the romantic look drag it on top and oh look at this she's got soft glowing skin glowing hair we go in for a close up and oh the whole image just becomes soft and anyway that's the romantic look but maybe we don't want to romantic look maybe we need something like this we want tohave it b o hot and desert ish so we're going to go find a hot desert glare dropped that on top of our clip it looks like it's baking under a summer sun well that's the advantage of looks is I don't have to understand what the actual color theory is that's going on here I simply have to find something that looks cool and apply it and probably the most classic example is this this is where the nefarious villain is driving up to a secret rendezvous rhonda's house plate meeting and they're going to have this meeting at night pump upon except shot at two o'clock in the afternoon so we grabbed the day in tonight filter drop it on top and now we have a suspension of disbelief off course. This is night. We hear crickets chirping. We don't hear any sound going by and to make this even more worthwhile. We're going to drop night vision goggles on here and now we are looking at our evil heroine about to have some sort of shenanigans at night being well, all this stuff who knows how this is put together? You just simply find fromthe looks older and dropped the look that you want on top of the video to give you a sense of a feeling for that particular scene, the cool thing about looks is there's dozens and dozens and dozens to choose from. They're all inside the effects browser all inside the looks category. We got twenty six different looks and it requires zero knowledge of color correction. All you have to do is sort of match the feeling with the look and you're good to go easy, simple, clean again, like any effect to get rid of in effect highlighted toe toe to click on it. Go to the inspector remember that's command for all effects are always at the top of the video tab or the audio tab of the inspector. Click on night vision hit the delete key that effect is gone click day in tonight hit the delete key. That effect is gone and there are settings that you can tweak should you want to inside any of these looks. So the benefit is simplicity is a virtue. Well, looks for the easiest because you just simply find them and you drop him on top of the clip. But we can get a little bit more detail by looking at some of the automatic features that are available to us inside final cut that are not looks. They're the next level of complexity up a classic example here is look at this. Train footage looks perfectly ok. This was shot by miles hale it's, a train layout in san st louis. But the problem is, look at the color of the gravel. Look at the color of the train engine it's leaning toward blue, green, blue, green, maybe a favorite of underwater photographers. But for us trained people, gravel is not blue. Green gravel has a nice rich color like that. What I would like is, I would like this sprain shot toe look like that train shot. I want to be able to match the color. Now if I gave this to add I said match the color he'd go poof poof poof poof! The colors would match in a heartbeat that's because he's got eight hundred years of experience doing color grading and knows how to read monitors and look att sculpts he's got a fifty five thousand dollars cover bored sitting directly in front of that runs with his feet it's an amazing operation I don't have access to feet that about talented so I've got to come up with plan b and this gets us to a menu that we have not looked at, which is the magic wand menu let's close the effects browser click on the magic wand if you remember we talked about enhancing the audio and this is where we were able to remove home, remove noise fixed the loudness, that kind of thing we can also match the audio we'll talk about that in the next section, but we also have the ability to balance the color and match the color. Let me show you what this means if I put my play head in a clip, I know this clip is wrong, but I don't exactly know how to fix it so I can go up to the file menu, I think and go to the file menu hang on well, I just find this for a second I can liken there it is analyzing fix I can analyze clips in the browser, but I can't analyze clips in the timeline, so what I'm going to do here is I want to select my clip go to the magic wand menu and say balance the color let's go click here and quick back again and save balance color it goes through and makes a good guess at what it thinks the color should be and if there's a person standing there with skin tone, it can guess pretty accurately but it doesn't really know what any of these colors are because there's no skin tone colors clearly it's better it's not as green as it wass but it's got a lot of magenta in it's not quite what I want balance color allows you to correct the problem without understanding exactly how to fix it you select balance color and the best way to do that it's a select the clip up here and then go to analyze and fix what analyze does when you select analyzed for balanced color is it looks at the entire clip and in analyzing it it says okay, this is leaning toward blue green and it will then look at the average color value southie entire clip and allow it to make changes when you go to the balance color option what happens when you don't analyse is it analyzes the entire clip based upon whatever frame your play head is parked in and sometimes that's an accurate frame and sometimes it isn't so you're always better off if you know that the clip is going to need color correction, selecting a clip up here, go to the modified menu, say analyze and fix and analyze for balance color first, but there's an even better way I know that this clip looks good. This is my source clip. I know that this clip looks kind of sick, so I'm gonna put my play head on the frame that I want to correct. Go back to the magic wand menu and say match color what match color allows me to do is to match the color ofthe any clip that's in the timeline or any clip that's inside the browser. I'm going to drag until I find essentially the same angle which is right about there and I click watch the right hand image. This is the the source, the original in to one click and now it's still not perfect, but it's a whole lot better than balance color was when I click apply match. Now, as I look at this, look at how muchmore close to real life, the colors in that blue green shot are when you compare them to the colors in the correct shot that we had before. Match color is an easy way to get your colors close. And when you're working with skin tones, it gets a whole lot closer than when you're not working with skin tones. Match color looks the characteristics of one image and matches it to the characteristics of a second image.
Class Materials
bonus material with purchase
Ratings and Reviews
a Creativelive Student
Absolutely one of the best & easy to follow teaching / learning sessions for this product. Larry has a great approach & insight into delivering a wealth of information from his years of experience that budding video engineers will certainly benefit from with a product that is powerful & great to use. I'm enjoying the journey to better understand & use this great product, expanding my experience in producing awesome video presentations. Great work Larry, & also huge fan of creativelive Keep up the great work you all do to assist budding producers in mastering their skills. Noel Blake Melbourne Australia
plb42
Final Cut Pro with Larry Jordan has been of enormous help to me just stating in FCPX. Larry has a unique way of getting the message on the basics across in an easy to understand manner. I have not yet looked at the entire course as I am practicing the steps as I go through the course. Many programs of FCP are not presented in the easy to follow manner thatL array does so well. I am 100% delighted with my purchase. I am in Sydney, Australia, and, due to the time difference it is impractical to view courses live. So I had to purchase on trust which in this case was a good choice. It would be good if Creative Live could perhaps rerun programs so overseas folks could view them at a convenient time. The courses still need to be purchased as I find it best to run it on another monitor and put what is taught into practice. Well done and thanks for the special offer in July.
a Creativelive Student
Attending this class was really a life-changing experience. Larry is a wonderful teacher and clearly on top of the program and methodology, and the way he structured the course, did frequent reviews and constant technique reminders (naming keyboard shortcuts as he did them, for example) really added a lot to the presentation. The depth of the class was very much appreciated, and his command of a complex subject showed that it was possible. I have wanted to understand FCP for several years and have only gotten the beginnings of a handle on it in the last 6 months or so. This class was an exponential knowledge upload and I hope will allow me to do lots of things I've only wondered about. I thought Jim was a good foil for Larry and did a nice job keeping things together, even when there was a technical problem. The value for me of being able to sit through the class before deciding to purchase was huge, and I am very much looking forward to reviewing the videos as questions come up. The class was very thorough and I didn't feel anything was being left out. Thank you so much for making it available.
Student Work
Related Classes
Final Cut Pro X