Lessons
Lesson Info
9:15 am - Top Deck
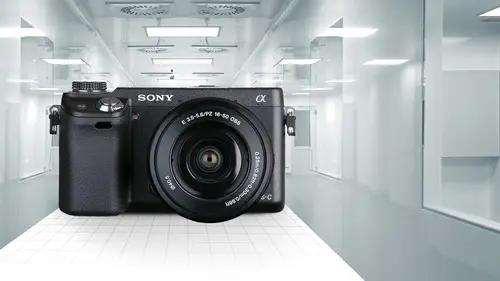
We're going to start with the buttons on the camera and we're just going to make a tour of the outside of the camera and talk about everything there is to talk about all right let's just start off with the super basics you're going toe on you you're going to want to have your camera turned on for the rest of the class now when you do turn your camera on the camera uses what's called a ultrasonic vibration mechanism to knock dust off the sensor so the camera is trying to keep dust off the sensor. You may get dust on the sensor even with that device and we're going to talk about cleaning the sensor later on in the menu setting so that's something to be aware of just when you're turning the camera on and off the controlled islands that silver dial below the mod ill on the top and so the main dialled to turn any time you want to turn something on or off for change a feature of something is that silver thumb dial up in the corner now you also have a control wheel on the back which is kind o...
f your secondary control wheel and sometimes they both do the same thing sometimes one does one thing and one does the other thing it's also a push tab so not only can you turn that back control will you compress it in as well now this camera has something called soft keys and a soft key is a key that does not have a hard defined function. It depends on what the camera thinks that button should be used for, and so it has softkey a and b, which are right next to the screen and then in the middle of the control wheel is soft keesee now what do those buttons do? Well, it's usually going to show you over on the right hand side of the display screen with a little icon or word to give you a shortcut as to what that particular button is doing in that particular motive, the camera so we're going to be using these controls throughout the day on a lot of the different features, so let's talk in particular now about the top deck of the camera. Obviously, the shutter release is where you're going to take your pictures. What you do need to be very aware of is that it is a two step device it's what you'll be doing that you'll be pressing halfway down to activate the light metering system as well as focusing. And so if you know that you're going to want to take a picture in the very near future, you would be wise to press down and kind of lock in focusing and get the meter in all taken care of before the picture is actually taken you will then press down all the way to take the picture you can leave it down to take repeated pictures and then raise it back up now the other thing is is that the cameron goes to sleep if you're not pressed halfway down and so if you just have your camera sitting on the table there are around your neck it's going to kind of go to sleep and tow wake it up, just press halfway down and that's something photographers do on a regular basis. The big dial on the top of the camera is the mode I'll it controls the way in which shutter speeds and apertures air set and sometimes a lot of other features it's arguably the most important control on the cameras so let's talk in depth about it. All right? If you want to follow along, you can turn your modi help along with it on the screen here, the intelligent auto mode is the kind of first standard most basic mode of the camera what's happening here is that the camera is setting shutter speeds, apertures it's turning on auto focus and is doing pretty much everything that you might need in a photograph. One thing to be aware of in this particular mode is that the camera is not popping up the flash this camera has a manual pop up flash will get into that a little bit later and so if you are in a dark environment, the camera will not automatically pop the flash up. That is something that you need to basically you need to make that decision on your home, and if you we're going to hand the camera to a perfect stranger to take your photograph, this might be a good place to put it. If you're going to let somebody borrow your camera for an afternoon and they didn't know howto work your camera, this might be a pretty good place for them to start because it's very simple. One of the problems with I I have with it for more serious photographers like anybody watching this class is that it locks you out of a number of features in the camera you're not allowed to go in and make certain changes, and my guess is that you are not purchasing or watching this class to have the camera do everything for you, and so you're going to want to move beyond the intelligent auto mode. Next up is the superior auto mode, which is even better than the intelligent auto mode in that it recognizes different types of scenes that you are pointing the camera, and so if it thinks that you are focused up very close, it assumes that you are doing macro photography or that you are doing something else that can see a range of light, and it starts making changes in the way it captures the image to accommodate these different settings. Where is an intelligent auto? It just kind of keeps it in a more basic, simple mode. Now, if you are in the superior auto mode, you can press down on that back wheel to get into the photo creativity mode, and you can have a little bit of control, not direct control over apertures, but you can have control over background d focus, brightness, color, vividness and picture effect, and so it's a way to just start playing around with a little bit of creativity. But the problem is it's really hard to lock in specific settings and keep them and have very tight control over the way you're captured your images. So I'm not a big fan of this mode it's kind of fun to kind of play around in here a little bit, but if you really want to take control of your camera and control of your shutter speeds and apertures there's still a little too much automation going on in here, next up is the scene mode, and in the scene mode it allows you to change a lot to a lot of different types of votes in the way that you do this is by turning that control dial up on the top of the camera and you can adjust the camera for specific types of scenes like portrait landscape and onward as you can see in the list here and if you were going to go run the neighborhood triathlon and your friend was going to take pictures of you well you could put it in the sports action mode for the day hand your camera off and the camera will be set in a pretty good mode for shooting a triumphal on type of that and as you go into different types of ah scenarios you could switch the scene mode once again the problem I have with this is that we have a lot of child safety locks on the camera where you're not allowed to go in and change a lot of the functions of the camera so I don't have a lot of fun in here because it's just doing too much automatically for me personally but it can be a very quick way to get pretty decent results out of the camera without knowing a lot of photography facts and information next up is a special mode it is for shooting panorama is and this one is kind of unique and fun and I do I do like this one in general and here's the way it works you can put it in the panorama mode and it is you sweep from left to right for instance, it will shoot a syriza pictures and stitch them together. We have a variety of ways. We have your standard right hand sweep. We could do wide right, which is a really long one. And then you can also hold the camera vertically and sweep so that you can get more coverage from top to bottom. And this mode works out quite well and it's it's kind of a neat added feature that we can do in digital that we were never able to do with film cameras in quite the same way. Now, how do you actually decide which one of these options well, throughout this class and notably right here, I'm going to show you a shortcut. So if you are watching this recorded you composite, you can take a look at this little box and go ok in the menu system. I want to go under image size and under the sub category of panorama you can go into image size in panorama direction to go ahead. And I set the camera up for the way you wanted when you turn it to the panorama mode and I will tell you right now in the panorama mode, I am a little disappointed with this camera. It tends to be very, very finicky when you are shooting your panorama, I know when I was out shooting these panorama is I would sweep left to right, and it would warned me that I was sweeping too fast so I would slow down. And then it was warning me that I was moving too slow, and then I was moving too fast, and I had to find this very, very small sweet spot of moving at exactly the right pace. And so if that's happened to you, you're not crazy in the cameras, just very particular about the pace that it is moving from left to right is your sweeping these panoramas, but it is ah pretty nice mode overall, so let's get into the more serious moments. P is for program, and the dirty little secret on program is that it is basically the same as superior auto what's going on here is the camera is setting shutter speeds and apertures, but the nice part about program is that it doesn't lock you out of a lot of features, so there's no child safety locks you can get in and control the features of the camera. One of the things that I like to be able to do in program is grabbing that control dial and spinning it to the left and right. And you'll notice when you do that in your camera, the p will get a little asterisk by it and what that indicates is that you have changed the standard program and you are setting a slightly different version that maybe has faster shutter speeds or more depth of field and it's a very quick way of letting the camera choose the basic settings, but then you have some final influence over the final picture and so program mode a little spin on the back of the camera take a look at the shutter speeds and apertures we will take an understanding of those shutter speeds and apertures to know exactly what you're doing, but if you want to have a higher f number like f sixteen that's going to give you more depth of field very good for a landscape shot you could be looking at the shutter speeds and going for a faster shutter speed for stopping action. But the problem is is that it doesn't really stay locked in as soon as the light changes or you move the camera to a different scene it's going to change shutter speeds and apertures on you so it's kind of a general tending of pushing the camera more in one direction or the other if you know specifics about what you would like to set with shutter speeds or apertures you're going to want to go into the next moz we talk about the next one is a for aperture priority this is where you get to set the specific aperture on the camera and the camera will figure out a shutter speed that makes this system works now this is one of my favorite ways to use the camera because you could have very specific control over your depth of field and or you could be looking at the shutter speed and just simply adjusting your aperture to get the shutter speed that you want and one of the great things about this is when you set an aperture of f eleven for instance it stays at f eleven no matter what happens it stays at f eleven and it will just adjust the shutter speed accordingly and so as they walk around tourist type camera for general situation where I don't know what my next picture is going to be, I'm probably going to have it in the aperture priority mode because no matter what aperture you have it'd the camera is most likely going to find a shutter speed that works and you do have to be aware of what that shutter speed is and that you can hand hold the camera for instance but it does a very good job in that mode. Next up is the closely related twin two aperture priety, which is shut her priority you get control of the shutter speed and the camera will figure out the aperture now I know a lot of beginning photographers air kind of drawn to the shutter priority more than likely, I should use the shutter priority mode for sports and that's, not always the case. The problem with the shutter priority mode is that your camera has a tremendous number of shutter speeds to choose from, but a limited number of apertures to choose from, which means that if you grab one of many different shutter speeds, the camera just will not have inappropriate aperture and you're going to get an overly dark or overly bright picture, so you have to be a little bit careful knowing that your camera is picking and appropriate shutters were appropriate aperture, for instance, right here, if I take my camera and let me just just display here, and if I set a shutter speed of let's, do something reasonable around a sixtieth of a second, I'm going to be able to shoot a picture in this case around five point six, but if I decide to set a shutter speed of one two thousandth of a second, my camera blinks, my aperture, the aperture setting and the whole image gets very, very dark because it doesn't have enough light in here to shoot at one two thousandth of a second, so you do have to be very aware of your displays when you are shooting in cheddar priority. It can be a very good mode but you have to be very careful about using it finally let's get to full on manual let me switch my camera emmanual now in manual you get to set the shutter speed you get to set the apertura you get to do the light reading and you get to pay the consequences if you make a mistake but the great thing about manual is that everything stays exactly where you said it no matter where you point the camera well you are working with manual you were going to want to take a look at your light meter now we're going to take a closer look at this later but either on the back of the cameras the lcd display or in the viewfinder you're going to want look down at this little m m for metered manual and it's going to have a little plus and minus in there and if you are on the plus side you are overexposed if you are on the minus side you are underexposed and you will need to adjust one of the settings or the other settings in order to get to a proper metered exposure and I have the camera in the manual mode and I can see down here that I am at minus two so what I'm going to do is I'm gonna turn the back wheel to change my shutter speed and now it's getting darker which means I'm going in the wrong direction, so let's go down to a lower and lower shutter speed and just by looking at the brightness, aiken, get a general feel for whether I'm under exposed are overexposed, but down here where it says, mm, very small, what I'm looking to get is a plus minus zero, and I can see there that I am at a proper exposure and so that's, what you're going to be looking at in order to do this. So it does take a little bit longer than aperture, priority or program or many of the other modes, but now that I've got it locked in, I can shoot several different pictures. I consume the lens around a little bit let's where's her assume there's a resume and all of these are going to be the correct exposure in that case. And so that's, what you'll be looking at, we're going to talk more about the display and how things show up in the viewfinder in a slightly later section. So that's the manual manual setting and I like that for any time you are taking a picture of a subject multiple times under the same lighting. So for instance, if you're going to go photograph a basketball game in a gymnasium, and the gymnasium lighting is not changing and the players are in a well defined area the basketball court you could figure out at the beginning of the game before the game started and appropriate cheddar speed inappropriate aperture and esso and you could leave it there for the entire game and that's very nice because once you get it set right you know it's going to be right for the rest of the game and so any time you're shooting lots of pictures of the same thing I like to go with manual it's when every picture is different you're walking around disneyland or the park and every picture you take is slightly different in a different environment that's where I think aperture priority or program are really good notes to use so maybe I could do a quick check in on questions here to see if there's anything regarding questions about the exposure modes we have just one kind of general question john from p m o nine zero two one oh I was thinking about getting the any ex dash six but want to know what comparable options might be for example I purchased the cannon g sixteen the familiar with that one that was and was trying to figure out how those would compare right so the g sixteen is a very different cameras about the same size it's not that different in price but it has well I guess the g sixteen that's, right? Just got to remember my candid cameras there for a moment the g sixteen has a much smaller sensor and it does not have interchangeable lenses and so I think for quality of image this is going to be much much better than a g sixteen g sixteen is goingto have more zoom range than the kit lin's in this case but you can add different lenses to this camera size does become bigger but I think overall this is a much better camera that a kennedy sixteen ok fantastic and then filmmaker would want to know is there a way to change the exposure range in hdr mode exposure range there dude dude dude I'm trying to remember on this one real quickly I will be covering that in later section and I don't recall off the top my head because I have it on my secret notes okay great so filmmaker please stay tuned we will be covering a little bit more on hd are a little bit later this afternoon all right let's make our way back to the top of the camera and one of the things you will notice about this camera is that there are not a lot of buttons on the camera so this is not going to take too long to go around the camera talk about different features on the top we got our on off got her shutter release we got our mode button and finally we have our function button and the function button works a variety of things, so let's talk particularly about that so when you press this button down what's going to happen is that you're gonna have a number specifically six different options pop up on the lcd now this does slightly depend on exactly what display mo jewry in, but in general you're going to have six different modes back here, and one of the things that sony has done better than anyone else is put on a really nice function button here because we have six different functions down here at the bottom, dealing with focusing, focusing modes, focusing area white balance, mita ring and picture effects. But you can change these if you want, which is the beauty of it. So once you press down on the function button, what you will do is you go to the back wheel and you'll just go from side to side to select a different option, and from there you can go up and change the different options on it. So for instance, in the first focusing option, the way it comes program from the factory you could change from manual focus to auto focus would to something called de imf, which is a way of manually focusing and auto focusing at the same time we'll talk more about that a little later and so you can figure out six of the most important functions and features that you use on a regular basis, and you'll be able to go into the set up menu that we will talk about a little later, but you can jump there right now if you want under main settings is something called function men function menu settings, and there is going to be a listing of six options in there, and with each of those six, you can dive in to this long list right here and choose one of those items to fill that spot of those six options within the function city. And I think this is a really good system because the camera doesn't have a lot of direct button controls on the top or on the back of the camera, and this allows you very quick access to a number of different features. I would. I wish other manufacturers would follow this because this is something that sony has definitely done very well and so very good customization. We'll talk more about this again when we get into the menu set, but the camera comes program with specific features here we're going to talk more about these features as we get through other sections of the camera. Next up on the top of the camera is this funny little mark that looks like a ufo or saturn perhaps and it's where the focal plane in the camera is sometimes in macro photography or with particular types of shallow depth of field lenses. You need to measure the distance from your subject to the focal plane and that is the area that you want to measure to on the cameras just a little little geeky indication of that sensor area next up we have the built in flash as well as the hot shoe which sony likes to call the multi interface shoe because it is super fancy if we look at the camera from the back side you can kind of see in to the multi interface you and you can see some electronics in there and they have stuff some electronics way up at the front so that they can have some very cool accessories that plug into their that doom or than just fire a flashes we will see in a moment but let's talk a little bit about flash if you do want to use the built in flash you do need to press the button and the flash will spring up word very quickly. It's got a pretty powerful spring in there and then you just gently kind of push it back into its place when you want to put it away so it's a it's a manual option to turn the flash on and turn it off now, within the flash mode, there is a lot of different types of ways of using flash, and we can go in to the menu system and change the way the features that we have for the flash. For instance, fill flash is having the flash fire when there's, normally enough light to take a picture without a flash, but you want to fill in the shadows with a bit more life. Slow sink uses a slower shutter speed so that you could have a blurry background, perhaps, and using the flash to stop the action of your subject. Rear curtain sink is where the flash will synchronize with the rear curtain. Remember when we talked about the different, too, the curtains in the camera, and this way you get trailing light from a subject that is moving through the frame is in the photo that you can see there in the lower right hand corner. You can also use this camera with a wireless off camera, multi strobe system, and this is something that you would do with other sony flashes were not going to get totally into that, because that's more of a flash feature thing, but it can do it, and the camera also has a red eye reduction notes. So if you take pictures of somebody that has red eyes you could turn on the red eye and reduce the amount of redeye or may be eliminated in a particular photograph. Now as much as I dislike red eye, I do not like red eye reduction and it is for the simple fact that there's a lot of very bright bursts of light that happened. It delays the timing of the actual shutters so you kind of miss important moments and it could be very, very distracting. Having this extra light and red eye has been something that has been pretty easy to fix in post, so if you have something like light room or a photo or a lot of other programs, you can just fix red eye with the click of a mouse and so you can do it in camera but I'm not a big fan of it now how do you do all this well in the menu, which we will get maurine detailed later there is a flash mode under the camera setting in there where you can go in and select the different modes for flash. Now the red eye in particular can be turned on and off in the setup menu undershooting settings and you might be wondering, well, why is it red eye reduction under the flash mode in the camera menu? Why would we put one sitting here in another sitting in a completely different setting? Well folks, the menu system on this camera is not the most clear system it's kind of strange, and we will talk more about it as we get into it, which, if you do get the class and you get the hand out, you get this one page of the entire menu setting, and you can scan the entire page very quickly to help find all these venues. So this will hopefully help anyone who was kind of wondering where everything is in the menus but staying with us. And we will get to that section in this class and just one other little footnote here. When it comes to flash, the top flash synchronization speed the fastest shutter speed you can use when using flash is one one sixtieth of a second. So if you are hooking up a flash, if you are using a flash and you can't seem to set anything faster than one hundred sixteenth of a second there's, nothing wrong with your camera that is just the maximum shutter speed with flash on the camera. Yeah, if you are not satisfied with the built in flash because it's not powerful enough or it's not versatile enough and it is not very powerful, it is good only for things directly in front of you. Sony has a few other flashes that you khun purchase from thie h v l twenty a m is not much more powerful than the camera it's about twice the power which sounds like a lot but it's really not that much more powerful than the camera's flash that one's going to sell for about one hundred fifty dollars they have a large flash which seems a bit overkill for this camera but it is significantly more powerful and this one's going to sell don't have it down but I think it's around four hundred bucks for this flash and if you recall that multi interface you what we're going to able to be able to plug in other types of devices. So for instance, if you shoot a lot of video there is a hot light that you can get this one sells for about one hundred twenty dollars and provides you a nice steady stream of light for shooting video now it's not good for a large distance it's only good for mainly things that are maybe within about eight feet or a couple meters from the camera using the multi interface you as well is a stereo microphone. This is going to sell for about one hundred twenty dollars and if you showed a lot of video and you're in audio and you want a really good sound well you can't use the microphone built into the camera because it's catching all the noises of the zoom and the focusing and you holding the camera for you want to get that microphone off of the camera or away from the camera and mounting it upon the hot to the cameras. One pretty simple way of doing them. So those are some of the accessories that you can put into that hot shoe of the camera.
Class Materials
bonus material with purchase
Ratings and Reviews
a Creativelive Student
I'm a great fan of John Greengo and own NEX-6, hence I bought this course. Managed to learn quite a few tidbits here and there even though I've been using this camera for a few months. I disagree with one thing John mentioned though, which is Long Exposure Noise Reduction (LENR). John recommended disabling LENR as he prefers doing it in post. But LENR is not something casually done in post, and it's still best to do in camera, and it will affect even your RAW files. Unless you are shooting something time critical e.g. fireworks, time lapse, etc., then I would suggest leaving LENR on.
Karolina
I'm writing this review long after the class was recorded. I own a Sony Nex-7 (significant camera setup overlap with Nex-6) since 2013 and even now found the lessons useful. Most importantly, it reminded me of the DMF function, that I've never really put in practice, which will most probably change. I love that camera! Thank you John and CreativeLive team :)
a Creativelive Student
The class is quite comprehensive and easy to follow. I'm learning something new everyday with my new camera. Thanks!
Student Work
Related Classes
Camera Guides