Post Production: Liquify and Selective Color Part 2
Lesson 28 from: Family Photography: Capturing ConnectionJulia Kelleher
Post Production: Liquify and Selective Color Part 2
Lesson 28 from: Family Photography: Capturing ConnectionJulia Kelleher
Lesson Info
28. Post Production: Liquify and Selective Color Part 2
Lessons
Day 1
1Introduction
16:55 2Psychology of Parenthood
20:59 3The Power of a Story
14:45 4Composition and Color
27:50 5Psychology of New Parent and Connecting
28:26 6Pre-Session Questionnaire
33:31 7Posing Basics for Connection
20:40Shoot: Parent Pose with Newborn Part 1
41:02 9Shoot: Parent Pose with Newborn Part 2
32:06 10Shoot: Toddler and Newborn
12:17 11Shoot: Parents with Toddler and Newborn
22:27 12Shoot: Parents with Four-Week Old
31:15Day 2
13Connection with Yourself and Creativity
19:20 14Your Inner Critic
11:02 15The Five P's of Creativity and How to Steal
33:11 16Parenting Themes
15:00 17Prepping for Concept Shoot
12:13 18Frozen Themed Shoot: Mother and Newborn
27:17 19Frozen Themed Shoot: Mother and Daughter
16:01 20Concept Shoot: On the Ground with Newborn
28:36 21Concept Shoot: Mother in Water
15:46 22Shoot: Dad and Newborn
31:31 23Book Concept Shoot: Dad with Daughter Part 1
21:20 24Book Concept Shoot: Dad with Daughter Part 2
19:18 25Closing Thoughts with Q&A
13:10Day 3
26Post Production: Skintones
25:57 27Post Production: Liquify and Selective Color Part 1
27:18 28Post Production: Liquify and Selective Color Part 2
33:48 29Post Production: Concept Shoots - Winter Theme
14:28 30Post Production: Book Concept Shoot Part 1
26:30 31Post Production: Book Concept Shoot Part 2
27:03 32Printing and Self Mounting Fine Art Piece
29:20 33Photo Mounting Demo Part 1
14:59 34Photo Mounting Demo Part 2
38:56 35The Buying Mindset
25:39 36Marketing Fine Art and Hospital Contracts
21:05 37Pricing Fine Art
16:08 38Wrap Up and Review
17:36Lesson Info
Post Production: Liquify and Selective Color Part 2
And I want to definitely show you guys remember having one was confused yesterday when I flip the mama and they're like but she's all the wrong so I don't know I'm going to show you what I did teo come back that and the rule is with that if the light's coming from the same direction you're okay, okay? Now if the client has a very distinguishing mark on one side of their face like a birthmark or something, if you then you've got a problem because you're going to be flipping stuff and it's not going to be them necessarily, but in concept work I have no problem doing that because it's not really about what the subject looks like it's about the story were trying to tell with them okay, okay, so let's do that let's go to this mama here okay? We're going to play with this image babies lots of colors so white balance is pretty good its a little underexposed do you see that it's not bad, but it's a little bit underexposed first thing I'm going to dio is enabling profile correction since I used...
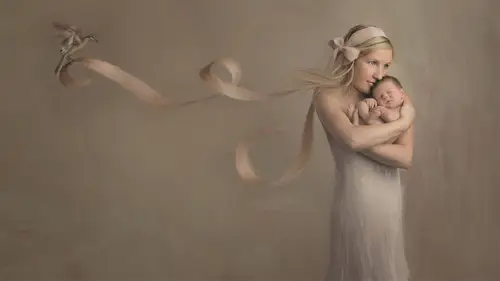
eighty five millimeter lens look how little it did to fix things there's wasn't much to fix because that lens is such a beautiful job and not distorting things ok by the best class you can get you can afford, I shouldn't say glass is I bought this lens a year and a half ago and I when I bought it I was like why the heck did I not buy this length three years ago it makes your life easier okay really does the tool and it and it will last you much longer than your camera body so before you go out there and decide oh I need a new camera body get a lens first okay okay so I'm going to go back to my basic settings I'm going to improve my exposure just to touch bring down my highlights I'm just kind of talking through what I see highlights got a little hot so I'm gonna just close down a little bit I'm not worried about baby at the moment increased my clarity just a touch you know play with white council of it it looks a little bit warm to me here we go and for you guys here in the studio audience this monitor is a little different than what I'm seeing on my screen it's calibrated to go out to the internet so just keep that in mind but the folks on the internet I do believe we're seeing exactly what I'm seeing on my screen so just sorry guys but note that okay ok so then I'm going to go again into my to saturation remember playing with the red just going to make those little bit smaller okay so reduce red's just attach can you use a lot seeing much read there is in baby oh, I mean luminous sorry I'm in luminant okay, look at all that red dead baby that disgusting but this is a huge lesson do this with your images because that'll teach you where the reds are it'll show you where the color is nicole okay, so it'll help you visualize eventually as you do this more and more you'll just see it like oh yeah there's where the reds are but in the beginning I want you to kind of play with a little bit I mean, I could take this too far in a hurry I'm not reducing that was read by much at all oranges there's a ton of orange in the skin look at that orange is everywhere. So I'm going to be really careful about now not reducing the oranges too much because I don't want to compromise the image, okay luminant I can increase the limits and my reds just a touch to kind of help me out a little bit. I wanted to that mom's lips got a little bit annihilated with thea we'll just leave that that looks pretty good obviously it's not perfect I can't make it perfect in raw because these air global changes so I'm going to open my image he's doing all right over there now I can do a couple of things I can either start working on the skin and you a selective color adjustment and work on these reds and start bringing down the magenta sze in the red's a little bit or when I do that I start affecting mama a lot too, and mama skin tone is pretty good at this moment so here's what I'm going to dio instead of doing a selective color adjustment across the entire image, I'm going to start selecting just the baby okay now it's really important that you do this with a feather and nicole this is going to answer your question about how to make it blend and not be so oh let's fix magenta let's think yellow let's fix red ok, so and baiju plicating your layer you could really help yourself by only working on certain parts of the image. Okay, so I'm going to be like overkill on non destructiveness here so you guys can conceive what I'm talking about, but I can go in and fifty pixel feathers probably too much I should probably just two twenty okay, I'm going to go in and just loosely run my little walkom tablet around mama and baby, I don't have to be super perfect about it because it's feathered okay, you will know really quick if you haven't vetted it, it'll be like a strong line around where you selected, ok then I can now hit my selective color adjustment tool and it automatically applies a mask for me so now I'm just working within my selected area do you see that? So I'm obviously reducing the magenta and the reds on just the baby's body okay if I just do it a little bit look how sudden everything's starting to correct okay? You see that see how things are starting to match more and I can go into this mask that I've created you can see I started to do it a little bit on mama here you can see that it's too much I can hit my brush tool use my black or white to just remove it off mom right there like that little area right there that maybe was too much okay, but make sure it's still stays true on baby and this is really only a major concern if you're blowing up big okay if you're just doing a small area image no one's ever going to see that so work according to how you're going to finish it how you're going to display it okay or send it out there as a finished product okay, so you could do the same thing with um with magenta tze and yellows or whatever so if you had a really jaundiced baby if I wanted to go in here say I'm like how shoot I want to get that selection again press command and hit the mask and it'll re select what you just selected so I can go in and do another selective color adjustment on just that area that I picked us if I want okay so say for example this is actually turning out pretty well go back to my my my layer here it may be the baby's head was yellow I would just select the baby's head with a nice loose feather. Okay, now I can go into another selective color adjustment this time picking my yellows and reducing the magenta is within the yellows teo like add more magenta to make a john just baby a little more pink produce the yellows in a john just baby okay, reduce the yellows within the yellows if that makes sense so yellow oh there's yellow and yellow take out that yellow please let's make it a little pink here a little bit more rosy that makes sense so the colors that you're going to use in selective color nine times out of ten are reds one time out of ten yellows and point five out of ten magenta has so play with these three channels and futz around with it and see what happens to images you and sometimes it's just a matter of playing until you feel it until you see what's happening and then when you get a really bad jonah's baby and you fix it by using yellow channel or the yellows within the reds you'll be like oh my gosh okay, that worked on that baby let's try to get on this baby but those are the colors in skin tones so those are the colors will be working with the most that makes sense that maybe doesn't really need that adjustment that's ok, I just want to show you what I was saying okay? So baby actually looks pretty darn good compared to mama it's a decent decent playoff here okay on this screen you guys mama looks a little bit more washed out that she is on mine. Okay, so now I'm going to smash my layers me little destructive editor that I am okay? And now I want to start working on mama and we're gonna liquefy she doesn't need it hey, beautiful mama, but I see some things that are bothering me that I want to fix. This is where the details get into it. I really want you to focus on the details when it comes to editing so I'm gonna go in to liquefy this little hair right here is bugging me. I just want and notice how I'm pushing outside of the pixels hair have to be very careful you could mess apparent hurry with liquefy okay, just be gentle with it don't try to move it too much or you'll make the hair going doll long qi and it doesn't fix like it's really impossible to fix it or it takes forever so the biggest advice I can give you with hair is to get a nice big brush and start pushing out here to get it to go in don't make a small brush and go in here because it'll just won't mess up and then you you're like, okay, how do I think the end? It'll all be you'll screw yourself over, so don't do that. All right, then I can also kind of bring in her neckline and her shoulders down just a touch being in her waistline if I wanted to just a touch all these little things, things begin to add up and notice I'm annihilating her elbow so I'm gonna go ahead and reduce the size and just bring that back up a bit okay? So notice when you futz with one thing, you'll end up screwing up another, so don't be very aware of what you're doing when you're working liquefy and what other areas you're affecting cause all it's doing is pushing pixels okay don't even bring that hand in and I've even fixed baby's head before conehead ok, you can fix go ahead, just I mean, everybody thinks, oh, I can liquefy the baby sure, why not? I can liquefy a blanket yeah, why not? You never buy anything it's just a matter of pushing pixels around, so I kind of figure out what you want, what you need to move and as you shoot just like emily, it was emily. Did you say that I forget about you? Find that maybe was joan was joan, you find that when you start bringing photoshopped, it makes your shooting better. So you'll start thinking to yourself, when you're shooting a baby wrapped in a potato sack rap, you'll go, oh, I can liquefy that, you know? And so if baby's struggling around but it's, a really cute shot their face, but their arm was like this, but wrapped up tight in the blondel you go, we'll liquefy and make him look like a tall, cute little cocoon again. Okay, so looking guy is your best friend, in my opinion, I don't think I have ever touched a face, maybe once this is a person's identity it's like your logo and your business, joe, mess with it because people know right away when you've messed with their face, the on ly thing I will do is a double chin, as I will attempt to do that. Double chins are not easy to fix, it requires to liquefy and the patch, tool and portraiture because you have to not only deal with the shape of the edge of the pixels but you also have to deal with the shadow lines and highlights that are caused by the fat folds in the double chin so I really try hard when I'm shooting to not get a question that's what you always see me going up chin up, chin towards me it feels weird, it looks great feels weird looks great. I tell my clients that all the time it feels weird, but it looks great and then they trust that that is the case and not and also the other thing is shooting from above. This doesn't look like I shot from above, but you guys know darn well I was standing still. The woman was six feet tall, okay, you must shoot down on your client's because number one it makes the you're not shooting up the baby's nose remember how I kept telling him bring the face forward, bring the face forward I don't want to shoot like that attractive what's in there, okay, you don't want to see that on a baby on a human being, I don't care what don't always shoot down on a subject we were shooting selfies in here when after the class is over and people were holding their phones, I'm like up higher, higher, higher, higher get the angle higher, I mean it's a matter of fact you guys all have your phones on you you know it's a good exercise take a selfie, go like that and go like that well, you know the boss you know you you do not want to shoot yourself down there it's like I mean, unless you're like seven feet tall and one hundred ten pounds you do not want to do this because it does not make things attractive especially with a wide angle iphone leads oh, okay, so be careful with that always shoot from above always shoot down the nose and bring the chin up because that's what keeps the double chin effect from from happening? Okay, okay let's go in and play with some other things here now mama skin this highlight here is really irritating the heck out of me it's a little too bright. Okay, how do I fix it? Anyone bueller? Any ideas? Do you ever use curves for the for that area? My head? I could kind of a patch to old junkie which isn't always the best method, but yeah, I mean you can highlight this with a feather and try to reduce the curves layer you could get out, you could mask it out, do that or use the spatula and curves I would probably start with patched because it's kind of a go to for me you're gonna think I'm crazy cause you're like oh my god she's totally has fallen on the wrong foot wrong to jay so I can kind of come in here and play around with this and you guys are going to like, you know she's totally hashing that up but I'm on a duplicate layer and I don't have a ton of skin to pull from so I'm just oh that looks bad you'll find yourself doing that you'll be like well that's not good that's kind of a hero but you'll see that you pulled from different areas and it helped you out a lot to kind of bring in different skin tones I'm hashing this you guys it looks terrible I know that okay but I'm on a duplicate layers to keep that in mind then when I could do is just go like this and all of a sudden it was much softer not nearly as bad okay then when I apply portrait to it it's going to smooth it all out and make the highlight pleasant but not distracting okay so that's a method kurds would work just find two like I said there's twenty ways that's gonna count photoshopped now spot healing brush tool this fool is probably my favorite tool of all especially the welcome look how big my brushes but if I just touch tiny little spot because I'm just barely touching with my walk I'm tablet where is with a mouse? You have to make your your tool as bigas a spot you're trying to touch in order to make it happen and you could do that with a walk on two you want okay but for the most part if I just kind of keep my tool at the place I want then I could just go in and just either touch softly or really hard and get the same effect without time to change my brush too all the time and it's pressure sensitive so you're doing it based on your art and how you like things to feel rather than you know what your mouse is dictating you d'oh these lines I will often sick same thing command j get him out of there and then bring it back oh, come on, come here. What did you do you do? Come on here we go on dh then bring it back a bit so it's there but it's not so glaringly obvious to mama so she has a smile line but it's not like oh yes my wine okay same thing with the eyes command j go back to the patch tool get her little dark circles reduced gonna look bad at first and then bring it back to about fifty percent there dodge tool the lips my poor computer is not happy with me right now come on, here we go the lips just make that highlight a little bit more so her lips glow somewhat ok same with the eyes I'm going to look for my own ten percent let's put a thirty percent I love those round catch lights you want to do it real soft at first with your welcome and then get a hotter spot because if you'll notice that highlight in the eyes when it's photographed really well the reason that's happening is because the eyes sphere and when you shine light through one end of it it's going to refract on the other side it's a natural occurrence okay, so I'm just accentuating what happens and actually when you put light over a convex kurt surface ok, so the light shines and clear surface or it's a translucent surface so I'm like that light shining through it creates that little that little counter catch light and if you'll notice an image is that it's natural and photographed really well it's hotter in the middle that it is on the outside so you want to kind of blend it and make that a little bit artsy okay, so same thing I can deal with babies baby's little frown line if I want I just duplicated my layer patch tool to kind of get rid of it not annihilated just soften it up a little bit and then reduce that and the baby all of a sudden looks a lot happier so I would probably run portraiture on mama just to smooth things over, unfortunately feel really bad that I don't have it, but let's do poor man's portrait you're out of that sound. I have a question real quick. Yeah, I know your last class you had used an action? Do you still do that, or did I decide? Because I can't I can't give it away or tell anybody where and how do you do it with the family portrait as well? Yes, and that helps soften things up and reduce the reds as well, but you don't need teo I mean a finished image out of camera that's done right doesn't need an action, it doesn't need an effect, it's just a style thing on and you will find a style that you like. I've found a couple of people who have really beautiful actions. Jessica drossin news I think that's the last time jessica drossin going to use some of her textures in the next segment jessica drossin and flora bella actions are all really nice to have more stylized looked them. All I can say is is don't always pull it back do less than you think you need to dio because there is so much over processing these days, and people use those stylized actions to hide mistakes and to hide. Errors in both shooting and in post processing, and if you learn photoshopped and how to get it right in camera, you won't need an action too. You will only want to use an action to create a look or a style not to cover up something. You sure your highlights in your shadows should still be perfect? You should have detail in your shadows and you should have detail in your highlights if you don't you're doing something wrong, okay? So I know high contrast images have a place like this ppt image that I'm doing has high contrast it's supposed to be that is supposed to be a little dark, but on a baby image that soft, since we you want lower, you don't want your blacks to be blown out black with no detail, same with your whites, so I think sometimes people apply these actions and it just annihilate there they're black and they're white and it's it's a shame to see, because the image itself is don't hide behind your actions, I guess is what I'm saying because I see a lot of that, especially in the beginner world, people who are just starting out they go, oh, it's pretty well it is, but study, yeah, tone it down. Take it down to most of the action that you can buy out there apply the effect way too heavy I every action I work with even my stylized action I reduce it below fifty percent I don't even let it apply that that much I mean I can apply it to this one I'll show you guys what it looks like I have it on here think I do yes newborn action where is it so it applies a lot of different looks to the image and to me that's too much it kind of over saturates everything a little bit and s o I highlight the entire thing group it and then pull it back to about fifty percent and to me that adds the effect without it adds the effect but without you know here I'll take it on and off it just it just makes a little bit of a glow but really is that the difference between it doesn't mean that the way the difference it's just the style thinks that's kind of why I wasn't really going to show up I was like I don't really do that much it's only it's a me thing that's what I like to do I want to teach you guys how to get the strong core value techniques that you need in photo shop and then apply those to your work because then in actions just the little cherry you put on the top okay, give or take it. Yeah. Okay. So when you were talking about the eyes and the lips and you kept saying dodge tool, is that just a blending mode? You're in good question. No it's in the tool palette. So on. But it was one of the first tools I learned. Not a brush. It's, not the brush. No, the brush tools right here. And there is a way to dodge in bern using the brush tool to what the art history brush to lush should say both, actually, but this is the dodge and burn tool. You see that here I will. I will do my little new trick here. This is the dodge and burn tool. Okay, this is destructive editing right here. I mean, I'm basically going in on the background layer using the dodge tool and annihilating the pixels is what I'm doing. Okay, so that's, why? I only do it, like on the eyes and on the lips and the little highlights because I don't wantto do it like on a face. I mean, I couldn't dodge tool nowadays is actually really good because of this protect tones feature up here. I can go in, and like I said, ten percent dodge tool is very heavy handed, I can kind of softly ad a little highlight to the baby kind of brighten up the skin there if I wanted to it is making a difference you guys can really see it on that screen there but um I I will occasionally use that if I'm in a real big hurry but just be careful and use it with this bearing hand because it's pretty destructive okay, okay um let's go ahead and say that and let's see is there anything else I want before we go into the next segment let's too so we covered liquefy we covered um skin correction cover backgrounds cropping just a couple little questions great. So from leslie welcome question. How are you quickly zooming in and out with the welcome I am a new user and I would love to know yeah again, huh? Yeah, and I didn't chat about that a little bit beginning, but I'll go over it again because I know this things take a few times to stick let me open up in there, mitch here so we can open little ezra I mean that's awesome or what? Anyway, okay, let me go into even abel lenz correction get my little adjustment is here gonna go real quick on this so we can kind of you guys saw that already, okay, so the zoom in and out on the fly command space and then just drag your welcome back and forth across your screen that's all I'm doing if you look at the big picture wise here camera over there, khun see me instead of being on my screen I'm just dragging back and forth on my walk on look de da la de da going bigger and smaller okay, it's a nice fast way to zoom in and out and then if I let go of the command bar, I get the hand tool and I can scroll around like this holding down the space bar and moved to different areas. Okay, so thes two tools I use all the time also control an option dragging will increase or decrease the size of your brush as well. If you go up or down, it will increase the hardness of your brush. Okay, sometimes I need a little bit of a harder brush when I'm trying to mask out areas like where sweater is instead of hair. Yeah, does walk him work for the pc, mac? Oh, yeah, yeah, welcome is actually in washington state. They are in vancouver, washington communications is the actual acronym wacom people call it wake um, it's actually walk washington calm so that kid from anyway cropping remember your power points notice in the crop tool look, power point, see it it gives you your tick tack toe box and you can make power points. You can make your subject going your power point just by cropping. Okay? And now I want you to see the difference between the baby on the right side of the frame. First the left doesn't it imply a little bit of meaning? Like you go hoo! It feels a little it's, ok, it works, but you're like, well, what's over there you re read from left to right it's it's a western habit so our eyes, our brains are trained to do that. So when there's nothing over there. Okay, so, um I went ahead and crop, this one is a long skinny because I liked it, so I'm kind of using to power points here on the left side I love negative space. I'm kind of a junkie for it, but you will see yourself cropping in artistic ways now. Okay, the other thing that I want you to consider when you crop is how close you are to the edge of the frame that you're cropping. So say for example, um let's do this one here was going toe really quickly do you need to do is actually pretty good opening image, okay, that's how fast you are in wrong if you get it right on camera yeah, that was five seconds and raw. Okay, if you get a rain can and you're spending so little time and raw and you get you get to go the fun part so I'm gonna go ahead. Just fix my background here I'm taking the marquis tool command teague and straighten that out. Go ahead, liquefy her. No, I'm you see my background. Just just move over there on the left side of the frame. I can fix it. Cropping notice how? In camera I put her head up by the top of the screen if I had shot her up here like this. Okay, I'm just gonna go ahead and have a lot of room toe edit this year. I know, I know. Stop! Stop complaining me. Go ahead. Just kind of just to show you guys what I mean by this. So look weird, but I want to be able to see it if I had shot in camera like that man's okay and work space above her head, right? So if I crop and because she's hitting down here she's grounded at the bottom of the image, if I tighten it in just a little bit, or even touch the top of her head there all of a sudden and that's why, I'm not sure if I like that part, but all of a sudden the image like things are if you're if you're touching down the bottom you want to be really close on top too does that make sense unless you're purposefully cropping for artistic notion cropping can really increase the composition of your image so like if you have a limb that's close to the side of an image on the right side that you don't want an awkward space on the left does that make sense you want to keep it relatively even if you have a really big like that image of little ezra there's a big space on the left on purpose that's different does that does that followed? You guys understand what I'm saying about copping I don't want to move on to more bad stuff so I'm not don't want to get too much but yeah bree this is a little bit of a print een thing and and I find this is hard for me because I do a lot of cropping in camera during the session and then I'm going crazy during printing if they wantto dio you know a rap and all of sudden I'm rapping half their head and I'm going crazy I'll help you fix that do I have the software for two hours just to get it shoot? I don't have the software on here on one genuine fractals are it's it's called a report it's called perfect resize now it's like one hundred dollar program I think plug in well it can be a pleasant or separate program it will take your image and start it for you in two clicks, so it'll what it will do is it extend your canvas by how much you want it so two inches two and a half inches however and then you can have the option to it'll create new canvas for you to wrap you can either tell it to mirror so it'll take the two inches on the edge and just flip it and mirror it or it'll stretch the pixels that when you wrap around the edge you have a place to go and it looks great I mean that's what most labs do when they stretch your campus for you that's what I use it looks fantastic so perfect resize is what it's called and I believe it's made by on one if I'm not mistaken and I think all the time when I'm doing campuses and even I sent in the lab I do that the other option is to have your lab or you put a put a color block around the edge but I want the actual image to rap so but yeah that's that's the solution to that and you could do it here and extend your campus and clone club alone alone alone alone what a pain hundred dollar program will save you I know that sounds bad, but they're the reason these companies come out with products is to make your life easier and if that hundred dollars makes you that much maurin time over time it makes you it gives you time saved that costs you money that hundred bucks is worth it if you're not doing a lot of gallery at campuses, don't bother it's not worth it. It will also below up images. It will help you in large images so you could take a smaller resolution file and increase the resolution to be able to print it to an extent it's called it was called perfect that's. Why it's called perfect resize because it will take us, you know, a three hundred dp I image at two thousand pixels and allow you to extend it to four thousand pixels by creating pixels for you. It helps you with, you know what I'm saying so I know that's not exactly the exact definition, but that's the gist of it. Okay, okay, so what I want to show you what I want to show you is what we're gonna be doing next. Um, I want to show you some things that I finished, so this is what I finished yesterday. I'm not entirely satisfied with it, you guys all know me so well I'm not entirely satisfied with it so I'm kind of thinking I want to show you how things flipped, so it works because everyone was confused yesterday when I was shooting it. I want to make sure you understand my thinking process and why this ended up working out, okay? And then the other thing that we're going to look at is the daddy image that we're going to look at the frozen image, which the finished product is right here, okay? It's very soft, ethereal, faded look, it looks a lot more faded on the screen that, um, and then we're also going to discuss the daddy daughter image, so we don't have a lot of time to do it all, but this is the image here, and I'll go ahead and take off. So this is what it ended up finishing toe look like, ok, so, um, if I was to do this for, like, competition or for a client, I would spend more than the hour and a half I spent on it. Okay, the two hour line up in two hours, but so keep that in mind that you know to me, I look at this and go it's not quite finished, but this is about learning this is about. Teaching you guys to do it. So I wanted to come up with something that felt finished. You guys. So you could see where the end result was trying to go. Okay, so we're going to talk about all about this next and how to do this, how to take these concepts and make them blend in with background of work, right?
Class Materials
bonus material with purchase
Ratings and Reviews
Natalia Malinko
This is the second course with Julia I have seen. And it's amazing and very inspiring in so many ways! I appreciate so much the honesty of Julia, her spirit for doing things she loves. Like a photographer and artist myself, I feel identified with her perception of world and the passion for artistic and family photography. This course is about never give up, it's about hard work, and also it's about cultivating creativity and honesty. I highly recommended this course to every photographer who want to grow and understand himself and the business of professional high-quality photography. Thanks, Julia and Creative Live, for this one!
a Creativelive Student
So glad I bought this class - well and truly worth the investment. This course has helped me realise why it is so important to make an emotional connection and how to use it to my advantage {while giving my clients the very best too}. I cannot wait to try some new printing/mounting techniques...so glad Julia was kind enough to share this! I got a lot out of this course and would highly recommend it to anyone wanting to take their newborn photography business to the next level.
Jenny White
This class was amazing!!! Julia does a great job of showing her process, how she captures beautiful images from start to finish. It was worth every dollar I spent!!
Student Work
Related Classes
Family & Lifestyle