Lessons
Class Introduction
12:53 2What Is Low-Key Lighting?
11:11 3Bringing in the Subject
05:01 4Lighting Patterns
19:21 5Lighting Patterns: Broad vs. Short
09:25 6Giving Your Light a Job
12:07 7How to Create Separation
06:58 8Shoot: Putting it All Together
08:34Developing the Raw for Low-Key
12:40 10Enhance with Local Adjustments in Lightroom
12:31 11Creating Different Interpretations in Lightroom
16:19 12Clean Up Image in Photoshop
09:11 13Dodge and Burn in Photoshop
11:00 14Liquify in Photoshop
09:40 15Adjust Color and Contrast in Photoshop
11:17Lesson Info
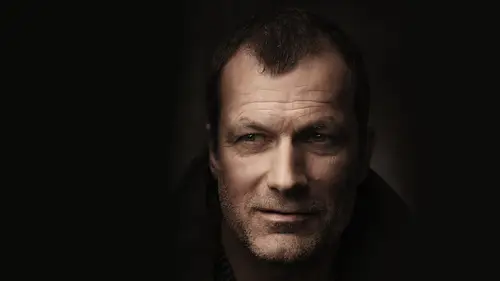
Lighting Patterns: Broad vs. Short
and the last part of these lighting diagrams are about broad versus short and broad versus short doesn't really work on on on Paramount, but in terms of light. Sorry. In terms of loop, Rembrandt and split, it's about the side closest to camera and whether that's in light or in shadow. And you can get this by you moving, you can get this by the subject moving or the light moving. All of these can be can happen based on those those different elements If you have broad, which we have in the left image If you've got broad, most of your subjects up the side facing the camera is going to be light. If you have short, the side facing the camera is going to be in shadow. And when you have shadow, you have more drama, right? Very self explanatory. Now so knows I haven't moved the light right. That's what we're gonna do. I'm just gonna show you how we can go with this light being in split to the front and how we're gonna change different lighting patterns very, very quickly. So I want you to do m...
e a favor. Turn your body this way a little bit. I don't regularly shoot the subject front on. It's usually very broad. It's about as broad as you can ever photograph someone. So a lot of times will have them turn a little bit to the side. Not all the way. Just about a 3/4. Why don't you turn your face back to me a little bit? Turn, turn, turn, turn, turn. Keep turning. Turn, turn, turn, turn. Keep going to the light. There, you a little bit more. A little bit more than a great Now what I've got right now is he's turning to the light a little bit, and I know my light is 13. Still, And so now what I have is a little bit of a short Rembrandt. Okay, It's very, very dark. We haven't really done much to modify those shadows, but you can see the delighting pattern on the face is very dark. I'm gonna brighten this up just a tiny bit. We've exposed for the highlight, so we know we have good exposure, but I'm gonna bring this up a little bit so you can kind of see everything else that's happening in the background of this image. and so you can kind of see where that light falls on him. And this is known as a short Rembrandt. Now, if I wanted to go to a, uh ah, broad, Rembrandt, I'm going to turn the face. You can keep the faces backward was I'm gonna bring the light around to the right side really quick. By the way, in case you're wondering, I am shooting on a cloudy white balance. I use a lot of warm tone images quite a bit, and this is totally a stylistic preference because I use warm tones quite a bit. I will regularly warm the image up, and that's that purely a personal thing. If we wanted to render everything totally accurately, 100% we'd be shooting on flash again. This is this is stylistic. I remember hearing, I think was Eric All miss who said he liked the idea of when you shoot a natural light to not use different white balances but to use like a daylight white balance all the time. And what you start to take into account are the characteristics and the colors of light throughout the day, and you shoot new approach light differently and so I always I kind of like that fundamentally, and I like shooting with a little bit of a warmer light on. So that's why my looks a little bit warmer. Turn back to me just a little bit, a little bit more. Do it more. Uh, let's move this a little bit more to the side. Turn your face a little bit more this way. Cool. Let's go and get a meter on that, please. Great. And so I now have Broad Rembrandt. Sure, these two side by side and there you go. Short versus Broad may bring this back down. So we're on the same plane. There you go short versus broad, remember? And they have two very different responses. One definitely feels a lot more dramatic. One feels, ah, lot brighter. And neither of these air correct or incorrect. It's totally a matter of what works for you and also what works for your subject's face. Some people suggest that when you have a broader face and you want to narrow it, you would use short life. And if you have a narrow face and you want to broaden it, he would use broad life different different approaches. Basically, the idea that things to remember are that if there is more light to the sign, you have more shadow. More shadow equals more drama and everything is relative to this. If I were to move this around, I would be getting different patterns. Broaden his shortness. Obviously Depends on what my background looks like. Depends on the relative position of your subjects. Head the relative positions all relative. It's all about how it looks in relation to this. To even simplify that out a little bit further. If I had a light right here, just go ahead and do that. We talked about relativity, right? This always think is a good way to explain it. So at the moment, this light is above my camera. Okay, So that means that the shadow it's slightly above right. My shadow is going to be slightly to the left and slightly below. Right. But if I go above the light, I now have a plight, right? It's all relative. The light hasn't changed on Lee. My relative position to it. If I move way to the left, the shape of the shadow changes. If I move way to the right. The shape of the shadow changes and he hasn't changed. The light hasn't changed. It's just about this, Okay, Any questions? I do have several people who are wondering if they are not yet using strobes if you can get all of these lighting effects with using just flash and other modifiers as well. So so light is like generally speaking light is like there are certain reasons why you might want to choose, Ah, certain brand or style of light, meaning a continuous light or a strobe light or a speed like more than others. The reason I like these is because there's no cords and they're pretty powerful, and they fit into an ecosystem of modifiers That I like. Pro Photo has a wide range of modifiers. If I need to rent, they are easily available. I also I think one of the best things that they have going for them is the is the connection. I love the connection. It's very easy to use, and it's it's tough to break it. There are other connectors out there for modifiers that kind of take it very precarious when putting things on. Um and I find that to be a little bit frustrating, but that's why I use these. It's it's it's a luxury, but the energy is on a necessity. They're great. I love them. I can't say enough great things about them. But light is also light. If you know what you're doing, you can make great light out of a $30 light from Home Depot. You can also make a mess of a $10,000 lighting kit. It's all about if you know it and you understand it and what to do with it. A speed light. You can definitely get these effects from the downside of speed lights. Is there less powerful, like That's just something you have to take into consideration. You've gotta compensate for that, either by using more speed lights or using a little aperture or higher. I s o it's there. There things you have to address hot lights of the same way. Also, hot lights you risk you have a different kinds of modifiers because that you need high heat modifiers, right, unless you're using L. E. D's or different things like that. But generally speaking, light is like small light sources. It will be hard, relatively large light sources will be soft, the relatively larger it is, the softer it is. And so what that means is if I took this modifier right here, either one of these and I brought it in really close relative to him. It would be large and so would be soft if I took that same modifier and I moved it across the room, it would be a much harder modifier because it is relatively small. The sun is relatively small, tow us, but it is large, and so it's a hard light source to us. But when we throw diffusion over it in the shape of the cloud, then that becomes a very, very large modifier, and so it becomes very soft.
Ratings and Reviews
Brenda Pollock Smith
Thank you Chris Knight and Creative Live for another excellent class. I appreciate both the actual shooting and post instruction. Right before your eyes you will see how simple applications of light, shadow combined with post production can create gorgeous, dark images. Chris has a great relaxed manner, easy to follow while offering a ton of tips and tricks. I can hardly wait to try my hand at producing some hauntingly beautiful images like Chris.
Marie Fox-Nuchols
I don't have a ton of time to spare and largely catch segments of courses on short breaks. One of the things i like best about this course Chris's ability to communicate so effectively and efficiently. He covers a lot of ground in not a lot of time, but the course doesn't feel at all rushed. He's just a good speaker/instructor. One of the other reviewers mentioned that this instructor brings no ego to the stage, and I have to agree. He's a confident and competent instructor without being obnoxious. Rock solid course with terrific instruction. I will definitely check out more of Knight's classes.
jen
What a great tutorial and a fantastic teacher! Not too long and full of top information. I'd highly recommended it for any beginner who wants to know how to create and process dramatic portrait, as Chris also explains such things as feathering the light or using the light meter. But also as a intermediate/pro photographer you'll get a lot of it. Thanx for this brilliant course.
Student Work
Related Classes
Portrait Photography