Lessons
Class Introduction
03:58 2Concept vs Experimental Photography
04:26 3Visual Storytelling, Why It's Important.Finding Inspiration In Others Work
04:57 4Equipment
04:57 5Setting The Mood, Color, Style
05:55 6Mextures App Deep Dive
10:00 7Capture Apps
04:33 8PaintCan App
06:26Lesson Info
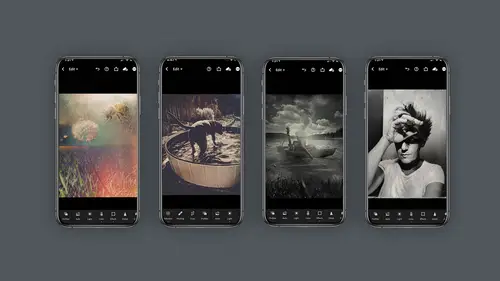
Mextures App Deep Dive
this next section. I'm going to talk about an application called mixtures which I absolutely love and adore and if you've taken some of my other courses you'll know, I've talked about it. We're going to do a more deep dive into this particular app right now. But I want to stop for just a second and call attention to a few things. One. I want to acknowledge that this first sections that we've been looking at. I am a heavily processing these images and you may not want to do yours as heavily and that's fine. I'm going to show you some techniques to pull back and in addition I want you to keep in mind like I'm not just talking about mixtures or prisma, There's many apps you can use and so keep in mind when I'm showing this particular app, you may want to try another app. But what I'd really like to hone in on is this notion of flexibility of your image and changing and augmenting and creating fantasy images. So let's take a look as I said before having a series you'd like to do often is a...
great way to start this particular image was born out of my covid experience and my second dose of vaccine, the world looks different to me and I was so grateful to have gotten the vaccine. And so I took these very snapshot e images of dandelion and a be all shot with my iphone using Light room mobile, which is my standard camera and I started processing it in mixtures and take a look at this how mixtures works. The first order of business is to load your images into mixtures then you will have an option to crop it for a square for instagram. Next you'll see the textures panel which gives you radiance grit, grain light leaks and this is no joke. The amount of content here is staggering and that's what is even slightly more overwhelming is what do you do with all these meaning what's the blend mode set at the intensity? The rotation. There are so many choices. It's absolutely overwhelming but pick slowly an inch by inch. You'll get there. It's a phenomenal program. The other option that comes up is formulas and I love formulas precisely for this very reason of how overwhelming mixtures can actually be and formulas are a way for you to start with someone else's decisions. Let's just say however even in formulas there's a tenant choices. So there's my formulas which will be yours that you have chosen. There are imported formulas, Guest formulas. Universal formulas, mood magic. But wait there's more you'll find community pack one landscape black and white. Oh my God the black and white is amazing, destroyed film. Love it. And spring formulas. Then you'll find the summer fall winter outfitter. Oh wow outfitter has some amazing stuff in it and then light leak four. Okay I'm really not trying to overwhelm you here but here's the next level. Once you're inside each of these formula or packs you will find a variety of different looks. You can then apply think you're starting to see how deep this application really is. It's amazing. So for the sake of this conversation I'm going to use one of my formulas and once I click on that I want to call your attention to the three icons here. The lab beaker. If you click on it will take you back to the formulas, the eyeball will turn the formula off and on and the check mark takes you to the recipe for that formula. Since you are here, you can click on the actual item that's in there and change the opacity by simply changing the slider here. The same applies for every element inside the formula. And if you click over here to the little circle, you can actually flip the position of each of these items. Man, the possibilities are endless. If you click on the little check box here, it will take you to the category and you can change the texture and switch it to a different one. But wait, do you see the little bar here? Oh, no more options. So let's go through this on the far left. You'll find blending modes pretty self explanatory as you click on them. It will change the way that particular layer is blended in the images. The next one over will be the layer count. And if you click on that and you slide to the left, you'll see all the layers that are currently existing. The middle one is to add a new layer and you can pick from any of the formulas there. The last one here is the adjustments and oh my heavens, there's a ton film, looks exposure, shadow contrast. Uhh overwhelming. Let's just say the truth. Absolutely overwhelming because now you can change how these one layer is adjusted to your image. Now there's a lot, this is a lot like instagram or snap seat if that gives you any indication of what to do. Now I know this is a lot of data. You can do black and white with hue saturation or you could slide over and do black and white with the black and white on and off. Please don't freak out at this point, creative live, you can watch this 100 times, you can slow it down, watch it again. There's a lot to unpack, but it's amazing in here. And when you're ready to save the document, click on the button on the top. All that was to get us here. So in this image, what I did is I shot to be in the dandelion. Like I said, I took the dandelion and processed it through mixtures using all those buttons and sliders that we just reviewed again, you're going to want to practice this once you feel comfortable. What we're gonna do is for this shot, I took the B and combined it with the dandelion mixture arised as I like to call it photo and I combined it in Photoshop. Let me show you how I did that starting Photoshop by opening the background image and then place your B where I place my B. I selected the B. And then I'm asked it now to some a little bit more elaborate Photoshop work. Now while I'm in Photoshop, the B for me is a little too pronounced. So I'm going to put that on the mode called soft light. Now, once I'm in this mode, the B isn't quite have enough detail. So I'm going to copy that be, I'm going to put it on normal mode. But now what I'm gonna do is something interesting called blend. If I'm going to hold the control or command key on the name, I'm going to go to blending options and I'm going to do something called blend. If, and I'm basically going to say, hey, the dark part of this be hold the option key here to split the triangles. I don't want the dark part of the B to show up quite as much. So I think I'm gonna bring it over to about this point right here. And then if you turn this on and off, you'll see, I've got a little more detail but not too much detail. Now one of the things about mixtures that I don't like is everything it's so mushy. So I'd like to make some lines show up on this image. So what I'm gonna do is I'm going to go ahead and import the original image of this dandelion. So I've brought the original dandelion image in and I'm gonna put it under the B and what I'd like to do is actually create lines out of it. It is a smart object. So what I'm gonna do is go under the filter menu and I'm going to go to something called find edges under stylized and that's going to find some image edges for me, which I think is really cool. Now, here's the thing, I don't want black lines, I want white lines. So what I'm gonna do is invert this command. I and that has inverted this image command. I and now I'm going to put it on screen and what that's going to do is give me this kind of groovy line look to the image, which I really like. And then I can add a mask to that image and paint in or out if I want, let me do it a little more gently, some of the lines to disappear. So you could, this is again a creative process, You can do whatever you like to make it look right? I'm thinking this looks pretty cool. Now, the only thing I'm not entirely thrilled with is the hole in the middle of the day and the lion. So you know what I'm going to do, I'm going to get clever and I'm going to cheat and put another day underlying Imogen. I've dragged in another dandelion image in and I only wanted to be just in this section here. So I'm gonna put a black mask on it and paint it in with white. Now, here's the thing, I don't want the whole dandelion to show. So I'm gonna use that blend if option, once again hold the command or control key and click on the name, go to your blending options and this time I'm going to move this over so I can see a little better. I'm going to slide the blacks down way down and then I'm going to hold the option key and click on the little triangle and split it even more. Yeah, I think that's looking pretty cool and then I can scale this or even go back into the mask and maybe paint out a little more because it really just want the center of this and you know, I think that's looking really cool. I know the image has a hard line down on the bottom, frankly, I don't mind it so much. But if I did, I could just take the paintbrush on the mask and paint that out a little bit again. This is all your aesthetic what you would do if you're doing this. This is just my process. I hope you found this instructive on how you can make a kind of a fantasy image using mixtures and your mobile device
Class Materials
Bonus Materials with Purchase
Ratings and Reviews
Charles Smith
Good course. A lot of good tips and ticks. I thought there would be more on using different props to create different effects....A little disappointed that Mextures and PaintCan is only available on iPhone not on Android.....
Michael Branch
This class really helped open my eyes to the potential of mobile photography. Now I know some new apps and ways of using my existing apps to take my mobile photography in a fun, new and more artistic direction.
user-1acd94
Oh Lisa, what would we do without you? You are one of the main reasons I keep coming back to Creative Live. If anyone is relatively new to either mobile photography or Photoshop - push through the zones where you feel a bit lost. One of the absolute joys of Lisa's teaching is that she addresses all levels of students in one go - there is always something as an instant takeaway, and always more to sink in on future viewings.