Making Selections and Masks for Better Composites
Lesson 8 from: Essential Compositing Tips & Techniques In Photoshop 2021Jesús Ramirez
Making Selections and Masks for Better Composites
Lesson 8 from: Essential Compositing Tips & Techniques In Photoshop 2021Jesús Ramirez
Lesson Info
8. Making Selections and Masks for Better Composites
Lessons
Class Introduction
01:14 2The Importance Perspective
05:35 3Examples of Perspective in Compositing
08:56 4Creating Depth with Atmospheric Perspective
09:39 5Matching Brightness in a Composite
05:59 6Matching Saturation in a Composite
04:06 7Matching Ambient Color in a Composite
08:01 8Making Selections and Masks for Better Composites
11:06Lesson Info
Making Selections and Masks for Better Composites
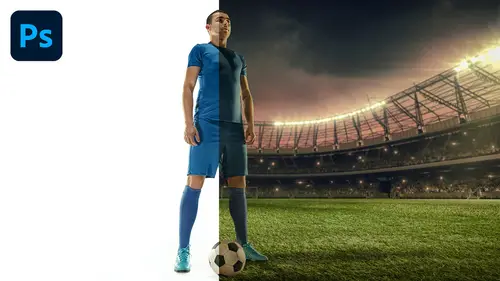
next, I'm going to show you how to make cutouts using the selected mask, workspace and Photoshop. This will be a crash course on the selected mask workspace. I will show you how all the tools and sliders working this panel as well as my masking workflow. We're going to work with this document that contains two layers, a background and a foreground. The goal is to remove the background so that it looks like the model is standing on this background. Now, before we go any further, I would like to address a question that I'm sure will come up. Why am I using a solid color background and not something with a busy background? Theano sir, is because it's easier to teach how a tool works. If you show a simple example, much like teaching math, you do not start with a difficult equation to teach a principal. Also, professionals do use solid backgrounds when possible, much like a movie director will use green screen to place their actors into different backgrounds. I understand that sometimes you...
're forced to work with images with difficult backgrounds, and if that's the case, you have to use alternative techniques that I will discuss in the next video. But for now, we're going to focus on this image, and we're going to start right from the beginning. There's several ways to mask a background out in Photoshop, in other words, to remove it. The easiest way is probably using the quick actions in the properties panel. If you haven't unlocked layer, you can simply click on a remove background in Photoshop Lisa Decency, which is artificial intelligence machine learning technology. To analyze the photo, find the main subject selected and apply a layer mask. In most cases, this does a very good job, but it's not perfect. We do have to fine tune the mask. I can disable the background layer, and I can create a solid color fill layer, and I can select a color that will make the edges stand out better. And you can see that we need some work in her hand and under her arm. But that's okay. We consume in by tapping on the Z key and then with the brush tool. I can paint with black to hide, and I can click on this icon to make my foreground color white, and I can paint with white to reveal again. You have to be on the layer mask, and I can click and drag to paint in with white to reveal pixels that should be showing again. I can tap on the X key to make my foreground color black, and I can paint with black to the select in Photoshop. If you click once in whole shift and click again, you will make a straight line between the two points that you clicked on. So that's why I was holding shift as I was painting in these areas. Also, I'm using the right and left bracket keys on the keyboard to increase or to decrease the size of my brush. Now I'm not going to spend too much time fine tuning the mask because it's not really relevant to this session. You do want to spend as much time as you can fine tuning your mask, but in this case again, it's not necessary to get a perfect mask. You'll understand the principles with a mask that has a few imperfections, and I'm holding on the space part of click and drag and pan around the image. I'm not gonna worry about the hair For now, I'm going to double clicking a handle to 50 Image to screen and the images looking very good. What I'm gonna do now is fine. Tune the layer mask by selecting the layer mask thumbnail and from the properties panel clicking on the select and mask Orc space. This will show me this Orc space that has selection tools on the left hand side and slider controls on the right hand side. Currently, my view is set to onion skinning, and the transparency by default is set to 50 which means that the opacity on the hidden pixels will be set to 50%. If I increase the opacity to 100% then the hidden pixels will not show at all. And if I bring the transparency back to 0% then the hidden pixels will show at 100%. So in this case, 50% works. Okay. And one thing that I want to mention is that you shouldn't work on all the edges of your image at once. I like to separate them into pieces, the main edges, and then I like to work with the hair. So in this first step, I'm going to completely disregard the hair. But I will assume in so that we can see the edges that we have here and the edges our little blurry and a little jagged. So I'm going to smooth them out by increasing the smooth like so, And I'm also going to increase the contrast, like so so that I have sharper edges. And if it's difficult for you to see the adjustments that you're making, you could always change the view to something else. In this case, maybe something like on Black will work best, and I have the opacity set to 100 so you can really see what we did here. Let me just bring them back to zero so that you can see what we have to begin with. So notice how there's a lot of jacket is there. I can smooth those jagged edges, and I can increase the contrast to sharpen those edges at this point, if you need to, you can paint with the brush tool, this one here, and it works just like the brush tool that we were using a moment ago. I can add or subtract to my mask so I can paint to add. You see there is a black dot there, and I can also paint on this black dot. And of course, you can keep fine tuning the mask as much as you like. You also have the quick selection tool, which allows you to click and drag over an image to select. In this case, I don't need to do that. I'm going to come back into the refine edge brush tool, so we're going to skip this one for a moment. Then we have the object selection tool, which allows you to click and drag. Or your image in Photoshop will make a selection using Adobe Sense, a Onley over the area that you click and drag over. Then we have the political lasso tool and the regular lasso tool, and these tools simply allow you to either freehand a selection or to use the political lasso tool to click and create a selection with these sharp corners like so. Then we have the hand tool, which allows you to pan, of course, and the zoom tool, which allows you to zoom in or to zoom out by holding Alton Windows option on the Mac. But anyway, the most important thing at the moment is that you adjust the edges of your mask and you're using that with the global refinement adjustments. We smooth out this election. We don't need to feather it. Feathering means to blur the edge. We definitely don't want to do that. And adding contrast makes the edges sharper, and you can shift the edge in or out to try to minimize the fringing or the white outlines that you see here. I'm gonna leave the shift edge set to zero because there's a better tool that I prefer for this. I'm going to press okay and Photoshop will apply those adjustments to my mask. What I'm going to do now is that my color failure to black so that you can see those white edges, and I'm going to zoom in. What I like to do instead, to minimize the fringing or these white outlines is to select my layer mask thumbnail and then go into a filter other minimum, and this will open up the minimum filter, which allows you to contract the mask. And I prefer this option better because it gives us two algorithms, a roundness algorithm and a squareness algorithm. So if I were working with a man made object like a car or a building, squareness might be the better choice. But in this case, we're working with a person, so roundness is the best choice you can. Then increase The rate is to contract the mask. If you don't see any changes, make sure that the preview check boxes enabled, and you can see how I contract that the masked by 2.5 pixels removing that fringe. And you can adjust this lighter accordingly until you get a good result without having to push the mask too far in. This tool also has another great feature. You can use decimal points, so you're not stuck with whole numbers, and that makes the tool more precise again. I'm using 1.5 in this case. I'll press okay, and I'll double click on the hand tool to fit the image to screen. What I'm gonna do next is go back into the selected mask workspace a second time. In this time, I will focus on the hair. So with my layer mask selected, I'm gonna go back into selected mask and from here I can use the refine edge tool to paint over the edge is that I want Photoshop toe. Apply a refinement. You can actually see that edge by clicking on show edge. And if I decrease the edge detection, you can see that edge. So that's the edge there. But in this case, I don't really want to see that edge. All I wanna do is paint so that I could let Photoshop analyze the pixels on that area and try to remove her hair from the background. So I'll bring the edge detection down to zero, because I only want to focus on the areas that I paint over. And I'm just going to disable the edge, and you can see how this tool works as I paint. See that I'm painting in. Photoshop is analyzing the image and making those adjustments like so. And this is why I'm working with hair in a separate adjustment because now I don't have to worry about the smoothing or the contrast on her hair, which gives me much, much better results. So I always do two passes, one for the overall edges and one pass for the hair. If need be, you can maybe increase the contrast, just a tiny little bit, and you can try doing any other adjustments that you need. But in most cases, maybe contrast is the only thing that you'll need, and you can press OK and Photoshop will apply those adjustments to the hair. Now I know that the hair looks a little messy in this case, and that's because reviewing it up against the black background. But what I recommend that you do is place the image on the background that you intend to place it in and then make your adjustments. Because in a lot of cases, those imperfections could get lost on the background that you place your model in. So you don't have to spend too much time fine tuning details that are not gonna be visible anyway. You could also create a new layer and press control all G on Windows Command Option G on the Mac to clip this layer to the layer below so that the contents of this layer will Onley affect the layer directly below it. Then I can select the brush tool, hold Alton Windows option on the Mac to temporarily activate the eyedropper tool click to select a color and you can just start painting like so. So I'm just making the hair strands just a little more visible, like so. And I know that I'm making some areas brighter, and that's okay. I'm going to change the blending mode in just a moment. What I'm gonna do now is change the blending mode to darken, and what the dark and blending mode will do is keep the darkest color. In other words, I'm only making the bright pixels darker, and the pixels air were already darker than the color that I brought in will stay darker, and that is my technique for removing backgrounds from a photo.
Class Materials
Bonus Materials with Purchase
Ratings and Reviews
David
This course teaches what you need to know about creating composites. As alway Jesus delivers in a clear, precise and fun way. You can just tell this guy has a great personality and he loves what he does. I greatly enjoyed the course and would strongly recommend it. A big thumbs up!!!
a Creativelive Student
One of the best courses I've done on CreativeLive and that's a high bar! An incredible mix of in depth guidance but also some simple photoshop tips along the way, I had so many 'wow' moments, learning things I had no idea you could do in Photoshop. Really a good pace too. Quite a short course but so many good lessons to revisit. Great work!
Jorge Perez-Martinez
I think this is a wonderful course. It goes into the key aspects that one needs to know to make a good composite. Jesus does not go into needles details and assumes a basic knowledge of photoshop; this make the course very manageable as far a its length. Highly recommended!