Lesson Info
26. Range Masks
Lessons
The Lightroom Ecosystem
08:33 2The Tour de Lightroom
07:49 3Image Organization
05:20 4Finding Your Images in Lightroom
14:28 5Lightroom's Right Hand Panel
13:43 6Lightroom's Lower Panel
13:03 7Setting Lightroom Preferences
18:57 8Adding Images in Lightroom
06:46Adding Metadata to Your Images
06:32 10Lightroom Cloud vs Local File Management
11:35 11Selecting Images in Lightroom
16:49 12Adjusting Images: The Light Panel
23:09 13Adjusting Images: The Color Panel
17:30 14Adjusting Images: The Effects Panel
12:47 15Adjusting Images: The Details Panel
09:50 16Adjusting Images: The Optics Panel
10:16 17Adjusting Images: The Lens Blur Panel
15:16 18Adjusting Images: The Point Curve Tool
09:17 19Image Enhance: Noise Reduction
16:31 20Image Enhance: Details and Super Resolution
05:05 21Image Merge: HDR
11:50 22Local Adjustments
10:47 23The Crop Tool
09:51 24Image Merge: Panorama + Full Image Edit
16:25 25Masking and Retouching
11:54 26Range Masks
07:46 27Creating Adaptive Presets with AI Masks
10:24 28Importing Presets
04:34 29Retouching Brush: Clone, Heal, Remove
09:53 30Sharing Your Images
13:05 31Customizing Sharing Web Pages
08:44 32Conclusion
01:25Lesson Info
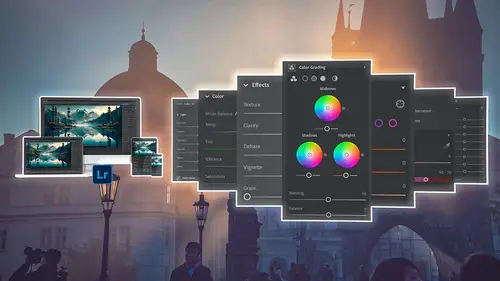
Range Masks
1 Now speaking of masking, 2 there are some pretty interesting masking tools 3 that are available inside of Lightroom 4 that are not selecting sky or buildings 5 or people, things like that. 6 But instead, we call them range masks 7 and they can be combined with anything as well. 8 So for instance, in this image, 9 I really like the blue versus the orange. 10 I think those two competing colors are pretty awesome 11 in this photograph, you can see 12 that the shadow areas on the building, like right 13 around here are really cool. 14 But I love the way the orange sunlight just kind of filters 15 through like the window. 16 It filters past some of these areas. 17 It like filters through these corridors 18 between the buildings. 19 I just love it. 20 So one of my favorite images, and I can go in 21 and enhance that feeling by doing some masking. 22 So in the rain or in the masking area, if I go 23 and create a radial gradient 24 and in that radial gradient, I'm just gonna go like this 2...
5 and I'm gonna try and put that gradient. 26 So I made the gradient 27 and now I'm going to just out hover outside of the gradient 28 and it gives me that same kind of u-shaped arrow. 29 I'm gonna grab it and I'm gonna drag it this way 30 and I'm gonna pull it across so that what I'm trying 31 to do is mimic sun seems to be coming from 32 around here somewhere 33 and kind of going through this building. 34 And so I'm just trying to mimic that. 35 So I've got that general area selected 36 and now I'm gonna try 37 and, you know, get the right trajectory. 38 That's probably about right. 39 So that's where I want to affect, 40 but I don't want to affect everywhere. 41 I only want to affect the area that is already warm. 42 So now I'm gonna go up and instead of clicking on subtract 43 or add, I'm going to go to the triple dot button, click on 44 that, and I'm gonna intersect with a 45 radial no, sorry, with a color range. 46 So I want to choose color range 47 and intersection allows me to have two different rules 48 and both of them have to be true in order 49 for the mask to work. 50 So it's like a Venn diagram where the two things overlap. 51 That's what gets affected. 52 So I'm going to choose color range, 53 and now I need to choose a specific color range. 54 So I can choose this orange over here, 55 or I can choose this orange over here. 56 And the idea is that I'm going 57 to basically draw a square around the color range. 58 So I'm just gonna go like that. 59 That general color is what I'm looking for. 60 Now notice that even though I selected over here, the red 61 of the selection is only over here. 62 And the reason for that is that both have to be true. 63 This is if I hover over here, 64 there's the color range that I chose. 65 And here is where the gradient is. 66 And both of them have to be true. 67 So it has to be orange like that. 68 And it has to be within this gradient in 69 order for it to work. 70 And I can then move this gradient around 71 like this in order to manipulate where it's gonna go. 72 And once I have that in play, I can also increase 73 or decrease this color by changing the amount. 74 So when I click on the color range, 75 so now I was working on the gradient 76 and now I'm working on the color range. 77 If I look over here, 78 this amount area allows me, sorry, 79 not the amount area, 80 but this refine area up here allows me to choose 81 how much it spills outside of that color 82 so I can increase or decrease. 83 See how when I decreased zero, then 84 nothing over here is getting affected. 85 And as I spill, it starts to get, 86 as I spill, it starts to get more and more. 87 See how the now the building's starting to light up 88 and all of that red is just the mask. 89 That's not the color that we're making it, 90 we're just finding the mask there. 91 See how it's starting to spill into those kind 92 of shadowy areas. 93 That's what I want. 94 I want that light to spill forward, 95 but notice that 96 it's spilling here along this corridor, 97 but then when it goes to the blue area of the building, 98 it leaves it alone. 99 That's what we want 100 because we want to mimic the same feeling 101 and now we're gonna play with it. 102 So I'm gonna take the light or the exposure 103 and bring it up, see how I'm just, 104 that sunlight is getting a little brighter now in that area. 105 And then I can go into the color area 106 and I can warm it up just with the temperature, see that, 107 and I can maybe add a little magenta in there 108 and I could even go in to the hue 109 and kind of shift it a little bit so 110 that it's a little bit more warm rather than green. 111 I'm really liking this. 112 Lemme go back to the light area 113 and maybe kind of bring up the highlights some 114 and maybe we could bring up the shadows a little. 115 Oh, that's nice, yeah. 116 But notice because see that shadow that's right here 117 that's coming down like this, 118 there's like a triangular shadow here. 119 That shadow is not getting warmer, it's staying cool. 120 But this area up here is getting nice and warm. 121 That's a fantastic way to do this. 122 So this allows us 123 to target very specific areas in a photograph 124 because we have all of these masking options. 125 So you can select the subject, the sky, the background, 126 which is everything except for the subject. 127 You cans select very specific people 128 and very specific things on the people. 129 You can select very specific objects you can brush in 130 or brush out, remove stuff 131 or add stuff to a particular mask. 132 You can do it with a linear gradient, 133 which is a linear gradient is simply just grab and drag 134 the mask across. 135 Up here is 100%. 136 Down here is 0% of whatever mask you're creating. 137 You can create a color range or even a luminance range. 138 So you can affect just dark areas or just light areas. 139 And all of those things can be done in combination 140 with each other by clicking on the add 141 or the subtract option or going up to the triple dot 142 and inverting the masks or intersecting the masks. 143 So all of those things together give you the perfect 144 opportunity to utilize a lot 145 of power inside of masking.
Class Materials
Bonus Materials
Ratings and Reviews
Ross Copperman
Jared really does have a fantastic style. His pace and articulation are perfect for following along and the detailed editing of the videos, themselves, makes it really easy to absorb. Well worth the clams, for sure.
Tim Byrne
Great job, Jared! You have delivered a master class for anyone beginning a journey into Lightroom, presented in absolutely clear and relaxed style. And for those with more experience with the program, every old dog can learn a few more new tricks. Teaching software is tough. Jared does it by breaking down each function and including not only the what, but the how and why as well. And each step is amplified by crystal clear photos which are manipulated with the function at hand. Bring a pad of paper, some snacks, and a cup (or two) of coffee. He is relentless in his presentation. You might watch this course as a freebie, but buy it to be able to refer to it for specific steps and processes. I've been using Adobe products since the mid 1990s and this is the best instructional presentation I've taken. ABSOLUTE WINNER1 Thanks, Jared
Caroline Faure
Really good class!! A lot of classes I've taken thus far have gone too fast or had an instructor that just tells you everything without you being able to actually follow along with your hands on the software. I learn best by doing... not just listening. With this class, it was easy for me to split the screen and do everything the instructor did - and really learn in the process. I will definitely watch for more classes from Jared Platt!