LRC Merge: HDR
Lesson 32 from: Editing and Organizing your Photography in Lightroom ClassicJared Platt
LRC Merge: HDR
Lesson 32 from: Editing and Organizing your Photography in Lightroom ClassicJared Platt
Lesson Info
32. LRC Merge: HDR
Lessons
Introduction
05:51 2A Tour of Lightroom Classic
28:03 3Importing Images into Lightroom Classic
23:14 4Selecting Images in Lightroom Classic
19:32 5Importing Metadata and Catalogs into A Catalog
03:01 6Organizing Images in Lightroom Classic
10:13 7Adding Metadata to Your Images in Lightroom Classic
09:21 8Bonus: Impossible Things AI Plugin
10:26Adjusting Images in Lightroom Classic with Synchronization
14:15 10LRC Adjustments: The Histogram and The Basic Panel
14:54 11LRC Adjustments: Profiles
07:39 12LRC Adjustments: The Transform Panel
05:38 13LRC Adjustments: The Crop Tool
04:25 14LRC Local Adjustments: Masking
12:35 15LRC Adjustments: The B&W Panel
06:02 16LRC Adjustments: Grain in the Effects Panel
08:17 17LRC Adjustments: The Point Color Tool
05:24 18LRC Adjustments: The Color Mixer Panel
01:15 19LRC Adjustments: The Tone Curve Panel
05:29 20LRC Adjustments: The Lens Blur Tool
07:59 21LRC Adjustments: More Masking
10:10 22LRC Adjustments: More Masking with Color Effects
05:14 23LRC Adjustments: Color Grading
15:42 24LRC Adjustments: Complex Masking
15:39 25LRC Adjustments: Masking and Retouching People
06:55 26LRC Adjustments: Creating AI Presets
11:39 27LRC Adjustments: Sharing, Installing, and Managing Presets
02:15 28LRC Adjustments: The Details Panel
16:20 29LRC Adjustments: The Lens Correction Panel
09:44 30LRC Adjustments: Retouching a Family Portrait
08:20 31LRC Enhance: Super Resolution
05:58 32LRC Merge: HDR
29:23 33LRC Round Trip to Photoshop Beta
11:36 34LRC Merge: Making Panoramic Images
13:59 35LRC Cleanup and Archive Workflow
20:20 36LRC Workflow Overview
02:47 37Finding Your Images from Lightroom Classic
13:35 38Conclusion
01:45Lesson Info
LRC Merge: HDR
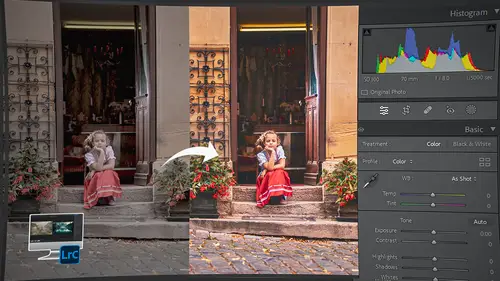
1 One of the things that I do quite a bit 2 when I am either traveling 3 or even when I'm photographing a wedding 4 and there's a really high contrast situation, 5 is I will put my camera into an HDR Auto mode. 6 The Canon has a really great HDR Auto mode 7 that just automatically does a three bracket shot burst 8 and it just takes whatever your settings are 9 and it gives you a stop or two above 10 and a stop or two below 11 depending on how much contrast it sees in the situation. 12 And I can do that handheld 13 as long as I'm at a high enough ISO 14 or a fast enough shutter speed 15 that it's not like gonna be a two, three second exposure. 16 I can just handhold and just go 17 and it just quickly gets all three shots. 18 And then, I have three raw images side by side. 19 And you can see that here. 20 When it's nighttime, 21 you're gonna actually have to lock that camera down. 22 But I've got a shot here 23 that was taken 24 really late at night in Sweden, 25 in Stockholm, in Goles...
tan. 26 And this is a really cool little square. 27 And I wanted to capture it. 28 So, I just kind of set my camera on these park benches 29 and took the photo. 30 But there's a lot of work that needs to be done. 31 And it's not a super great photo, 32 and it's not even a really great HDR, 33 which is why I'm choosing it 34 because I wanna show you how good an HDR can really be. 35 Usually, with an HDR, 36 you would try and get an even brighter version 37 of the scene than this. 38 But you can see in this version, the bright version, 39 a lot of the lights are pretty blown out. 40 This section here of the wall is pretty blown out. 41 But most of the time, 42 you're try to get something a little bit brighter. 43 And then we have the darker version 44 and then the really dark version 45 that gets us the windows 46 and the wall has the right amount of exposure on it. 47 So, this is a good dark photo for an HDR. 48 This is not quite as bright as maybe it should be, 49 but it'll work, 50 because what we really want is just the data, 51 and we want extra deep data on these shots. 52 So, this is going to be an acceptable HDR. 53 And especially when you see how it turns out, 54 it's gonna look really great. 55 So, the first thing to check on an HDR is 56 when I cycle through them, 57 are they similar? 58 Do they have similar focus? 59 Are they correctly aligned 60 so that they don't look like they're moving? 61 That kind of stuff? 62 And if there's people walking through 'em, 63 like you can see there's a person in this door here 64 and then they move away, 65 that's not as big a deal 66 because Lightroom can figure that out. 67 Okay. The first thing that we're gonna do 68 is we're gonna highlight all three of these images 69 and we're gonna right click the set of images 70 and we are going to go to the Photo Merge option 71 and we're gonna click HDR. 72 Now, if you happen to be doing a panorama 73 where you do three shots, three shots, three shots, 74 three shots. 75 That's an HDR panorama 76 And you can actually do one of those as well. 77 I don't typically do those. 78 Occasionally I have, 79 but not too often 80 because that's a pretty long process to do 81 and I've never really run into a shot 82 that really has to have HDR and Panorama at the same time. 83 Usually I do a panorama 84 or I do an HDR. 85 Okay. So, here is our HDR merge preview window, 86 and you can see that there are a couple options 87 that you need to be aware of. 88 The first is this auto align. 89 Obviously you want the images to align, 90 so that's gonna be checked yes. 91 The second is auto settings. 92 If I click auto settings, 93 it's going to automatically try and show me 94 what that would generally look like. 95 And that's fine to give me those auto settings. 96 You might as well put it on. 97 You can always adjust it later. 98 So, you might as well see what it's gonna look like 99 and get the advantage of being closer to finished 100 when you open it up. 101 So, that's fine. 102 So, the de-ghosting option here 103 is simply when you have things or people moving around 104 in the photograph 105 and you want to get them removed automatically by Lightroom, 106 then you want to use some kind of amount of de-ghosting. 107 And so, you can do low, medium or high. 108 You can kind of play with it 109 and see what it's gonna look like 110 by moving back and forth between those. 111 So, there's nothing really moving around in this photo, 112 so we don't have to worry too much about it. 113 But you can see that person in there. 114 And Lightroom is trying to tell you 115 see how there's some red around them, 116 that's because I have this button check 117 that says Show De-ghosting Overlay. 118 If I turn that off, then that red disappears. 119 So, it's trying to show you where it's working 120 to try and remove things that are moving around in there. 121 But when I click on None, 122 it's actually choosing 123 the right element or the right exposure for this door, 124 almost by happenstance. 125 It's not doing it on purpose, 126 it just happens to be doing it right. 127 So, I don't need it to do any de-ghosting. 128 But if I wanted to, I could turn it on low, medium or high, 129 just play around with it, look at it, 130 and then you can turn on or off the de-ghosting overlay 131 to see what it's gonna look like. 132 And then, of course, I always want to create a stack. 133 So, I'm gonna create this stack 134 so that when the image is opened as an HDR, 135 it's actually opened on top of the other three images 136 so that it kind of tucks those away. 137 And I'm just looking at the final result. 138 So, I'm gonna hit Merge. 139 And then it's gonna take a little bit to create this HDR. 140 Not very long, but a little bit. 141 And once it does, 142 there, it stacked it on top of those other images. 143 And I'm just gonna go into the develop module 144 and look at my HDR. 145 Now, it's not, 146 doesn't look all that great. 147 It's okay. 148 I mean it's just a picture. 149 But when I zoom in, 150 and let's go to a hundred percent, 151 look how clean that is. 152 That is just a really clean, beautiful photograph. 153 All that data is in there. 154 And you can see that I've got full data 155 in the yellow of the building. 156 I've got full data here in the shadows on these buildings. 157 So, there's plenty of data here that I can play with. 158 And when you have an HDR, 159 you'll see that your sliders 160 go instead of five stops this way and five stops this way, 161 you actually have 10 stops either way. 162 So, there's 20 stops worth of data here. 163 So, I can really play with this. 164 I'm gonna take the exposure way up. 165 And then, I'm gonna take my whites 166 and my highlights down quite a bit 167 to kind of bring them back. 168 And it looks like I went too far with my exposure, 169 but that looks about right. 170 And then, I'm gonna go up here 171 to the temperature and the tint 172 and I'm gonna play around with that. 173 So, I really need to bring that white balance way down 174 'cause it was way too warm there. 175 And then, I'm gonna go into the black 176 and bring, 177 see I'm gonna richen up those black points there. 178 And I can take the contrast up or down. 179 And if I go down, 180 I even get more data available to me. 181 So, I'm kind of limiting the contrast 182 so that I can be much more precise. 183 So, I can bring that exposure down a little bit more. 184 And then if I want to get some more contrast in there, 185 I'm gonna take that clarity up 186 'cause that's gonna give me good contrast in the midtones. 187 You see how I'm getting really nice, rich, beautiful detail. 188 And when I zoom in, 189 you can see all of that data 190 and it's so clean. 191 All the work that I've done 192 usually would introduce noise into an image, 193 especially when you take the shadows way up 194 or the exposure way up, 195 you get a lot of noise. 196 Here, you don't get that noise 197 because you have such deep data. 198 The color data is so deep in this photograph 199 that you can do a lot of adjustments 200 and it doesn't show a lot of noise. 201 So, I'm gonna keep working 202 on this clarity a little bit more. 203 And I'm even gonna take the dehaze, 204 which, dehaze is basically Uber contrast. 205 It's like over the top contrast. 206 And if I just take it up just a little bit, 207 it really richens up the photograph quite nicely. 208 So, you don't have to be, 209 you don't have to have a hazy photo to use dehaze. 210 That's kind of sometimes helpful. 211 And I'm gonna brighten up the image a little bit more. 212 Maybe, I'll kind of play around with the white point. 213 Nope, I need to bring that way down. 214 And I actually need to bring the exposure down 215 'cause I'm not getting enough information 216 in my areas with the lanterns. 217 And so, I just gotta make sure that that's okay. 218 And then, my shadows can come down just a little- 219 Actually, no, let's bring the shadows up, 220 and let's take the black point down. 221 That's what we need. 222 There we go. The black point. 223 Now, that's a pretty decent overview 224 of what we want to do. 225 At this point now, 226 we can go into the tone curve 227 and really start finessing things. 228 So, I'm gonna create a tone curve 229 that brightens up the the higher mid tones. 230 So, basically everything from middle gray 231 up to about, I would say, like zone six and seven. 232 That's the old zone six and seven 233 from Ansel Adams. 234 Sorry, I was trained in the Darkroom, so. 235 I'm gonna brighten that area up. 236 But then I'm gonna come down into the darker areas, 237 everything below mid gray, 238 I'm gonna come down with that 239 and kind of richen up those areas. 240 And I'm just gonna put another little point 241 right here in the middle and bring that up there. 242 It's getting pretty rich. 243 So now, I can go into my saturation. 244 You can see that it autos saturated 245 with the vibrance up to 20. 246 If I double click that, 247 that looks nicer without the extra saturation. 248 So, it's a little bit more realistic when you do that. 249 I'm liking what I'm seeing here, 250 but I would like the tops of the buildings 251 to be as bright as the bottoms. 252 But obviously, the lights are down here, not up here, 253 so I'm not getting as much light. 254 So, I'm gonna pull a little trick here. 255 So, I'm gonna go in to the masking options. 256 And this is important when you're working on an HDR. 257 Don't think that you have to do everything 258 with the general sliders. 259 You don't have to do global work on everything 260 and get it done and be done. 261 Because, now you have the ability, 262 you still have all that color depth, 263 you've got so much data in there. 264 So, you can play around with the masking 265 and brighten up certain areas 266 and darken other areas down. 267 That's something that you have full capability of doing 268 because you have so much color depth. 269 So, in this case, I just need to think through 270 how do I get the tops of the buildings 271 really quickly 272 without having to put a lot of effort 273 into making some kind of a mask 274 or something like that. 275 And the way I'm gonna do it 276 is I'm gonna go in 277 and click on the sky. 278 I wanna choose the sky. 279 There, it chose the sky. 280 And 281 that's not a really good mask. 282 So instead, I'm gonna go back to my mask 283 and I'm gonna delete this mask 284 and I'm gonna create a new mask. 285 And this time, I'm gonna choose the subject 286 'cause it's probably those- 287 Nope. No subject detected. 288 What would be my best way 289 to select these buildings? 290 Well, I know firsthand, what I'm gonna do, 291 the easiest way to select it is by brush. 292 And if I take the brush 293 and I just go into the buildings 294 and say, I'm gonna double click this preset, 295 so this preset button here, 296 so that I can reset everything 297 and I'm just gonna take the exposure up a bit 298 and start painting 299 so that you can see where I'm painting 300 like this. 301 Right? 302 And I'm just painting the tops of the buildings. 303 And it's okay that it's, kind of, rough. 304 So, now that I've done that, 305 I've got the painting done, 306 I can take the exposure up and down 307 until I like what I'm seeing. 308 That's about right, 309 but it's not quite even. 310 So, now I can take my flow down to about 30%. 311 And I'm gonna increase the size of the brush. 312 And I'm just gonna kind of merge 313 what I was working on here. 314 There we go. 315 So, there's not so obvious 316 that I was burning and dodging. 317 Now, you're saying, well Jared, 318 it's really obvious that you're burning and dodging up top 319 because I'm seeing it in the sky. 320 That's okay 321 because I've got a secret. 322 So, there we go. 323 I'm liking what I'm getting. 324 See how I'm at 30%. 325 So, I can kind of slowly build up my brightness 326 on these buildings. 327 I gotta build up a little bit more brightness up here. 328 So, I'm gonna increase the flow on this, 329 bring the size of the brush down. 330 And I'm just gonna try and bright up. 331 I think I need to do a little bit more on that, 332 but maybe we'll do that a little bit later. 333 So, what I want to do now 334 is I want to change this mask 335 so it doesn't include that sky. 336 The best way for me to do that 337 is to subtract something. 338 Now, obviously, the sky wasn't a very good selection. 339 We tried that. 340 It didn't do a great job at choosing the sky. 341 And I'm not really sure why. 342 That was kind of weird. 343 So, now I'm gonna take this mask 344 and I'm gonna click on minus or subtract 345 and I'm going to subtract a color range. 346 Then I'm just gonna click on the sky 347 and I'm looking for, kind of, a blue. 348 So, I'm just gonna click right here, that's my blue. 349 And notice how the sky is gone now from that selection. 350 So, with that, I can come in here 351 and just, kind of, increase and decrease that sky. 352 And see how it increase and decrease those buildings 353 and they are not interfering with the sky. 354 So, now I can just kind of increase, 355 brighten them up just a little bit. 356 So, this is what it looks like before. 357 This is what it looks like after. 358 Before, after. 359 Before, after. 360 So, we're just brightening up the tops of the buildings. 361 I think I brightened them up a little bit too much. 362 So, I'm gonna bring 'em down. 363 I'm gonna take the shadows up just a little bit. 364 There we go. 365 Okay. 366 So, now I have the buildings looking pretty good. 367 I want this to be a little richer down here 368 in the cobblestones. 369 So, I'm gonna create another mask 370 and it's just gonna be a linear gradient. 371 I'm gonna drag it across here. 372 And I'm just gonna take the shadows down 373 and I want to affect the highlights. 374 I still want that shimmer across the cobblestone. 375 So, I'm only taking the shadows 376 and maybe the black points down just a little bit. 377 And that helps to intensify the light coming forward. 378 I like that a lot. 379 Okay. So, now what I want to do 380 is I want to go into my lens correction 381 and make sure that I am removing the chromatic aberration. 382 'Cause there's gonna be some around these flares 383 and around the building windows and things like that 384 just because it's really bright light 385 against something dark. 386 So, I've done that 387 and now I'm gonna go in and enable the profile corrections 388 so that it fixes the obvious curvature 389 that's caused by the distortion of the lens. 390 And that's actually quite a bit. 391 Because this, 392 if you look at this, this is an old lens. 393 This is the old EF 24 to 70 394 2.8 lens. 395 So, it's got a lot of bowing to it. 396 It's not a super great lens. 397 It's very old school. 398 And so, you could see how much it bows. 399 Like, that was quite a bit. 400 But the buildings look nicer. 401 So, that's pretty good. 402 The one thing that I noticed though is that, 403 see how it's gets way too bright here? 404 So, I don't like the bowing of the lens, 405 but I actually think that 406 the vignetting, it was helping me. 407 So, I'm gonna take the vignetting back down to zero. 408 I don't want that vignetting to be removed. 409 I just wanted the distortion to be removed. 410 So, it's looking better now 411 with the vignetting at zero 412 with the distortion of the hundred percent, 413 that's looking pretty good. 414 So, now what I want to do 415 is I want to go into the transform tool, 416 grab our little handy dandy guided transform. 417 And I'm just gonna follow some vertical lines 418 that, I think, are pretty good indication. 419 They're far enough away from the edge, 420 but they are, kind of, at the edges. 421 I want something that's not right at the edge, 422 but that it's about maybe a fourth of the way in 423 is a pretty good place to go on an image 424 that's got this much parallaxing on it. 425 So, this standpipe here is good too. 426 So, I'm just gonna go down this standpipe. 427 And there. 428 That looks good. 429 That's nice. 430 Now, I'm gonna do a little horizontal work. 431 Here, 432 there that fix that pretty well. 433 And then I'm gonna do a little horizontal work 434 right at the bottom of this building. 435 So, I'm kind of using this red building 436 as my main horizontal subject. 437 There. 438 That looks great. 439 Love it. 440 See, that's such a pretty looking square 441 when you're not looking up at the buildings. 442 But now, I have to do a little cropping 443 because I gotta get rid of some of these benches. 444 So, I'm just gonna bring the crop up to there 445 and that looks good. 446 Done with that crop. 447 I'm loving everything I'm seeing here. 448 Now, I'm just gonna do a little extra work 449 with another mask. 450 But this mask is just gonna be a brush. 451 And I'm going to bring shadows and black down a little bit, 452 and even go down into 453 my clarity 454 and just kind of boost the clarity 455 'cause I want these things to be a little richer. 456 So, I'm just gonna kind of bring up the size of my brush 457 and I'm just gonna paint in a little bit of shadow, 458 a little bit of clarity 459 along these areas here that are a bit bright 460 and kind of glary even. 461 Like, right here, is a bit glaring. 462 And I might be a little bit much on this brush. 463 So, I'm gonna take that brush down to 30, I think. 464 There we go. 465 Just have to go over a little bit more 466 when you're down at 30. 467 30, kind of, goes slow. 468 50 is pretty good. 469 There we go. 470 Nice. 471 Come up here and get a little bit of this. 472 Right there 473 on the edge of that building. 474 That building has nice dark shadows on it. 475 Run across these awnings where people eat. 476 And then, I'm gonna go across the bottom 477 of this a little bit. 478 And I'm choosing specific spots. 479 I'm not actually burning and dodging 480 or burning every portion of it. 481 I'm just looking for the darker areas 482 and I'm kind of drawing the shadows in a little bit more. 483 So, I'm leaving the highlights coming this way 484 and I'm just putting a little bit more 485 into those shadows that are coming forward. 486 And that helps to richen up that effect 487 of the dimensions. 488 And this building needs a little extra darkening. 489 There. 490 See, that all looks really quite nice. 491 So, let's show before, after, before, after. 492 See how I just, kind of, got rid of 493 some of that glare that was going on. 494 And then the last thing that I want to do is 495 I really don't like this that I'm seeing here. 496 So, I'm gonna make a new mask 497 and I'm going to do a radial gradient right here. 498 Just right there. 499 And then, I'm gonna figure out what needs to be done 500 to make it look right. 501 So, the first thing I'm gonna try 502 is a little bit of an exposure change. 503 Just barely. 504 That's too much. 505 And then, I'm gonna take the white down. 506 Nope. That makes it sickly looking. 507 There, the highlights that's where. 508 That brings that yellow in a little bit better. 509 Okay. So, I'm okay with what I'm seeing here now. 510 I'm getting the building to be less bright, 511 but I also need to go into the actual light here 512 'Cause the light is sitting up on a pole 513 and that pole or that bracket that's holding it to, 514 to the building, 515 is 516 needs to be richer. 517 So, I'm just gonna take the black point down on this. 518 See how I'm enrichening up that, 519 that bracket that's holding the light, 520 but I'm also helping those windows sills a bit too. 521 So, kind of just deciding how much I want to do. 522 I don't want to go overboard. 523 Oh, look at this. 524 There's like little statues in the window. 525 I never saw those. 526 That's cool. 527 Do you see how much detail we have in here? 528 This is absolutely amazing. 529 I love the detail. 530 And this is literally a kind of an iffy HDR shop, 531 and it's with an older camera 532 and still, we have such beautiful information in here 533 and it's so crisp and clear. 534 Okay. 535 So, I like this. 536 I'm gonna go down and see 537 if maybe a little bit of dehaze, 538 we'll help this. 539 See, how I'm getting even more rich out of that. 540 That's great. 541 Don't go overboard with this dehaze. 542 I'm warning you. 543 If you go crazy with the dehaze, 544 it goes nuts. It looks gross. 545 So, just a little bit of dehaze goes a really long way. 546 So, I like the way this looks, 547 but now I have to get rid of the spill. 548 So, I've got all this spill that's going on 549 and let me just turn on the overlay so you can see. 550 There's quite a bit of spill 551 that's happening over here 552 that I've gotta get rid of. 553 And so, all I have to do is hit, subtract 554 and subtract by brush. 555 And then once I've got subtract by brush ready, 556 go up to the top of the brush. 557 And I want to remove a hundred percent. 558 So, flow 100. 559 And then I'm gonna turn on the auto mask. 560 And auto mask is going to look for these edges. 561 So, I can go in and just remove 562 this entire area here. 563 See how that- 564 It's looking for the yellow edge there 565 and I'm just removing it. 566 And I can even come down here, 567 And I don't need- 568 I like this yellow being affected, 569 but I don't need this yellow down here. 570 But because there's an edge there, 571 it stops right at the edge of that edge. 572 So, this is a really great way to remove stuff 573 because it's looking for edges 574 and it's trying to avoid them. 575 It does a great job at it. 576 So, once I get the edges removed, 577 so that I'm not going over the top of 578 my other selections, 579 then I can turn off the auto mask 580 and then I can increase the size of the brush 581 and I can just go in and erase 582 anything that I don't want to be affected. 583 So, I'm just erasing the spillover 584 that's coming down to the bottom of this building here 585 and the spillover that's coming over into this shadow here. 586 Just getting rid of all this kind of stuff. 587 Yeah. 588 There. 589 So, now when I zoom back out, 590 now I can look at this 591 and see how bright or dark I want that to be. 592 And I have full capability over 593 and it's just affecting that building. 594 And I can be very specific 595 about the way that part of the building looks. 596 And I don't want to completely remove everything 597 about the brightness of that. 598 I don't want it to equal the brightness up here, 599 but I don't necessarily want it to just blow out. 600 And I think that looks pretty good. 601 Okay. 602 So, I really like the way this image looks. 603 I'm happy. 604 I'm happy with the transformation of the buildings 605 and kind of straightening 'em up. 606 I'm happy with the burning and dodging. 607 I'm happy with the way the tops of the buildings look. 608 They still kind of have a shadow to them a little bit, 609 so they look natural, but they're a little brighter. 610 I like the colors of the buildings. 611 So, the only thing I don't like is this wire up there. 612 That wire is just really annoying. 613 And so, I could go in and click on the retouching tool 614 and use the remove tool 615 and then go into this area up here 616 and just start removing like this. 617 And that's gonna do a good job for a while. 618 And it's going to be pretty accurate 619 for a little bit. 620 So, I'm gonna, you know, like, if I do this part here, 621 that'll work. 622 But then, when I get to here, 623 it's gonna be a little worse. 624 Do you see how it has a problem there? 625 It's not super great at this. 626 So, this is not the tool 627 for intricate work like this. 628 So, I'm going to reset this. 629 And the way I'm gonna do that 630 is I'm gonna hit the option key 631 which makes this turn into scissors, 632 and I'm just gonna draw my scissors 633 across both of those points 634 and let them delete 635 so that I have this back. 636 All right. 637 So, this is why 638 when you purchase Lightroom with the cloud, 639 you also get Photoshop with it. 640 So, you want Lightroom hand Photoshop. 641 So, this is a job for Photoshop. 642 And more to the point, 643 it's a job for Photoshop Beta, 644 because Photoshop Beta has some extra tools in it. 645 And those tools are based in AI. 646 So, I'm gonna open this in Photoshop. 647 And I need to show you 648 how to open something in Photoshop anyway. 649 So, we're going to right click this image 650 and we're gonna go to edit in Photoshop Beta. 651 So, if you install Photoshop Beta, which you can have, 652 if you have Photoshop, 653 you can get Photoshop beta. 654 It's just a matter of going up to your creative cloud. 655 You'll see it in the beta apps right here. 656 So, if you click on beta apps, 657 you should see Photoshop Beta. 658 If you open that up, 659 you get to play around with the new tools 660 that they're working on 661 inside of Photoshop 662 for the next release. 663 And so, Beta has some really cool things in it. 664 And I'm gonna show you one right now.
Class Materials
Bonus Materials
Ratings and Reviews
Maarten Barckhof
Wonderful. I am a (very curious) amateur photographer and for me this was all really interesting. Clearly spoken, nice examples, very educational indeed. Some doubts about making (too?) many changes in photos with generative AI, changing color, etc.: where does editing of a real word picture change into painting and creating something non-existent? And in some lessons the transcript (and subtitles) are missing. For people not having english as their mother language they are sometimes quite helpful. All in all: very recommended!
Sicily Dickenson
Great class to help you establish and understand workflow in Lightroom Classic. I also loved the presets that accompanied the class.