LRC Adjustments: The Lens Blur Tool
Lesson 20 from: Editing and Organizing your Photography in Lightroom ClassicJared Platt
LRC Adjustments: The Lens Blur Tool
Lesson 20 from: Editing and Organizing your Photography in Lightroom ClassicJared Platt
Lesson Info
20. LRC Adjustments: The Lens Blur Tool
Lessons
Introduction
05:51 2A Tour of Lightroom Classic
28:03 3Importing Images into Lightroom Classic
23:14 4Selecting Images in Lightroom Classic
19:32 5Importing Metadata and Catalogs into A Catalog
03:01 6Organizing Images in Lightroom Classic
10:13 7Adding Metadata to Your Images in Lightroom Classic
09:21 8Bonus: Impossible Things AI Plugin
10:26Adjusting Images in Lightroom Classic with Synchronization
14:15 10LRC Adjustments: The Histogram and The Basic Panel
14:54 11LRC Adjustments: Profiles
07:39 12LRC Adjustments: The Transform Panel
05:38 13LRC Adjustments: The Crop Tool
04:25 14LRC Local Adjustments: Masking
12:35 15LRC Adjustments: The B&W Panel
06:02 16LRC Adjustments: Grain in the Effects Panel
08:17 17LRC Adjustments: The Point Color Tool
05:24 18LRC Adjustments: The Color Mixer Panel
01:15 19LRC Adjustments: The Tone Curve Panel
05:29 20LRC Adjustments: The Lens Blur Tool
07:59 21LRC Adjustments: More Masking
10:10 22LRC Adjustments: More Masking with Color Effects
05:14 23LRC Adjustments: Color Grading
15:42 24LRC Adjustments: Complex Masking
15:39 25LRC Adjustments: Masking and Retouching People
06:55 26LRC Adjustments: Creating AI Presets
11:39 27LRC Adjustments: Sharing, Installing, and Managing Presets
02:15 28LRC Adjustments: The Details Panel
16:20 29LRC Adjustments: The Lens Correction Panel
09:44 30LRC Adjustments: Retouching a Family Portrait
08:20 31LRC Enhance: Super Resolution
05:58 32LRC Merge: HDR
29:23 33LRC Round Trip to Photoshop Beta
11:36 34LRC Merge: Making Panoramic Images
13:59 35LRC Cleanup and Archive Workflow
20:20 36LRC Workflow Overview
02:47 37Finding Your Images from Lightroom Classic
13:35 38Conclusion
01:45Lesson Info
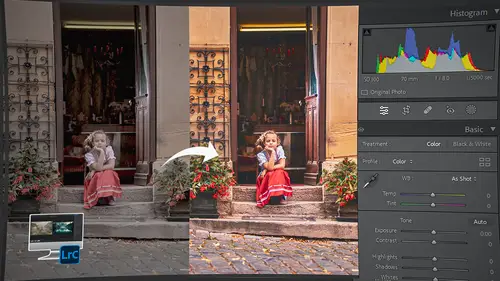
LRC Adjustments: The Lens Blur Tool
1 I'm gonna do one more thing to fix these foreground trees. 2 And that is, I don't want to look at them, 3 I don't want to to see them all that much 4 and so I'm gonna do two things to them. 5 The first thing I'm gonna do is I'm gonna use 6 what's called the lens blur tool. 7 This is an early access tool. 8 So it's brand new, 9 it's still in the development phase, 10 but you get to use it 11 and they're going to, 12 they want to get your feedback on it, 13 so they're gonna be adjusting it, 14 working on it. 15 So this is the beginning of 2024, 16 but by the end of 2024 you'll see that 17 this might have changed a little bit 18 or it might be just a little bit better or more effective, 19 but it will shift and change a bit 20 cuz they're still working on it. 21 But it looks, it's really good right now. 22 So I'm gonna click on the learn lens blur tool. 23 This is an AI tool, 24 so it's got artificial intelligence 25 and it's reading the depth mask of this image. 26 And so I'm gonna c...
lick apply 27 and it has to analyze the image 28 and then it gives you a lens blur. 29 And I like the fact that it can blur out the trees, 30 but look what it's done. 31 So it has chosen, 32 it's figured out what the information in the photo is 33 and how close it is. 34 And if I visualize the depth, 35 you can see all the yellow stuff is close 36 and all of the orange stuff is kind of close. 37 And then the kind of reddish stuff 38 and purple stuff is further away. 39 And then the black stuff is like way far away. 40 And you can see that that is also mimicked here. 41 And this area right here 42 is what we call the focal range. 43 And so I can increase the focal range all the way, 44 so now everything's in focus 45 or at least as in focus as the photo itself has. 46 And so obviously some of the photo is not in focus. 47 And so even if I increase the focal range, 48 if something's blurry, it's gonna stay blurry, 49 it's not gonna sharpen the image. 50 But now everything's totally in focus 51 and I want to cut these out of focus. 52 So I want it to look like I focused maybe on the trees 53 back here and on the building itself. 54 So I can take the focal range 55 and I can just go like this 56 and you can see how those trees 57 are starting to go out of focus, 58 but the trees here are still in focus. 59 So I can kind of guess and judge based on the colors 60 that I see here or the visual depth that I see here, 61 I can say, okay, I want the orange to stay in. 62 So I'm gonna go look at that. 63 I'm gonna go to about there. 64 That way everything that I want to be in focus 65 is still in focus and the rest of it is out. 66 There's another way to deal with this as well. 67 I'm gonna increase the focus to everything. 68 If you have people, 69 you can use this little people selector 70 and it will select the person and make that the focus 71 and then try and blur everything out. 72 Or you can choose a very specific area in the photograph. 73 So what I'm gonna do is I'm gonna choose an area 74 in the photograph by clicking on that little target tool 75 and now I can just draw and say 76 I want this area here in focus. 77 Boom. 78 So it looked and it said, okay, 79 that area equals this, 80 everything to the background all the way up 81 to the castle itself and a little bit of the trees. 82 So now I can visualize that depth and see what it did. 83 So I'm just gonna click on this 84 and see that's where it did it. 85 So everything below that ridge, 86 but I want the ridge to come back a little bit, 87 so I'm just gonna kind of go like that. 88 So I just finessed it's automatic assessment 89 and that works really quite well. 90 Except if I click on the background focus, 91 I want that to be exactly the way it was. 92 So I'm gonna leave everything in the background 93 the way it was and I just want to deal 94 with focus in the foreground, 95 that's what I want to change. 96 So lemme turn off the visualized depth 97 and you can see that I have blurred the foreground trees 98 quite a bit and I've softened, 99 I've softened that transition a little bit. 100 So I like that except I think I need 101 to go a little bit further this way 102 so that the trees themselves here don't get too sharp 103 and I can see that there's a little bit 104 of sharpness on this tree. 105 So it's having trouble in the transition here 106 cuz it thinks that this area is over here. 107 And that's why we have these options. 108 So this is a refinement brush that allows me 109 to add blur or focus to an area. 110 So I can click on blur 111 and I can change the focus brush and size. 112 And I can also change the feather on the brush 113 just like all brushes in Lightroom. 114 And I'm gonna turn off the auto mask 115 so it's not trying to find edges. 116 And then I'm going to put the flow at like say 60% 117 and then I'm gonna take my pen tool 118 and I'm just gonna come over here and paint in, 119 see how I'm taking care of the blur at the edge 120 of some bushes that are having problems there. 121 So now there's not a bunch of crunchiness 122 at the edge of these trees 123 because I brushed in total blur on those areas. 124 And I could have done this at like a a 30% or something. 125 So if you find yourself on an edge 126 and it looks like it's getting a little too crisp, 127 you can always kind of paint in and out that blur. 128 Okay, so now that I've done the blur, 129 I can actually come back here 130 and choose the type of blur that I want. 131 So now I can come in here and look at the Boca Effect, 132 anything from a very round Boca effect 133 to ablated Boca effect, 134 even a flourished kind of Boca effect. 135 And I would, if I were you, 136 I would just kind of cycle through 'em. 137 The blur itself is chosen. 138 So now I can just kind of cycle through 139 and I wouldn't actually cycle through these 140 until you had figured out what amount of blur 141 and where you want the positioning of the blur. 142 And then I would go through these and see 143 if there's any difference 144 in the way that your image is looking. 145 Now because this is in the fog, 146 you're not gonna see any major change in the Boca effect. 147 So you might want to try this on something 148 with some like specular highlights, 149 maybe sun coming into the image or you know, 150 the way a person has some highlights in their hair, 151 things like that. 152 That's where you're gonna really see some 153 of this stuff affect your image. 154 And then you can boost that Boca effect 155 so you can increase the effect of the Boca itself. 156 And then you can change the blur amount. 157 So I can increase the blur amount 158 or I can decrease the blur amount to zero. 159 So now we're back to normal. 160 So I can just kind of play with that blur 161 until I'm happy with it. 162 I don't necessarily want it to be like that 163 cuz that looks pretty obvious. 164 So what I want is just a kind of a soft, 165 a softening of those foreground elements there. 166 So I have a nice realistic blur on the trees in the front. 167 I'm getting sharpness in the trees in the back 168 and of course my castle looks awesome. 169 Alright, so I've played with the lens blur. 170 Now I have to do one more thing. 171 I have to create a mask that will help me 172 to put fog over the top of these trees just a bit. 173 So I'm gonna go into the mask section. 174 I could do this with a brush, 175 but instead of using a brush, 176 I'm going to use a range.
Class Materials
Bonus Materials
Ratings and Reviews
Maarten Barckhof
Wonderful. I am a (very curious) amateur photographer and for me this was all really interesting. Clearly spoken, nice examples, very educational indeed. Some doubts about making (too?) many changes in photos with generative AI, changing color, etc.: where does editing of a real word picture change into painting and creating something non-existent? And in some lessons the transcript (and subtitles) are missing. For people not having english as their mother language they are sometimes quite helpful. All in all: very recommended!
Sicily Dickenson
Great class to help you establish and understand workflow in Lightroom Classic. I also loved the presets that accompanied the class.