LRC Adjustments: The Details Panel
Lesson 28 from: Editing and Organizing your Photography in Lightroom ClassicJared Platt
LRC Adjustments: The Details Panel
Lesson 28 from: Editing and Organizing your Photography in Lightroom ClassicJared Platt
Lesson Info
28. LRC Adjustments: The Details Panel
Lessons
Introduction
05:51 2A Tour of Lightroom Classic
28:03 3Importing Images into Lightroom Classic
23:14 4Selecting Images in Lightroom Classic
19:32 5Importing Metadata and Catalogs into A Catalog
03:01 6Organizing Images in Lightroom Classic
10:13 7Adding Metadata to Your Images in Lightroom Classic
09:21 8Bonus: Impossible Things AI Plugin
10:26Adjusting Images in Lightroom Classic with Synchronization
14:15 10LRC Adjustments: The Histogram and The Basic Panel
14:54 11LRC Adjustments: Profiles
07:39 12LRC Adjustments: The Transform Panel
05:38 13LRC Adjustments: The Crop Tool
04:25 14LRC Local Adjustments: Masking
12:35 15LRC Adjustments: The B&W Panel
06:02 16LRC Adjustments: Grain in the Effects Panel
08:17 17LRC Adjustments: The Point Color Tool
05:24 18LRC Adjustments: The Color Mixer Panel
01:15 19LRC Adjustments: The Tone Curve Panel
05:29 20LRC Adjustments: The Lens Blur Tool
07:59 21LRC Adjustments: More Masking
10:10 22LRC Adjustments: More Masking with Color Effects
05:14 23LRC Adjustments: Color Grading
15:42 24LRC Adjustments: Complex Masking
15:39 25LRC Adjustments: Masking and Retouching People
06:55 26LRC Adjustments: Creating AI Presets
11:39 27LRC Adjustments: Sharing, Installing, and Managing Presets
02:15 28LRC Adjustments: The Details Panel
16:20 29LRC Adjustments: The Lens Correction Panel
09:44 30LRC Adjustments: Retouching a Family Portrait
08:20 31LRC Enhance: Super Resolution
05:58 32LRC Merge: HDR
29:23 33LRC Round Trip to Photoshop Beta
11:36 34LRC Merge: Making Panoramic Images
13:59 35LRC Cleanup and Archive Workflow
20:20 36LRC Workflow Overview
02:47 37Finding Your Images from Lightroom Classic
13:35 38Conclusion
01:45Lesson Info
LRC Adjustments: The Details Panel
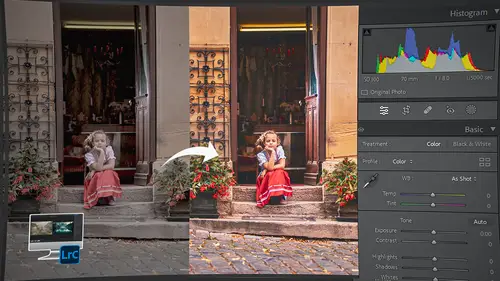
1 So the next thing we need to talk about is details. 2 Now in the details panel, 3 there are two different things that you deal with. 4 The first is sharpening and the second is noise. 5 So we're gonna deal with both of those here in this segment. 6 But I'm gonna skip over the sharpening for a minute. 7 We'll talk about sharpening a little bit later 8 in this segment. 9 I wanna talk about noise first. 10 So you can see that there's a new noise reduction area here, 11 which is an AI feature 12 inside of the new versions of Lightroom. 13 And it's available in all the versions of Lightroom. 14 So it's here. 15 It's also in Lightroom desktop, 16 so you can use it in a lot of different places. 17 But noise reduction, the new one, 18 the denoise button is AI driven. 19 So you don't make a lot of choices on it. 20 You click it and you can kind of use, 21 like, a sliding scale and I'll show you that in a minute. 22 There's also manual noise reduction 23 and manual noise reduction allows you...
24 to choose luminance noise reduction 25 as well as color noise reduction. 26 Now color noise reduction is something 27 that has to be done on all images. 28 It doesn't matter how good a camera you have, 29 it doesn't matter how low the ISO you're shooting is. 30 All digital images have color noise. 31 That's just the nature of the beast. 32 So you'll find that that's always about 25 33 inside of Lightroom to begin with. 34 And so generally speaking, 35 these numbers are perfect no matter what. 36 In this case, 37 you can see this image actually has very little color noise 38 necessarily in it because 25 takes care of it. 39 So this image, if I zoom in on it, 40 it's got quite a bit of noise in it. 41 You can see that these kind 42 of flat walls look like they're very sandy 43 and that's because of the noise in the digital image. 44 And that's just simply 45 because it is a 6,400 ISO image. 46 It's a little bit older camera. 47 It's not the newest cameras. 48 It's kind of like, 49 I think it's a 5D Mark IV. 50 So it's a little bit older, but it's got a lot of noise. 51 But if I were to turn off the color noise reduction, 52 you can really see that noise, 53 but you'll see that in every camera 54 and you'll even see that at fairly low ISO 55 just because that's just how cameras are. 56 They have color noise 57 and we use color noise reduction to remove that. 58 So there is no shame in using color noise reduction 59 on every single image. 60 In fact, it is the default. 61 So this works well. 62 You generally don't have to change it. 63 This is just the amount of noise reduction 64 for the color area that you're gonna use. 65 This is how much detail it's going 66 to try and sharpen into the image. 67 And this is how much smoothness it's going 68 to try and create in the areas 69 that it's trying to remove noise. 70 But you'll see very little change in these. 71 You'll see a lot of change in this, 72 but usually you'll lose any additional change. 73 Once you hit 25, 74 you probably won't see any more color noise reduction 75 because it'll be gone by that point. 76 You would have to have a really old camera 77 and a really high ISO to go over 25, 78 probably 50 would be way overboard on any image. 79 So I've never run into an image 80 that I needed more than 50 on. 81 So color noise reduction pretty much takes care of itself. 82 Now let's talk about this luminance noise reduction, 83 the manual section 'cause I want you to see the difference 84 between this and AI. 85 So I'm gonna go to somewhere on this. 86 Let's see. 87 Right here will work. 88 Okay, so there's some detail here. 89 I've got some pillars 90 and I've got some awning stuff going on. 91 And there's, like, a little chain here 92 and you can see the links in the chain. 93 And so what I'm gonna do 94 is I'm gonna take the luminance noise reduction up 95 until the walls don't look like they're sand. 96 And so I'm just gonna grab that luminance noise reduction 97 and start bringing it up. 98 And you can see that I'm removing the noise. 99 I'm doing a pretty good job at removing the noise. 100 The problem is that as soon as I get to the point 101 where the noise is fairly under control, 102 it's still a little bit grainy, but it's not bad, 103 I lose a lot of the detail in that chain. 104 I lose a lot of detail in folds in any kind, 105 like these stripes on the awnings get a little bit soft 106 between the black and the white bars. 107 So it gets pretty soft 108 and if I come down to any other kind of areas of detail, 109 it gets a little mushy. 110 Then I can take the details up and try, 111 and see how I'm sharpening in some of those details here. 112 So I'm trying to crisp up those edges. 113 Let's go back to our chain 114 and see, no, I still don't have the links in the chain. 115 They just kind of all mush together. 116 And then I can take the contrast up 117 and that just tries to find edges of contrast. 118 So you can see in the shadow on that chain, 119 it tries to kind of sharpen the edges of that shadow 120 so that I can see it a little bit better. 121 You'll also see it in the window shades here. 122 So that just adds contrast at the edges of things 123 so that you can see them a little bit better. 124 So this is about as good as I'm gonna get 125 in a manual noise reduction situation. 126 Okay, so that is what luminance noise reduction does. 127 The amount of luminance noise reduction 128 is how much it's going to try and soften the grain 129 and the detail and the contrast allow you to try 130 and get some of the detail back that's being lost 131 by smoothing the grain. 132 Now let's turn this off back to our original, 133 which is very, very grainy. 134 And let's go and use the noise reduction denoise option, 135 which is new inside of Lightroom. 136 So this new denoise feature is AI so when I click on it, 137 it has to actually send it to the cloud 138 and get some feedback on that. 139 So it takes a little while. 140 In fact, this one's giving me an estimate 141 of 15 seconds, no big deal. 142 But if you want to de-noise, say an entire set of images, 143 say you went on vacation 144 and there were like, 150, images that you wanted to de-noise 145 because they were all shot in, like, some dark chapels 146 and dark caves that you were in and things like that. 147 You can do it, but it'll take you a little time 148 and it'll give you an estimate as to how long it'll take. 149 Notice that it has a de-noise option, a raw details option, 150 and a super resolution. 151 And we'll talk about these other ones later. 152 When you do denoise, you automatically get raw detail 153 as part of the deal. 154 So if I were to turn off denoise, 155 I could just do raw details 156 and it would help to sharpen up 157 and kind of firm up the raw details in an image. 158 In fact, if I were to go to the chain 159 that we were looking at, 160 this is the raw detail enhanced version of that chain. 161 And if I go before, that's before. 162 So before actually looks like just kind of a gritty line. 163 And then when I let go of it 164 and I get after, you actually start to see a little bit 165 of the links in the chain, not much, 166 but you definitely see some improvement on the chain itself. 167 So it tries to help with the actual details. 168 You can see that the lines get a little bit crisper, 169 especially, like, the shadow here. 170 You start to see the shadow a little bit better. 171 And it does a really great job 172 with, like, blossoming areas here. 173 So if I click on before, you can see that there's, 174 like, a stair stepping effect in this little, 175 this little glowy sunrise looking thing 176 that's coming from a light inside, it kind of stair steps. 177 But when you let go, it gets a little smoother. 178 So those are some of the things that raw details does. 179 But if you de-noise, 180 you're actually adding to the raw details. 181 So it's doing raw details 182 and then it's denoising. 183 Now at 64%, look how smooth the walls are. 184 And yet with as smooth as those walls are, 185 look at the chain. 186 I can actually see the chain a lot better. 187 This is original and this is the new one. 188 Now I still only see one or two links, 189 but I definitely see the line itself 190 and I can change the amount of denoise that I'm doing. 191 So I'm gonna take it down to like say 45%. 192 Now we're back to 193 about the same amount of noise we were getting 194 on the manual noise reduction. 195 So we have a little bit of grain, 196 but it is significantly improved 197 on the amount of detail that we're seeing. 198 Look at these lines. 199 Let's go up to the awnings. 200 See how nice that awning looks? 201 And those lines are pretty crisp. 202 So I'm gonna use the 15 seconds 203 to enhance this at 45% of denoise. 204 What's gonna happen now is it's going 205 to create a brand new image. 206 It's gonna be a digital negative, a DNG, 207 and it's going to stack it on top of the original raw. 208 So I'll have the original raw 209 and then I'll have a DNG, which will be my denoise version 210 that is a raw image but now has less noise. 211 So we are still waiting. 212 Should be just a few more seconds now. 213 And then as soon as it's finished, 214 it's gonna just stack it right on top of this original. 215 So you can see that now we have a stack of two images 216 and if I go to the grid, I'll actually see those two. 217 And if I click on that, 218 if I click on this little two button, it opens up the stack. 219 So now I can see that there's, 220 this is the new one and this is the old one. 221 So let's look at 'em. 222 I'm gonna zoom out and we will go into the image itself. 223 Zoom into that image. 224 So this is the original image. 225 You can see it's very, very gritty. 226 And this is the new image. 227 Very clean. 228 But look at the window. 229 Look at this window. 230 If I go to the old one, there it is, a little rough. 231 Go to the new one. 232 Look how clean those lines are. 233 Absolutely beautiful. 234 I mean, it's so clean. 235 I mean, look at the shadows. 236 Like, let's go into these shadows here. 237 The shadows inside there. 238 Look how detailed those edges are. 239 And all the pillars and all the iron work. 240 The trees look good. 241 The windows with the light coming out look good. 242 Even the sparkles coming through the railings here 243 and the pillars. 244 I mean, that looks fantastic. 245 Now you're gonna look at these people 246 and say, "Well, those people look a little bit blurry." 247 Well, they are 'cause they're moving their heads 248 and they're kind of blurry because they're moving. 249 This is a a little bit longer exposure. 250 So it's a one 60th of a second. 251 They were turning their heads. 252 So you've got a little bit blurry. 253 His is a little less blurry 254 'cause he's just looking out the window. 255 These guys are a little bit better 256 'cause they're not turning their heads, 257 they're just kind of staring into each other's eyes. 258 But look at all of this detail and it's so smooth. 259 And that was a really noisy image. 260 So very noisy image and we cleaned it up. 261 Now in addition 262 to cleaning up the noise on this image, 263 I also want to work with the actual sharpness of the image. 264 So let's go back in and look at this image, 265 say right here since we were looking 266 at this before, this gives me the grid irons here, 267 gives me the awning. 268 I can see the chain over there. 269 So let's look at that. 270 And now let's go to the sharpening portion 271 of the details here. 272 So when we look at sharpening, 273 the amount slider is really dealing 274 with the minute sharpness. 275 So it's actually trying 276 to sharpen things at even the grain level. 277 So you see that it's actually sharpening pixels, 278 which starts to look grainy again. 279 So we're getting more noise back into it, 280 at least luminance noise looking stuff. 281 So it's not a great idea to overuse the amount slider 282 in the sharpening area. 283 So you know, anywhere below 50 is probably pretty good. 284 It used to be that 25 or 30 was a really good range, 285 but now that camera sensors have gotten much bigger, 286 they tend to push this up to in the 40s and 50s 287 in order to sharpen it. 288 So that's fine, 289 but just don't go overboard with it and don't try and, 290 when you need a sharp image, 291 don't take the sharpened amount up, take the radius up. 292 The radius is where you get your really good sharpening 293 without adding extra noise in the image. 294 And then detail kind of is a mix between the two. 295 So it's not quite as bad as amount 296 in, like, making the photo rougher, 297 but it's not as good at doing the big chunks as radius. 298 So radius is more about the big chunks. 299 Amount really focuses on the amount 300 that is being sharpened at the micro level. 301 And then details kind of goes in between. 302 And so if you go too far with details, 303 you start to get some of that grain back, 304 but not as much as you would if you were using the amount. 305 So typically my order of operation is leave the amount 306 where it is, take the radius up, 307 then start moving the detail up, 308 and then if you absolutely have to, 309 then you can play with the amount slider. 310 So the amount slider 311 is the very last thing that I would touch. 312 So that is the detail panel. 313 Manual noise reduction still works pretty well, 314 but the auto noise reduction 315 that is artificial intelligence is far superior. 316 And then sharpening, always use the radius first, 317 detail next, and amount last and never use the masking. 318 The masking just is ridiculous 319 because as you mask, you start introducing little areas 320 at the edges between not using. 321 So let me tell you what the masking does. 322 The masking actually is trying to find a cutoff 323 between sharpening and not sharpening. 324 So it will look for things that, 325 it'll try not to sharpen things that are smooth. 326 And then as soon as it sees something 327 that should be sharpened, it starts to sharpen. 328 The problem is then you end up getting 329 these little areas right at the edge of light and dark 330 and it starts to get noisy right when it gets to that. 331 And then it un-noises later. 332 And you get these lines of noise around 333 and it looks really horrible, especially on people's faces. 334 It looks awful because right when you get close 335 to their eyebrows 336 or right when you get close to their lips, 337 they have this line of noise around their lips. 338 It's awful. 339 Don't even touch masking. 340 It's the worst slider that, 341 well, maybe not the worst, 342 but it's close to the worst slider inside of Lightroom. 343 So don't touch masking, just touch these three 344 and in the order that I said: radius, detail, then amount.
Class Materials
Bonus Materials
Ratings and Reviews
Maarten Barckhof
Wonderful. I am a (very curious) amateur photographer and for me this was all really interesting. Clearly spoken, nice examples, very educational indeed. Some doubts about making (too?) many changes in photos with generative AI, changing color, etc.: where does editing of a real word picture change into painting and creating something non-existent? And in some lessons the transcript (and subtitles) are missing. For people not having english as their mother language they are sometimes quite helpful. All in all: very recommended!
Sicily Dickenson
Great class to help you establish and understand workflow in Lightroom Classic. I also loved the presets that accompanied the class.