LRC Adjustments: Profiles
Lesson 11 from: Editing and Organizing your Photography in Lightroom ClassicJared Platt
LRC Adjustments: Profiles
Lesson 11 from: Editing and Organizing your Photography in Lightroom ClassicJared Platt
Lesson Info
11. LRC Adjustments: Profiles
Lessons
Introduction
05:51 2A Tour of Lightroom Classic
28:03 3Importing Images into Lightroom Classic
23:14 4Selecting Images in Lightroom Classic
19:32 5Importing Metadata and Catalogs into A Catalog
03:01 6Organizing Images in Lightroom Classic
10:13 7Adding Metadata to Your Images in Lightroom Classic
09:21 8Bonus: Impossible Things AI Plugin
10:26Adjusting Images in Lightroom Classic with Synchronization
14:15 10LRC Adjustments: The Histogram and The Basic Panel
14:54 11LRC Adjustments: Profiles
07:39 12LRC Adjustments: The Transform Panel
05:38 13LRC Adjustments: The Crop Tool
04:25 14LRC Local Adjustments: Masking
12:35 15LRC Adjustments: The B&W Panel
06:02 16LRC Adjustments: Grain in the Effects Panel
08:17 17LRC Adjustments: The Point Color Tool
05:24 18LRC Adjustments: The Color Mixer Panel
01:15 19LRC Adjustments: The Tone Curve Panel
05:29 20LRC Adjustments: The Lens Blur Tool
07:59 21LRC Adjustments: More Masking
10:10 22LRC Adjustments: More Masking with Color Effects
05:14 23LRC Adjustments: Color Grading
15:42 24LRC Adjustments: Complex Masking
15:39 25LRC Adjustments: Masking and Retouching People
06:55 26LRC Adjustments: Creating AI Presets
11:39 27LRC Adjustments: Sharing, Installing, and Managing Presets
02:15 28LRC Adjustments: The Details Panel
16:20 29LRC Adjustments: The Lens Correction Panel
09:44 30LRC Adjustments: Retouching a Family Portrait
08:20 31LRC Enhance: Super Resolution
05:58 32LRC Merge: HDR
29:23 33LRC Round Trip to Photoshop Beta
11:36 34LRC Merge: Making Panoramic Images
13:59 35LRC Cleanup and Archive Workflow
20:20 36LRC Workflow Overview
02:47 37Finding Your Images from Lightroom Classic
13:35 38Conclusion
01:45Lesson Info
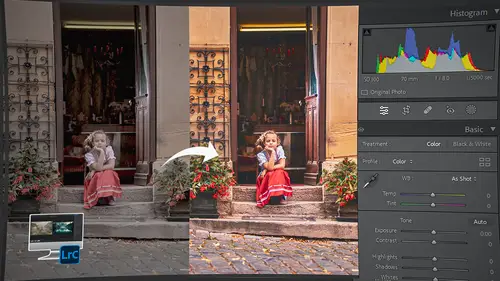
LRC Adjustments: Profiles
1 Inside of the basic section, 2 there is a really important tool up here, 3 and it's called Profile. 4 Notice right now that it's saying the profile 5 is Camera Neutral. 6 And the reason it's Camera Neutral 7 is because I have asked my preferences, 8 and we talked about these preferences earlier. 9 I've told my preferences that on the way in, 10 I want it to apply this profile 11 based on the settings on my camera. 12 So the picture styles in my camera, 13 it's seeing that I was choosing Camera Neutral. 14 So it's choosing Camera Neutral 15 as a starting point for the profile. 16 But I can go into this profile, click on that, 17 and I can choose any of the ones I've used in the past, 18 or I can browse. 19 And by the way, the browse option is also available 20 just by clicking on this little grid here. 21 So if I click on that grid, 22 then I get to see all of the different profiles 23 that are available to me. 24 And what I'm gonna do is I'm gonna go over 25 to these Color Art Pro ...
by Jared Platt. 26 So I have a set of profiles that are really quite nice, 27 and I can choose any of those profiles. 28 And if I float over them, 29 you'll see what it's gonna look like 30 while I float over them. 31 So these are different profiles. 32 Now, let me explain what a profile is. 33 A profile is a underlying color definition for a photograph. 34 So the photograph itself, 35 when it comes in, it has just data, 36 and then the software is going to try 37 and define that color. 38 And if you don't give it a profile, 39 if you just allow it to do, you know, Adobe Standard 40 or something like that, then it's just gonna say, 41 "Okay, we are going to define red 42 as whatever Adobe thinks red is." 43 Red is Adobe's red and blue is Adobe's blue, et cetera. 44 But you can apply any profile to it to the point 45 that you could say red equals green, 46 but it's just a definitional change. 47 It doesn't slide any sliders. 48 It doesn't do anything that you would see 49 inside of the adjustment sliders. 50 What it does is it changes the photo 51 before you see the photo. 52 So underneath the photo is an underlying photo definition, 53 and that is the profile. 54 And then you see that photo based on that profile, 55 and all the sliders are still at zero, 56 which is kind of cool because then if you apply 57 one of these profiles, then in a sense, 58 you've got two opportunities to adjust the image. 59 You got the profile opportunity 60 and then you get everything else. 61 I like to consider the film I'm using. 62 So in the old days when I would go out taking pictures, 63 I would take camera and I would choose a film 64 based on the way I wanted it to look. 65 If I wanted to go take landscapes, I might go get Velvia. 66 And so I go get some Velvia, 67 and that specific film is gonna look a very specific way. 68 I put it in my camera, 69 and then everything is gonna look like Velvia film. 70 That's a profile. 71 If I wanted black and white, 72 I would go choose, say, T-Max 400, 73 and I'd put that in my camera. 74 And then everything's gonna have 75 kind of a grainy black and white look. 76 So that's my profile. 77 These profiles, I'm going to choose a profile 78 based on the way I want these images to look. 79 I like the way that looks. 80 I'm gonna click on it. 81 Now I have a profile attached to this image. 82 And before I leave this, 83 I can come up to the profile browser area, 84 and you'll see that I've chosen this Color Shift Neutral 3, 85 and there's an Amount slider. 86 I can go more or I can go less. 87 So if I go less, I can go all the way to 0, 88 and now I'm back to normal. 89 And then I can just bring it in 90 and see where does it look best. 91 I'm gonna go way past. That's kind of cool. 92 I like the way that looks, 93 but, nah, might be a little bit too much. 94 So I'm gonna kind of come back out, 95 and I'm gonna zoom in and look at her 96 and make sure that I like the way the profile looks. 97 There's no profile. 98 There's 200% of that profile. 99 Where is the best look? 100 I'm gonna say it's right there. 101 So that's at 72% of the profile. 102 And then once I prefer that 72%, I hit close. 103 And now you can see that that's still available. 104 I can still adjust that to my heart's content. 105 But now I have this Color Shift Neutral 3 at 72%, 106 and here are all my sliders. 107 They haven't changed at all, 108 but the photograph itself has changed 109 in the way that it looks. 110 The final things to notice about the basic adjustment area 111 is the Auto button, the Black and White button, 112 and the HDR button. 113 HDR button is kind of a new thing. 114 And it's really based on do you have an HDR monitor? 115 Do you have a way to present HDR 116 to people outside of your room that has the HDR monitor? 117 Do you have a way to deliver HDR? 118 If you don't, don't worry about this. 119 But if you have HDR images, 120 so you've taken images that are HDR that you, 121 say you took three or four or five, 10 images at once, 122 and different exposures, and you've got this really rich HDR 123 that expresses everything from super bright highlights 124 to deep, deep, deep, dark shadows. 125 You can then turn on the HDR option here. 126 As long as you have the equipment to display HDR, 127 and you have an HDR image, 128 and you have the way to display that image 129 to your clients or to people that you want to show it to, 130 like, they have an HDR monitor, 131 and they have the capability of seeing it, 132 then it makes sense to play with HDR. 133 Otherwise, it's not worth touching. 134 The Black and White button is simply, 135 if I click on the Black and White button, 136 it turns it to black and white. 137 And then everything associated with this image 138 now becomes about black and white. 139 So for instance, the Vibrance and Saturation disappear. 140 You don't have that as an option. 141 The profile goes to a black and white option of profile. 142 And also instead of a color change option down here, 143 instead of the color adjustments, 144 those become black and white options here. 145 If I click on that again, now I'm back to color. 146 And the last option is this Auto button. 147 And this Auto button is almost completely worthless. 148 So if I click on that, 149 it's always gonna choose the wrong exposure. 150 So don't click on the Auto button. 151 That's the most important lesson you can learn 152 from the basic module. 153 Don't click the Auto button.
Class Materials
Bonus Materials
Ratings and Reviews
Maarten Barckhof
Wonderful. I am a (very curious) amateur photographer and for me this was all really interesting. Clearly spoken, nice examples, very educational indeed. Some doubts about making (too?) many changes in photos with generative AI, changing color, etc.: where does editing of a real word picture change into painting and creating something non-existent? And in some lessons the transcript (and subtitles) are missing. For people not having english as their mother language they are sometimes quite helpful. All in all: very recommended!
Sicily Dickenson
Great class to help you establish and understand workflow in Lightroom Classic. I also loved the presets that accompanied the class.