LRC Adjustments: Creating AI Presets
Lesson 26 from: Editing and Organizing your Photography in Lightroom ClassicJared Platt
LRC Adjustments: Creating AI Presets
Lesson 26 from: Editing and Organizing your Photography in Lightroom ClassicJared Platt
Lesson Info
26. LRC Adjustments: Creating AI Presets
Lessons
Introduction
05:51 2A Tour of Lightroom Classic
28:03 3Importing Images into Lightroom Classic
23:14 4Selecting Images in Lightroom Classic
19:32 5Importing Metadata and Catalogs into A Catalog
03:01 6Organizing Images in Lightroom Classic
10:13 7Adding Metadata to Your Images in Lightroom Classic
09:21 8Bonus: Impossible Things AI Plugin
10:26Adjusting Images in Lightroom Classic with Synchronization
14:15 10LRC Adjustments: The Histogram and The Basic Panel
14:54 11LRC Adjustments: Profiles
07:39 12LRC Adjustments: The Transform Panel
05:38 13LRC Adjustments: The Crop Tool
04:25 14LRC Local Adjustments: Masking
12:35 15LRC Adjustments: The B&W Panel
06:02 16LRC Adjustments: Grain in the Effects Panel
08:17 17LRC Adjustments: The Point Color Tool
05:24 18LRC Adjustments: The Color Mixer Panel
01:15 19LRC Adjustments: The Tone Curve Panel
05:29 20LRC Adjustments: The Lens Blur Tool
07:59 21LRC Adjustments: More Masking
10:10 22LRC Adjustments: More Masking with Color Effects
05:14 23LRC Adjustments: Color Grading
15:42 24LRC Adjustments: Complex Masking
15:39 25LRC Adjustments: Masking and Retouching People
06:55 26LRC Adjustments: Creating AI Presets
11:39 27LRC Adjustments: Sharing, Installing, and Managing Presets
02:15 28LRC Adjustments: The Details Panel
16:20 29LRC Adjustments: The Lens Correction Panel
09:44 30LRC Adjustments: Retouching a Family Portrait
08:20 31LRC Enhance: Super Resolution
05:58 32LRC Merge: HDR
29:23 33LRC Round Trip to Photoshop Beta
11:36 34LRC Merge: Making Panoramic Images
13:59 35LRC Cleanup and Archive Workflow
20:20 36LRC Workflow Overview
02:47 37Finding Your Images from Lightroom Classic
13:35 38Conclusion
01:45Lesson Info
LRC Adjustments: Creating AI Presets
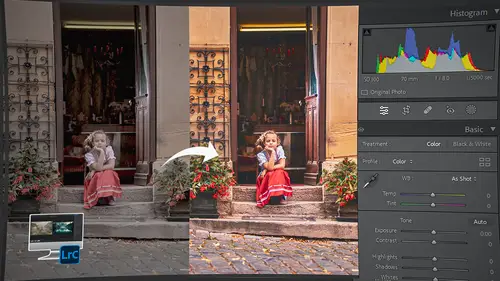
1 So the first thing that I'm gonna do 2 before I make this AI preset, 3 that's going to involve a mask, 4 we're going to go to the mask itself. 5 I'm gonna double click the mask name 6 and I'm gonna call it skin smoothing and hit OK. 7 So now I've got a skin smoothing mask 8 and that mask contains everything that is lips, body skin, 9 facial skin, and all of these settings that we just changed. 10 So now what I'm gonna do is I'm gonna go to the preset area 11 over on the left hand panel. 12 We haven't talked about this yet, but we're gonna make one 13 before we even talk about it. 14 And it's gonna end up in this user presets area. 15 So I'm gonna click on the plus button and hit create preset. 16 It's gonna give me choices. 17 I'm gonna call this skin smoothing standard. 18 Okay, so that's my skin smoothing standard. 19 Oops, that's not spelled correctly. There we go. 20 Skin smoothing standard. 21 I'm gonna put it in the user presets folder. 22 Gonna keep the process version corre...
ct 23 and then I'm gonna use the masking tool 24 to choose skin smoothing. 25 So now I'm creating a preset that has a mask in it. 26 Now if it was just a normal mask 27 where you'd painted something, that'd be a dumb idea 28 because it would always paint the same thing. 29 But in this particular situation, 30 the skin smoothing is chosen by AI, 31 so it will be different every time it's used. 32 So I'm going to make sure the masking is selected, 33 that automatically chooses the process version, 34 and I'm gonna make sure 35 that the support amount slider is checked. 36 That allows us to increase and decrease 37 the effect of our skin smoothing 38 after we choose the image and after we run the preset. 39 So I'm gonna hit create. 40 I've just created my preset. 41 You can see if I go here, 42 skin smoothing standard is right there. 43 If I right click it, I can add it to my favorites. 44 So now there's a favorites folder here, 45 and it has skin smoothing standard in it. 46 If you ever like some kind of a preset 47 that's down here in the presets, all you have to do 48 is go and click on that favorite and right click it 49 and just add it to your favorites. 50 It still stays here in the folder, 51 but then you don't have to go hunting for it, 52 it's just right here in your favorites. 53 If you don't like it anymore, you can right click it 54 and remove it from the favorites, 55 and now you just have the one. 56 Okay, so now that I have that, I'm gonna go back 57 to the same photo. 58 I'm gonna highlight all of 'em, 59 and I'm gonna go up to the the masking options here 60 and I'm just gonna click on this mask 61 and I'm gonna delete all masks. 62 And because we're auto synced, 63 it's gonna remove the mask from all of 'em. 64 So just to show you that that's happened, 65 there are no masks. 66 You can always tell there's no masks 67 because there's no dot underneath the masking tool. 68 So there are no masks on this 69 and all I have to do is highlight the entire set of images, 70 I'm in auto sync again, see that? I'm in auto sync 71 and I go over to the skin smoothing standard 72 and click that button, it automatically detects 73 all the faces in all seven photos 74 and as soon as it's done, it's gonna apply 75 that set of adjustments to the mask and we're done. 76 So now I don't even have to go through the process 77 of making the mask 78 because the AI preset does it for me. 79 So there we are. 80 If I click on that mask and show the overlay, there we are. 81 She has the same mask on her here, see that? 82 She has the same mask on her there. 83 So that mask is on all of 'em and if I zoom in, 84 you can see that her skin is now smoothed 85 and if I turn it off, that's what it looks like. 86 Turn it on, that's what it looks like. 87 Off on, off on. 88 So if you want to retouch images really quickly, 89 this is the way to do it. 90 And if you take portraits of children, 91 if you take portraits of people 92 and you want to quickly show them the images, 93 and maybe you're gonna do some serious retouching 94 in Photoshop later, do this to all the images 95 you're gonna show to the people, 96 and they will love the way they look in the photos, 97 even when they're just proofs. 98 Now, I promised you that I was gonna show you 99 another mask technique and create another preset. 100 So I'm gonna show it to you on these same images. 101 I'm gonna go in and create a new mask, 102 and this time I'm going to create a radial gradient. 103 And that radial gradient is gonna go 104 right behind her like this. 105 And I'm just gonna kind of put it 106 in the center of the photograph like that 107 and then I'm gonna invert it. 108 And you can do two different things to invert. 109 You can go up to the triple dot button up here in the mask 110 and you can say invert, or you can just simply 111 click on the quotation mark key, 112 which is right next to return and it inverts it for you. 113 So this is the easiest way to invert a mask. 114 So I just inverted the mask, I'm gonna make sure 115 that my mask is feathered, it's at 100%. 116 I don't want it to be like this. I want it to be like that. 117 So I'm, let's go 71%. 118 So it's a pretty good gradient. 119 Then what I'm gonna do is I'm gonna make my burn. 120 So I'm gonna take the exposure down 121 just a little bit like this. 122 But what I don't wanna do is I want it to hit her, 123 because in the future when I use this as a preset, 124 I want to just kind of make a burn on the background, 125 but not on whatever the person is 126 and I probably don't want to go that rich. 127 I'm just doing a very subtle burn on the background. 128 So now that I've got my subtle burn on the background, 129 I'm gonna double click this mask, 130 I'm gonna call it background radial burn, okay? 131 And I'm gonna hit OK. 132 Now that I have the background radial burn made as a mask, 133 and I like the way it burns, 134 I'm going to remove her from it. 135 I go up here and I click on the subtract 136 and I choose people or I could choose subject, either way. 137 Right now it's gonna subtract the subject 138 because she is the subject. 139 But in the future, maybe I only want it to remove people. 140 So maybe you should make two different versions of this. 141 So I'm gonna choose people 142 and right now there's only one person, 143 so it's just gonna choose the one person 144 but since I only have one person, if another image comes in 145 and it has five people, 146 it's actually gonna choose all the people 147 'cause it doesn't know who to choose. 148 So I'm gonna just say, choose the person, 149 and I'm choosing the entire person, 150 I'm gonna create the mask. 151 It has removed her, so now you can see that it doesn't have, 152 so there's the person, there's the gradient, 153 but there's the mask. 154 See how she's cut out of the mask? 155 So now that gradient burn is behind her, not on her. 156 So I've got that set, I like the way it looks, 157 so now I'm gonna go over to the presets, 158 I'm gonna create a preset by clicking the plus button, 159 hit create preset and I'm gonna call this 160 background radial burn. 161 And I'm gonna leave it in the user presets 162 and this time if I wanted to, I could actually make one 163 that does both at the same time. 164 It could smooth her skin 165 and create a background radial burn, 166 but I'm gonna separate them out into two different ones. 167 I'm gonna still support the amount slider and hit create. 168 And now if I go into the user presets, 169 where is that one background radial blur, a burn. 170 I'm gonna make that a favorite. 171 So now I have two favorites. 172 Background radial burn, skin smoothing standard. 173 So now, remember we've got all of these applied, 174 but I'm gonna go in and I'm gonna again, 175 delete all of my masks. 176 So if I go down to the bottom of the masking, 177 I can say delete all masks. 178 So all the masks are gone off of all these photos 179 because we're in auto sync and so now, 180 I'm just gonna do the skin smooth 181 and it does the skin smooth for me. 182 There. 183 All of my images have skin smoothing on 'em 184 and then if I wanted to, I have the ability 185 to click on background radial burn 186 and it's finding the person, cutting 'em out. 187 If it was just a radial burn, 188 it would just apply it to all of 'em really quickly 189 but it has to find the person 190 and remove them from the scene. 191 So there see how it gave me that burn? 192 And all of 'em have that burn on it. 193 Now if I wanted to, I could just go to one of them 194 and say, oh, I want that burn to be a little bit different. 195 So I click on the background radial burn, 196 just choose the radial gradient part of this, 197 of this mask and I can move the actual burn around, 198 but the person is still in there and I can go in 199 and darken it up if I want and I can keep moving it around. 200 So I could put all the light over here 201 and see how she doesn't change at all, 202 no matter what I do, wherever I put it. 203 So I could put the sun coming down 204 and hitting the top of this tree 205 and everything else is a little shadowy. 206 Maybe that's too much, 207 but maybe like that looks pretty cool. 208 And so I can kind of play with where that position is, 209 but she's never affected by it 210 and then I've got all of my other images, 211 which may have completely different positioning 212 for that same radial gradient, can move around 213 because their independent masks within one mask. 214 So that's how you create AI presets 215 that will do a lot of work for you 216 that you never have to do again, 217 because it'll find the person, it'll find the skin, 218 it'll find their lips, it'll find their eyebrows. 219 In fact, I just made a bunch of presets 220 specifically for this Creative Live workshop 221 and the other ones that I'm creating right now. 222 So I've got an entire set 223 of what we call adaptive presets. 224 So these are all adaptive presets. 225 They are the Adaptive JP Presets collection 226 and I am going to share them with you, 227 for those of you who have purchased this class, 228 you have access to the Adaptive JP Presets, 229 so feel free to look in your account 230 for those in this class.
Class Materials
Bonus Materials
Ratings and Reviews
Maarten Barckhof
Wonderful. I am a (very curious) amateur photographer and for me this was all really interesting. Clearly spoken, nice examples, very educational indeed. Some doubts about making (too?) many changes in photos with generative AI, changing color, etc.: where does editing of a real word picture change into painting and creating something non-existent? And in some lessons the transcript (and subtitles) are missing. For people not having english as their mother language they are sometimes quite helpful. All in all: very recommended!
Sicily Dickenson
Great class to help you establish and understand workflow in Lightroom Classic. I also loved the presets that accompanied the class.