Adjusting Images in Lightroom Classic with Synchronization
Lesson 9 from: Editing and Organizing your Photography in Lightroom ClassicJared Platt
Adjusting Images in Lightroom Classic with Synchronization
Lesson 9 from: Editing and Organizing your Photography in Lightroom ClassicJared Platt
Lesson Info
9. Adjusting Images in Lightroom Classic with Synchronization
Lessons
Introduction
05:51 2A Tour of Lightroom Classic
28:03 3Importing Images into Lightroom Classic
23:14 4Selecting Images in Lightroom Classic
19:32 5Importing Metadata and Catalogs into A Catalog
03:01 6Organizing Images in Lightroom Classic
10:13 7Adding Metadata to Your Images in Lightroom Classic
09:21 8Bonus: Impossible Things AI Plugin
10:26Adjusting Images in Lightroom Classic with Synchronization
14:15 10LRC Adjustments: The Histogram and The Basic Panel
14:54 11LRC Adjustments: Profiles
07:39 12LRC Adjustments: The Transform Panel
05:38 13LRC Adjustments: The Crop Tool
04:25 14LRC Local Adjustments: Masking
12:35 15LRC Adjustments: The B&W Panel
06:02 16LRC Adjustments: Grain in the Effects Panel
08:17 17LRC Adjustments: The Point Color Tool
05:24 18LRC Adjustments: The Color Mixer Panel
01:15 19LRC Adjustments: The Tone Curve Panel
05:29 20LRC Adjustments: The Lens Blur Tool
07:59 21LRC Adjustments: More Masking
10:10 22LRC Adjustments: More Masking with Color Effects
05:14 23LRC Adjustments: Color Grading
15:42 24LRC Adjustments: Complex Masking
15:39 25LRC Adjustments: Masking and Retouching People
06:55 26LRC Adjustments: Creating AI Presets
11:39 27LRC Adjustments: Sharing, Installing, and Managing Presets
02:15 28LRC Adjustments: The Details Panel
16:20 29LRC Adjustments: The Lens Correction Panel
09:44 30LRC Adjustments: Retouching a Family Portrait
08:20 31LRC Enhance: Super Resolution
05:58 32LRC Merge: HDR
29:23 33LRC Round Trip to Photoshop Beta
11:36 34LRC Merge: Making Panoramic Images
13:59 35LRC Cleanup and Archive Workflow
20:20 36LRC Workflow Overview
02:47 37Finding Your Images from Lightroom Classic
13:35 38Conclusion
01:45Lesson Info
Adjusting Images in Lightroom Classic with Synchronization
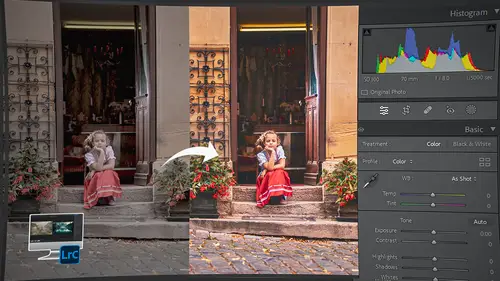
1 Now, I have gone through and removed all 2 of the adjustments that the AI feature put into these images 3 so that we're back at square one, 4 so that I can show you the process of adjusting images 5 without the assistance of any kind of AI 6 that's external to Lightroom Classic. 7 So we are now inside the Library module, 8 but we need to go to the Develop module. 9 So I am clicking on the Develop module, 10 and you'll notice that down below on the film strip, 11 I have all of the images selected. 12 And that's for a reason. 13 So I've selected the entire portrait session. 14 Now this may be a wedding for you or it might be 15 a travel photography that you've done, or a trip, 16 or it could be some art photography, 17 it could be your kid's soccer game, 18 whatever it happens to be. 19 I'm selecting all the images because I want you to see 20 that most images, as long as you're doing a decent job 21 at exposing your images and kind of taking some time 22 as you set your settings in ...
your camera, 23 most images are fairly equal to each other. 24 So you don't have to edit one image at a time. 25 That's a very slow way to work, 26 and you don't necessarily have to do that. 27 So what I'm gonna do is prove that concept to you 28 by doing what's called synchronization. 29 And we'll go through all the adjustments that I'm going 30 through really quickly here in a minute. 31 So don't worry that I'm going way too fast 32 on the adjustments. 33 I'm just talking about synchronization at this point 34 because this is a pretty critical part 35 of a workflow inside of Lightroom Classic. 36 So, as I go over to the right hand panel 37 where all the tools are for adjustment, below at the bottom, 38 you'll see that there is a reset button 39 and there's an Auto Sync button. 40 Now, oftentimes it looks like this: sync dot dot dot. 41 And if I click on that button, I get a dialogue that asks me 42 what kind of settings do I wanna synchronize 43 from one image to the rest of the images that are selected. 44 And I can choose all, I can choose none, 45 and then I can choose specific ones 46 that I want to synchronize. 47 But in this case, I'm gonna hit Cancel 48 because I want to turn on Auto Sync. 49 When I turn on Auto Sync, anything 50 that I do in an adjustment slider is done 51 to all images at the same time. 52 And that saves us a lot of time 53 when we're adjusting a bunch of images. 54 So I'm going to do this across all of the images 55 so that you can see that all 56 of the images can be adjusted at the same time 57 and they will get close to the right exposure 58 and close to the right contrast. 59 There will still be some adjustments that need to be made 60 but, we're gonna get 90% of the way there 61 with editing one photo. 62 So here comes the proof. Are you ready? 63 I'm going to just do a little bit of work on this. 64 So my first thing that 65 I wanna do is warm up the temperature. 66 So, I've just warmed up the temperature. 67 I'm gonna take the tent up a little bit. 68 I'm gonna take the exposure up. 69 Now, just a warning about that temperature and tent. 70 If you are not in the same general lighting, 71 you're gonna see some major differences in the lighting. 72 Now, in most of these images, I'm kind of 73 in the same lighting conditions, so I can do that. 74 But you're gonna notice some 75 of these are gonna get really warm if I'm kind of 76 in the deep shade or something like that. 77 So, if you are doing travel photography, don't play 78 with the temperature and tent, 79 just play with everything else. 80 So I'm gonna bring the exposure up just a little bit, 81 not too much because most of them are the correct exposure. 82 And then I'm gonna take the highlights 83 down just a little bit. 84 I'm gonna take black down quite a bit 85 to give it some contrast. 86 I'm gonna bring the shadows down just a little bit, 87 and I'm gonna bring the white point down. 88 Actually, I think that exposure is too much, 89 so I'm just gonna double click it and take it back to zero. 90 And then I'm gonna take the contrast down, 91 which I know most people like to take the contrast up, 92 but I actually prefer to bring the contrast 93 down just a little bit. 94 So I'm generally bringing the contrast down somewhere 95 in the 10 range or something like that. 96 It just softens up the image a bit more. 97 I like where that's at. 98 I think that's probably about what I want to do. 99 I'm gonna zoom in and make sure 100 that I like the way that looks. 101 So I'm gonna now look at all the other images 102 and we're gonna see if I was right. 103 Can I adjust one image and get it to apply 104 to all the other images and be close to what I want? 105 And so we're gonna just scan through 106 and you can see that these are adjusting. 107 But if I click on this one, yeah, that's pretty close. 108 Let's click on something 109 that's a little further away like this one. 110 Yeah, that's pretty close. 111 How about this one? 112 A little bit dark, but still pretty close. 113 How about this one? 114 Just a little bit dark, but pretty close. 115 Let's go to something like this. 116 Okay, see, this is a little bit warmer, but it's not bad. 117 It's not too far off. 118 Grab this one. Eh, it's a little dark, but pretty close. 119 This one. 120 Okay, that one's quite bright, but it's still okay. 121 It's not awful. Same thing here. 122 So this one is a bit off. 123 It's good exposure, but you can see that it's warmer up here 124 and it's a little bit greener and bluer down here. 125 And that's just because of the way the light's falling. 126 So this one needs a extra help, which we can work on later. 127 I'm gonna come in here, take a look at this. 128 She's leading the horse. That looks pretty good. 129 How about this one? Yeah, it's pretty close. 130 So I mean, so far everything's within an acceptable level 131 of close until we get to something like this 132 where it's really, really warm 'cause the sun is setting. 133 And so we're getting that really warm sunset 134 that's coming through the dust in Arizona. 135 So things are gonna start to change here quite a bit. 136 But still, even with things changing quite a bit, 137 this is still acceptably close to a normal exposure. 138 So as I click on images, I'm just kind of scanning 139 through looking for things that are way off and they're not. 140 And that's because most images, 141 as long as you get the exposure semi-close in camera, 142 they're gonna be close. 143 Now this one's a bit dark, so we'll have to work on that, 144 but I'm gonna show you how to do that in groups. 145 So let's just kind of keep going through that. 146 That's a little dark, but it's okay. 147 So I've just shown you that we are in the zone, 148 we are close on everything. 149 Now these are quite varied. 150 You can see that they're quite warm. 151 But if I were to go through 152 and highlight all of these that are inside the barn, 153 just highlight all of them. 154 So I Shift + click from one all the way 155 to the other one here, and then I just choose one 156 that's kind of in the middle. 157 So I'm just gonna choose this. 158 It's kind of in the middle of bright, dark, 159 too warm, not warm enough. 160 And I'm just gonna take the warmth down a bit. 161 I'm gonna bring the exposure up, bring the shadow up. 162 There. Now all of these, look at this. 163 All of these are in the zone now. See that? 164 So I'm already where I want to be. 165 And then I can click on this next set here. 166 And I can just say, I want this to be a little bit brighter 167 and bring the shadows down just a little bit. 168 And because I have the Auto Sync on, anything I do 169 to these images is being done to all 170 of them at the same time. 171 So this one was a little bit bright, 172 I just need to bring the shadows down, 173 bring the exposure down just a little bit, 174 and that looks pretty good. 175 Then I'm gonna highlight the dog 176 and brighten that up just a little bit. 177 Bring the shadows up a little bit. There. 178 So I click on this image 179 and I'm looking for similar lighting, similar conditions, 180 and all of this looks the same up to here for sure. 181 And so I can just take the shadows down just a little bit. 182 I like where their faces are. That looks pretty good. 183 Now I can click on all of her images. 184 Now notice that the lighting changes 185 a little bit starting here. 186 So it starts and goes to about here, 187 and that's where it changes. 188 So I'm just gonna take the shadows down a little bit 189 on all of those. 190 You can see that one looks good, but I'm gonna go to here 191 and now things start to change a bit. 192 So I'm gonna bring the shadows down again. 193 But then here, these three images, it's a little dark, 194 so I just take the exposure up just a bit. 195 And maybe just a little bit more. There. 196 Then I'm gonna go to her. 197 Next one, I just want to bring the exposure up a little bit 198 and the shadow down a little bit. 199 But notice that I'm only adjusting one 200 or two sliders, just a few sliders here and there 201 instead of all of the sliders 202 because most of it's in the zone. 203 Most of it's where it needs to be, 204 but it's just a couple changes on this group of photos 205 and then on this group of photos 206 and then on that group of photos. 207 It's much easier to do it this way. 208 And you'll notice that it's not taking me all 209 that much time to go through it. 210 In fact, we should be done here pretty quickly. 211 I'm just gonna go through. 212 These photos are a little bit dark, 213 so we'll highlight both her and her mom, brighten that up, 214 take the shadows down just a little bit 215 and add a little bit more warmth there. 216 And then when I go to the mom, she looks good there. 217 So then I'm gonna highlight all of these family photos here. 218 And actually I think that the adjustments I just made 219 might actually work on these pretty well. 220 So what I'm gonna do is I've got them highlighted 221 and if I hit the Shift key, 222 this Auto Sync button is gonna turn into 223 what we see as a Previous button. 224 See that? 225 And because Auto Sync is still on, 226 if I hit the Previous button, 227 it will take the previous settings 228 and apply them to all of these images. 229 And now if you look here, that's pretty much in the zone. 230 So now we're gonna highlight the next set of images. 231 Now notice that this one is dark, 232 'cause that's an example of no flash. 233 And then this one is light. 234 So this one here, I'm gonna just hit the X key for reject 235 because there's no flash. 236 So I don't want to use that photo, 237 it's more of an example of the before after. 238 So then I'm gonna click on this one 239 and Shift + click to the end of this set here. 240 And I'm gonna go in and say, ah, 241 I need to brighten this up just a little bit 242 and take the temperature down just a little bit, 243 bring the shadows down just a bit. 244 Good, we're all set on that one. 245 Then I'm gonna go into the one with the girls here 246 and highlight all of those. 247 I think I can Shift + click this and Previous. 248 Close, close but not quite there. 249 I need to bring the exposure down just a little bit. There. 250 And actually that white dress is a little bit bright, 251 so maybe I can take the highlights down just a tad too. 252 Okay. Then we're gonna do the couple. 253 And bring the temperature down a little bit. 254 Bring the exposure up, shadows down. 255 Seems to me that most of these dark ones need 256 the same group of adjustments on them. 257 But this is how we synchronize images, 258 one image to a group of images. 259 And we're halfway through this 260 and we haven't spent too much time. 261 In fact, if I had been doing this without talking to you, 262 I'd be done by now. 263 So, 264 the key to getting your images quickly done 265 in the zone is to start with all of them if you can. 266 If you're kind of in similar lighting conditions 267 and you've been paying attention to settings on the camera. 268 Now, if you are doing your images 269 from a month-long period of photographing, 270 you've been shooting for a long time 271 and then you're just coming back and editing those images, 272 or you've been on vacation for a week and a half, 273 you're going to probably not be able 274 to do all of them at once. 275 But you can probably do everything from this street area 276 and everything from this park 277 and everything from this. 278 And you should be able to get most 279 of the things in one area done at the same time. 280 So just select that group of images and work on those, 281 and then select the next group of images and work on those. 282 So that is the best way 283 to adjust your images is through the synchronization method. 284 And you can do that either by doing Auto Sync 285 or you can turn off Auto Sync 286 and you can adjust an image here. 287 And then just simply Shift + click to another set 288 of images and hit the Sync button 289 and choose exactly what you want 290 to synchronize from one image to the others.
Class Materials
Bonus Materials
Ratings and Reviews
Maarten Barckhof
Wonderful. I am a (very curious) amateur photographer and for me this was all really interesting. Clearly spoken, nice examples, very educational indeed. Some doubts about making (too?) many changes in photos with generative AI, changing color, etc.: where does editing of a real word picture change into painting and creating something non-existent? And in some lessons the transcript (and subtitles) are missing. For people not having english as their mother language they are sometimes quite helpful. All in all: very recommended!
Sicily Dickenson
Great class to help you establish and understand workflow in Lightroom Classic. I also loved the presets that accompanied the class.