Lessons
Lesson Info
Demo: 1 Point Perspective
We're going to talk about one point versus two point perspective in a minute and this is where people often say, Oh perspective, forget it, you lost me, because I just don't wanna deal with measurement and I just wanna; I get that like I'm sort of that camp that have been in the past, but I'm just gonna show you some super simple ways that you can start to understand the positioning of blocks in space, show you some real time examples of that and then, practice it a little bit and, of course, we have our downloadable practice pages for you to practice at home and they're literally like simple dot to dot tracings, but you can just do; it's really; there's no fear about that; you can just practice in that way, as well in addition to sort of setting up with block and all that, so we will get there, so we have this drawing, but the other thing I actually wanted to talk about is segue to perspective. This drawing feels kind of far away and maybe initially, it feels like, maybe, Whether she'...
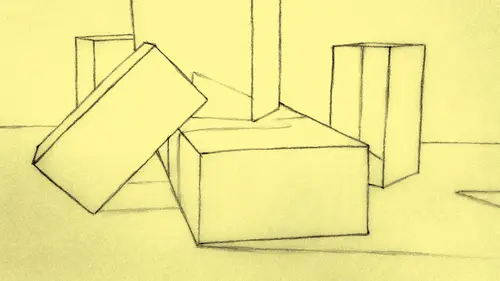
s using perspective there. Whether she's not using perspective. She's talking about stacking blocks, but the reality of this drawing is that all from this view, all of the buildings; pretty much all of them have a corner coming right at me; a corner facing me, so if we can just get one other shot of this drawing and show that and then, I'm actually gonna show you how these buildings actually fit into two point perspective which is not meant to scare you; it's just meant to show you sort of the theme of it and then, we're gonna dial it back to something more simple, so right now, if we look at this drawing, we can see that we've seen it before. We can see that a lot of these front corners are facing us and then, from those front corners, the ceilings, the roof tops and bottoms of the buildings are all sort fanning out, so what would that look like if we looked to the diagram of it in terms of two point perspective? So, I happen to have that here. So, it's a very long diagram, so we'll have to take a scan of it maybe, but this is is basically showing that the front corners and the roof tops and the ground planes of all of the major buildings in this image. If you traced; so this red line here refers to my eye level, so my eye level was pretty high. Refers to my eye level, so all of the roof tops that sort of line up with my eye level were relatively horizontal to the ground plane, but as you go above my eye level, you can see these blue lines start slanting down to two vanishing points on the horizon. If you go below my eye level, you'll see that these blue lines start slanting upwards to these vanishing points and again, these lines are coming off of the roof lines and the base lines have a lot of these buildings, so this seems rather complex, but the idea is rather simple and that's what we're gonna do next. We're gonna look at how one point perspective relates to two point perspective. I'm gonna draw you through some examples of that. You can practice it and then, we're gonna show how that applies to some shapes; some simple box shapes and then, from there, you can just practice, practice and then, maybe find the bravery to get outside and draw some buildings, so I'm gonna go ahead fill this up and move on to some of the ideas about one point versus two point perspective, so we're gonna go back to the slide and here it is; one point versus two point perspective, so I wanted to show you some examples of the two just so you get a feel for it, so in one point perspective, you have pretty much all the lines that are going away from you are converging to a single point on the horizon, so this is a beautiful little courtyard that I photographed in Rome and if we take this image and do like a simple overlay, you could see it's pretty magical actually how visually all these lines converge back to the single vanishing point, so when we talk about perspective like what is perspective; it's basically a system we use to create an illusion of three-dimensional space and it relates to how the objects in the picture; three-dimensional objects get constructed by relating them back to either one or two vanishing points on a horizon line and that helps us relate (mumbles) their scale to each other, their placement to each other and their overall structure and we're gonna find out how to do that, so this is a one point perspective example, but let's take a look at the two point perspective example, because we often see that, so this is this in Italy to a little structure outside this old church that I found and I thought it was a great example of two point perspective, so notice here, the building has a corner coming at us, right? And then, the walls are sort of spanning away from us, so if we looked at this in two point perspective, you notice how the eye level is just right about down in the lower third of the building; not sort of my height and then, I was looking at the building and you can see how the roof lines come down towards the vanishing points. One of them is on the page. One of them is off the page, right? You can see that. You can just the other ones are sort of implied and you can see how the ground lines come up, because that's under my eye level to the vanishing points and that starts to create this; actually, really simple 3D block in space that's very believable and those things that within this spot like the door and some of the detail the building follow the sort of fanning out to the vanishing points, so some artists use these ideas in a rather structured way like kind of letter from the 18th century. He did a tons of drawings (mumbles) the paintings and they are rather structured in academic, but some artists like my friend Mark Adams. He's amazing artist. He has tons of sketch books and this one he's using perspective, but more loosely. There's a sense of a zoom of space and lines converging, but it's much looser in these sketch book pages, so there's no one way to use it, but definitely learning the basics. Learning how to establish the really core concepts will allow you to spring more to do more creative things like Mark does here in his drawing, so we're gonna try it; we're gonna try some one point perspective first, so here's one point perspective, so let's check a little animation of where we're going and then, we're actually gonna look at each section of it and then, we're gonna draw it out, okay? So, here's an animation. So cool. One point perspective. So, you can see how those blocks are channeling back. Their front facade is facing us directly and their sides are channeling back to one point on the horizon, so let's take that apart visually and then, I'm gonna draw it for you and then, you can try it at home, so basically, we start a horizon line and we start with the point on that horizon line. Then, we might put a box shape on that point. If that box is at my eye level, it would sit right on there and we're not really seeing unless we're seeing through the box. We're not really seeing the sides, so we're not drawing the sides in this case; in one point perspective; here if the box is dropped below the horizon line, you can see the top and the front and you can see how the sides converge back to that one point. Here you can see the center box as if it see through and here, you can see a box above eye level where you're seeing the bottom of the box and the front facade, but again, still this parallel lines are going back in the space; no longer parallel they converge like looking down wherever it tracks into space. Here are a couple boxes (mumbles) to the side, but still demonstrating one point perspective and then, here's some sort of simplified boxes that are the end result of that process, so what I'd like to do is I'd like to take you through how we do that like how would you draw. If you just wanted to practice it at home like how would I draw a box in one point perspective and we can do that in two ways. We can do it here first I'm gonna go through the construction of a diagrammatic way in like a conceptual model and then, I'm gonna actually take a block and put it in front of me and sketch with these ideas in mind, so you can both see sort of the concept as we've built it here, but then, you can see how that applies to an actual physical block in space and I think that's a nice reinforcement of the idea and at home, you can work on the downloadable practice pages or you can go ahead and like draw along with me; you can set up a line. You can work with that or you could just take a block out and practice with it, alright, so we're gonna direct our attention here and I'm gonna draw through some of these ideas, so, right now, in this one point perspective diagram, I basically have a horizon line which I'm going to intensify, so I'm not a big drawer of... I don't love drawing with the ruler, but sometimes, just to establish some basic ideas, you kind of need to create a few lines with the ruler. Ideally, to have the confidence to this free hand, then the line would be a great thing, but this line right here is my horizon line and have a little dot right here. This is my vanishing point in one point perspective in this particular picture. I have one, two, three rectangles that are facing me and I want them to all converge back to this vanishing point, so I'm gonna show you how I would do that, so, first off, we think about how the diagonal lines would converge back to that vanishing point in three scenarios; one above my eye level, one below my eye level and one at my eye level, but a little bit to the side, so let's go through and sketch this out a little bit, so let's try initially from above my eye level, so this would be a situation where something was high up on a shelf or you were looking at something from below and if I have a facade facing me here, then, the question is like: How can I make it look like it's believably 3D? Well, that means you have to allow these lines coming from the lower corners. We're connecting this lower corner to the vanishing point and this lower corner to the vanishing point and in doing that, I'll just sort of... In connecting this, I'll color code it and it be fancy to the vanishing point, right? So, I've drawn one of the sides of the bottom of the box and I've shown by making a red dot in line how we connect to the vanishing point. Now, I've drawn the other side and I'm gonna then bring this down and connect it to the vanishing point, so we've got our angle and then, all we need to do from there is simply draw the back edge, boom. We got the box scene from below in one point perspective. It's pretty easy, so let's try from if we're looking down at something, alright? Let's try that. So, we're gonna do the same thing. We've got our vanishing point. We've gout our front facade, but just, if we don't think about anything else, that's literally just a basic rectangle. Gonna take it. I'm using this ruler to guide my line back to the vanishing point. You can make a side and then, bring it all the way back to the vanishing point and then, we can do it again here and you may be thinking at yourself, well, I know a ton of computer programs that could this for me, right? I get that, but I've had architects who've been trained pretty much solely on computers come to me and ask me to help them learn how to draw free hand, because they feel like it'd be more impressive for their clients, so that's just something to consider like I know that you could do a lot of this; there's programs that can put this all together, but learning how to draw free hand is a way that you really just reinforce it for yourself and it's really makes seem more real. So, let's try it from the side. which is the last little demo here for the one point before we go in and sort of try it in real time, so this box has been moved over, but it hasn't turned so that the corners are really facing me and so, we're just gonna try to see what happens when we are really observing the front and the side of the box and then, we'll go ahead and put that back corner on. Now, notice we've got to put the back corner on this one, too; the back edge. There we go. So, we have one, two, three boxes drawn in one point perspective. This is something you could absolutely practice on your own and it's a way to really make these things very 3D, so let's try this with an actual block, so I'm gonna set this up just here and I'm gonna set it up in such a way, so what I've done is basically done a little mini diagram and what this looks like to me, so that you can remember these ideas and then, I'm actually gonna work up a drawing based on what I'm seeing, so when I position this block to myself in one point perspective, I'm not turning the corner towards myself; I'm actually setting it up so that the edges are somewhat parallel, but I know in perspective, the parallel lines moving away from me actually converge to the point in the distance, so I know that intellectually and I can actually start to observe that once I start to do the drawing, so I'm setting the block. I'm posing the block and before I draw it, I wanna take a look initially just to sort of remind us what's happening here, so I have a block; the front facade is facing me. I can see something of the top and here's something we're gonna talk about this again, but, here is a point at which it's really important to actually consider what the... Let's do this in red. The relationship between the height of this front area, right? And how that relates in terms of measurement to the distance between here and here, so we have this distance here, which is the front plain of the block. To my eye, we really need to consider like are these distances the same? Are they different? So, if I take a measurement of this and sight a measurement, what I'm doing in this case and it's a little tough to sort of explain if you're not; well, you can try with me, but the tip of this pencil is touching to my eye; it's touching the corner here which is right there. I'm getting a measurement of this front facade by putting the tip of the pencil at the top of that edge to my eye and then bringing my thumb down until it hits the bottom of that edge, so right now, I have a measurement of that front facade. I'm simply gonna keep my thumb where it is and I'm gonna move it up and ask myself how many of these front facades fit from the distance across the top of the block and that's developing a ratio. Okay, it's developing a ratio. It's developing a comparison. So, when I did that I discovered that from here to here and here and to here are actually almost equal in their length and that's kind of astounding, 'cause my brain wants this to be longer, because in reality, like in physical reality like this is wider than that, but in terms of perspective looking across the form, this diminishes and from my eye, if we don't make this short enough from here to here. If we don't make that short enough, then, the blocks gonna look like it's popping up. It's gonna look like it's like that instead of resting flat, so we always want to be sure that we create these relative relationships and we're gonna talk about that a little bit more. Alright. While speaking of other things, I'm thinking about this I'm drawing. Alright, so we have this little like prototype. This little motif and it's showing the diagram. It's showing that these lines are converging back to this vanishing point on the horizon. Classic one point perspective, so let's just take that idea and if helps you, you can make these little diagrams. You can make these little motifs to remind you of what's happening in the bigger drawing. Alright, so, now I can go in and start working with the sketch, so I've got a block in front of me. I've got a little bit of a format started, so I might start drawing that block by just establishing. I often sketch very lightly at first. Just trying to get the basic shapes, because if you push down too heavy at first and then let's say that you don't really like where your lines are going, then, it's really tough to get rid of them, so I'm just gonna start by making a nice like front edge to this box and then, from that front edge, I'm remembering in this prototype, these are coming back to a point on the horizon which more or less my eye level, so I'm remembering that I need to let these lines converge. These are the top edges of the block to my eye. These lines converge towards each other and those lines ultimately would come all the way back to that point in the horizon and all the way back to that point in the horizon and then, I can seal the deal by finding this back edge and again, making sure that I've put in a place that feels relative in terms of its length to what's happening in front and so, once I have this established and it's helpful for you to draw this point and let these lines diminish to that point, that can be really useful. Once I have this established, I can go in and kind of get rid of some measurement lines and in the end, you might have a block like I have sitting on a table edge and you might sort of just put in that edge. You can see how automatically gives it zoom, some space and also a sense of wight on the table and you can see how this line here, this line here and this line here are all horizontal to my ground plane whereas this line here and here; even though if I looked at from straight above, they would be parallel to each other from this view, they converge back to that point on the horizon, so that's how one point perspective works with the really simple form. A really simple block. And that's something you can absolutely practice and I encourage you to do that.
Class Materials
Bonus Materials with Purchase
Ratings and Reviews
DiDi Hendley
Excellent instructor! Simple to understand instructions, told in few words. Thanks Ms. Wynne and CreativeLive!
Wendy Nelson
Fantastic - I learned so much and got answers to things I was struggling with. This is a great beginner class.
Julia
Student Work
Related Classes
Illustration