Preliminary Furniture Plans on a Floor Plan
Lesson 3 from: Draw like an Interior DesignerJorge Paricio
Preliminary Furniture Plans on a Floor Plan
Lesson 3 from: Draw like an Interior DesignerJorge Paricio
Lesson Info
3. Preliminary Furniture Plans on a Floor Plan
Lessons
Introduction
01:14 2Materials and Tools to Use when Drawing
14:27 3Preliminary Furniture Plans on a Floor Plan
07:45 4Using a Scale Ruler and Templates
05:36 5Rendering Furniture on Floor Plan to give Volume and Depth
06:06 6Line Weights and Adding Texture
04:24 7Architectural Lettering
08:11 8Complete House Floor Plan
03:23Isometric Perspective
03:42 10Why 3-Point Perspective Doesn't Work
04:05 11Benefits of Two-Point Perspective
03:06 12Preliminary Sketches for a Living Room
11:29 13Using Different Textures of Materials in your Drawing
03:51 14Adding Color to the Couch to Create Shiny Leather
11:26 15Rendering Soft and Shiny Textures
09:09 16Starting Elevation for the Kitchen
07:54 17Full Rendering Elevation of the Kitchen
07:28 18Putting the Elevation at a Different Scale
10:33 19Two-Point Perspective for Kitchen
10:04 20Canson Paper with Pastels
05:35 21Transfer Line and Heights
08:27 22Finishing the Rendering Using Canson Paper
08:48 23Creating Chrome and Color Reflections
10:43Lesson Info
Preliminary Furniture Plans on a Floor Plan
the next phase that we're gonna be covering would be creation off preliminary furniture plans using Greek paper and all right, So what I have over here is a floor plan. When you first hard drawing for interior design, you have to know your layout, which means you need to have a floor plan off. What would be the space that you would be covering? Um, we have in this case and for the lack of a better example. If you want a practice, you can do your own floor plan on home. So what you would need is this Don't forget, this is your best friend. Just your tape measure. He would just go around the rooms and measure in feet and inches right from corner to corner. And then you jot everything down. Don't worry about the interior walls. How thick they would be. You can just guess them. Hopefully the camera can pick these. Well, we have. This is a great paper. Actually, this might help you in order to draw faster. You can always use a great paper to just figure out your proportions. So we have here...
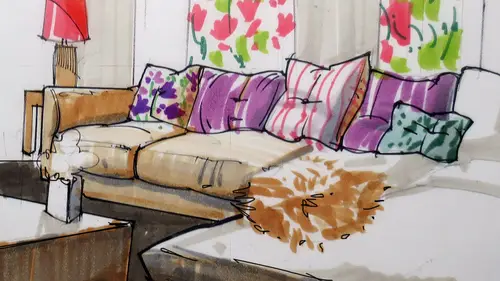
a the first floor of her house and then we go to a second level here we have a kitchen, family room, my bedroom deck, a dining room in a studio. Today for this class, we're going to be covering kitchen and family room or a living room. So, um, I have here something, and I'm starting to smile because this is when it gets interesting, we can get lots of interesting tricks. You know, the bones and these classes that not only you will learn how to dio how to render as an interior for interior design, but also you learn lots of interesting tricks, and this is one of them. And let me just say we all make mistakes large and small, and we have to learn from them. All right, so I don't know if you notice we have windows that are drawn here and then you see us. I was drawing these windows. I realized that I had not left these in white. Whoops. I rendered through my windows. How do I fix that? Well, one thing and this is one reason why markers can be intimidating to an audience. Because you cannot really erase markers. Will, instead of erasing, you can cut and replace. It's like doing like a skin graft in a way. So what you do is you have two pieces of paper of the same type. It's very important that you have the same type of paper. You put them together and then what you do, ISS, I have cutting board over here that I'm going to put under. Now what you dio is you grab the ruler sector knife and then very carefully making sure that these two pieces of paper do not move. You cut through the two pieces of paper. It's important that you cut through the to not the 1st 1 but both. All right, Um, I'm just going to do the last cut over here. Once you cut through the two pieces of paper, you can do the magic swap. You remove the top and the bottom is intact. Now, force, you would have to remove the bottom piece of paper. Here, put this on top. And now this is the tricky part. You would have to flip it over, make sure that it fits, and it should fit perfectly because you cut the same shape through two pieces of paper, all right, and our wonderful tape. We put it over and it's like nothing happened here. And we would just have to do some retouching and we would be done. Sometimes we have to rabbit with the back of our nails, and then we would be able to continue working directly on top. So this is a great technique to use to fix our work. So now we would have to use the same markers, Um, can practice and decide just to make sure that we get the same color. And then we were just fix this, all right. First, I'm gonna use my non photo blue pencil and then reposition my window or just draw it again, making sure that I would not have the gray over the window opening. All right, So great tool to have to know how to use right. And it's very simple. And it's effective. In other words, there may be cases when you would be doing of drawing and you're almost done. And dang it, you make a mistake. Do you have to start all over again? No, you don't have toe. You can use this technique to fix that corner and then just rework it so I thought I would just point that out to the class. All right, So what we have over here is a spot rendering off a my living room. And we're going to get, uh, to draw that You just a couple of seconds. So now, um, I need to get some photocopies here now, in the packet that you're getting this class, we have to, um, understand the main points that we need to cover when we render in interior design. So let's get that covered first. When you're standing in front off a view that you need to render your room in your living room, for example, where you're standing, that would be your station point. Then, when you're standing at a place you're looking this case I'm looking at the camera. We have what it's called the cone of vision. Depending on the books that you read, you would have between 60 and 90 degrees off vision. All right, so that's what you would see if somebody approaches you from, decide if they are behind you. They would not see you until they get to. Maybe you're 45. Decrease over here and then you're over 45 degrees here. So this is why Just seeing the scene, then we have your horizon line. Your horizon line is where your eyes are. Okay, If you're standing, your horizon line is where your eyes are standing. If you are lying on the floor, that's where your horizon line is. Very close to the floor. Um and then we have the picture plane. The picture plane is where you would be actually drawing. That would be the equivalent off me extending the arm and drawing in a canvas. And that is exactly what we have in the package so you can follow along.
Class Materials
Bonus Materials with Purchase
Ratings and Reviews
user-8adf9d
It's difficult to find a class like this -- but that's exactly why it may be best to start with some sort of quick foundation in perspective drawing. This class puts together the process at a level that is not easily available outside of formal study and while it's not difficult, it is involved.
user-d2a6ef
Creative LIve Why don't you re-do this class! Its a great subject.....get a new camera operator, who knows the concept of learning from watching.