Lesson Info
5. Selective Adjustments in ACR
Lessons
Lesson Info
Selective Adjustments in ACR
so far, we've only looked at techniques that applied to the entire image. Now, what I'd like to do is paint in changes because then I can control more of where somebody's eye looks and it's less dependent on where the light was falling in the original photograph. So let's see what we can do with camera ross adjustment brush. Here's an example of an end result. And if you look at it, the first place that you're I will often go to is the area of highest contrast or the brightest area in the picture. The brightest area in this particular image is this area right there and I made that the brightest area on purpose. So you're, I would be pulled near the subject of the photograph originally, if I remember correctly, the sky was the brightest area, but I toned it down so it wouldn't compete with this area also. I adjusted this. So my wife's pants that are here ended up being either black or very close to it and they're very close to the brightest area, the photograph and therefore this area a...
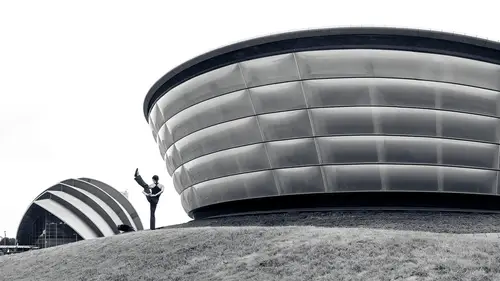
s a whole has the greatest contrast and that helps pull your eye there. Previously the area over here on the right where you see the number of this particular house, It's not a house, it's a library actually. Um This was quite a bit brighter and so was it on the opposite side and that caused my eye to be drawn to those areas, but I darken them up so that your eye goes exactly where I want them to, let's look at a second image with this one. Look at the area of greatest contrast. Of course it's the contrast between my wife's black pants and the bright background that is directly behind her. But in the original photograph, most of the background was about the same brightness as the area that is directly behind my wife. And it was through selective brightening and darkening that I was able to get it. So your eye is more drawn to this area and I darkened these edges tremendously to make it to your eye is drawn more to the central portion of the image. And if I were to work on this image some more, I would probably darken the upper right corner and a little bit of the upper left because my I still gets pulled there because of this little bit of contrast between this brighter in this darker area. But if I were to do that then my I would most likely stay down here where I wanted it to. And if we look at one more image, We can actually adjust this one with this image. I like that you're I will be drawn to these skylights because it's an area of great contrast. We got the whites right next to black. But I want your eye to be drawn a little bit more to the statue that is here and I don't want your eye looking in the upper right or the upper left. So let's see how we could make those types of changes. I'm just going to double click on this raw file and then I'm going to grab the adjustment brush and with the adjustment brush I'm just going to choose the first year I would like to adjust which is the upper right and upper left. I don't want your eye exploring that area so much. So when you're in this tool, you can use the square bracket keys on your keyboard to change the size of your brush and you can add shift if you want to change how soft the edges Or you can just adjust the settings over on the right side. I'm going to use both flow and density at 100. Therefore I get the full strength of the adjustment on my first paint stroke. And I'm going to paint right up here. Now I don't see anything happening to the image and that's simply because I never moved the adjustment sliders that were found down here and therefore it doesn't know what kind of adjustment I'd like to make. But now that I've painted in that area, I can go in here and maybe take the white slider and bring it down. I could maybe take the exposure slider and bring it down and now that's starting to becomes so dark that my eyes probably not going to explore it all that much. Then I'm going to go to the upper left and in the same adjustment, I'm just going to click and this time when I'm painting, you'll actually see the effect happening. It will darken that up. Then next I want your eye to be drawn here to where the statue is. So in this upper right area you see a plus sign that means I want to add to my adjustment. I'm going to click on it. Then I'm going to go into my image and I'm going to paint in the next area. I would like to adjust and since I've clicked that plus button, we're completely done with the previous adjustments so I can move these adjustment sliders if I would like or I can click this little arrow which would reset all these sliders to default settings and therefore I can start from scratch. So I could just guess at what I'd like to do here. I think I'm going to want to bring the whites up whites is going to take the brightest part of the image and make it even brighter and I'm not sure what else I'm gonna wait until I've painted to find out. I'm just going to come in here and paint into this general area and then I'll come over here and make my adjustments. I might also bring contrast down and bring something like clarity. Up clarity is going to make the detailed pop out. Just don't go too much next. I don't like this dark kind of area around that skylight. I wanted to look a little bit more like this. So I'm going to get a brush here that has high feathering, that means a really soft edge and I'm going to turn on this check box called mask options. It really makes your mask visible, therefore you can tell exactly where you're changing the image. I'm gonna hit the plus sign up here to make a new adjustment and now I'm going to paint that in and I'll see a red overlay where I'm gonna affect the image Now when I adjust this area, I'd rather not affect the whites of the skylight so I can come in here. And if I scroll down to the bottom of these sliders, you're going to find an area called range mask. And that means I can take the area of already painted on and I can further isolate it based on luminous, luminous is just a fancy word for brightness. Then here I can choose the brightness range that would apply to right now, it apply to the whole thing. I'm gonna grab this right most slider and pull it in until that red disappears from my skylight maybe about there. Therefore I won't be affecting the brightest area. Then I can turn off the mask options checkbox, which is gonna hide the mask and then here I can reset my sliders. So I start fresh and here I think I'll take the shadow slider and I'll bring it up to say make the dark areas brighter in this particular area. Or maybe I'm going to bring down contrast or even up exposure. It's a matter of experimenting until you find the right settings that gives you what you're looking for. But if you want to see a more refined version of this image, where did a lot of adjustments. If you open this raw file, go on the right side of your screen and go to snapshots and there you'll find, I made some snapshots, you can see the color version of the picture and then here's the dramatic black and white version of the image. And if you click on dramatic black and white there, then you can go to the adjustment brush and you'll find a bunch of those adjustment pins on the image. If you hover over one of the pins, you'll see a red overlay of what area that is affecting. And if you click on the pin, you can see exactly the adjustment that I dialed in to fine tune that area and then you can go to the next pin, whichever one you'd like to work with, click on it and again see the adjustments that were applied there. You can continue doing that for all the various areas in this image to see exactly how I fine tune it when I originally process this picture and if you want to see what it looks like with and without, there is an overlay check box, you can turn that off so you don't see the pins and then click and hold on the eyeball and you'll see without, and then let go and you'll see with, and therefore you can compare what the image looked like originally to what I ended up doing, to refine it using the adjustment brush.
Ratings and Reviews
ehab ghobara
Good content Ben. Thanks a lot
Chris Lonardo
Ben's course is concise, practical, and packed with useful info. I've already recommended it to several NYC photographer friends. Well done!
Tom Hackett
Thanks for stressing the position of the photographer (perspective) rather than the focal length of the lens.
Student Work
Related Classes
Architectural & Real Estate Photography