Designing a 2 Page Spread
Lesson 14 from: Digital Scrapbooking with Photoshop ElementsMichelle Stelling
Designing a 2 Page Spread
Lesson 14 from: Digital Scrapbooking with Photoshop ElementsMichelle Stelling
Lessons
Day 1
1Day 1 Pre-Show
05:43 2PSE for Photographers and Scrapbookers
37:32 3Editing Photos in Photoshop Elements
45:20 4Favorite Features
39:30 5Typography
23:24 6Creating Textures
33:57 7Making Patterns
45:25More Typography and Simple Backgrounds
19:54 9Tools and Techniques
31:41 10Creating Layouts with Digikits
27:43 11Day 1 Wrap Up
01:28Day 2
12Day 2 Pre-Show
11:08 13Using Thumbnails, Templates & Masks
18:38 14Designing a 2 Page Spread
38:57 15Photo Composition 101
22:04 16Poster Creation
27:19 17Card Creation
37:18 18Custom Brush Creation
26:23 19Layout Creation
15:28 20Working Creatively with Brushes
38:01 21Social Cover Templates
45:56 22Create a 10 by 10 Layout
30:54 23Day 2 Wrap-Up
02:33 24Thanks + Credits
03:55Lesson Info
Designing a 2 Page Spread
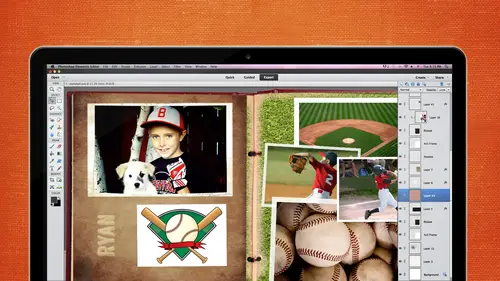
So I like to work from the back forward, so I like to start right off the bat with the background layer selected. You can work however you want to. I just like to kind of work from the background all the way to the top. So I know the perfect photo that I want to bring in for my background, but I'm going to show you some of the photos that I have. So this photo here I did, we just pulled up. I made a big canvas of this, like a thirty six by twenty four or something like that canvas. And we got to this island like it's six. Thirty in the morning because I want to do a photo shoot without the people there. So we got to this island there's our boat right there we were on the first little ship that brought us over at six. Thirty or so. And unbelievably, this is true. There was a rainbow. People say all you put that in there like on serious, there was a rainbow. I couldn't believe it and it went right from right to the ship and then over here, crazy and about an hour later all of these seats...
were filled, so I created I have actually been to this exact location, and it is so fantastic and michelle is right if you're not there because it's a private island and so you actually basically take a smaller boat to the island and everybody crowds on those seats is an amazing thing I didn't see the rainbow that I thought there is no way people are going to believe this yeah and I'm like I did enhance it a little bit though so I did enhanced because I wanted to make sure because it was kind of faint but when we were traveling from the boat to the island I was like that rainbow better be there when I get off on I started running and I said I told my husband and that's my husband son I said get over there now and they were hammocks back in the back unbelievable if you ever get a chance it was my first conference cruise and I want to go back under me too yeah it makes you think oh I want to get back there and it was perfect weather and everything so I I did have to do this and we're going to do this later today you know how when you can't get the whole shot in you sit there and you take a picture like oh my gosh, I got to do this now and do this and put him together have you guys ever put him together and photos of elements easy as pie so when you have to do a panoramic take a picture and then don't do this though don't rotate your body this is a little trick I don't remember where I heard this from take a picture and then stepped over and then take the picture it's really strange because when you rotate it gets all discombobulated whenever you put him together okay so I never I thought that's kind of a weird trick I'll try it and it worked much better than when you rotate your body into this because it just doesn't line up a swell so I didn't have to do a panoramic and slice them together which I'll show you later so this photo I thought would be the perfect photo for my background so I'm just going to go I can't remember this is really really huge or not let me let's bring it in here the dragon drop but actually it's not bad ok perfect so this is my background I want to make sure though that I can see the ship and I can see um my family and they're so let's go ahead and shrink it down and I think I placed it right about here now you have to be careful because this line that goes down the middle that's where the gold is going to be so you don't want anything to get too close to that s so you're gonna have to at least go about a half of the nancy I say too bring that away someone is going to put it right about enlarge it just a little bit more but whenever you are doing to page layouts just be careful of what's in that center you want to have a little bit of leeway so that if if it's really really tight in there you can at least see what you wanted to be seen all right and then I'm gonna go back and get my I want to close this out now so that automatically went right on top of that background and because it was white it's just force right on top of it we're fine I'm going to keep it at full blown one hundred percent for now but we'll play around with maybe even taken the opacity down when you have backgrounds you want to be careful that's not too much in this case I really wanted to focus on that background so I'm going to probably keep it at a hundred percent but when you do bring in backgrounds just think if it's too much just go to your opacity take it down a little bit so that it's not overbearing okay, I'm gonna go ahead and keep it up for now and then we'll see what happens later now I'm going to go step by step so I'm going to the next layer on top of that this one is the left paper now you're going to get this template if he purchased the class this one here you just click on left paper that's what the layer will say you go over to file and you can place it if you want to and I'm looking at the two pieces of paper that I put in there at the beginning and this is sdi which stands for stick a little artist in me collection it's the sporty sass and let's just bring in this piece of paper I thought this one matched pretty good so I'm gonna go ahead and place it right about there the cool thing about this is we can clip it inside of there and then we can move it around if we like certain parts of that paper let's go ahead and commit it and I'm gonna go over here there's three different ways you can do this you can right click you can choose create clipping mask and it clips that right inside control z so we can show you the other way you can hold down the altar key and when you go right in between both of those layers see those double circles once you have those double circles while you're holding the all key down, click in between there and it will clip it in there that way as well third way controls the I don't usually use this way very often but you could go toe layer and create clipping mask could do it that way actually there's a fourth way and you can use this dorky command hey, which is probably what you should do but if you forget just remember you can go under layer clipping mask and right next to that says control g or command g on the mac and just hit those two keys and you can clip it that way for different ways some just gonna go control g to clip it once you get good with this, you can create this page in probably five minutes if you know exactly where you're going, what you're going to be putting on there in the title and everything like that ok over to the next layer right above that is called a right paper click on that go to file and place just for sake of using a different paper I probably would use the same paper and go ahead and place this other piece of paper over there drag it to where you want it to cover the area now if you wanted to you can reduce this paper inside if you need to in a school on right click are actually committed first then you right click choose create clipping mask and it's on there any questions on that? Pretty easy the um cluster is already in there so we already did the masking off to the side I usually do them asking right in here but I thought it might be kind of confusing because it's going to so many different layers and such so I did that separately, so we just brought that in on its own. But otherwise you could do it. Yep. That's ok, people asking questions about the cluster could you just kind of remind everyone where that came from? Is that something terms from karen's does yes. And it will be included with the purchase is well, it is one of karen's clusters and let me let me see what the name of it is it's called artist in me collection. I love that collection she's got that someone a good collection, so but that one's fine, because I grouping an artist and it's got papers and paint brushes and splattered paint and all that inside that cluster. So our kids yeah, no problem. All right, so now we're going to start working with photos so the next layer up is called photo one. I try to keep my temple it's very, very simple don't get all crazy on naming my my layers I'm gonna go to find a photo that would fit in that right right now, that's a really long, tall photo, so I'm like, I don't know if I have any photos that would really kind of go in there but I found this one when they were they went parasailing I did not I was not going to do this I was like you guys go ahead and do that I had a fit on the boat kind of the boat was really really small I'm petrified of fish eye don't ask me why petrified of fish so we're in this little bitty boat and there was water splashing up on it it's like I'm going to have a heart attack here you guys but they went parasailing so I was in there I had to get in the book so I had to take pictures otherwise there is no way you would have caught me on that boat so I'm gonna go ahead and place that photo in there because that would be the perfect piece right there so I'm gonna go file make sure I'm on that right layer file and place and bring it in way too big so let's shrink it down and go ahead and I want to make sure that the top and the bottom will fall in there so that there we go go to my layer that is called right photo and right click and could create clipping mask once you have that you can move it around this is like a mask so it's not going to hurt everything around it's not cutting that ofthe same goes same goes with this piece of paper if you kind of like the bottom right hand corner you like that blue and they're just move it on up ok, now we're going to go to the next layer which is and if you forget if you don't know what's on that later just to hide it and then you'll see a bounce right to it from a go that next layer photo to same thing see what did I put in that photo? Okay areas it's gonna go right on top I just wanna put him right about here we'll shrink it down in a few minutes actually shrink it down just a bit and then commit if you go up here and you're like right clicking and you're like where's the drop down michelle so there was a drop down look right here this drives me nuts because I forget about this a lot make sure you click on this little green checkmark because you can't do anything until you d'oh okay right click then you will see create clipping mask he's way off so let's move money and I might even have to zoom in a little bit remove that let's go ahead and zoom in just a bit and then you can narrow get your move tool and then move them into place I wanted to kind of get it close up so next photo file place and it doesn't matter if you bring in on the wrong layer it's not a big deal you just have to drag and drop it right later sometimes though you'll get it clipped with the wrong thing and you're like oh my gosh how do I get out of that clipping mode just command z and then start from bringing placing it back in so what you guys think about temple it's those are pretty cool you know most of you worked with him before but we have a just a question about the folders artsy wants clarification you said you saved your group of pictures and papers and templates and a folder is the folder and photoshopped element somewhere or is that just in your computer files it's on my hard drive in a computer file some people will work with it being inside of the organizer the organizer is a different animal kind of I don't use the organizer but those of you who do want to learn about the organizer I do have like a half an hour class inside that free membership if you wanted to take a look at it because I would say do you guys use the organizer? Okay there's my preferred I would say maybe ten percent of my members used the organizer so I don't even trained people to use it because they a lot of people don't use it not saying that it doesn't work I'm sure it's awesome but I like to organize my files how I've been organizing for like twenty years and I just can't get out of that mode I think everybody has their own kind of organizing idea and going karen did a great class on how to organize digit kits because some people have, like hundreds of digit kits and that's kind of a tough thing to organize a swell so yeah organizing I don't pull that that's probably what she's talking about I don't pull him into photoshopped elements go ahead and bring that back and because I think I distorted it here we go constrain proportions shrink that down we were trying to do like a did you see that? This photo here we're trying to do a a fun little cute sea thing like put your hands up no higher higher okay, there you go perfect and there again he's like mom come on, please that there's that there's that face alright shrink it down a bit and then committed right click and clip who seen? I'm kind of glad I did this because this might happen to you so you may know what I did wrong wrong layer has to go above that layer and then you can clip it in there so that ever happens just try it and drop it to that layer that you need to be on their good yeah um joined while it's clift if you do command g again in london clips that okay move it right awesome thanks, brenda yeah just do the same command control g or command g on the mac and then I'll go ahead and unclip it for you this is the last one is the bottom right hand corner I'm going to select that layer place that photo in there so which photo do you use? I guess this one all right let's go on in there and then right click welcoming it first and create the clip mask and lou it down a little bit so there we have it we only maybe twenty minutes or so and we took our time but we're still not done. We still want to put a few more elements and of course we need some text in there. Um I've usually just with my demonstrations I don't get too crazy with the text but I know you guys know you can put this much body content in there as much journaling as you want. Tio um we're talking yesterday about like the handwriting font would kind of be cool if you did get your own handwriting cause then it's even an extra touch you know, I know my mom's handwriting and if it would be on all of my scrap of pages, I think that would be so cool and I really should probably do that, but I haven't done that yet that's that's the beauty of teaching you get ideas from your students but I think when I go home I'm going to try to do my own handwriting and find out where that where we can get that done it, you can also put it affects I would say effects but effects on your templates so for instance, if you wanted to go to maybe this template right here this layer right here you can go down to your effects panel and then you could put drop shadows in there so you don't have to you can change templates if you want to they're not set in stone, so I just want to head and put a drop shadow on that photo and I can just copy and paste it to all the other ones if you like, drop shadows that makes it look a little bit more three d you can go ahead and do that to all of those pieces and strokes and devil's and all those you don't want to get too carried away sometimes it's like, oh my goodness, they have learned this new things so now they're going to be I remember when I was teaching I used to teach a different colleges in denver area and this was twenty years ago maybe fifteen and the rainbow effect came out and all my students use the rainbow effect on everything that they did every assignment that was turned in there's the rainbow effect I'm like if I see another piece with rainbow effect on it but that was the thing that was in style at that time so you know, sometimes it is kind of fun to put all the bells and whistles on it but sometimes it's the simple or that is better yes, which which layer did you put the drop shadow on photo layer or the mask ling the actual math glare so let me do one more let's go with, uh, this right paper so you see that what selected? And I went to that actual gray box, not the actual photo that I brought in and then I went to effects and then I put that drop shadow on it yeah, good question, because if you put it on the photo, you're not going to able to see it it's below that I just love the like, the textures that they have on those papers, I just can't get over that. You guys are gonna have some fun today to wrapping up what karen did yesterday um, I'm fascinated by all that because I don't I don't actually make kit kids, I just do the image editing part of it, so I'm so glad I found karen all right so we're going to go ahead in and bring in some photo are some text so I'm gonna go to the top layer I always pay attention to what layer I'm on when I bring in text because if you're in the bottom layer you're not going to be able to see it get my text tool and let's go ahead and keep it at that I don't know what this is going to look like but let's just click I'm just gonna put first cruise I'm under a two thousand thirteen all right the leading his way off which is fine because we now know how to change our leading we go get our text tool and we just push it to the left hand side, push it to the right hand side and I'm just gonna go ahead and right just if I don't really know if I like this fought for it it's kind of cool fun but I'm not sure if it's going to be my headlines let's go get our text tool and another thing you can do too is once you click inside there I noticed this last night you can use your scroll wheel to also go through all the different text it's not you have to be really careful because it goes really fast but I was doing this last time like why is it doing that? And I was playing around with my scroll wheel so you can go bounce through all the different fonts as well which might save you some time but I kind of like to have a little bit more control and use my arrow keys to bounce back and forth between thoughts let's pretend we like that which I don't really I don't really for this layout but let's just pretend we d'oh you can change the color just like we did yesterday we had a little section on typography in such maybe even I to change this to a different color and man have it overlap that might be an idea kind of happy little happy accidents there doesn't look so bad but maybe even changed the size of that I can have it the leading b you know overlapping let's go with maybe seventy two and his overlapped a little bit tips come on now it's not gonna let me uh mr curious I'm gonna go back in there to see if it's gonna let me yeah, it will okay I have never thought about that before. Yes and psc or do you have to just make sure you get it right outside there isn't photo shop I believe I don't think there is one in the elements all right way didn't but actually I yeah I've seen that before for in some design work actually was the cover approved cover of a book and he was passing it around for feedback and I said you spell the main word on I'm not a great speller so when I'm doing my classes I'm like so super careful because I don't know I passed spelling when I was in school but what I'm doing a demonstration sometimes it just looks writer doesn't look right and so I always I'm always kind of paranoid about that but I know there's one in photo shop because I remember when I was working a photo shop there's like in the drop down somewhere but I don't think there's one in filderstadt elements that might be a good thing to call adobe and say hey let's add that inversion thirteen everybody shouldn't like all let them know my petition petition in fact will spell it wrong yeah checks their attention all right so I've got my headline in there and maybe I put a little information down in there as far as what we did how much food we ate how much pounds we gained you know, nine pounds each of us yeah exactly it was funny because my husband went into a himself and he says I gained nine pounds I'm like I don't even wanna weigh myself I went in there like I gained nine pounds too and am I someone and I mean I there's no way you gained nine pounds but yeah that was that was a trip of a lifetime so if we wanted to put some body content journaling is what most people call it did graft world it we're going to go ahead and zoom in a little bit I was thinking last night were called the did you scrap girls is that what you call us yesterday the did you scrap girls have got that rings pretty good I love all of us to describe girls we're going to go ahead and get our text tool I'm not going to make it so big but I'm going to make a text box we talked about this a little bit make a text box you click and you drag and then you start typing this way two bigs let's get this down in size let's go with maybe you know fourteen you want to make sure you can read it especially when you're going to be doing somebody mentioned that the biggest ah ha moment for them was to do that little frugal thing I said about twelve by eighteen love that but when you do the eight we do that small ones just remember that your journaling might have to be altered a little bit because the first time I did that I had this little baby baby text and I thought oh yeah that that's true you're going to be shrinking it down a lot so you gotta be careful with that so I like tio keep my stuff this a private right justified split all on the right side and let's go ahead and do a different font for that. I like to keep my fonts pretty simple when I'm creating smaller tech so that you can actually read it pull that in just for demonstration purposes all right? This is way too close for comfort as far as the color goes for the background so we're going to make something make it pop a little bit I'm going to pull a color from my photo maybe I'm going to pull out. Mmm I don't think yellow is gonna look good delicious to for the sake of checking it out I think it's almost too hard to read but we'll go in there and get maybe this light brown we might have to go dark yeah, we're gonna have to go dark so a lot of times it's trial on aarhus faras putting um text on top of tick texture to paper here we go and push that letting down just a little bit. I know it's going off the page that's. All right? We're just going to kind of make a look halfway decent shrink it up a little bit and maybe that would be a good spot for your for your text. You could also put some a little journaling on the right hand side in the upper right hand corner and then you'd be good to go once you're done with your entire layout you can kind of play around with the opacity on this background layer maybe bring it down to seventy five percent might be a little bit overwhelming once you're finished go ahead and make sure you save it as a psd file and I was gonna put this as two and that will save all the layers and of course when you print it from home you don't have to worry about compressing it if you're gonna be putting it somewhere else you're gonna have to cut it apart because they don't normally do twenty four by twelve so what I do is I go file save as I choose j peg for my list to drop downs I save it I make sure that I pulled us all the way over to the right so it's the highest quality and then click on okay now we have that flattened version of that j peg it's going to be pretty big file size okay, we got a lot going on there I can close this psd file seats his psd right here I've already saved that so I'm fine with closing it ifyou'd happen to not save it it'll probably warn you and say hey did you want to say this so make sure that you save it and then I can pull up that j peg of the entire layout and we're gonna cut it in half so I go get my crop tool now that we have this line in the middle it's guide, it'll jump to that now what happened here is I have a priest set size so if that ever happens to you just press escape and then I'm gonna go in here and I must say I want no restriction or I can type in twelve by twelve I know what's going to be twelve by twelve but it usually jumps to that and I'm usually okay with with doing it that way then I press commit then I go file save as because I don't want to save over that other one you to kind of be focusing whenever you're doing this and then I'm just going to go I don't know right side I mean sorry left side uh do I have this also that way okay impress save and then I'll go back to that original I'm gonna go commit control dizzy and then I'm going to take this one press commit go file save as and then right side some make sense okay then he just upload both of them and when you get him home they should line up perfectly. I brought the sample and yesterday and it did did line up pretty good now with persnickety prince they had this metallic sort of print that you can get teo suggest checking it out because it's really cool are any questions on the two page layouts all good you guys go home, make some two page layout. There is one question from tracy in oklahoma when cutting the two page layout do you have to allow for a bleed? I don't I just do twelve by twelve and send it on off and they did do it automatically at the print stores. Yeah, it's kind of nice. Back in the day, though, we had to, like do ah quarter of an inch bleed all around and they would trim it to size, but most of the printers now they'll just thought it's automatically blood off page. Good question. All right, you guys ready for another layout? Okay, so this one, I thought I would kind of throw out there because I've seen a lot of these lately with this picture stocking thing, and we didn't cover the picture stacking yesterday, so I thought, let's, just do a very, very simple layout with the picture stocking because this is a popular thing. So picture second, what I mean is that you just press a button pretty much, and it does it for you, which is really nice. All right, so this is the final outcome, not anything spectacular. Well, like jean marie was saying in chris was saying this morning it doesn't matter if it doesn't look off, you know, like, oh creative and stuff I loved your layout I'm not saying that I didn't love you but the thing is is that no it look I thought it looked awesome but even if it looks something like this which I don't think it's anything much but it's the memory that counts it doesn't you know not going to sit there and go oh why didn't she use a different paper for the background you know who cares to yeah I remember that and captured it so well oh my gosh that was gorgeous gorgeous place so I've got a few different pieces in here that are from a collaboration digital scrapbooking studio dot com is a really cool place to go if you want to check out a ton of different designers they have a collaborations all the time so check that place out and I think here it has some of her pieces in that store as well the cool thing about digit designers is that they all get together and they sell through different stores if you know it's just basically like a walmart you go and you you enter your all your stuff if you ever become a digits could get designer you don't have to have your own business but you can go ahead and a contract your workout I guess is what you might call it probably a different phrase for that but um so there's a pieces from that so let's start from scratch first thing I'm gonna do is I'm gonna go ahead and open up the background paper here is using the same paper that we used before. Now the other thing is that we can take a photo, I'm gonna open up just a plain photo and we can go into the guided section, and this is where I said, you could just click a button and it will do it for you. This thing called picture stacking, and I think it was inverted noah's inversion twelve eleven maybe not in ten, but I could be wrong, but it's called photo it's in the photo play department area towards the bottom. So normally when you come in here, these guys all might be like this. I can't remember how it defaults, but if you see this, you go well, where's, everything at you just click on this little arrow that points down and that I'll give you everything that they have inside there. So yesterday day we talked a little bit about I think it was a vignette effect in the burst and maybe some other things, but these all have different areas, so let's go with picture stack and you could do for pictures, eight pictures or twelve pictures, so I'm going to twelve pictures just to see what it looks like, I think it's too much, usually and hopefully it doesn't take too long there we go it's this too much, so if I don't like it, I just click on four pictures and I'll go ahead and do that now the thing I don't like about it is that it will go off the page and I don't want that for this reason this layout that I want so what I can do is kind of cheat a little bit I'm going to click on large click on large borders I kind of like the large border I'm going to click on done and then since I am I know howto work in the expert mode I'm going to bounce back over to the expert mode and look at everything it did for us it did all of this for us within a second in the back in the day we used to have to do this all by hand, so everybody that just now started photoshopped elements should be very happy that this is so much easier. I sound like my mother, so I'm gonna pull this in here, you know he had to walk to school, you got there so lacking I e it does so so many tools in here that make I don't remember back in the day with photo shop did they didn't even have layers looking photo shop one came out or whatever it was called there was, I don't think there's any such thing as layers, how tough would that be once you have it on that page, it is there. So that's, how long I've been using that? We'll keep it at that so I can come in here and I just click on that photo and I can rotate it to what I wanted to be. I have more control over this aa lot of people don't even know that you can go into the expert mode and mess around with it, but for some reason, I just thought, I don't like the way it looks let's just go into the expert won't see what I can do, so I kind of stumbled upon that, all right? I'm just gonna rotate this other one up here. I don't know, maybe I think from the corner, I don't know, I don't want to bring out my indecisiveness now. All right? So I'm going to say, this is perfect, we're going to use this now how am I going to get this over here? Got to take each individual photo are each new vote layer and also is that black? Forget background gonna be there, what we're going to d'oh it's going to go back to our original layers, and I'm going tio go from let's see what point I think maybe this point all the way up and I hold my shift key down to select all those layers at one time then I right click, then I choose merge layers and then I'm going to bring it on over just that let's see if that's it that's it ok, cool! And then I just rotate it down and I can use that as part of my lay up. So when you see all these cool didi kit people who are doing all these really neat layouts with all the picture stacking that's where they found it from unless they did it by hand, which they could have, because if if you know how to do it by hand it's it's not too bad, but it does take a little bit time, you know, I've got this in my lay out it's all one layer, those were not going to able to mess with it anymore unless we saved that original one from before, and I can't remember where I put that right about there let's go ahead and start stacking some or, um, pieces from here, I always like little tags because you could put the date and time and place and all that kind of stuff, so let's just put this in here somehow and I always just bring in everything, and then I start placing it later, so I'm just going to bring in the beach ball, put it in the bottom right hand corner and actually start placing these place from this time this one start stacking them back down here because I think I wanted to be a little bit heavier on the side, some glasses so cool because these glasses, if you notice here she could see through those his husband, but how do you tell these guys get think about all these little things, I just don't have the patience that's why, when I go to purchase these digits on like, this is a good price for what thes designers to very, very economical. All right, so you get the idea? We're just kind of throwing a bunch of little pieces in here, maybe put a big headline in there in this case what I do, what I try to d'oh with things like this, if you're going to be doing type, what I'll do is I'll try to bring in a guide, so I'll go to my view in like rulers, and I'll drag a guide in there and I'll put this up here, and then I'll rotate it so it's perfectly straight so I can bring in the text and make it rotated the same time. So that's my easiest way to do it I mean you can do it however you want to but I just lined it up like that and make it straight and then after I get my text in their eye group those two together and then rode him because sometimes it's really hard to get then exact it bounces around and everything and it's too it's a little frustrating so let's go ahead with a maybe hopeless color out from this piece right here and fourteen point that sounds pretty good let's just go it was half half moon cay or half moon cay think it's pronounced both ways sometimes so we that's the place that we were let's go with actually I'm gonna go in there and make it all the same let's bring that up and then you could put the date and time and all that stuff this is where you're leading comes into play so I made might want to push this down and put the leading so that lines up push that over okay once we're done getting all the text in their buttoned up and everything, we're going to go ahead and take both of these I'm gonna hold my shift key down while I'm selecting both of them if you're not sure if you have them both selected you just kind of look over glance over at your layers and you see that there are both both highlighted and then I'm going to right click on that. And it may not let me, um, keep those together until I simplify that tech. So if you ever run into this problem, we just right click here and see if I can't it's not going to let me merge down. We see appear real quick. Yeah, it won't. Okay, good until you simplify that layer, which means that you're taking it from a text format to an image format. So once you simplify that, if I right click and I choose simplify layer, you're no longer going to be ableto change the date or change if you type had a typo in there, so just be careful with that. You could link them as well, but I'm going to right click and merge those and now I can move them at the same time and I don't have to worry about, um when I rotate, if they're lined up and everything, so just remember, you can either link them, and then you can move in together a same time or you will want to merge them.
Class Materials
bonus material with purchase
bonus material with enrollment
Ratings and Reviews
Prairie Chicken
I found this an excellent course on the use of PSE--not just for scrape booking but for any use. And of course the scrape booking ideas and methodology was great. I enjoyed Michelle's approach very much, and also liked Karens.