10:15 am - Text Clipping & Guided Modes
Lesson 21 from: Digital Scrapbooking for BeginnersMichelle Stelling
10:15 am - Text Clipping & Guided Modes
Lesson 21 from: Digital Scrapbooking for BeginnersMichelle Stelling
Lesson Info
21. 10:15 am - Text Clipping & Guided Modes
Lessons
Day 1
19:00 am - Intro & Michelle's History
38:59 29:45 am - Intro to PS Elements & Organization
44:46 310:50 am - Using Quick Pages
36:10 411:30 am - Second Quick Page Example
15:42 511:45 am - Useful Tools
12:08 6FreePreview: Red Eye, Feathering & Collages
34:33 71:30 pm - Creating a Simple Cluster Page
16:301:45 pm - Different Modes & Making a Bookmark
31:54 92:30 pm - Creating Cards With Digi-Kit Elements
41:29 103:15 pm - Constructing Cards Without Digi-Kits
33:30Day 2
119:15 am - Collaging: Alignment, Guides & Grids
23:50 129:45 am - Paint Bucket, Brushes, Gradients & Text Effects
45:13 1310:45 am - Cookie Cutters, and Personalized Background
22:38 1411:15 am - Frames, Filters, & Blurred Backgrounds
42:12 1512:45 pm - Photo Restoration: B&W and Color
37:22 161:30 pm - Photo Retouching
44:41 172:30 pm - How to Use a Pre-made Template
37:02 183:15 pm - Creating your Own Templates
38:31Day 3
199:00 am - Creating Your Own Paper
36:09 209:45 am - Photomerge: Panoramic & Style Match
21:18 2110:15 am - Text Clipping & Guided Modes
17:05 2210:45 am - Postcards from Digi-Kit
50:20 2311:30 am - Postcards from Scratch
17:40 2412:45 pm - Creating a 12x12 With a DigiKit
34:01 251:30 pm - Creating a 2 Page Spread
44:18 262:30 pm - Creating A Collage
48:47 273:30 pm - Second Collage Example
21:25Lesson Info
10:15 am - Text Clipping & Guided Modes
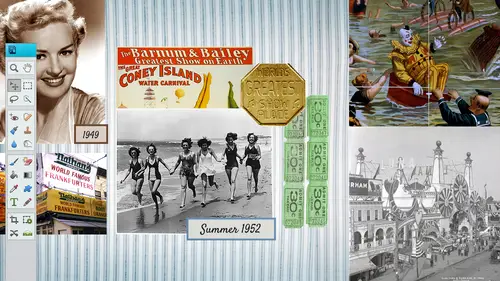
so you can clip text out of any photo that you want. Let me give you an example. Let me to show you an example. So it makes more sense. So right here, we've got the word baseball, but we also have a photo behind it, and we can move that photo around from behind it. It's clipping that from that photo so you can do any photo, take a picture and think about what kind of text you might want to lay over it and then clip it out of there. So it's pretty easy. There's two different ways you can do it. I don't like the first way that I'm gonna show you, but I like the second way. So just remember, there's two ways Stay with me till a 2nd 1 because it's much easier. I think so. I'm gonna go file and open. Let's go with sand for now. So we got some sand here down in down south and Colorado, and maybe I went the word sand to be cut out of the sand. So if you go to your text tool, you're gonna see all different kinds of type tools down there. You've got we talked about the horizontal type tool a lo...
t. We talked about the vertical type tool. So that's gonna do the vertical type. The next one over is called the horizontal type mask. And unless I'm not doing this right, this one kind of frustrates me a bit. But it's OK because there's another way around it. So I'm gonna get my text. Let's make it protects a little bit bigger here. Let's go with maybe 100 and 50 and then get my tool bounced back. That's OK. And 150. Okay, so I'm gonna come out to my photo, and I think I need Nope. I'm gonna stay on that layer with this. When we stay on that layer, I'm gonna click one time, and it's gonna create a mask just like that. And I'm a type in sand. The only thing about it is that and I don't know, maybe maybe I'm doing this wrong, but it will. If I don't know exactly where I'm gonna place it. It will place it there, and then it cuts it out automatically right away. So I'm gonna have to go control Z and do it again cause I know that I'm gonna be clicking my left a line click one time, then type sand, and this should work out. Okay, I'm gonna have that now. I can cut that out of there. So control C control V turn this one off. And now I've got the sand cut out of that layer. That's the way. I don't really care for me Zooming up a little bit. You can kind of see the sand in there. The other way I feel is much easier. Maybe it's just because it's my old school way of doing it. I'm gonna delete that layer trips the meat delete, and I'm gonna go in and get my other tool, my my regular type tool, and I'm gonna click one time and I typed the word sand, and this is cool because you have the opportunity to move it wherever you want. Maybe I want a little bit of that blue sky in there because I think that would be cool. And I can change the size of it. Do you want a little bit of that blue to stand out? So I'm moving. It's the place I want and I'm gonna change the type. I think I think I'm gonna make it impact because that's one of my favorite sick fonts. So now it's a really thick font. Okay? And now all I need to do is move my bottom layer above the word sand. But this layer is locked. And someone in day one, I believe, was talking about this some. Glad this came up again. If your background layer is locked, all you have to do is double click on it and click. OK? And now it will become unlocked. And now we move it to the top. And now we create a clipping mask. I hold down my shift key Click one time. And now I've got the word sand cut out of there. And this is the cool part. I can move my photo to any place that I want to. I can also take the state the word sand. I'm assuming a little bit here so you could see this school will do it again with another photo. Could take the word sand and do some effects to it so I can do a drop shadow on it. I can go back into the layer layer style and style settings and put a stroke around it. Okay? And I can change that stroke color. Maybe I wanted to be blue gun. Okay. And okay, there. And now I've got that cut out of their much easier, I think because you can move, it's much, actually, maybe not much easier. It's just much more. You can control what you're doing, more control, what you're gonna get. So let's just do it on another photo. So if you wanted to, you can pull that word sand over into any of your scrapbook layouts that you want to use it for. Any questions on that? Okay, really great people asking questions about fonts, exceptions, anything you particularly just like you feel comfortable with. You know, I do tend to go with certain finds a lot. Think it really does. And you know, we have talked about where to find front except on the line. Somebody just is asking, though, about the difference between photo shop and 12. I have lost it. So I don't know, say, are all of these options available in PSC 11. I don't see photo emerges. Part a P C. 11 photo emerges changed and I can't remember where it was in 11 but it is in 11. I just can't remember exactly where it ISS. But that's why I got tripped up when I purchased 12. It took me, like, a couple weeks to find it again. Like, where did they put that in? I stumbled on like, Oh, good. I thought they took it out. But it is in there somewhere. They could email me too. And I can help them went once I get off said I can help him find it as well. You found what? When you are clipping on the certain forms that just don't work for clipping that? Yes, I like the thick fonts. You want to get some thick fonts Impact. I use a lot because it is really nice. And then you act. Yeah, And if you go back in the course, I mean day one Day two, we've gotten all these great websites where a bunch of resource is for all the funds that you could ever want having more than you could ever want. Exactly. Exactly. There's scrap bookers, love fonts. So there's scrapbooks, Pacific fonts out there that you're gonna wanna check out date I think was day one or day two. I can't remember what today, but we talked a lot about that. We did. Thank you. Awesome. So let's just do it with this. This photo right here, we've got the baseball course, I'm going. Teoh, go over to my layers, get my text and it doesn't matter what color you have. That's the cool thing. So if I want to do this color in red, it doesn't matter because it's just going to clip it out of there. Click wants. I'm just gonna type baseball. This is a pretty thick font to, but I still like the impact whenever it comes to this. So I'm gonna change it to Impact. And I can just click inside my list of fonts and type in I am. It goes directly to it, and I will just make it really thick. Pull it, drag it. And the next part is to move this. But it is locked, so I double click on it. Click on OK, move it above And then I can control G to click it are to clip it or I can use that Ault and click as well. There's four different ways to get there. Next, I can go in there and just do my effects. That usually makes it look a lot better. It pops it out a little bit and go into my layer. Well, your style. And I can, uh, bevel that little bevel on it. Maybe a little stroke on there, too. Then change that color if you want to. Maybe to read going, okay. And then we can always go in there and fill that background with something. You can make postcards out of this. Whatever you want to dio. Lot of graphic designers might be interested in that part, too. Not just digital scrap bookers. Go back to my layers. I wanted to add a layer behind that. I could just drag and drop it behind their fill it with whatever color I want. Teoh. And add on to that cool thing about this. You can move that picture around behind it. It doesn't matter because it is a clipping mask. It's not hurting anything. Another cool thing about that. If you don't like this font, you can go back in there and change that fun it any time. Whereas the other way to do it. You can't do that. So if I want to go back in there and kind of, like go through some of the fonts these air way too thin, see how thin they are? Just click through these and find a font that would work for that. So a lot of fonts are thick and thin. Are there's Sarah for sand Thera. So impact to me just was the one that always seems to work. And there we have it. There is what's called the out of bounds. And we've covered this a little bit of think, maybe in day one or two. But since, um, we've got a couple more minutes, I'm just gonna go ahead in there and do a pop out. So we go in here, Teoh one of these photos here. His feet look huge here, but we're gonna even make it look more huge by going into this area that's called the Guided section. And normally, when you get into Photoshopped elements, you're gonna automatically go into the expert area. So we're gonna go click on guided, and I'm gonna go town to the bottom and click on out of bounds and click on, add a frame and then I'm gonna pull this in just a little bit. Anything that I want to pop out of that box, I want to make sure it's outside of this frame. I'm gonna click on the check, Mark. I'm going to go ahead and pull this just a little bit out so that we have a little bit of a frame on and then we're gonna go back and forth and I'll go through each individual section here. So now I need Teoh. He added. The frame I click on OK, now the next thing I do is I take my selection tool so it step by step, really, really easy. Take my selection tool, click and drag the area that I want to pop out. So I want his feet to pop out of this frame and you don't have to pick with just the parts of going outside of the frame. Then you click out of bounds. Effect didn't do very good job on selecting that that foot, but that's okay. We can go back in there and change it later. We need to click on a medium drop shadow to kind of pull it a little bit more or we can put a graphic and or a solid background on there. So I'm gonna click on, OK, find a different Grady. It may be that suits it. I don't know if that one does, but I'm just gonna go ahead and pick whatever and it pops it out a little bit more. Click on OK, and now I can put a drop shadow on it to kind of make it pop a little bit more and click on dime. Now, the cool thing about that for those of you who are kind of Maurin, the intermediate or the advanced, take it back into expert mode. If you made a mistake on it, you can go in there and fix that. No problem, because you have all the different layers thes the layer mask and you can go in there and play around with that as well. You can also turn layers on and off. You can kind of see how it was built a couple versions ago, we had to do this all by hand. It took maybe 10 minutes just to do something that now takes 10 seconds. So the more and more. Each version that comes out makes our lives a little bit easier. I was talking the other day that when Photoshopped first came out, it didn't even have layers. So any of you out there in the Internet world, if you remember that, go into the chat room and say I remember when Photoshopped did not work with layers and I don't know how we got by, I don't. But we did, because it was a new program. We thought, This is the best thing ever. So now it's like if we didn't have layers, I don't think I could work with it. So I think that was version one. All right, Got a few more minutes here, so let's go back in and talk a little bit about another place in the guided section. Go ahead and bring this one out. We have been yet sin there. We talked about yesterday so you can go into the vignette. You can put a white vignette on their really, really quickly or a black vignette, And the cool thing about this is we have the refined shaped tool, or you can put a Nintendo City amount so you can take the slider. Slide it all the way to the right or the left, and we can refine that. So if you click on the vignette several times, it will get darker and darker each time, so you don't have to just do it that way, and you can refine that shape by clicking on refine and putting the roundness, pulling it in a little bit closer. If you need to feathering ATM or if you need to feather and then click on OK, once you're done, Gone done. There was the picture stack that we talked about a little bit and go ahead and show you those different versions. Here is this. Is this more of an artsy type of thing that you can dio? Probably This one would be work better. And then we did talk a little bit about the Post are the, uh, puzzle piece as well. So we go into puzzle piece puzzle effect. This, I think, might be new to version 12. So those of you who are using version 11 you might not have this effect, and it's okay. I think I might have used it once or whatever. It's just kind of a fun little thing. Basically, you're just gonna go ahead and pick what size small, medium or large. It turns your photo into a puzzle piece are a puzzle, and then you can go in there and you can select different puzzle pieces. So maybe I'm gonna select this one. Hold my shift key down, just like more than one, maybe one corner area. You extract those puzzle pieces, and then you can move them to any location. And you can rotate them if you want to. A swell so kind of something kind of fun, never know. Might come in handy somehow. Print this as a puzzle of somebody. Well, you know what do you say that? Because one of my members she has it's called treasured memories. I think she sent me a puzzle piece with my son and my the doggy that we just got Cubist thing ever. I posted it up on Facebook, So if anybody's out there learned photo editing, facebook slash learned photo editing I posted up there. This is one big puzzle piece and you could hanging on your wall, But no, I don't. That would be a cool thing to Yeah, I mean, maybe source with you. Whoever does your printing for? Um um I just ask them. Do they have the facility to come? Yeah. Die. Cut once they've printed. Yeah, I do know that you can send your photo just playing photo and have it sent back a puzzle. Now that I'm thinking about it, I dio God had that, but I can't remember where it waas. So be fun, though. But we do have some comments from the audience. But first of all, what are we gonna be covering when we get back? We are gonna get covering postcard cluster design and maybe get into the digital kits reading a page and educating on a later in the day. You have a postcard source card center that absolutely well, we had some great quotes. Thank you so much for joining us today. We really appreciate all your comments and feedback. There are some we definitely want to share with Michele. Nancy G in Albuquerque. I think's been with us all three days. So thank you, Nancy. Welcome back. She's saying Good morning, Michelle. This has been such a great job. I am learning tons. Thanks. Thanks, Nancy. A saffron cell is saying I purchased the course on the first day after watching for only an hour or so. I want to watch and rewatch while having my PS elements opened in the days to come. Thank you, Saffron on T. W. Bev to says there are some wonderful scrapbook scrapbook teachers up there. But I'm so excited to see Michelle and creative life venturing into this awesome hobby. Thanks so much for that. I really appreciate it.
Class Materials
bonus material with purchase
bonus material with enrollment
Ratings and Reviews
PJ
I really enjoyed Michelle's teaching style. I'm new to digital scrapbooking and am on my way to becoming an die-hard convert. Thank you so much for explaining everything so clearly. I'm so glad I bought the course and all the extras you gave me were wonderful - a quick way to get started. Hope to see you again on CreativeLive soon!