Text Wrap with Shapes
Lesson 7 from: Digital Guides, Products and ePDFs with Adobe InDesignKhara Plicanic
Text Wrap with Shapes
Lesson 7 from: Digital Guides, Products and ePDFs with Adobe InDesignKhara Plicanic
Lessons
Class Introduction: Project Overview
12:01 2Before You Start: Preferences and Document Setup
23:52 3Creating a Cover Page
19:06 4Building a Spread and Table of Contents
11:55 5Multi-Spread Story
16:11 6Pull Quotes
05:17 7Text Wrap with Shapes
13:48 8Overriding the Master Page
02:57Lesson Info
Text Wrap with Shapes
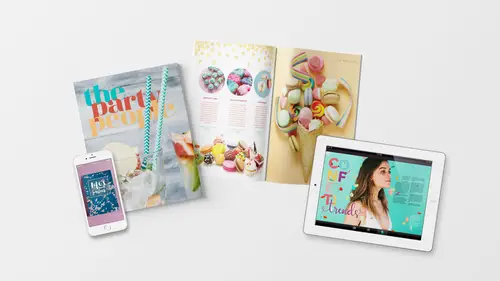
Here we're gonna be working again with images and text, and this time how they play together. We're gonna make them play together, play nicely, using text wrap. So what we wanna do is we're gonna place a couple of images. So this is a piece about party favors, so we're gonna place in some, what are they called, those little horn blower things. We're gonna place those in here, noisemakers I think. And we'll see how we can make it interact with the type. So first thing I'm gonna do is grab my frame tool, the rectangle frame tool, right over here. The keyboard shortcut is F. And I'm just gonna click and drag, I don't even know how big I want the box. About like that. And I'm gonna place my image by pressing Command or Control + D to drop in. We'll go to our photos for this course, and I am looking for this thing. This is a party horn from our friends at PhotoSpin. And I've got placed in here. And this is a PSD file, so it's got some layers, it has an alpha channel built into it, so it's g...
ot transparency, which is really nice. It's not required for text wrap by any means. You can put a text wrap on anything, and you'll see how that works in a minute. But I'm gonna take this, we're gonna place this twice. So I'm gonna drag it over here and I want it to be I think a little bit bigger. So I'm going to just Shift and Command + Drag from a corner. The shift keeps it proportional. The command will scale, the command means to scale the frame, and the content within the frame together. If I just held shift, I would just be moving the frame as you can see, like I could make it huge and nothing happens to the graphic. But if I Command + Shift it, there we go, then the whole thing grows, so that's kinda nice. So I'm gonna just position this about like so. And if I zoom in so we can see, nothing's happening other than this thing is just covering up this text. Which is fine for right now. But what I would like to have happen is that this text, it used to be, text wrap used to be called runaround, so sometimes I still like to call it that. So I would like this text to run around the graphic right here, so here is how we do it. We make sure that we have the graphic selected. There we are, it's kinda hard to see for a minute. So I've got the graphic selected, and then I just open up my text wrap box. So I'm gonna go to window, text wrap to find it. The icon for it is this little circle with lines. So the circle represents the graphic, and the lines represent type wrapping around it. So you may have it on your screen already, I usually keep it in my panel over here. There are all different types of text wraps. This right here is no text wrap. So if you ever accidentally make a text wrap, or you change your mind and don't want a text wrap, you can't just hit delete 'cause that would delete the image as well. I guess you could replace it, but, you could also just open text wrap back up and turn it off. So we have different choices here. We can say to wrap around the bounding box, which as you can see is now pushing the text away. So what happens when you wrap, is it actually re-flows the type. So if I toggle on and off and I zoom in a little bit so you can see maybe, if I toggle this on and off, it's actually pushing the type down. It's not just covering it or blocking it in any way, it's actually re-flowing it so that it flows from right down here to here. So basically this becomes the top of the column now. So we don't want the box in this case. There might be other times where you want the text to wrap around a box, but in this case I actually want it to wrap around the shape of the photo inside the box. So we have some other options here. We can click this right here, which isn't gonna work in this case. This tells it to wrap around the object shape, but in this case, the object is a photo and it's still not recognizing it. It's recognizing the box, 'cause it doesn't know noisemaker. But what we can do is come down here to contour options, and I can tell it to wrap around the alpha channel. Or, sometimes you can tell it to detect edges, which it will do, you can see here it's detecting the edge. And it's actually doing a pretty good job. So if you had, for example, if you had a picture of like, I dunno, an apple on a white background, and you didn't have an apple, or you didn't have an alpha channel, the whole thing is just a JPG, there's no transparency, that's when you would choose detect edges. But in this case I actually already created a layer mask here, so we can choose the alpha channel, and then it'll just wrap perfectly. If we want to push the wrap out a little bit, like maybe the wrap is good, the shape of it's good but it's too close, we can give it a little more of a buffer right here by clicking this up arrow, and you can see it kind of just expands the, it's almost like it puts a little, I dunno, electric fence around it, like zap. And then it's like stay back, and it pushes things away a little bit more, and you can see the text re-flowing. So I think that actually does look nice. We wanna make sure we have a comfortable room to breathe around the object. So I'm gonna bump that up to like 1/8 of an inch wrap, and that's kinda nice. And then I'm just gonna duplicate this noisemaker and the settings that we've just applied to it, and then we'll put it over on this side and have it as well. So I'm going to just grab my selection tool, and I'll hold down Alt or Option and then drag this over here. And now we see that it has duplicated. So Alt or option allows us to make a copy using the move tool or selection tool. Holding Alt or Option makes a copy. And I'm gonna drag it over here, but what I want now is to actually flip this so that it's the other way. And you might think, well you could rotate it, and I could. But then it's, I mean that's clearly upside down and kinda weird. So instead I want to flip it horizontally, and it's super easy to do. With the frame, the graphic frame selected, I'm gonna come up here into the control panel and these options right here will allow me to flip it horizontally or vertically. In this case I want horizontal. So I'm just gonna click on that, and it flips over, and I'll drag it a little bit off the workspace. And now I wanna spin it just a smidge. So I'll hover my cursor in the top right corner until I see that double-headed arrow, and then I can click and rotate, click and drag to spin this a little bit. And I'm gonna drag it down so it bumps into this caption text ever so slightly. Let's zoom in by holding Command or Control + Space Bar, and click and dragging, so we can see a little better. And now in this case, I may want to bump the wrap out a little more, there we are. Perfect, okay. That's looking pretty good. And this already has a text wrap applied to it. So if I click on this, we can see that confirmed. In this case it is wrapping around the object shape versus the bounding, the bounding box. So here's an example where the bounding box is the square, but the object shape is the circle. And maybe I wanna push it a little more, because I would never wanna leave a little piece of text dangling over here. So I'm gonna expand that. You can expand it, or you can also grab the white selection tool, and I can actually click. It becomes like a path, so I can actually click. You'll see that, it's so hard. There are a lot of things on the screen, it is hard to see, so I apologize for that. You really, really have to get your eyes checked or have some good glasses I guess. Zoom in and I've got this, I've clicked with the direct selection tool to sort of activate this path that's around the shape. And if you look really closely you can see I have handles here, and I can kinda pull into this weird shape to just bump that piece of text out. So if I keep expanding the wrap buffer big enough to affect this text down here, then it might be too big for this area up here. So you can actually just edit this the way you edit any path. You could even custom draw your own if you really needed to. So sometimes you just have to really mess with it and fiddle until you can get things how you want. Okay, let's see. And I'm also noticing that this type in this article is not styled with the body copy. So I'm gonna select all of that and go to our paragraph styles and give it the body paragraph style. And we'll put our cursor in this first section and give it the drop cap. And maybe we, oops, drop cap, there we go. Maybe we click over here and give this a section head. Just kinda play with it a little bit. Alright, and one other thing that can be kind of fun is you've seen articles where they maybe put a little, a symbol or something at the end of an article. So we can do that too, really easily. One thing I might wanna do, looking at this, is thinking you know what, I would just, we gotta style this quote, first of all. I'm gonna put my cursor in there and click, oh, did I not make the pull quote? Whoop, well let's just change this. And we didn't make that into a style for the pull quote. So we'll call this railway for the font, railway or regular. Oops. Goodness. And we can increase this, maybe 24. And then what I'm gonna do is Shift + Drag, Shift and Command + Drag in. So I actually think that was like, way too big. Way too big, and I want a little more so the text can finish here and not be quite so narrow. So we'll shrink this down, that looks much better. And we can make this white. There we go. And, if I decide I want more of a buffer within the text frame, I can go back to those text frame options. Remember, the keyboard shortcut's Command or Control + B, or I can right click and choose text frame options. Control + Click, and I want the inset spacing to be a little more, there we go. So that looks better. And then if we wanna put a little symbol here, that can be kind of a fun, kind of a fun thing where I'm just gonna put my cursor in here and then choose a fun dingbat. So we'll go to our glyphs panel, back to type, and glyphs. And something like, literally dingbat? Oh wait, type the name of the font down at the bottom. Ding, or modern pictograms. And we can find any old shape that we wanna put there. Maybe we put an X like eh, you're at the end. Or if we wanted to carry on from a previous page, we might put a little triangle that's pointing to let people know that this article continues on the next page. I like the star, so I'm gonna double click to insert a star. And remove the space so I get it right on this line, and maybe I make it gold or something. So it's kind of a fun little symbol. And the thing that's cool about it is that because it's text, it just flows along with the type. So even if I decided to remove whole paragraphs or something, it just flows up. I don't have to click and drag it and reposition it all the time. So that's kind of a neat thing.
Class Materials
Bonus Materials with Purchase
Ratings and Reviews
lisa
Love love love all of Khara's courses! She's explains things clearly and really makes the process fun and less daunting!
Céline
I so wish that Ms. Plikanic would make a new course to push this further and learn how to make ''books'' and tables etc., for those who have done this course.
Mariya Haberberger
This course really helped me understand how to make printable PDFs. I took four pages of notes. :)
Student Work
Related Classes
Adobe InDesign