Lesson Info
6. Digital Wedding Invitation
Lessons
Lesson Info
Digital Wedding Invitation
So now, we're gonna switch gears, and go into our digital design, and this is really fun. Okay, so, the premise of this was, I was thinking, like, what about all the other cool stuff that you can do that costs extra? Because you can create die cut pieces, so you're not limited to rectangles and squares. Of course some things can be die cut round, but you could have your own custom die cut made. So what does that mean? So if you wanted an invitation to be in the shape of a heart, or in the shape of someone's name, or maybe you're getting married in the mountains, and you want it to be, where the actual paper is cut, into a mountain shape, or something. That's called a die cut. And you can have your own custom die cuts made. That's gonna cost you some money. But, other things you can do that cost extra money would be foil, if you wanna put foil on your piece, or, any special finishes, maybe you want a spot gloss, or something, or a certain PMS color. Those are all extra kinds of things, ...
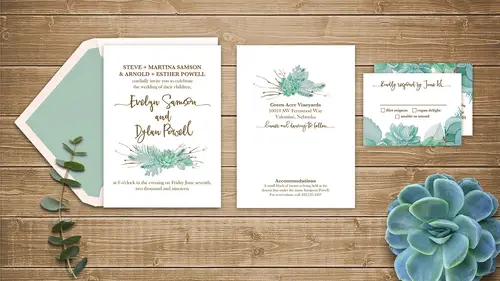
you could... What else is extra fun stuff? You could add vellum, and layering, and of course, you could do letterpress. All of those things are so delicious and gorgeous, but it's gonna come at a higher price point. So then I thought, how could we show all of that, and have some fun with those kinds of things, and not have to actually pay for all of those unique features? And then I thought, well, let's look into digital invitations, 'cause that's a thing, and then I found this company that does it called Green Envelope, or Greenvelope. Greenvelope, they pronounce it. So, it's just spelled like that, Greenvelope.com, and they make digital invitations, and what's cool about it is they track everything, so you can track who's opened it, people can, like, they track your responses from guests, if they're coming or not, or all of those types of things. And, it's really cool, and they have a whole catalog of designs, but, they also have the ability to make your own custom ones. So, then I thought, well that sounds like it could be really fun. So I looked into it, and... So that's what we're gonna do, and we're gonna make it die cut into a heart shape, and we're gonna use glitter, and we're gonna use foil, and we're gonna use all these fun things that cost more in real life, but, because it's digital, we can make a die cut for free, it will just take us a little time. So that's what we're gonna do. So their documents, at least the one we're gonna make, is 2100 pixels by 2100 pixels. So, I'm gonna make a new file. 2100 by 2100, and the resolution will just be 72. We have a question? So, as you're doing this, we're just about to the point, as soon as you hit the create button right there, we're gonna have this big blank document. Where do you personally get inspiration from? Where do you draw inspiration? Oh, that's a good question. Everywhere. Yeah, I mean, I just look around, and I browse for things, and... This one, actually, was something that I have been looking for an excuse to play with for a long time. So whenever I am shopping on Creative Market, it's hard to not be inspired, because there's so much cool stuff. And then my list of my collection, wants, is really long, and this, the product... We're actually gonna use another Creative Market product for making all this glitter and stuff, and so it's just been on my wish list forever. And so then when I started planning this course, I was like, "What can we do with glitter?" And that was my inspiration, in this case. And, I was looking through at Greenvelope, I was looking through their designs and trying to see, what could we make that would be different than anything they have? And could take advantage of a virtual, digital die cut? And so then I thought heart shape would be good. But, I don't know, inspiration comes from anywhere. But it never fails if you browse Pinterest, or Creative Market, and you come up with all kinds of things. But, of course, then, you just have to make sure you're making it your own, and all of that. So, good question, but, sometimes, I find too, when I'm doing design work, that it's really hard to work when you don't have the inspiration yet, and I'm trying to force myself. 'cause I've got a deadline, and you're just like, "Ugh." But then I find that I really spin my wheels, and I sit for hours, and eat a lot of chocolate, and design stuff, and then it's all just garbage, 'cause I wasn't ready yet, and it hadn't jelled in my mind, or whatever, so. For whatever that's worth, I think you kind of have to listen to yourself, too, and work when you feel it, and still try to work when you don't, 'cause that's how you eventually feel it later, so it can be a long process, and as designers, you have to remember to charge for all of that, because, as I said before, I can sit down and design this for you now, and it's so fast and seemingly simple, but, when I'm home at three in the morning, eating my, however many bowls of popcorn by that point, is long, so you have to make sure you include that. Okay, so we're gonna make this 2100 by 2100, and I'll hit create, and now we have that blank canvas that just stares at us. So, what we're gonna do, is, I found this graphic. This. So, oh, I'm gonna pop into Illustrator, I guess, to grab this really quickly. Oh. And I didn't have it launched, sorry. So, this graphic I found, and I like this faceted... And I think the glitter product from Creative Market had some sort of similar diamond faceting happening in their little mock-up, and I was like, "That is so fun." And it's a great way... Hey, Illustrator, are you not cooperating? It's a great way to showcase all the neat stuff that comes with this little glitter plugin. Okay, this is a EPS file. So, the reason I'm opening it in Illustrator instead of Photoshop is just 'cause I don't want to have to cut it all apart in Photoshop and pick pieces, so, in Illustrator, I can do that very quickly. So I'm gonna grab this faceted heart that we see here, and I'm just gonna press Command or Control + C to copy it. So if you're like, "I hate Illustrator, "I can't deal with Illustrator." First of all, Illustrator's pretty great, gotta give it a shot, but, also, all you have to do is copy and paste it, so don't panic. So we'll come over here, and I'm gonna paste this in now, and I get to choose how I wanna paste it. And I'm gonna go ahead and choose Smart Object, and we'll click OK. And there it is. So, again, because it's vector, I can scale it up, and I'm gonna make it fill this whole space, because, this square, oops, that was maybe a little too big. This square is their whole, like, design canvas area, and so, because, when we save this, to actually send the files, we would delete this background and save this whole thing as a PNG. So it will look like it's die cut. So I want to make the heart fill the whole shape because that's going to be the whole invitation, basically. So, we have this, and then what I want to do, before we get into glitter-fying everything, I want to set this area in the center where we're gonna place the text. So, right now, it's this faceted pentagon, or hexagon, and I want to fill that in, and it's a little tricky, because it's the Smart Objects, so... The easiest way, I think, is gonna just be to use his lasso tool, the polygonal lasso tool, so I'm just gonna click and work my way around this. I don't know why I keep wanting to call it a pentagon, it's obviously not, but I keep thinking of it as being one. So I'm just clicking around this edge to just draw this pentagon shape. And then... And I missed a spot. Let's add to it quick. There we go. So I've got the shape, and I'm just gonna fill this in with black. On its own layer, I guess. And somehow I missed it, still. There we are. Okay. So now we have this space, and this is where we're going to put all the type that we're gonna be using. But first, I'm gonna merge this into the vector object. So it won't be vector anymore, but I think we'll be okay with the size. So, selecting both the layers, and pressing Command or Control + E, just... 'Cause it's gonna be easier for what we're gonna do later as you'll see in a minute. I'm also gonna put a chalkboard texture into this. So in my design files, I have this chalkboard graphic. So I'll open that, and select it all, copy it. I'll come in here and just paste it. It's gonna be huge compared to our little 2100 pixel file. So I'll scale it with Command or Control + T, and now I'm going to clip it to our heart-shaped hexagon thing by making sure it's directly above, and then I'll hold down Alt or Option, and when I see this cursor, I can click in between those two layers so that the chalkboard gets applied. And it doesn't make a huge difference, I mean, you can see if I toggle that on and off. But what it does do, is it helps, first of all, unify the illustration here with the nice black that we have here, but, also, it sort of gets rid of that digital-perfect look, of just a clean, perfect, black fill. A lot of times, if you're creating digital stuff, and you want it to be realistic-looking, you really need to add grain, or some noise, or something to rough it up a little bit, 'cause digital things tend to just be so super-perfect. So, now I've added this chalkboard, and it makes a nice contrast, I think, with the text. Okay. Now we're gonna start the magical glittery part. Okay, are you ready for this? I'm gonna merge this back down. Okay, so I'm gonna grab my magic wand, and what we're gonna do is select these different triangles and fill them in with amazing glitter texture that is so magical it's gonna blow your mind. So, I'm just gonna pick, I'm gonna select groups of three. So I'll click over here, I've got my magic wand set to continuous, and, I'm just gonna click in this empty space, and I've got it set over here to add to the selection, so we'll do one, two, and maybe three down here. And then on a blank layer, I'm gonna make a fill, so it doesn't matter what we fill this with, it could be neon green, it doesn't matter, it's gonna convert in a minute. So I've got this selected, and, I can't decide what order I wanna do this in. We'll save the wow for later. Okay, we'll do another three, so, one, two, three. And I'll make a new layer and fill that, also, with white, I guess. And, let's do another one. One... Oops. I'm gonna tell it to sample all layers so I don't have to change layers all the time. So we'll do one, two, three. And again, another new layer, and fill with white. So we gotta keep going 'til it's all full. One, two, three, I'm just trying to scatter them around 'cause the groups of three are all gonna have the same treatment. So I want them in different places. Okay, oh, we're getting close. Woops. One, two, three, there we go. Oops, I think I just switched channels. Okay. Good. And, two more. Actually, just one, these will all be the same, that'll be fine. Okay. Now we're ready for the magic. So what we've got, just so you can see what's happening, is, these are all different sets of three. So this layer has these three. They each are all on different layers in sets of three, so what we're gonna do is I installed this product called Gold Rush from Creative Market, and it has... It's amazing, it has a ton of glittery, foil, painty, incredible... And it was only, like, 20 bucks. I cannot believe it was the price that it was. And, what's cool about it, is that they're all made as these styles here in Photoshop. So you wanna make sure you have your Styles panel opens from the Window menu, you open Styles, which is this little button that looks like this, and I already have them loaded, here, so this is easy, so here's what we do. Are you ready to just, like, pee your pants with excitement? Okay, so, the hard part is just choosing, 'cause there's so many. So I'm gonna target one of... I don't even know which one this is. All I have to do is target it, and then I'm gonna come over here, and say, "I want Gold Glitter 1." Ta-da. Gold glitter. Or, maybe, Gold Glitter 2. Oh, that's kind of fun. So, I don't know, you can just go through, so now I'll pick this layer, and then... I wanted to do a whole mix, so let's do some metallic-y silver stuff, so maybe silver foil? Nah. Silver Giraffe, that's fun. Silver Glitter Paint, okay. So I just went through, and then did a bunch of different textures. There's Gold Leaf, and, there's also Rose Gold. Rose Gold Glitter. And... There's also a Black Glitter, there's a... Titanium-something, here it is, that was kinda fun, too. So anyway. We'll just go through and pick a few of these. I think we need some more gold-gold. There we go, so something like that. So you can see how easy it is to add those styles, which is fairly incredible. And then, we'll add the text. So I'm gonna make... Come up here to the top, and I'll grab my Type tool. And the names that we're gonna put in here are, I think, the same, so, we'll just grab our Type tool, and I'm gonna go with white for right now so we can see it. And the type face is gonna be, I think, the Bonjour. And we'll type Sophie. And I don't even remember what I had in here. Sophia and somebody. Sophie needs... Who's Sophie marrying? I don't know. Matthew. Sounds good. Sophie and Matthew. And we'll give an ampersand to them. There we go. We'll make it tiny, and then we're gonna glitter-fy their names, and it's gonna be... I'll show you how you can add some real extra little level of realism. Okay. So, we'll take Sophie's name and we'll go back to the Effects panel. And we'll go with, I think, the Rose Glitter. Here we go. Something like that. And... We'll do this one in Silver. And Matthew we'll do in the Rose, also. Okay. So when we zoom in on this, you can see the detail, I mean, that's pretty awesome. What's super fun to really bring this home is adding another blank layer. And then, if we grab our brush tool, and, that same Gold Rush Collection from Creative Market comes with a lot of brushes, including one called Confetti Chain. And if I click on that, and I lower my brush size, I'm using the left bracket key to reduce the size of the brush, and I'm going to, just to make it easier to see what's happening, I'm gonna apply the style already, so we'll add this Rose Glitter, so that adds a pattern overlay effect. And now if I come in here with my brush, and I'll zoom even a little closer, so you can... Maybe that's too close. Now I'm just gonna paint. And I'm actually painting... I'm gonna make my brush smaller. I'm just painting around to basically, again, make this not-so-perfect, 'cause if you were really putting glitter on the page, or gluing it to type, or like, something, it wouldn't have such a perfect edge, right? It would be dimensional and a little imperfect. So, basically, I would just go through, and kind of add some glitter on to the top of this, so that it's not just so perfect. Like it shouldn't have such perfect edges, 'cause glitter doesn't work that way. So I would just go in, and... And, anyway, this brush lets you paint with glitter. And there's all different kinds of brushes, so I could do, like, Fairy Dust, is another one. Like that, so you can just spray glitter around, I mean, that's kind of awesome, who doesn't wanna do that? So, I would just use these different tools to add some realism here. This Confetti Chain, I have found that this brush does, I think, for me, anyway, I get the most out of it when I'm using it to fill in some of these letters, and just brush over things, just kinda basically tracing over the type to just add a little extra oomph. And then because this is all on its own layer, and this is now just pixel information, I can just erase, so this mess that I made up here, I can just get rid of that. So I'm not even gonna mask it, I'll just delete it. And then if I wanted to add silver glitter down here, I would wanna put that on the separate layer because it would need its own style. So, separate layer, and a separate style, just go with the Silver Glitter, whichever one. And then, maybe I go back to that same Confetti Chain brush, or maybe I try something else. You can try, maybe Fairy Dust, for this one. Close that. And it's really a lot of trial and error, because, oops. 'Cause I'm painting with an eraser. (giggles) That will make it tricky, 'cause you just don't always know what you're gonna get until you try. So maybe I wanna sprinkle some of this around. You have to play with it and see what's gonna work. But you can really see, when you toggle that layer on and off, these two layers, I'll group 'em, so we can toggle 'em on and off easily. You can see how much extra realism that really adds. And then, maybe we have our, you know, type down here that needs to say whatever it's gonna say, like, Friday, June, I don't even know if that's really a Friday. At, let's say they're gonna get married at Windsor Castle. They probably wouldn't be sending out an e-Invite for that, but, you never know. Maybe that's where they spend all of their budget. So, we'll place this type, and then maybe we don't want this to be the same script-y type face, we want this to be something cleaner, more modern, like, I don't know, we can do, like, Futura. Maybe we don't even want caps. Sometimes that's a thing where it's all lower-case. Oops. I will also point out that Photoshop has spell check. Does everyone know that? Do you use it? People? Do you guys use it? Spell check in Photoshop? Oh, no, you're like, "No." Me neither, and you know what? I should, because I'm notorious for having typos and things that could have been avoided with spell check, so, use spell check when you need it. So for this smaller type, I probably wouldn't do one of the glitters, I'd probably go with something, like, maybe the Gold Paint, or Silver, where is my Silver stuff? Silver Stone or something, just because I think that it's too small to really look well with the glitter. So I would do something about, like that, and, maybe, there's also some design elements. I'd probably want some sort of visual separation right here, so I would grab... Go back to that Brush tool, and there are some really nice Flourishes. Or Strokes. So, for example, I would want a horizontal smear of, let's say, glitter paint, underneath there. So there's a brush right here, but it's not a horizontal, but if I click on it, and grab... Get on a layer where I can add it, we see that it's enormous, and it's also not at the angle that I need. But, if I just open up my brush's panel, you'll notice that, on the very first tab that's active here, you have this little wheel, and you can grab this triangle right here and spin it. So I can actually rotate the brush, so now it's the shape that I want. So now I can get rid of this, and I'll just come over here, and let's say I want something about, like this, I'll just click. And, it's white, 'cause it doesn't have any style applied to it, yet. But now, if I come over here, and open the effects panel, and I'll go grab Gold Paint. Where are you? Gold Glitter Paint 1. So, this is a paint that's also got glitter on it, and then, of course, I'd want to add another layer, and switch to a different brush, like my Fairy Dust, maybe. And then, we'll add another Gold to that. And then, just come in here, and flesh that out a little bit. And there we have this awesome design, with all these fun textures, and colors, and neat stuff. Then, when you send this to Greenvelope, or, when you upload this to them, you would not include the background, obviously, 'cause we would want transparency there. And then you'd save this as a PNG file. So you'd wanna come up and choose Save As. Save your PSD, obviously, for yourself. And then we would save this as a PNG, right here. Well there is one question about making generic invites without the people's names and info already on it, for, like, to sell it on an on-demand site, or something like that. Would you do anything different? Well, I wonder, usually when... You'd want the blank design, obviously, to be able to add the names to, but usually, when you're showing the design, you would put names in it, because if I just showed this, if I was like, "This is gonna be your invitation." But I was, like, showing it to clients without anything in it, it's hard for them to envision it, so you'd want the blank version for the demand site to be able to use, but... And maybe they mock it up with names, but at some point, you'd want a mock up of it with some names, and so that's, like... Here. This is the mock up up that I made when I was building this. If we were gonna make this as a print piece, then this would require square envelopes, and that would be an up in postage. We were also talking, during one of the breaks, about how, you know, sometimes in print pieces for invitations, there's, like, that 5 by would have, maybe, an envelope that it comes in, and then when you open that, you get another envelope, and inside that, would be the actual invitation. And then the reply card, I designed it to just be mailed as a postcard. So, the guests would, or you, I guess, as the host would put the stamp on it, and they would just drop it in the mail like a postcard. But if you were going to put an envelope with it, then that would be another thing, but then, all of those envelopes, and all that's gonna make for a very thick and heavy piece, and that is gonna cost extra postage, too. So there's a lot of those things to think about when you're designing pieces for clients. And also, if you have any funny inserts in your mail, that costs money, too. So if you were gonna make, like, I don't know what you would make. Sometimes people make magnets to send out with stuff, but, anytime you have funny things in your mail that make it hard to run through the machine, they give you a surcharge for that, too. So, of course the sky is the limit as far as imagination goes, but, gotta be realistic with your budget, too. Exactly, so what would you recommend for somebody just starting out doing this? Where should they invest their money, in fonts, or? 'Cause you could spend your budget pretty quick, just, as a designer, buying a bunch of cool stuff. That's a good question. Well, I love fonts. So I would say fonts are a good place to go. But, you know, if you get a good... For example, to be able to offer something with a script-y type face, if you find a good script-y type face, you can work that for a lot of different projects. So, the one that I showed you, the Sophie, I think it's called, I forget what the price point was on it, but it wasn't one of the $100 fonts, it was probably in the 20, maybe, range, or less, even? And it has all those great alternate characters, and fun, swashy things, and... So that's a good starting point. So I would maybe get a couple of fun fonts that have neat features, like, swatches, alternate characters. I love Dingbat fonts, too. So, it just depends on the type of design work that you wanna be doing, but, that's what my collection tends to include. So, starting with some of those, and then, some good design elements, too. And a lot of them you can make yourself, you don't have to purchase everything, you know? If you want to just invest some time with the pen tool you can get decent at making some simple things. A lot of 'em are just shapes, simple shapes. You know, like, those mountains are really simple to just draw with a pen tool, or something similar, so, a lot of it you can even D.I.Y. that part, as well.
Class Materials
Bonus Materials
Ratings and Reviews
Lt. Cmnd. Data
Not only was this class very approachable and fun to watch, it is going to save me a ton of money designing my own wedding invitation. Highly recommend the purchase. Thank you so much Khara!
Bardha
Amazing class! thank you so much for teaching me a few new tricks. * I cannot find the templates on the mixpro website. Can someone help or guide me in how to download them?
Sherry Fish
Thank you so much. Really excited to play around with the glitter idea and also learned a few things about Photoshop that I didn't know before. Thank you!