Uploading Patterns for Web Printing
Lesson 31 from: Design Surface Patterns From ScratchBonnie Christine
Uploading Patterns for Web Printing
Lesson 31 from: Design Surface Patterns From ScratchBonnie Christine
Lesson Info
31. Uploading Patterns for Web Printing
Lessons
Day 1
1The World of Surface Pattern Design
35:40 2Living Your Creative Dream
22:15 3Introduction to Illustrator
27:16 4Basic Tools: Pen, Text, & Blob
22:28 5Color & Function Tools
32:27 6More Tools: Rotate, Duplicate, & Replicate
19:16 7Custom Color Palettes
18:49Essential Tools for Pattern Making
41:59 9Tools for Sketching Inspiration
27:50 10Inspire & Nourish Your Creativity
34:55Day 2
11Creating Objects from Scanned Sketches
17:04 12Tracing & Coloring Sketches
30:46 13Tracing & Coloring with the Pen Tool
37:44 14Working from a Photograph w/ Live Trace
36:24 15Hand Tracing Over Photographs
31:27 16Building Pattern Tiles in Illustrator
21:13 17Adding Textures to Illustrations
28:52 18An Unrefined Look in Illustrator
26:10 19Typography & Students Homework
21:39 20Legality of Design w/ Annie Tunheim
27:33 21Trademark & Licensing w/ Annie Tunheim
27:50Day 3
22How to Design Repeating Patterns
18:52 23Complex Cluster Patterns - Part 1
27:38 24Complex Cluster Patterns - Part 2
28:35 25Getting Noticed: Portfolios & Trade Shows
39:43 26How to Drape on Pattern Mock Ups
19:07 27Fun Stuff: Desktop Backgrounds
19:42 28Fun Stuff: Gift Cards & Tags
29:05 29Fun Stuff: Clip Art & Shipping Labels
28:17 30Spoonflower: Stephen Fraser
29:04 31Uploading Patterns for Web Printing
20:29Lesson Info
Uploading Patterns for Web Printing
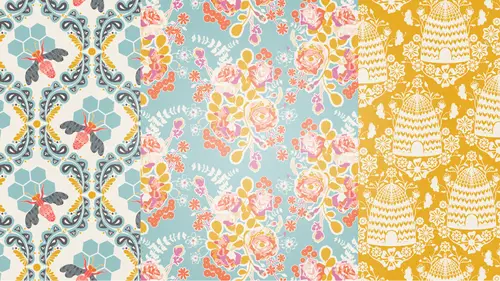
I want to show you how to upload repeating square for Spoonflower and also just tell you a little bit about my personal experience with Spoonflower. I didn't mention this earlier, and I should have when I was talking about my portfolio and attending Quilt Market, but when I, you guys know my story and you know that I went to Quilt Market with my portfolio in hand and the other thing that I did was, I packed a whole bag of some samples that I had made up to show companies what I really, where I saw this going. So, I use Spoonflower. I uploaded my repeating patterns to Spoonflower, I ordered yardage and I made a sample quilt, I made a yoga mat bag and a tote bag and I made these samples with me and took to market because I knew I would be speaking their language from fabric to fabric but at that time, I had no way of getting fabric printed except through Spoonflower. So, the other reason, I'm gonna hop over the web and show you guys just a couple of things as well. The other thing I used...
Spoonflower for, I'm gonna head over to my Etsy shop, is that sometimes in the fabric industry, we just don't have enough fabric to do what we really wanna do with and so I recently made this sleeping bag and didn't have enough fabric of my own to make this with and I was on a deadline and so I, Spoonflower came to the rescue. I made this out of Spoonflower fabric, this is the organic satin and I just have to tell you, it's to die for, the feel of this fabric too. So it still comes in use to me for sure everyday, so. I'm gonna hop back to Illustrator and show you how to save your files for Spoonflower. And this is also gonna teach you a couple of other things along the way. So, I'm gonna open up a new document that's Command + N and I'll just name this spoonflower. Spoonflower's fine. We'll decide which pattern we want to use. How 'bout our, I think this triangle print is gonna be great for our, I could have picked any of them. Pick whichever you want. So I have this pattern, just copied and pasted it into my new document and I'm gonna do the same thing I've been doing to access the original design files for this pattern. All I have to do is drag and drop the fill square over to my art board and I get right back to where I was when I was designing all this. So, this is the same concept that is behind that no fill, no stroke rectangle that's behind there, that is our bounding area for this repeating pattern and that is what Spoonflower's interested in. That's the perfectly seamless, repeating square. So, what I wanna do is just save that exactly. So, I'm gonna increase the size of this. This is when you need to decide the scale of the pattern that you want printed with Spoonflower or whatever. So, right now, if I select this, I can come up to Transform to see that it's 700 pixels wide, I know that this is 7 1/2 by 11 sheet of paper in landscape. So, roughly, I'm happy with that size. What I'm gonna do is right-click and Ungroup this and I'm gonna make a copy of the background and send it to the back. So that's Command + C, Command + B. I know that's identical to the background and identical to my repeating pattern. So I'm gonna convert that to an artboard. To do that I go Object, Artboard, Convert to Artboard. I'm done with the first artboard that we started with. So, I'm gonna delete that. And just because we keep talking about that one-pixel line, this is not always necessary but I'm just gonna show you this, I think it is a way to ensure that you're never gonna have this problem is that I just grab the background area and I just increase it a little bit so it spills over the edge. This is not a design element. So, it doesn't matter if it spills over, it's a solid color. So, it's gonna read seamlessly repeating. This is gonna ensure though, that there's no one pixel line around your repeat, okay. So, from here, you have two options. You can upload an Ai file to Spoonflower. So, I can save this and when I go to Spoonflower, when you go to upload it, you can upload directly your Illustrator file just like this. However, Spoonflower doesn't read, they allow you to upload them but they always rasterize images. So, sometimes, when you rasterize an image, the colors can change a little bit and so if you want to be in charge of that process, you can rasterize this image yourself, which basically just means converting it to a jpeg or a png. So, in order to do that, I can't use this save for web feature because that is gonna automatically save everything at 72 dpi, 72 dpi is the standard for anything online. For Spoonflower, Steven said we need 150 dpi. So, I'm gonna come up to File and just select Export, and it's already set to png, I could leave it at png or I can switch it to jpeg, doesn't matter which one. And what I wanna do is use the artboard. So, this is going to save the image that I have on the artboard. Use Artboard. I'll do Spoonflower repeating square. And if I export this, RGB is what I want. I'm gonna go ahead and bump the quality up to 10. But the main thing I need to change here is the Resolution to 150 ppi, dpi, same difference as far as I'm concerned for this application, 150. Also, this is set to Type Optimized, I would like to do Art Optimized. And select OK. Right there, Spoonflower repeating square. So if I double click on that, this is what we get. It's perfectly the repeating square and that's what you upload to Spoonflower. The other interesting thing about this is that this is not just perfect for Spoonflower but it is a repeating tiling square. So, if your are on Twitter, you can upload this to your Twitter background and it will seamlessly repeat as your Twitter background. If you're blogger and you wanna do a custom background, this is the repeating tiling square. You could probably make it much smaller than what we just did. But this is what you're gonna upload to your blog background to make that seamless repeating tiling square back there. So, have lots of fun with that. Okay, the other thing I wanna show you guys, are you familiar with society6? Oh boy. So, I am just gonna show you my society6 shop for the sake of this course. So, if I'm correct, my society is society6.com/bonniechristine and society6 gives us a really unique opportunity to upload our repeating patterns. You open a shop, similar to the same way you would on Spoonflower and you can get all kinds of things printed with your patterns on them. So, we have, Ill go ahead and go over to more. We have art prints, let's see, iPad cases, art prints, throw pillows, rugs, mugs, iPhone cases. So, this is a really cool opportunity for us to be able to upload our artwork, open a shop immediately and start getting feedback on our work. I am using a, the, yeah. So I'm using, I'll just show you. This is the iPhone case I have for my phone right here. And I'm using it, the interesting thing about society is that your sole job is to upload your artwork. They take care of the manufacturing and the printing and you get a percentage of that back. So, they do all these things, mugs and rugs. So what I want to do is show you, I'm not gonna go through the entire process, but at least want to let you know how to upload, save an image for society6, which you already know how to do but just wanna make sure you guys know for sure. So, when you open a society6 shop and you begin uploading images, I'm gonna tell you a couple of measurements but you don't have to remember these because when you're on society and you start uploading, it's gonna tell you exactly the artboard size that you need to make in order to upload your repeating pattern. Okay. So for an example, I'm gonna do society6. As an example, if you want to do a shower curtain, your artboard has to be 6,000 by 6,000 pixels wide, okay. That's gonna tell you that. So don't worry about remembering it. But it can just get to where these artboards are pretty huge and I just want you to be comfortable with that. So, I will grab one of our repeating patterns from earlier, I'll do the flower print. And so when I copy and paste it over, it's really, really tiny because 6,000 by 6,000 is huge. So I wanna fill this artboard with that. I'm gonna drop a point here and go ahead and do 6,000 by 6,000. Okay. So that is that little tiny pattern, I can get rid of this box. The first thing I wanna do is make sure I know that my square is the correct size and my artboard's the correct size. But I wanna make sure that they're exactly on top of each other to avoid any of those line gaps like we've been talking about. So the easiest way to do that is just come over to align and instead of Align to Selection, I wanna align this to the artboard. And I'm just gonna hit align vertically and horizontally. It might've moved a hair or might not have but now I know for sure that it is exactly on top. So, the easiest thing to do now is just scale this to where I want it to be. So, I have it selected and I'm gonna right click and scale this pattern. Not the object but just the pattern and we're gonna have to scale this up pretty high. Let's start with 6,000. So, this is a shower curtain if you can imagine that. So it might be really pretty, really blown up. Or if we wanna see more of the repeats, we can take that down to something like that and select OK. So, whenever you are happy, you do have to upload, I have it written down here. Maybe, seven different sizes, even though you're gonna be offered 12 to 15 products, some of them use the same size but you're gonna have to updo this several times for every single pattern that you want available but once you get the hang of it, it moves pretty fast. So, to save this, you can either export it as a png or a jpeg or you could just save as web. But I think exporting is a safer bet because you can get a higher dpi. So, gonna export this as a jpeg and we'll name it shower curtain. Oh, I have my caps key. Use the artboard and select Export. That's all great, and hit OK. So, when you head over to society6 and start uploading, that's the process you're gonna go for and then you can instantly make your products available for sale, so you can get right started in your process as a surface pattern designer. I have a question. Yeah. I was wondering if you knew what the commission was on society6. I know that he said for Spoonflower, it was like 10%. 10%, society6 is upfront with that. You can find it on their website. The first thing that you do is upload the art print. So, you have to start with, in like a 8 by 10 art print, and from there, 8 by 10 art print, oh, you can name your own price for your art print. And so, basically, you can, they'll tell you how much profit margin you're building in when you enter your number. So, that one is totally up to you, how much you're making from that. Mm-hmm. And then, once you upload everything else, it goes from there. So, it's not a huge amount. I know it's not a huge amount but go check it out and it is definitely, it's definitely worth something and in terms of opening a shop but also in terms of just getting your work out in the world. It is basically like a mini portfolio online and you just kind of gaining credibility with your work. So, what that brings me to is that there is a definitive difference between Spoonflower and society6. Spoonflower, you're uploading your repeating tiling-- Okay. Square, and society6, you are not worried with repeat, with your repeating square, you're just uploading the image. Okay. So it doesn't have to be a repeating pattern either if you're in Illustrator and you just have like that big vase of flowers we used on the card. It doesn't have to be in a repeating pattern like that. I'm gonna go make my own shower curtain now. (laughing) I know, and rugs and all. Yeah, that's so cool. I didn't know that that existed. Yeah. So, I would love to take questions if anybody has one from not only this segment from but from the whole course. Okay, we actually have one that just came in that's very relevant to what we're just talking about. This one comes from Casey York and they say, "This question may be industry-specific "but if you are interested in licensing your work "to manufacturers, would that be a reason "to hold off on selling things on sites "like Spoonflower and society6, "for example, would a fabric company "be less likely to take you on "if you were already selling the same print "on Spoonflower or would they want to see "exclusive, never before released prints "from your portfolio." Good question. I wish that I had the answer to this question. It is something that we all toil with and I still toil with it. So, to show your work or to not show your work. Don't show your work because you wanna keep it hidden for companies, if you don't show your work, how are they even gonna find you in the first place. Yes, you'll be sending your work around but if you show your work, it's out there in the world and you'll have opportunities come up. If you don't show your work, you're gonna have, I think, less frequent opportunities but you may run the risk of somebody not wanting to use any of the work that you've put out into the world. So, everything in my society6 shop is licensed already. But I haven't, but I honor my licenses and like, I don't have shower curtains with anybody. So, I put them on society6. So, I do know like a really unfortunate story where a fellow surface pattern designer had gotten approached by her dream client, like total dream client and got all the way to the contract phase and this dream client noticed that she had shared a picture of this pattern on her blog in preparation for Certex, as advertisement and they dropped the contract because of it. That's pretty uncommon but it does happen and it is something to be taken to consideration. But my standpoint is always, I err on the side of showing my work. Sometimes I will maybe keep something that's really, really, really special but usually I show my work so that it can be out in the world. Yeah. So question for both Spoonflower and society6. Are you entering in sort of a time agreement that you're gonna keep those designs up there? Or can you pull them at any time that you want? You can pull them at any time and that may suffice if somebody becomes interested in them that may, and they're concerned about the fact, then you can pull them at any time. I do wanna just kinda recap what we've talked about. And talk about where this leaves you for the future. So, we started from the very, very bottom with this course. We started from, what is surface pattern design and how to open Adobe Illustrator. And in just three sessions, we have learned everything that you need to learn in Illustrator to be a surface pattern designer. You know now and I know it can be a little overwhelming but it just takes practice and through these segments, you've learned everything that you need to know. So, from there, I was in the same spot as you, many of you, many of you are way more advanced than I was when I was starting out but I knew nothing and learned this step by step and I have some of my fabric up here. I don't know if you can see this. But I have some fabric up here and I'm excited to be releasing some new wallpaper and wall stencils coming up. So I just say that to kind of put some wind under your wings and let you know what the possibilities are for you and also, let you know that you've done your one thing for today, if you've watched this. So, you can cross it off and so, I wanna encourage you to not get overwhelmed by anything that we've talked about in this course. Don't be overwhelmed by how fast I've gone maybe through some tools or other people's work that you see. Don't get overwhelmed. When you feel that way, just nourish your creativity, look with inside at yourself and get quiet somewhere and just kinda close your brain off and just do what you love to do. If it's sketch or take photographs or whatever. Just do something that makes you happy and get an Illustrator and just start. Just put pen to paper, put the pen tool to the artboard because you'll never know what's gonna come out until you start and I promise you, it's gonna be really beautiful things and I cannot wait to see them.
Class Materials
bonus material with purchase
Ratings and Reviews
Emily Leggett
I am so glad I took the time to sit through all 3 days of this course. I have been to hour long classes that I can't wait to get out of and this one I sat in for 3 days and I am wishing it wasn't over. I take a lot of continuing education classes and am always trying to learn new things and I have to say this is by far the absolute most informative, educational, inspiring, and motivating classes I have ever taken. Bonnie Christine was an amazing teacher. She took the time to take us through all aspects of the process and even beyond showing us so many things that can be done with everything she taught us in this class. I think she did a great job with the class, was easy to follow and is someone I would love to learn from again. Great job on everything. I would recommend this class to anyone who wants to learn about surface pattern design and Illustrator. Great job to everyone involved in putting this course together!
a Creativelive Student
Awesome awesome awesome course! Thank you Bonnie! Thank you Creative Live! I have learned so much... so much great information packed together in one class. I am so glad I bought the course so I can rewatch it any time I need to.
a Creativelive Student
I'm about halfway through my first viewing of the course and I have to say, its been electrifying! There is so much quality information here, its an excellent starting point, and I do think I can start working towards a career in design now. It also makes me want to find more information and courses in the art and design area. Bonnie is such a joyful, honest and enthusiastic instructor and really, it feels like she';s hosting an amazing party for her friends. Thank you Bonnie for doing this course and thank you CreativeLive for pricing it so affordably