Pre-Shoot and Scouting
Lesson 5 from: Darkness in an Urban Environment: Managing Light on the StreetsJoe McNally
Pre-Shoot and Scouting
Lesson 5 from: Darkness in an Urban Environment: Managing Light on the StreetsJoe McNally
Lesson Info
5. Pre-Shoot and Scouting
Lessons
Managing Light on The Streets at Night
04:20 2Camera and Lighting Gear on Location
11:42 3Working with Models: Etiquette and Considerations
01:44 4Releases and Permit Basics
02:41 5Pre-Shoot and Scouting
19:45 6Shoot: Male Model with Dusk City Traffic Background
15:16 7Shoot: From One Light to Three Light Setups
24:44 8Capturing Motion with City Lights
06:48Lesson Info
Pre-Shoot and Scouting
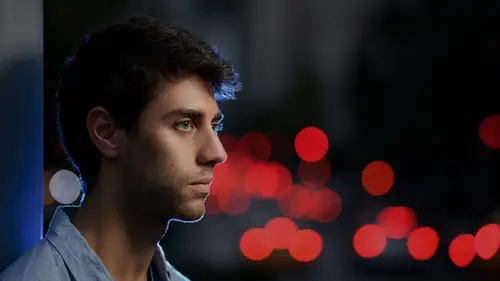
Obviously I've shot for years in New York City, so I kind of have a good road map of where to go in my head, but, you know the nuances of even locations you know about change. So location scouting and choosing the location, very, very important, you know, paramount to your success. So, 68th and Park I knew to be kind of an elevated spot looking down the pipe of Park Avenue, repetitive elements, graphic quality, all that sort of stuff. And I thought, okay, let's come here. So that's our initial foray into the streets. But we already changed it. Because what changed? 68th and Park didn't change. But it's summertime. There's a lot of trees on Park Avenue. And they've overgrown out into the roadway. And they've narrowed down my angle to get the graphic of the avenue. So what we did already was move one block south to 67th. It does not have a big tree that I'm confronted with. It has more of an open throw to some of the traffic and the urban environment that I'm seeking to create the backgr...
ound out of. So we've already made a move. And that's the way location scouting is. You are always attune to what might, the possibilities might be and where you might have to go off of those possibilities should they not work out. So, subject is going to be on the south end of the island. We'll be on the north part of it, you know. And starting lens, definitely 70 to 200. All right? And, I don't know. Let's try and see if we can get away with a small box first. A small speed light box. All right so speed light box, Justin Clamp, paintball and gate. Yeah. Okay. Yup. Sounds good. It's going to be a while before we shoot. Yeah. What time you thinking? I say easy an hour. Maybe more, you know. 'Cause we got nothing going on right now with nighttime activity. So. I'm hoping, actually, that traffic builds. You know, 'cause right now it's, for New York City, it's kind of skinny. Yeah, New York City in August. Yeah. Everybody's gone. This is Park Avenue, so most of these people are in the Hamptons. (both laughs) Why aren't we there? 'Cause we're photographers. Oh, that's right. Yeah. (laughs) That's just the way it works. See the traffics filling up right there. Yeah, yeah. That's a nice view right there. See that's kind of pretty. Base camp here. Yeah, I think, I think this will be off frame. I'm sort of thinking that we might start with our subject kind of in this neighborhood. Okay. You know. Kind of. Camera angle across the street? Yeah. Right up in that way, you know? I might have to cheat them a little bit out this way, you know? And be this. You could even work with this a little bit too to give yourself a little bit of elevation, as well. Yeah. A little bit more. Yup. Yup. And then you can kind of, I mean, same thing just straight, straight down there. And then we can try and move into the crosswalk a little bit. Yeah. We're definitely going to do some run and gun. There will be sometimes that I'm going to want to like during a break, while there's a stop light, being active, we going to get into the street. Yeah. Okay. Sounds good. All right so then I'll just get a, I'll get the camera out now, D5, 72, the transmitter and you can just start. You can build the bigger box. Yeah I'll get. Yeah. Yeah. Build the bigger box and let's get 782 and I'll just, while you're building the lighting, I'll just look around for angles. Okay. All right. So the light is going to take a while to develop and mature to a point where I can work with it for that nighttime feel. But I'm not going to waste that time, you know. Last thing you want to do is kind of, just, oh say I can't work right now and then all of a sudden you look around and say oh my God, it's closing in on me faster than I thought. So you have to be prepared. So what I'm going to do now, instead of just chilling I'm going to take a camera and a lens presumably, the rig that I will shoot this picture with, a 70 to 200, and I'm going to scope around a little bit. Take a look. It's not going to hurt. It's going to help me be more efficient when the model actually get here and their clock is ticking. So, simple stuff. Hold off on the transceiver or you want me to throw that on right now? Let's hold up on that. Okay. So ISA 200. Searching aperture priority. So you want to go kind of wide open right away two eight? Yeah, we'll go a two eight. What Cally's is doing is setting up the camera for me. We have a tried and true, I would say, we're pretty good at it. Because Cally is good at it. He gets the camera's "zeroed out" for me. We start at ISO 200. That's just a dart at the wall. It's not my favorite ISO or anything like that. It just is, okay. We start at ISO 200, auto white balance, aperture priority, zero compensation, adobe RGB, you know, my focus mode is kind of up to me depending on when I get my eye in the camera. But the basics of where the camera starts at like, he can hand me the camera right now. I pretty much know what the settings are. And we try to religiously observe that. And the one thing that I always check, because occasionally we do tests with the camera or we send it in for repairs, I check my diopter. Because I got to get my diopter tuned into my eyes. So, I kind of fine tune things in my head before again, the talent comes. 'Cause the last thing you want to do is be messing around with all your technique stuff while the model's getting bored. You want to hit it hard. They've got a certain energy level. You want to take advantage of that. All right, we're good. Cool. Thanks man. Yup. (cars driving) (people talking) Cally could you go stand on that edge there please? (Cally talking from a distance) Yeah stand up on that. (camera clicking) (cars driving) Turn this way. There you go. Hold arms, cool. (camera clicking) So a little bit of a problem with the banners, of course, that's just a given. (car honking) It's kind of the way I sort of thought it was going to be. Which is mildly unusual. Lot of out of focus city stuff in the background Very nice. Too much in the way of trees, you know. You know. What are they doing, allowing a tree in New York's no. (laughs) Park Avenue is full of trees. It's one of the prettiest Avenues in the whole city. So I'm just going to have to, you know, deal with that there's nice kind of splotches of color and then there's the repetitive element of all the traffic lights and the traffic, which is going to get more accentuated as it gets darker. We'll see. So that's not a bad starting point. The hard thing for me is going to be, kind of lighting Cally 'cause naturally I want a light in from the traffic side. (laughs) Of course. The light is coming from the traffic so you want your light to be continuous with that. Indifference to safety, I might (laughs) use the traffic as like a hair light and spin them the other way and light them from the safer side of the street. There's also the other possibility when the tail lights come on, depending on the persona of my subjects, I might want to throw a little bit of a warm geld light into the background. Just nestle it down in the bushes or lay it on the concrete and let it just be a little bit of a rim or a backlight. All those things are still TBD. But the basics of the shot, I think, our starting point, pretty good. So we're going to kind of start the process. Though not really. It's still too early. But the models are here. They're absolutely wonderful. We just met. This is Sabina and Andre. Hi. Hello. Okay. And we're going to kind of work it out a little bit. It's always good to use the time on location productively, I mean, otherwise it could sit on the stoop, but what good is that? Let me get the models in front of camera, work it out with them a little bit, get some language going between us, you know. And have them see the positions; attitude. I'll try a little lighting. We'll see what happens. I mean, it's still too early for prime time. But we might as well use this time 'cause again, location will rise up and take you by surprise. Best to be prepared. Let's start with Sabina first. Okay. Could you take a walk along this? You see where the green hedge is? Right there? Just about to there and turn around and face me okay? (sighs) Cool. All right. Come a little, a little north of it. There you go. All right. Thank you. (camera clicks) No expressions, nothings necessary. I'm just kind of scouting right now. And she looks great, you know, pretty simply done. Available light, you know. Not where we're going to go but, you know, framing. First frame, not bad. Okay. So, what I'm going to ask Cally to do is bring in a light. I'm going to talk to this light via this transmitter right here. And we'll go from there. Controlling that light. Just giving her a little bit of dimension and contrast; snapping her face. What you're trying to do when you're light on location like this is you're trying to pop your subject out of the background literally. She's in the same exposure template as everything else that's here. So I have to lift her out of that and the way to do that is to apply my own light to the situation. I can shoot this available light. No two ways about it. But she's going to be flat as a pancake, you know, contrast wise in terms of the light. So I need to snap that. So not going to take much, but we'll give it a try. Sabina, can you turn your left shoulder towards me? That's it. Can you button the jacket? Let's try that. I think that looks pretty great. And Cally can you go to camera left side maybe in between the flowers and the hedge and bring that in? Can you, just really quick, on the back of the camera show me the. How we doing here? Just depth and field. Flash control. I am hot, okay. Group A. Zero, zero, hot, hot. Cool. Green. All right. So, in theory, the camera's going to talk to the light. We just checked out the settings. Everything seems to be good. All right. Jodi you want me to come around a little bit or just come facilely from the side? Wrap a little bit. Wrap. Okay. Cool. (camera clicking) Now, I do a lot of stuff that, you know, is just bad frame. I don't care when I'm starting. Like in that frame that I just made, the light is in the picture. Picture is, the exposure a little hot. I don't care. I'm building. I'm going to make a lot of mistakes during the course of this thing. All I'm going to do is just kind of see if I can chip away, chip away, chip away at the process to get to a good photograph. So, besides that was Cally's fault. He put the light in too close and you know. I'm sorry I failed you. What are you going to do at that point, I mean, literally, what am I going to do? So. All right. Other thing, you go to pace yourself here. You got to pace yourself. Because this picture, when the traffic is moving and the lights are green the picture does not work. The picture does not exist. When the lights are red and the traffic is stopped all the drivers have their break pedal on and their lights are bright red that's when the picture works. Anyway. So, let's keep testing exposure please. Positioning of the light? It was actually pretty good. It's actually pretty good. It was just too close, that's all You know. All right. Sabina, cross your arms. Fold your arms. That's nice, yeah. Cool. All right. Cool. (camera click) Very nice. Okay thanks. That's a wrap. All right. Thank you Sabina, we're done. All right. TTL predictably is responding a little bit strong. I'm going to take the exposure down just a tiny bit. Mine is point seven. Okay. And, of course, because I want traffic I haven't got it. But let's start. Here we go. Good attitude. Way to go Sabina. Fantastic, that's great. (camera click) Nice. Nice. (camera clicks) Pretty. (camera clicks) Perfect. (camera clicks) Really nice, really nice.(camera clicks) Okay. Good, good, good. Let me come in a little bit tighter here. Cool. Looking excellent. Way to go Sabina. All right (sighs). Here we go. Nice. That's perfect. Perfect. Really good. (camera clicks) Nice. Good. (camera clicks) Now Cally you can come in from the side a little bit and get close. Okay. Good, good, good. (camera clicks) Perfect. (camera clicks) Back off a tiny bit Cally. (camera clicks) Okay. Pretty simply done. Little bit of a pop on her. Background gets a little saturated. Let me wait for the next kind of set of traffic lights. And we'll see how we do. Doing okay? No so hard so far? Easy? Good. That's good, 'cause I'm exhausted. I am just flat out exhausted. Those first ten frames just took it out of me. Oh. He's such a diva. I am. I am. You know. And in keeping with the diva tradition of all like big time jerk New York City photographers I always have to have flowers on the set. I always have to have flowers on the set. All right. Here we go. From the side again like I had at the end? Yes. Please. And right this way Sabina. Doing great. Fantastic. That's real nice. (camera clicks) Perfect. (camera clicks) Cool. Really nice. (camera clicks) Good look, good look. (camera clicks) Perfect. (camera clicks) Nice. (music from car) Cool. (camera clicks) Cool, cool, cool. Back off tiny bit Cally. Now come on back in now. Good, good. Nice, nice. (camera clicks) Cool, nice. Good. (camera clicks) Good look, good look. (camera clicks) Very pretty. Very pretty. (camera clicks) All right. Relax. Now, what I might do is pop the exposure a little harder now. Because she's fading in. She's blending so. That's the world you inhabit in the realm of TTL. TTL will change. If you noticed, I went from horizontal, I zoomed harder, came in tight vertical. Exposure changed. Jodi you want to reference real quick to the, I don't know if you talked about this earlier, but the battery pack. Yeah, yeah, we can, I mean, you see that contraption at the end of the pole there, that's an SD nine battery pack, which we use religiously on location. Really gives you more efficiency and recycle. All right here we go again. Nice. Way to go. (camera clicks) Come in tighter Cally. Too much. (camera clicks) Good, good. (camera clicks) Nice. (camera clicks) Perfect. (camera clicks) Good look. Way to go Sabina. (camera clicks) Nice, nice. (camera clicks) That's it. Perfect. (camera clicks) Good look, good look, good look. (camera clicks) Nice. Okay, relax for a second. All right. Come on out of there sweet. You okay? Yes, thank you very much. All right. So, you know we got a little bit of a wind machine going on. That's a really nice slide. Wow. It's simple. It's clean. It's, you know. Yeah. Is what it is. All right. So I'm at two point eight. So one thing I do is I check my sharpness. I got sharpness drop on the near eye. Yeah you're tack I'm tack across the board, which is nice, you know. At that distance a two eight is even picking up the far eye so, that's something just to check, you know, because if you're so wide open you might lose that far eye but right now, I'm okay. It might fade just a tiny bit but I think it's within the realm of acceptability. Acceptability, you know. Can I just see real quick, I want to see where you're shooting at. So six 40. Jump at the one you just mentioned. Yeah. I know you're still shooting in aperture. Yup. Do you want jump over to manual? Yeah we can jump over to manual, I mean, you know, I'm pretty happy with the way. See, the, I start out, this is my default, you know. I start off. I let the camera drive the train. The camera sometimes is, you know, is just as smart as I am. Sometimes smarter, you know. I mean, you know the D is an expensive camera. So I'm going to let it do it's thing, you know. I'm not going to like, oh I don't trust the camera so I shoot everything on manual. That entire set was shot aperture priority. We got minus one dialed into the background basically, because I'm separating the components of exposure. The upfront exposure is being driven by the flash. The background exposure is being driven by the overall settings I've put into the camera relative to the ambient light level, which is largely governed by shutter speed. So what I'm doing, is I'm minusing light out of the background. Saturating it. Make sure those red tail lights, you know are like super saturated and then I'm popping her with just a little bit of small light. Very simple. Okay. And basically at this point the camera's driving the train. Minus one aperture priority and zero zero TTL compensation on the flash. That compensation that I'm talking about for the flash is local to the flash. It is a part from the camera exposure that I've set up in here. So there's two different wheel spinning here that are governing my foreground and my background.
Class Materials
Bonus Materials with Purchase
Ratings and Reviews
Janis Shetley
This behind the scenes class is great for those that already have a solid understanding of how to use their flash off camera. I really learned a lot watching Joe work with the models, seeing where he put the flashes, where he stood, how he framed the shots, how he had the models move - especially in the "movement" segment. The three light segment was also interesting - I would have never tried putting the reflector on the pavement with a flash firing into it - so cool. If you need detailed instructions on using your flash and camera - this is not the class for you. If you want ideas on how to get the most out of your flashes on the street - this is it. Great class. Plus Joe is just a great teacher and fun to listen to for 90 minutes!
Benjamin Lehman
One of Joe's most magnificent qualities is his ability to be *real* while teaching a class: Is everything going haywire, or are there troublesome problems that are challenging to overcome? Joe doesn't shy away letting you, the student, realize that even the pros have to deal with constant, unexpected problems. His other strength is showing you how to persevere and overcome those hurdles; and one of those biggest hurdles all photographers run up against time and time again - Light! Joe will go down in modern history as the father of small (and large) flash photography. He's not afraid to use the entire US output of flash watt seconds on a single photo, but he's also quick to remind us that flash is a tool, and not a crutch. This was a great course for those photographers who want some experience out on the street before ever leaving their house. As you grow and learn more about your camera and what it means to be a photographer, you can always come back to a class like this and learn new things that may have seemed alien to you the first go-around.
fbuser 4d17acbc
I like the class. It is a good primer for getting an idea of some of the things that you need to think about when you are doing a night shoot. This is a quicky class Joe just touches on a bunch of stuff so you don't get a lot meat and potatoes on this class, but I found it helpful. Worth the cost.
Student Work
Related Classes
Lighting