Lessons
Introduction to Studio Lights and Modifiers
33:07 2Understanding Direction and Distance
28:42 3One Light Setup
18:27 4Three Light Setup
23:11 5High-Key Setup
14:10 6Silhouette on White Seamless
26:55 7Snoots and Gels
35:45 8Sideways Clamshell Lighting
22:31Lesson Info
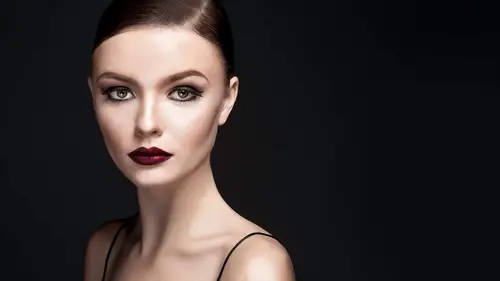
High-Key Setup
What we're going to dio is a high key set up yes, we're in black were not photographing her full length, so what this is called is a form of wraparound lighting in the old days in my studio, what I used to try to dio is they wanted light that they would wrap around the subject's arms kind around their neck I wanted I wanted to wrap around look really high key I'd seen it in like maturity sessions and I wanted to do it and then I could see what I did is I had a white background and I blasted it with lights. However, when you were in a space that is twelve feet wide, seventeen feet deep, eight feet tall white you get a grade lens flare picture if anyone's tried to you know exactly what I'm talking about, it is just flat and miserable and I'm trying to figure out how they did that, so there are a couple ways to do it, but I'm going to give you my solution so what you can actually dio is you can actually put a soft box directly behind your subject, so can you can you turn off this beauty d...
ish for a second and I won't even just fill the trough the modeling like okay, good, so try to ignore all the ambient light here dave, can you come hold a, uh go, go, go, go overhead so people can see better. And could you take the the fabric off your head? Yeah, perfect. Just put down there. Okay, good. And take one step back. So just try to block off. I'm gonna make sure you concede a little bit better. Okay. Can you see those highlights on her clavicles and on her jaw? Oh, they're so pretty. You also have awesome clavicles, which it sounds like a really awkward comment. Like a compliment, but they're awesome. And beauty photography when I choosing model their portfolio that's. Something I look for. What I'm hiring a model beloved. So anyway, um, wraparound light is different than barn doors. Air strip bank. So you saw with the barn doors did it gives you a really crisp highlight on the john on the neck. That's what a barn doors would d'oh, you can't get this. The highlight on the clavicles there. See how it's a nice, even highlight out to the tip of her chin. It pours around it's soft and wrapping light so you have to put a light source behind them. Now for this for a head shot, a soft boxes size is totally fine, like three by four foot would be fine for maturity sessions, something I've seen it's four by six foot or not the box you put that octa box directly behind the subject you turned them sideways and now the lights wrapping around all the baby bumps in one night uh so what I do is I late I put the light behind her and I get the height oh my god I love that beautiful highlights if I, um if I need her to I'll have her move to one side or the other because here's what happens if I move her more over that way a little bit? Okay seal the highlight on that side of her face gets bigger because there's more light wrapping from that side because there's more of it visible and if I want the highlight on this side of the face bigger for some reason I moved for over here so if you wanted more wrapping you would use a larger soft box because it's got more light that'll wrap around your subjects if you have one soft box and it's wrapping around too much you move them forward and it makes it smaller in relation to their body. So in this this is perfect for her to stand right there in the middle perfect just like that and so that looks good but now I've gotta add a light on her face now what you could do a few years photographing maternity let's say and you have a large octa box behind you can actually take large reflector silver reflectors because you've got this huge light source it'll bounce into the reflectors if you have the reflectors here reflecting towards her it'll actually take the octo box light and kick it back towards her uh this is something I've done is well for fine art news if anyone does find out nude photography because the highlights wrap around all the right places and then you can fill it in with a little bit of reflector from the front dave, could you take off the grid for me now that I'm a little I'm also really short nice have assistants for that uh so we're gonna do is we're gonna use that that beauty dish and based on where you used to be british defects what's the overall look like if I wanted a little more dramatic a pull it off to the side and add some shadow I wanted flat I'll put it in the front and that's what this lighting setup is what I would use for cosmetic photography like picture neutrogena face wash with a girl this meant you know how there's how goes look it's light wrapping around from behind a beauty dish in the front usually and then fill cards that's usually the cosmetic or soap ads or something like that but really it's high key female portrait heads up about this light because you have a light source directly behind your subject you have a couple things to watch out for. One big thing that watch out for is if you have hair like me okay, when you have hair like me and have a light source behind, it usually starts to piece it apart who's seen that look where something's it's a light behind his over exposure so the hair it breaks apart there's nothing you could do to avoid it in this instance because it's it's an overexposed background light source like that that will happen. So if you're trying to get wraparound light remember those those cosmetic ads I talked about imagine every single one of them the hair's always up every single one of those clean adds the hair is up I'm telling you or they haven't pulled to one side and in the hair fills this entire signed so you don't see what's breaking apart and then you just have the clean edge so it's just something to keep in mind this is great for high key portrait and beauty but not if you're trying to capture hair like mine you just got to know what's appropriate for so I'm gonna have you becky, hold the reflector for me is this a sign and I'm going to plug this late back in thank you and to sequence it a little bit off center okay, perfect okay, so now I got the that's perfect even have you taken meter reading for me perfect great and it's a little bit of phil beautiful all right so let's grab this and have you taken meter reading is it right here in my lens right here sorry I'm high maintenance so I'm not really not really but not high maintenance I just have lots of tours don't change exactly like stephen I know, but well it's more for my assistance that can you do this so in those five things at the exact same time uh this seventy two hundred's great thank you so much, it's perfect thank you, friend. Great perfect, baxter. All right, so here we go let's do it. All right, so we'll get a little test there. Yep, yep same settings is before I take a look. Perfect. Okay, so the reading is is ten to which is like ten eleven someplace and there will be fine um and what I should do is for the backlight I usually meter it to be a stop or two stops brighter than my main light. So it's gonna depend on what you I had it, but if you have it at eleven on the face you make your background light f sixteen f eighteen something like that so it is definitely brighter and its light source coming towards your camera if you have your highlights morning on your camera it will blank solid white goes blink the black it's blown on highlight its okay, but how did you find in this? And if you are looking your history and it's all in the white side it's okay it's supposed to be like that you know don't don't don't be too concerned I switched with this look perfect then we go a little brighter good okay so I can show you guys more truly what it is on the screen okay see those highlights that wrap around her cheek bones in her jaw line and then also on her clavicles so you can't quite see but it's pretty nice clean so you see highlight highlight, highlight and then we just filled in a little bit on the shadow side what would screen about this is all you have to do is can you turn up on the back a little bit? Um if you want those highlights to rap even more you turn it up, you can go from right now we're the front light. The main light is at about eleven of ten if eleven the back lights of f sixteen I continue up to eighteen or twenty two there is a picture in my portfolio um I did a lading dvd and it was the cover image they use the girls had flowers in it and the light is wrapping all around okay that shot light on her face was like f a and the light in the background was like f twenty two it is completely blown out but okay it's okay that's what I was going for so let's try this one more time perfect and do one more backs turned up one more time let's just overdo it let's make it over the top yeah we're going to one more over the top and can you use a silver reflector on grab one more of these so we reflect a really close cut all that light great let's try this is a vertical one perfect. All right, so if you look on this last shot the highlights on her face they're going to be completely blown out on the signs but it's like very glowy in the cereal and its okay so I mean let's let's put it this way by technical standard it's it's definitely wrong. However I've done this for tons of portrait's where I know don't necessarily have the herring I might have like from here down and it's just really high key and beautiful and people are fine with it by technical standards. Probably not right you probably go with one of the other ones but some people of that love the high key uh so it depends on what you doing lindsey when you're talking about doing the backlight is a stop writer darker whatever are you actually using the light meter and meet a ring like at the office because all of us I put it at the back of her head pointed at that light so it actually has to go already right there can you see it go right here when I meet her against the back of her head? So it's catching that light it's a very awkward position to put it in but you know it's usually if they're a little bit further back from it then it's a little less awkward but you don't mind, right? So sometimes when you do back like like that or sometimes when I do back like like that there's not good definition and in the face it kind of blows out great hole thing is that okay? So that's a perfect question for something like that we are actually shooting into a light source and so you will get lense low and that's what you're seeing the picture will look really dull or lower contrast that's so there's there's two things first of all, I'm shooting a preset or the picture style on my camel called standard, which has a little more contrast ads contrast back in what one thing that helps is you could have a soft walks behind and a soft box in front, but the soft box in front doesn't have enough contrast and so it flattens it out so what you would want to use is a slightly more contrast e light source in front of it reintroduces contrast so maybe even instead of a white beauty dish maybe this to be one of the few times where I might use silver because we'll add that back in yeah okay so sometimes I do that in photo shop at the contrast back in but this is adding it in case amber with dad a little you do is add a little and that's that's totally fine um it's the same thing like when they used to put in the darkroom at in contrast filters it's the same same idea um I usually add clarity as well because it just looks a little bit flat and that's ok ok good thanks. You're welcome okay quick question on this set of images from photo maker will you strip out even mohr of the model's skin tone when you process these images that you just captured a bit your stab me yeah it depends on what I'm going for if this isn't ad that's supposed to be like for cosmetics or something like that then not necessarily I'm trying to keep the actual skin tone but if it's me being artistic like okay there's a shoot that I am going to do basically exactly this in a couple weeks um where I want the girl to look like an alien I'm not saying I'm just not bring this up again but I want to go to look like a million so I'm gonna have she's blonde gonna pull her hair back completely slick and cover her face with baby oil and light it like this because then when I pull out all the color it's going to be like really really the high key highlights like her skin is plastic so it's kind of cyborg ish so yeah, I'm going for cyborg and like something like that but if it's must be for cosmetic and high key beauty and maybe pick the top right and add more of warmth erskine I'd warm it up a little bit in post because I'm trying to make it look like happy summer you lovely something like that so the goal totally makes the difference and yes, I like to make my model's super pale or the other extreme I make model super super dark I don't do like in between over this way I'm I'm not a subtle photographer which is why there's a high impact later okay yes take another question this is from arley seven one ninety who says bright lights behind the subject can generate the read through the ears what can you do about that? Okay, so this won't be too bad but it's a little bit and the answer is nothing not really um there's a couple tricks I think I talked about it a little bit, and one of my creative lives on retouching about how to selectively change colors. I mean, you can actually grab a color range and then change the hue of it. There's really, not much. You can do it's all about angle. Um, and so you're better off trying to get a light from the side. But here, the lights behind there's, really not too much, and the brighter you make the light, the more you'll see that color. If somebody knows another answer for that, let me know, because I'd love to know, ok, great. Maybe someone does in the chat room. Exactly challenge to you. Interwebs, internet. Yeah, not a photo shop challenge like heidi, actually question. And here, down, right, yeah, no it's, totally worth. It would totally work that's, a great idea and awkward but that's, really funny.
Ratings and Reviews
Justin Tui
This is my second course purchase from Creative Live amd im a short way in but already love it. Lindsay Adlers style of teaching is easy going and simple to follow along with. Her personal work is amazing too so i feel confident that im getting knowledge from a trustable source. Im definitely going to continue to invest in more content from Creative Live and I rock the podcast everytime a new ep comes out.
a Creativelive Student
I love watching Lindsay work, she teaches with ease as if it were a one on one session. Would love to assist her or at least attend one of her workshops soon. This course was very helpful as well as opening my eyes to a few things that were always there, but just able to see them, thank you Lindsay
Tracy Whiteside
Only 1/2 way through but I knew in the first module that Lindsay Adler is the best instructor!! So easy to understand, great demonstrations, LOVE HER!!!