Transfer A Template To Pumpkin
Lesson 3 from: Creative Pumpkin Carving Ideas, Patterns, and ToolsJason Hoppe
Transfer A Template To Pumpkin
Lesson 3 from: Creative Pumpkin Carving Ideas, Patterns, and ToolsJason Hoppe
Lessons
Lesson Info
Transfer A Template To Pumpkin
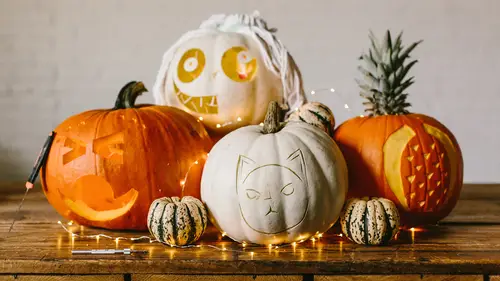
Now, I'm gonna show you how we can transfer templates to our pumpkins. These templates you can download from online. You can create it in any type of drawing or illustration program on your computer. Just printed these out on normal paper. There's nothing special about them. Just have a little bit of fun with these. Little upside-down face. We've got a pineapple here. Great stuff. Go ahead and do some surface carving with that as well. Put on a great little cat. All sorts of fun things. We're gonna show you the basics of just going in and transferring your design to a pumpkin. We'll start off with something fairly simple here. What's nice about this is it doesn't have to be perfect. You just print it out and if you want, you just can take your pumpkin here and we're just gonna lay it right on the pumpkin like so. Wherever you want it to go. If you feel more comfortable taping it on there, you can. Tape doesn't stick very well to the pumpkin, but we don't need to be that exact. What I'm...
gonna do is I'm just gonna take and I'm gonna put this on the pumpkin. Then, I'm gonna use my little tool right here. It's got little points on it and you see how this works. We're gonna line this up right here. I'm gonna take this and I'm just gonna run right along the edge of my template. Just match that template. You don't have to be super precise, because when you cut this out, you're gonna just use this as a very basic guide. We transfer that, run that through, line that up, and put that on each and every one of our designs on our pumpkin. If you overshoot, not a problem. You're never gonna see it. There it is. Easy to use, great way to transfer, and when you're done, little bit hard to see, but you can see that it just leaves nice little holes right there and that's where you're gonna be able to go through and get right onto your pumpkin. Now, with those holes there, as you let it sit, the holes are gonna become a little bit more prominent because some of the juices kinda leak out of the pumpkin. If you do this and then come back, it may be a little bit easier to see, but with that template, feel free to move the template all around on the pumpkin. Really easy to do and then just go ahead and trace it out. Now, sometimes people wanna get the perfect side for their pumpkin, but one of the things is is I like imperfect pumpkins. Some of the things that we do here, like with this pumpkin right here. I call this my road rash pumpkin and this is always fun. We go in, create a crazy design, like I did here, and this one's kinda my road rash pumpkin. Grab this one that I have and it makes it look kind of like it's been killed. You just go ahead and do that on the side that doesn't look so good and then you get a pumpkin that's had a little bit of a hard life, but still you can enjoy decorating it as well. Using this pounce wheel, really simple. Now, if you'd like to go and do it yourself, permanent marker right here. You can always go in on the pumpkin, draw whatever you want. If you wanna go in and you wanna put a nice, little mouth here. Very easy just to draw whatever it is that you want. Just draw that on the pumpkin, plain and simple, and there you have it. Now, you can see the little dots right here. If you wanted to, when you put the dots on there, if you can't see them very well, just go over with it with your little permanent marker too, so you can see those a little bit better while you're carving. Either way, super simple. Just print it out on normal paper. Just take it, put it right around and there you have it, or sketch it out by hand. Either way, you got your template right on your pumpkin. It's really that simple.
Class Materials
Bonus Materials with Free Purchase
Ratings and Reviews
Fran
Glad that I saw this, now! I love pumpkins!! Looking forward to the season You show a lot of great, and super creative techniques that I can't wait to try. Thank-you!
Claudia Ortega-Lukas
This video had some really good and cool ideas/techniques, however, you should do a zoom into the tools when you show them. I'd like to see close up the shape of each tool you demonstrated. Otherwise, it was fun!
Rhonda Chapin
I learned some great hacks and tricks. Going to carve my pumpkin this year with more enthusiasm! BTW something I thought might be helpful is to push pins to hold stencil designs on pumpkin since tape doesn't work.
Student Work
Related Classes
Holiday & Party Crafts