The Layered Ingredient Theory
Lesson 13 from: The Creative Newborn Photography StudioJulia Kelleher
The Layered Ingredient Theory
Lesson 13 from: The Creative Newborn Photography StudioJulia Kelleher
Lessons
Day 1
1Course Introduction
14:58 2Shift your Thinking
21:17 3Pre-Consultations
30:15 4Policies and Liabilties
17:30 5Style & Creativity
45:51 6The Creative Process
26:53 7Designing an Image Session
45:59Composition and Style
15:40 9Safety and Newborn Psychology
18:01 10Shoot: Lila - Taco and Sideline Poses
29:49 11Shoot: Lila - Bowl and Tushy Up
28:17 12Shoot: Maceo - Nighty Night
18:05 13The Layered Ingredient Theory
15:45 145 Steps to Design
19:41 15Shoot: Marion - Sensitive Babies Part 1
30:24 16Shoot: Marion - Sensitive Babies Part 2
17:04 17Shoot: Mason Fussy Babies
21:54 18Shoot: Israella and Parents
30:54 19Shoot: Mason and Parents
10:37 20Set-Up for Composite Shoot
24:51 21Shoot: Mother Child Composite
25:50 22Shoot: Composite Continued
17:26 23Basic Photoshop Concepts
22:32 24Post Process: Day One Images
27:17 25Post Process: Day Two Images
27:42 26Starting to Composite
26:04 27Composite Shoot Images
13:12 28Step by Step Composite Images
39:43 29Starting to Paint Images
19:33 30Corel Painterx3 Demo
18:35 31Live Painting Demo
27:56 32Branding is your Business's Personality
23:56 33Marketing is Strategic
25:06 34Vendor Kits and Social Media
46:04 35Define your Style
30:12 36Style and Purpose
19:17 37Top 10 Things to Let Go Of
14:27 38Posing Techniques
08:52Day 2
Day 3
Lesson Info
The Layered Ingredient Theory
when tiffany was talking she was you know a lot of people ask I kind of want to address my side of that a little bit because a lot of people ask me well are too afraid she's just going to take all your clients and like steal your business no not at all um I don't think any photographer should ever be afraid of that and I really encourage all of those who've you who have advanced business is where you know you may be a further ahead of some of the beginners out there too employees these people and give them that start and help them discover their voice and where they want to take their work I mean tiffany loves newborns but she doesn't she's not like enthralled with the whole controlled studio environment like this she would much rather go into someone's home and shoot that lifestyle look you know with newborns in a more family familiar environment and that is just so not me and so that makes us totally different and so you know with red all she does newborns with rental and I have no i...
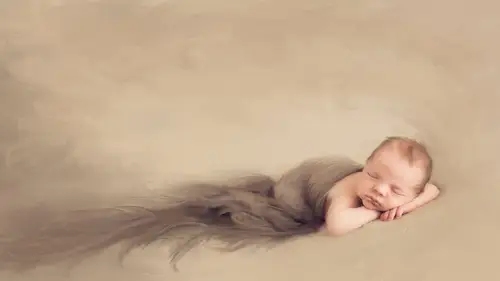
ssue with that at all because my look is so different from hers and yet she's discovering all these different things with photography and and different styles and what does she want to do and it's such a great way for her to start her business yet still like she said get the education be paid to to do this tto learn on in the meantime that's going to help her really solidify where she wanted takes where she wants to take her business now well will there be that dishonest person out there who just comes in lourdes everything they need to learn and then leaves and goes to start their business that's quote exactly like yours yes it'll happen but if you're true to yourself and authentic and really strive to create and be different every single day and further your work rather than just get stagnant it won't matter because you'll sail ahead of that person and you'll end up diverging in different directions yes when you were with each other your associate knew she might have discovered all these things about you and taking that but it will eventually go like this and she will she will carver he will carve his own path so I really encourage the advance photographers out there to take on these omb and teach him how to do it right teach him how to run a business right howto be profitable howto shoot correctly how to be safe because there's so many beginning photographers out there who were you know doing this not really knowing what the heck they're doing and doing things in ways that might not be really that safe or profitable or even for their own benefit so don't worry about the fact that someone might steal your business because I'm certainly not worried about it benjamin edwards who's the wedding photographer in town who tiffany works for us well he's not worried about it tiffany works for kevin kimono all the time too he's not worried about it we're not worried about it so I think that's taking that confidence and getting george off her shoulder once again to say hey I can hire someone my community who wants to be a photographer and help them grow and make the industry grow as a whole so you know my horse now by let's start with design you guys were doing exercise this morning before we get into photographing with props and buckets and things like that I am not a very proper person for lack of a better word I think like things real classic real natural I love to use natural materials because the baby is so earthy and natural s o I'm not into the really cute c props and things that maybe less timeless or things that may be outdated I want my clients and my moms to look at my image is ten years from now I don't want them to say oh that was so two thousand fourteen you know I want them to say oh that's timeless that's classic but still have mind style infusing it does that make sense to you guys and it's just personal personal aesthetic for me you guys if if you guys love that you know roll fun happy look and bright colors and things like that go for it and it's not doesn't matter if twenty years from now it looks dated I mean have you looked at your senior pictures lately I mean really like high school senior pictures I had the whole pom pom bangs going on in the perm anyway okay so let's talk about designing image we're going to talk a little bit about reviewing this and we're going to give you a one two three step technique for kind of combining things on set that'll give you a systematic approach at first to kind of teach you how to think about it and then as you learn those rules you can break him all right design review let's get into wit lighting techniques and planning for your set for artistic design okay I'm an image maker I make an image I put everything together pose a baby and make it according to what my vision is there are image takers out there who are super talented a taker someone who sees a moment artist moment and grabs it with the camera okay that's so not me and it's I can't even go there would bomb miserably if I tried to do that so admitting my weaknesses is like the first step on the first step process is admitting your weaknesses so I'm going to kind of teach you what I know and that's about it making an image that's being visualized in your head and or making an image and just letting it come together even if you don't have a previous visit visual ization of it color and its impact we're going to review that a little bit texture we didn't talk a ton about texture yesterday today we're gonna talk about texture and how to combine texture less is more okay so we're going to talk about how baby smooth skin and textures that juxtaposition of contrast could be really beautiful in an image composition we talked about yesterday we're going to focus on that again today when it comes to designing an image all right I want to talk to you about the layered ingredient theory what do you think that means come on guys your coffee coffee what do you think the layered ingredient theory is yeah I like it slow cadi then you have the baby then you have the wrap just different layers yeah photo exactly it's a recipe okay we all cook right I mean we all at some point but in the kitchen trying to put ingredients together to make something delicious right we're gonna do the same thing with newborn babies and we could do this on the beam back and we can do it with buckets and props we can do it with parents too okay any image you create the layered ingredient theory works okay so what's involved with the layered ingredient theory okay it's basically step by step picking the layers to create the image we really do have limited ingredients these were your only ingredient that you have to work with right which helps kind of put things in perspective and not make it quite so overwhelming and we have floors we have being bag drops we have regular backdrops if we want to do a bucket against a from the side to see the background we have of course buckets and containers all that good stuff stuffer so things that would go in the bucket kind of comfort in sooth baby we have wraps that would go around baby we have drapes that might go over mom we have drapes that would just kind of flow on top of baby on the beanbag we have hats and then we have things like headbands halo's we have a little you know the overall pants sets occasionally there's things specialty things like that that are there but these are your basic ingredients that you're going to use with every newborn session and sometimes less truly is more a backdrop with a naked baby on it is just pure simple clean and sometimes that is the most sellable image because it's truly timeless that will never ever go out of style okay so let's talk about it first to the base okay so that can mean on the beanbag mean the blanket remember yesterday we just had our blanket that we were going to showcase our baby on it could mean a drop or floor okay so um one of my followers go we'll pop out here in a second if someone could pull up those floors for me that would be awesome so we have floors that we can use today which is what we're going to use with our buckets okay we'll have lots of different options for that when it comes to choosing floors we also have our buckets that we would choose okay so when we have thank you so much for doing this forthe lacey so I'm gonna enroll these real quick these are from serendipity backgrounds I absolutely love serendipity these air canvas they're just printed on canvas and I you know me I love texture and wood and all that good stuff so these air just printed on canvass they're great for taking place is I mean they're soft you just roll him up and you could put any kind but now they're hard with toddlers because with toddlers they're going to wrinkle and stuff like that but with a non moving subject they're fantastic so I have all kinds of different floors and tech textures that looked like real wood with different tones remember how we talked about color yesterday what color is this floor pink exactly it's wood it's not wood color it's pink what color is this floor blues grays brown's there's all kinds of fun color on there that I can and whatever I put on top of this is going to pull out that color from the floor remember we talked about placing color next to one another yesterday so this has kind of a teal blue tone to it if I take a teal blue bucket by the way this is from j d vintage props another prop company that I loved dearly but if I take that blue bucket next to it it's gonna pull out the blues from it isn't it right if I take thie stainless steel bucket the resting been now all of a sudden I'm starting to pull the gray's out of it but you can still see the deals and there can't you so I need to recognize that I need to recognize that and understand that the teals are still in there so I probably need to still highlight those and bring that in say I'm saying if I ignore the teal in there it'll pop out more and be obvious so I need to make sure that I'm paying attention to all the colors of my floors so and then of course this creates more of a little boy look okay and then if I brought something in that was a little more girly that would change the look completely do you see my point so you start how I usually start is with the baby ah floor of some kind are these force gorgeous yummy she sent me this and I'm like oh this is just delicious I mean this is stunning what colors in here there's some green and there isn't there gonna be sore on my legs today after going through do I have any green I'm not sure if I have any green today I think I brought some have to find it I think there's some of the bucket over here so if I yeah herson green it's a little bit of a different green tone isn't it doesn't quite work it works we could make it work but it's not the exact green tone that I was looking for here is another green tone that's a little better isn't it do you see those greens that that pulls out it's so subtle this is really subtle stuff we're looking at right now okay so but I want you to see that your backgrounds and floors and things have colors in them that you wouldn't normally just pick up on right away you have to look at and go what color tone is there what texture is there how can I pull that out or influence it and do I want to okay what color is this it's got some purple in it it is more of a neutral gray tone though it has a very neutral field to it but you could definitely pull out some some lavender tones to it we just put up lab door next to it you can kind of see the lavender come out right very rich and deep it's gonna be a high contrast image would you put a white bucket on it probably not okay that delicious oh there's so many colors you could pull out of this and that so when you're looking for flores is called check by the way it's from serendipity backgrounds umm I know people are gonna ask that's why I'm so I'm sorry what shack like s h a c k shack um so what you'll do is when you start hunting for backgrounds and things from different designers you're going starting a real picky about what colors in there and you're gonna want to know what accurate tones are in a floor on dh then this one's really versatile there's not a whole heck of a lot of color in there at all oh so all of a sudden we can take this pretty much in any direction we want but what I put a dark colored bucket on it I could there's dark tones in here is depends on the look I want the safe route is to stay light with it and let baby be the star okay so I think it's a good exercise tio start with your floors and you're and you're as your base and that will help you but often times what I will do is I'll get a new bucket we'll get a new prop new prop you know how this will go antique shopping one day and pick something up and be like oh what can I pair this with so starting with the floor are starting with a bucket is kind of a good safe route but if you see a bucket that you really want to use for example I bought this at an antique store and in bend and I loved it so much I'm like what connive here this with so I could start looking at that going oh that would work okay so now I can later my color and tone into it say so start with a floor or a bucket go either direction saying with the being back start with a color in the bean bag and then go from there look at your baby skin tone okay now with the floors and buckets skin tone isn't quite as important you kind of fudge it a little bit and get away with it but on the beanbag where baby is the focus and it's you know it's truly skin on skin with one color tone you really want to look at baby skin color and and see how that will affect the look of the image on the beanbag does that make sense you guys okay so then we start choosing a bucket stuffer okay so that could mean anything from ah blanket tio something fuzzy like this devoted nits mix these cute things it could be a little bump blanket again this is to vote in it's so you know we could start layering stuff in here and really creating a beautiful neutral look neutral is usually the safe place to start because just combining neutral tones together and focusing only on texture and leaving color out of it is easy to start off with but it's not easy but it's safe for you don't you could you take one parameter out of it so you're not quite so overwhelmed with all the voices so that resonating see what I mean by that and then you want to start choosing your wraps okay think about texture too I have this floor with us texture this bucket with a lot of texture the bump blanket with a lot of texture well a lot of texture going on here okay baby is very smooth and soft so any kind of texture is goingto juxtapose that in contrast that so you wanna watch that you don't overdo it with the texture okay because it'll be so much jarring to the eye okay saying with color and texture have that same element so what I usually do is I'll use something texture on the floor I shoot a lot from above in this type of situation so yes the edge of my of my basket here will show but I'll do something a lot simpler inside the basket to really highlight the texture that's outside and keep baby the focus of the image okay you guys will see it as I started put baby in her and I see our baby just arrived so I'll get rolling here and then of course choosing a hat or a halo I's the next step again less is more you know you don't always have to wrap baby make him naked in there if you want if they're really good at keeping their arms and legs in if there really sleepy you khun just have him naked in there in a little hat on it and that's it I tend to wrap him a lot because it keeps him contained so that's basically the gist of the layered ingredient theory so if you start off with a floor or a bucket and kind of go vice versa that'll help then start layering in the texture
Class Materials
bonus material with purchase
Free Downloads
Ratings and Reviews
Norma Martiri
Julia is amazing and has delivered a brilliant class here. Her wealth of knowledge and positive energy is inspiring to say the least. Julia is a brilliant teacher and I've learned so much. I am so grateful to Julia and to Creative Live for recording this and for the fact the I can rewatch over and over from the other side of the world. Thank you!!!!!!
user-a234ea
Amazing course! I love it! I will for sure be re-watching it very soon. Julia is brilliant, honest, unselfish and just a great inspiration. This course definitely has given me the boost I needed to be true to my style. Thank you!
Abbigirl
I've had the privilege of attending a few of Julia Kelleher's workshops and I love them. She's a great instructor with a cheerful disposition and a great sense of humor. Julia's photographic genius is like no other. This truly talented woman creates masterpieces out of her photos. It is really amazing to watch. I'm beginning to collect her workshops b/c for me attending her workshops is not enough. I have to own them so I may go over them again and again.
Student Work
Related Classes
Newborn Photography