Adding Atmospheric Depth to Image
Lesson 21 from: Creating Your Reality with Composite PhotographyRenée Robyn
Adding Atmospheric Depth to Image
Lesson 21 from: Creating Your Reality with Composite PhotographyRenée Robyn
Lesson Info
21. Adding Atmospheric Depth to Image
Lessons
Class Introduction
09:16 2Why You Should Sketch Your Composite
03:25 3What to Look for in Your Background
10:51 4Posing Your Model
08:23 5Communicate with Your Team
10:34 6Elements of Compositing
31:36 7Learning from Failure & Criticism
12:27 8On-Location Safety Tips
03:42How to Nail the Right Perspective for Your Composite Photo
07:15 10Gauging Light & Exposure On-Location
03:49 11On-Location Posing
18:37 12Cliff Shoot Location Final Thoughts
12:03 13Tips for Culling Images
09:41 14Culling Images Q&A
11:29 15Preparing Your Image for Composite
07:18 16Composite Image Cleanup
11:01 17Adding Background Image to Composite
17:04 18The Difference Between Flow & Opacity
05:41 19Composite Sky Elements
20:58 20Using Curves to Color Match
05:43 21Adding Atmospheric Depth to Image
17:08 22Using Color Efex Pro to Manipulate Color
07:37 23Using the Liquify Tool
05:15 24Color Theory & Monitor Calibration
10:35 25Adding Smoke Layer to Image
07:55 26Selective Sharpening
05:18 27Crop Your Image
02:29 28Goal Setting for Digital Artists
04:39 29Review of Location Composite
01:57 30Understand Angle & Height for Your Base Plate Image
06:15 31Base Plate Focus Point
04:45 32Base Plate Lighting Tips
06:10 33How to Use a Stand-In for Base Plate Image
03:47 34Capture On-Location Base Plate Image
05:57 35Student Positioning Demo
09:05 36Base Plate Sketching
07:33 37On-Location Sky Capture
01:53 38What to Look for in a Base Plate Model
14:30 39Building Composite Model Lighting
10:03 40Composite Model Test Shots for Angle Matching
19:48 41Composite Model Shoot: The Art of Fabric Throwing
13:34 42Composite Model Shoot: Working with Hair
05:45 43Composite Model Shoot: Posing Techniques
21:26 44Composite Test with Final Shot
06:12 45Lighting Setup Overview
04:52 46Culling Model Shoot Images
03:35 47Adjusting Skintone Colors
04:54 48Merging Background with Model
04:54 49How to Mask Hair
09:49 50Creating a Layer Mask with the Brush Tool
14:23 51Creating Shadow Layers
07:10 52Removing Visual Distractions with Stamp Tool
07:11 53Replacing Sky with Layer Mask
05:15 54Drawing Hair Strands and Atmospheric Depth
10:30 55Creating Contrast in Your Composite
12:23 56Adding Atmospheric Elements
06:43 57Using Particle Shop
11:47 58Selective Color Adjustments
07:58 59Cropping, Sharpening, & Final Touches
10:29 60Closing Thoughts
05:52Lesson Info
Adding Atmospheric Depth to Image
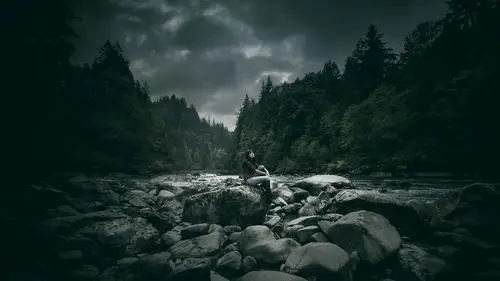
My mountain range is looking pretty good. I'm gonna, I'm gonna sit here. And I'm basically looking at this. So this is the first batch of color that we're doing. So we're getting all of our color harmony together. So the next thing I wanna do is I'm gonna add my atmospheric depth. And then I'm gonna go back into color afterwards. So this kind of compositing is not necessarily very linear, it's just kind of, like chasing little rabbit hole, right. So. The first thing I'm gonna do now is I am going to add atmospheric depth. So in order to add that, what I wanna do is I want to put a mask on. And I'm gonna paint a little bit of softness of color in between here. So I'm gonna take a brush. I'm gonna sample a color that is roughly the atmospheric color that we have going on here in the background. And here's a cool tip, if we go to our little eyedropper tool, see here where it says sample size. A lot times it's set on point sample. So it's set to whatever that one pixel is that you're sampl...
ing. I like to use 11 by 11 average. Which means that it's going to make an average adjustment of color in 11 by 11 pixels. Which is kind of awesome. The first time I found that out, I was like, what? This is great. I don't even remember how I found it out. But it was some, somebody was doing something. And I was like, hold the phone. Do that, what (laughing). You just did something amazing. So another case, atmosphere. Boink. I'm gonna take a larger brush, nice and soft, so using my keyboards to make the sizes nice and big and nice and small. I've selected a color. I am going to paint a little bit here. And it's gonna overlap her a little bit. And that's totally cool. Now, one of the fun things about masking is that we have this really awesome mask here that we already created. Remember, to cut out our girl? So if we hold alt, click, and drag, that copies our mask over. The first time somebody showed me that it was another one of those mind blown moments. I was like, oh my god. I've been doing the same masks like over, and over, and over again. And holding alt, click, drag. You're telling me that, what. So anyways, that saved me a lot of time. One thing I like to do is, even though this atmospheric depth is going to be very very slight, whenever we're painting, there's no noise when you're painting. No noise whatsoever. Every single photo has noise. So I'm gonna go filter, noise. Add noise. And probably like, two pixels, will be lots. Gaussian monochromatic. The more you do this, depending what you're settings are on your camera, you're gonna have to adjust this back and forth a little bit. You know, what ISO are you shooting at? 800. 1600. 6400. What kind of camera do you have? What kind of sensor is it? So, you know, how much noise you have to add is totally going to change on whatever it is you're working on. I've done enough of these to know that anywhere between one and three is pretty average for what looks good on my images. So I'm splitting the difference and going with two. So I've got it on gaussian and monochromatic. The reason why I don't have it set to chromatic is because I don't want chromatic noise in my image. That's it. So, I'm gonna do that. I'm gonna turn it down a little bit. And that's before and after. Once again, very subtle differences. If people were to look at this I don't want them to be like, oh my god, that's such nice atmospheric depth. Wow. Good job. Right? No. (laughing) I don't want them to see it. I want them to not notice it. I want them to notice the image and nothing else. I don't want them to look at the rest of the gray touching. Everything else that goes into this. Not my thing. So, that's one way to add atmospheric depth. Another way that I like to do it, and I did this on the other CreativeLive that we did for photoweek, which was really fun. And I like to use clouds. And I actually have a pack of clouds, in my stock shop that I like to use as kind of support, so. And I'm gonna have more. So if you guys are into buying cloud packs and stuff like that, if you, some places, some people live places like Los Angeles where there's never any interesting skies. So when I go to LA I'm just like, I'm never photographing here 'cause it just, it's bright and it's sunny. It's all the things awful. For me anyways. I have a friend of mine, he and I argue, he's a portrait photographer in LA, he does great work, but he hates overcast days. And so he moved to Los Angeles to photograph these really really awesome sunny day stuff. And I'm like, ah the sun is the worst. So basically we'll be complaining on social media. And, you know, we're just saying that we should trade locations. So another case, I go control a, which is select all, control c. Copy, control shift v. V for victor. Paste. And I'm gonna throw this on a soft light blending mode. And so, if that doesn't work totally the way that I want it to, right, so it's adding a little bit too much here. Maybe I'll try throwing this on multiply. And that's looking way better. I like that. And there's this little highlighty spot right here, so if I go to my stamp tool, come on. Stamp. Gonna get off the textured brush. Soft. And see how it says current and below right now. I'm gonna set it to current layer. And I'm gonna stamp somewhere random and see if we can make that go away. There we go. Oops. Now we have a line. And if all else fails, take the brush. Although it's not the best way to do it 'cause like I said, you're gonna lose noise. So I went to normal there. 'Cause I wanna sample a color from the actual area. So blending mode back to normal. Holding the alt key. Sample the color. Back to multiply. And just fill that in so it's not as distracting. It's also a little bit distracting here around the front. So it's too much. But otherwise it's looking pretty good. So that's before and after for adding some atmospheric stuff. The next thing I like to do, because I'm one of those jerks that believes in magic, I don't actually think it's real but there's a part of me that is a child, just hasn't died yet (laughs) and hasn't, you know, relinquished and given up on the dream that, you know, magic is real somewhere, I like to create layers, or I like to create layers of magicy stuff. And so I like to add atmospheric stuff with that. So I like to use brushes to do that. And there's a bunch of different ways. But there's this totally awesome plug-in that just came out through Coral actually. And so, unfortunately it only works in eight bit, eight bit color depth, which sucks. So I'm gonna go alt, control, shift e. Which is gonna merge everything up into one layer. Control a. Select all. Copy. Control c. Control shift v. So basically what I'm doing is I'm creating just a working layer. So I'm gonna go image, mode, eight bit. 'Cause this is my cloud layer. I'm not gonna save it to anything, right. So I'm just giving myself a working area that's gonna be in eight bit color depth that I can drag the layer overtop again. So I'm gonna go filter. Painter. Particle Shop. And there's a few plug-ins that I like to use that I'm gonna use them all today (laughing). Because I use them in a lot of images so. See, so it just takes a minute to load. Some computers it works faster. Okay, so, we recommend that you create a copy of the selected layer, object, or image before you paint in Particle Shop. So in this case, I'm creating my layer already. I merged it and dragged it over to another file so I'm totally cool right now. I'm not worried. So I'm gonna say launch Particle Shop. Boink. So there's a whole bunch of stuff in here that's really fun. They have these like little lightly things. It's like wee. So you can literally paint like, you know, if you're actually a painter, little wings. (laughing) Anyways, we're not gonna do that today. But I tend to like to add little sparkly things. Fairy dust. And whatever else. And a lot of times if I'm not, if I'm actually working on this, you know, by myself, I'll spend like an hour screwing around in Particle Shop. Be like, what's this brush do? What's this brush do? What's that brush do? I actually like to use Particle Shop for when I'm editing eyeballs. So I'll like, I'll zoom in really close on someone's eye and then I will take like some random brush and I'll add a bunch of texture. And then when the layer spits out as a transparent layer, I drag it over the eyes and I play with the blending modes. It's, I don't know, it's fun. (laughing) If you're into making fantasy stuff where you're not representing reality it's a good time. So, in any case I'm just gonna add some of this stuff here. And if you're feeling like making this really accurate, like photo accurate, make a whole bunch of different layers of it. And then you add different levels of blur to each level of them and then you have, you know, accurate atmospheric depth. So you have like one, two, three, four, five layers of a few different brush strokes. And then you'd get, yeah. I made a bunch of snow layers on the stock shop and that's exactly what it was is it was a whole bunch of layers of different things and then adding different blur, different motion, different levels of noise, whatever, mashed them all into one. So, most of the stuff that's in my stock store I spend more time making those than I do my composites because like, every single one of those images is like five or six hours (laughing). It's dumb (laughing). I shouldn't spend that much time. But it's fun. If you get into making your own textures, you're like, there's no client. And you're just like a kid running around with like, you know those angry therapy days where you're taking paint and you're throwing it at the wall. It's like the same kind of thing but digital. You know. And you're massively sedentary. But in any case, let's stick with that for right now. I'm gonna go save. Actually, yeah, there's, there's so many things. Oh my god, there's so much stuff in here. It's ridiculous. So I mean, I'm gonna undo this. But, like, you can actually fill in, if you're shooting a tulle dress, you can fill in tulle with that. Which is really awesome. So if you have like a tulle dress that doesn't have enough stuff in it or has a gap or whatever, you can match the color and then fill in the tulle. And then add the noise to the layer so that you can blend it in nicely. It's really fun (laughing). Yeah. We would spend a lot of time on that. But we just don't have the time today to do that. So I'm gonna go save. Right now it says merge brush strokes with source contents or save only brush strokes. I don't ever wanna merge with my source content. If you're that type of illustrator, and you wanna do that, rad. I don't want to. So I'm gonna go save only brush strokes. And I'm gonna go okay. Kapow. We have a texture layer with only our brush strokes of our stars. So control a. Select all. Control c. Copy. Control v. Paste. And we have fabulous little starry things in our image that were created on an eight bit file that we can mash over to the 16 bit. So, that was like one of the sad things about it is that it's not gonna work very well on, well they can't make it work on 16 bit right now. In any case though, we go normal. I'm probably gonna put this blending mode on like overlay or soft light. I like soft light. It's a little more subtle. You know, it's kind of pretty that way. Gonna go filter. Blur. I'm gonna blur it a little bit. 'Cause these brushes are sharper than any photograph is gonna be. That's the other thing to keep in mind when you're using this kind of plug-in, and when you're using any brushes, is you wanna match your sharpness of it. So, in this case here I'm gonna add the one pixel blur. Make it a little bit softer. So I can add a little bit of glow to this if I'm feeling up to it. I don't know if it's gonna work or not. But I'm gonna go control shift new. Make a soft light layer. Gonna fill it with a neutral density gray color. Hit okay. I'm gonna put it underneath my stars. And I, I'm on the fence whether or not this is actually gonna look good. I didn't do this before. But I figured I might as well give it a go. And let's just see if we add a little bit of color, is it gonna be awful? So this happens a lot when I'm editing. I'm like, is this a good idea? And I'll do it. And I'm like, nope. That was, that was pretty awful. That was a terrible idea. We need to not do that again. And so, I'm kind of on the fence on this. So the nice thing about when you're working with a soft light layer with neutral density gray is that when you paint with gray, you're undoing all the color that you just did. So instead of it being like oh you have to erase or mask or whatever, a soft light layer when you put neutral density gray, 50% gray, you can paint all the color you want and if you totally screw something up, you just, you know, paint back gray into the area that you botched, which is kind of nice. So you don't have to create a mask if you don't want to. So, I don't know. I'm gonna like kind of play with that a little bit. And see if I like my idea or if I hate my idea. If I was getting really technical I could probably add some noise to it. But it's so slight, don't, not really too fussed about it. Maybe turn it down a teeny bit. 'Cause like I said, I just want it to be nice and subtle. Okay. Before. After. It's not too bad. It works. I think it'll function. So, that's basically how I add a lot of atmospheric stuff. That's how I like to do it. There's thousands and thousands and thousands of ways to add atmospheric depth to your image. This is simply one of them. So tomorrow we'll go through a few different other ways. Do we have any questions. Yes. Yes. Would you mind reiterating the name of the plug-in please. Particle Shop. Perfect. Yeah. Particle Shop by Coral. It's actually super cheap too, which makes it even better. So. Thank you. Yes. So two questions, have you ever used the hair brush in Particle Shop to add more hair? I tend to, I like other brushes better for that, just because the Particle Shop brush is quite sharp and I can control the hair a little bit nicer. But I mean, if you're just filling in little spots it can actually be quite handy. So yeah, there's, there's so much that can be done with those. And, as far as you used the curves layer to do the, to adjust the, the white balance. Is there any advantage to using a photo filter versus that? You could use a photo filter too. I mean, it's, it's, with Photoshop, I mean we could have done that with, with color balance right. We could have done that with painting a color of layer, like a full color layer over top of it. And then you know, turning down the opacity of it. There's, whatever way works for you. Yeah. So a photo filter you could totally use. And then just play with it specifically. And clip it. Absolutely. Yeah. You just like curves? What works with you, right? So, I mean, I find, I just like curves because I have a little bit more control of what it's doing. But I mean, a phot filter color would also probably work just fine. You know. Thank you. Yeah. Unfortunately I'm not one of those instructors that's like, this is the only way to do it. 'Cause I've seen so many people do so many different things that I just can't say that anymore. Adrienne Sumler, that awesome retoucher, same with Draco Rubio, both of those guys are incredible composite artists and we've like you know worked with each other before on other projects, neither one of them edits anything the way I do. And they don't edit anything like each other does. But yet we all manage to come up wit, you know, results that are pleasing to the eye. Right? So I can't. I mean, Adrienne's a hard fan of, you know, certain techniques that when I saw him do it I was like, oh god no. Why are you doing that? But it works for him. And it works beautifully for him, right? And so I mean, it's, whatever can get you the result that you need that works for the way that you're hardwired. Do it. You know. I mean at the end of this, this is the thing that I think is so funny, people take digital art so seriously. And sure in some ways it should be taken seriously. But at the end of the day, when we're like you know, at the end of everything, there's no like gold medal waiting for us. Be like you get a gold star. We wind up in a box. Regardless of whatever your spiritual beliefs are, the fleshy bio-suit that you're operating right now is no longer yours. You're done rent. And you're moved on to something else. Or not. You could be just zipped off. And this is all an illusion anyways. But who knows? I'm not here to discuss that. But, the reality is is that it's pixels guys. It's supposed to be fun. It's supposed to be interesting. It's not life or death. We should just be able to make stuff. Enjoy it. Share it. And get out there and be awesome. So if anybody gets in the way of that, throat punch (laughing). Or just like bombard them with cat memes. That works pretty well too.
Class Materials
Bonus Materials with Purchase
Ratings and Reviews
Dino Maez
i have to say, the class was AMAZING! in every way from the tricks and technique's of mastering this art form to the personalized attention given by Renee. through the class you are able to learn information that would normally take the average person years of trial and error. Renee gives you the gift of benefitting from her her experiences and what she has learned THE HARD WAY! Renee is an outstanding instructor full of passion for what she does, and with a strong desire to not only improve the art, but more importantly, pay it forward, by sharing her knowledge with others. I was fortunate enough to be able to attend the event in person, truly a once in a lifetime experience for me, the staff at creative live were THE BEST! they are helpful in every way and really made this event something special, i can't say enough about the experience i had and would highly recommend that anyone who has the opportunity to go down for a class, it will be an experience that you will never forget. but the best part of creative live is that wether you are there in person or wether you are watching from the comfort of your own home, you are involved in the class in REAL TIME, you have the ear and attention of the skilled artist giving the instruction, being there myself i can tell you that Renee was regularly given questions and comments from the viewers via the creative live staff and she would respond to them as they came, in that way you are very much apart of the class you are never left without getting that personalized attention of an amazing artist or that specific question you have answered, and even better you have the option to purchase the class and have it as a constant resource in your tool kit that you can refer back to at any point that you need a refresher or want to recall that special technique that was demonstrated. thank you thank you to renee and all the staff at creative live you have a life long member in me. and i would recomend that everyone take advantage of this valuable resource dino maez
stephen lenman
I have completed many creative courses. This is by far the best so far. Quite the most amazing and inspiring presenter with a true passion for their craft. The core information is excellent, but the thing i liked most were her subtle tangents, dropping incredible information completely on the fly. A complete real world honest view of business and practical side of the industry. Especially her advice on how she started to her business. Saving up enough in her day job so she could pay the rent, and do photography for 3-6 months.
Sheldon Carvalho
Awesome class. I've been following Renee for a very long time. I love her work and to finally see her work and get an image done from start to finish was quite something.. I love the way she sees things and the way she treats her work and all fellow creative. I would recommend this to everyone interested in getting into composting. Looking forward to creating and making my own art work. But it now :) Have fun creating. :)
Student Work
Related Classes
Commercial