Creating Balloons Using Shape Tool & Pattern Overlay
Lesson 6 from: Creating Stylized, Artistic Portraits with Adobe PhotoshopKhara Plicanic
Creating Balloons Using Shape Tool & Pattern Overlay
Lesson 6 from: Creating Stylized, Artistic Portraits with Adobe PhotoshopKhara Plicanic
Lesson Info
6. Creating Balloons Using Shape Tool & Pattern Overlay
Lessons
Class Introduction
02:34 2Working With Brushes & Pattern Overlay in Photoshop
23:12 3Using Pattern Overlay and Pattern Fill in Photoshop
19:14 4Creating a Painted Backgrounds in Photoshop
15:33 5Using Smart Objects and Warp Tool in Photoshop
06:40 6Creating Balloons Using Shape Tool & Pattern Overlay
15:53Lesson Info
Creating Balloons Using Shape Tool & Pattern Overlay
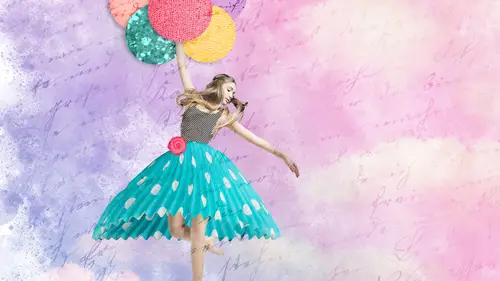
So we're ready to create her balloon bouquet. So we're gonna be doing that with the shape tool. So let's grab that, the keyboard shortcut for the shape tool family is U. And if we click and hold there, we see rectangle tools and a number of other tools. We want the ellipse tool in this case. And up here we can choose a fill color. It doesn't matter terribly because we're gonna be changing this as we go. We're gonna create a balloon bouquet that she's holding onto and then we're gonna duplicate that a bunch of times, changing the color and the patterns and the effects in each balloon, so she's holding a variety of balloons. Okay so the first one we'll create would be more of like a red balloon so from this fill color, I'm gonna click to bring up the swatches here and I'm gonna choose, oh, I have a hard time choosing just straight-up red. Just a very reddish pink I guess. I'll pull up this for the fill. We want the stroke set to zero. And this option right here should be shape. Okay, and...
now I'm just gonna click and hold shift while I drag to make a balloon that's gonna be about this big and let go. Okay. In the layers panel you'll notice that creates a new blank layer that Photoshop has called Ellipse 1, so I want this to be on top of her hand, so right now Ellipse 1 is underneath the dancer layer. So I'm gonna drag the ellipse so it's on top. Just on top of everything is a good way to start. And now we're just gonna add a texture to this. So we're gonna do all of these with effects, so from the bottom of the layers panel, we're gonna click to add an effect and we're gonna choose pattern overlay. And from this dropdown, we'll choose artist surfaces I think. Or maybe just, what did we do? Artist surfaces, in this case, let me show you what happens if we choose append. So we'll go ahead and add to this instead of replace so now you can see it kept the patterns we had before and then it added more. So I'm just gonna choose a pattern and we can see it here, just like before, we can adjust the scale of the pattern. So I kind of want this mixed media look that looks like, it's obviously a photograph of her, the cupcake comes from another photo. We have this painterly look going on in the background with the spattery texture, and then I thought it'd be fun to have this balloon bouquet that kinda looks more like a cutout, so we're gonna have some texture like this, so I'm scaling up the texture quite a bit, but now we've lost our pink because this pattern is currently in normal blend mode. So we wanna change that to something like overlay. Ew, not overlay, let's try soft light? Multiply is gonna be really dark. But it does show it nicely, there we go. Lighten is what we look for. So with blend modes, that's proof for you right there, it's a lot of just trial and error. So I'm gonna go with a lighten blend mode for this and actually like that, so I'll click okay. So right now we've applied a pattern overlay and it looks like I accidentally applied a drop shadow. Let me get rid of that. We're gonna apply it in a minute, but, just we'll do it together, how 'bout that? So let's add a drop shadow to this, so each balloon is gonna have a drop shadow, a pattern overlay, and I think we'll call that good. So to add a drop shadow then, we would just go back to effects and this time choose drop shadow. Or while you're here you can just click to add this check mark here. Okay so we'll add a little drop shadow and just like before, we can click in the image and just move it around like where we want to. So I'm looking at this and I'm looking where the light is falling on her and I feel like just following the shadow here from her hair and stuff, this shadow should be down and maybe slightly to the left. So I'm gonna position it about like this, so that's an angle of like 36 degrees. We can adjust the size if we want it to be softer or harder edge but I feel like that looks pretty good. We want it subtle, we don't wanna be like, hey drop shadow. So we can also adjust the opacity here. We don't want it at 100% so something like 30% sounds good. All right and we're gonna click okay. So that's our one balloon. All we have to do now is duplicate that a bunch of times. And change some of the settings. So she has this red balloon here. Next let's duplicate that twice quickly and I'll just do that by pressing command or control J twice, so I'm gonna hold down command or control and press J, J, and if we look at our image, nothing really happened. But if we look in our layers panel, we have three different ellipses here so I can use my move tool and just click and move them around, so maybe this one, I wanna change the color to yellow, so let's go to our swatches panel. I'll pick a nice yellow and then I'm just gonna fill the contents of this layer with my current active foreground color by pressing option or alt delete, and just fills it. And then let's see, here's our other copy, so I'll grab my move tool and move that one to be here, maybe I'll drag it below in my layers panel, and we'll make this one maybe a different shade of yellow. So I'll just repeat, again, select another color, or maybe a light yellow and then it's option or alt. Ooh, that's really bright. If we look at that and we're like, that doesn't work, we can change that blend mode maybe with that pattern's getting washed out, we can double-click the pattern overlay and maybe this would be a good use for multiply. Or overlay. So you can play with this stuff. All right, then we're gonna create four more balloons, but we'll just do like two at a time. So I'll press command or control J again two more times. Grab my move tool to move it over. This one we're gonna fill with that writing texture, so with this layer active, I'm gonna double-click the pattern overlay and from this drop-down, I'm gonna go back to that writing pattern that we made earlier and change the color to multiply and let's scale it way down. So now we have some handwriting in there which is kinda fun. Maybe we'll change this to... We can do multiply but maybe we fade the opacity a little bit. An then let's change that color so we'll make this one purple so I'm gonna grab a purple color. And then here we are in our layers panel. And with purple active here, I can just press option or alt delete. And let's see, where is our other copy of that? There it is. Sometimes if you can't find a layer you're looking for, you can toggle the visibility on and off and that can be useful for finding it. This one I'm gonna make pink. So I'm gonna select pink and press option or alt delete to fill that with a color, and we'll change that pattern as well, so I'm gonna double-click. Come back in here, select that handwriting pattern, scale it down and change the blend mode. Here we go. Okay. We have a lot of ellipses here. We just need two more and we're gonna put our good glitter pattern in there. So click one of these. This happens to be this one right here. Another great way to duplicate things is to use your move tool and hold down alt or option and you can just drag, and I love that because you can manually do it and see where it's going and it's just kind of a nice technique. So for this one we're gonna color this one orange, so I'm gonna grab orange and then alt or option delete to paint that in and we'll change the pattern. You'll notice that we don't have our glitter pattern here anymore. But because we saved it, it's very easy to load it back. So to get it back, I'm gonna click this gear icon and choose load patterns. And we saved it to our desktop, or at least that's where I put it. To MyPatterns.pat. And so now it'll load this up and show me the glitter pattern right here. So with the glitter, because we want it to be orange, I'm gonna change that blend mode to luminosity and we'll drag down the scale. Now we get orange glitter. We'll reduce the scale to about 50% again. And then, let's keep it simple and just duplicate this so with my move tool active, I'll hold down alt or option to drag another layer here. And this time we'll make it pink. So I'm gonna select, or turquoise, excuse me. I'll select a turquoise color and remember, because that's my active color and I've got a shape layer here. I can change the color of the shape layer by just pressing option or alt delete. And now I kinda wanna rearrange my layers a little bit. You'll notice too we have these effects open for all of these and that makes our layers panel just look really big. So what we can do once we've applied all these effects, we can collapse all of these effects panels so that we can actually see our layers a little bit better. And now, what I wanna do is rearrange some of these. So I want this layer to be in the back. So to select it, who knows what layer it is over here, right, so a shortcut we can do is if you hold down command or control and click, it will target the appropriate layer so I can grab this and just drag it down. And like this orange one, I want that in the back too, so I'll command or control click on it in the image using the move tool and then I can drag it as well. And same with this teal one, command or control click on it in the image and I can move it down in the layers panel, to about there. So something like that. If you wanna adjust the balloons using that move tool, just command or control click on the different layers and you can drag them around to put them in an assortment I think like that is kind of a nice, a nice little finishing touch. And then the last piece that I wanted to add to this is this flower right here. So we can just use our... Actually a cool, easy way, because this is a really simple image. We don't even have to make a selection anymore with Photoshop. You can just hit a button for that. So now I've got a selection tool active but I don't even have to use it. With the selection tool active, I can just choose select subject and then, just wait for a second and Photoshop selected it for us. I mean, I used to joke, there is no button to just select the giraffe or whatever is in your image. And now there's literally a button for it. So thanks for ruining my teaching style, Adobe. Just kidding. It's awesome so that's a great, great thing. So I'm gonna copy that, command or control C. And we'll move back over to our image and paste it in, command or control V. We'll drag it on top here. Now, again, it comes in big. It's always nice to, before we scale this stuff down, convert it to a smart object. That's just good flexibility for later. Otherwise, if you wanna scale it back up later, you would have lost the information. So smart object is gonna preserve all that pixel data. So to do that, right-click on that item in the layers panel and choose convert to smart object. Now we'll transform it like we transformed everything else by pressing command or control T for transform. Now if you're like me, you might be zoomed in so closely that you're like, I can't even reach my transform handles. And that's the reality of how things operate in Photoshop, but it's a really easy fix. Just press command or control zero to scoot back and however big your object is, that's a super handy trick. However big your object is, when you press command or control zero, it'll just zoom you out 'til you can see the corners. And then you can shift drag inward to shrink it down. So I just wanted her to have a little... Now of course, we have to zoom back in so we can see what we're doing. I wanted her to have a little flower on her skirt here. And maybe we wanna add a little drop shadow to that too, so down at the bottom of the layers panel, click that effects button and choose drop shadow. And it should just remember all the settings we made from the balloons so sounds good to me. We'll go ahead and click that. And that's really all there is to it. The one thing that can be fun too is if we go back down to this pattern fill layer, this is our layer that had the handwriting on it. If we wanna keep it relegated to the background, we can but we can also take this layer and drag it to the tippy top of our adjustment, of our layer stack, and then that can be applied so that it shows up like on top of her skirt here which I think is kind of a neat effect. So I would say, in my rendering of this, I would drag that pattern fill up to the top. I kinda like it being on top of her too. It's sort of, I think it integrates everything. It keeps it from looking like we just stacked a bunch of stuff on top of each other. Sorta brings the background up in a way. But, there you have it.
Class Materials
Creating Stylized, Artistic Portraits with Adobe Photoshop - Adobe Stock Contributor Tutorials
Creating Stylized, Artistic Portraits with Adobe Photoshop - Course Files
Ratings and Reviews
Bess Palmer
I really liked this. I learned a few new tricks and got to practice others. I liked learning about the Kyle brushes, making a pattern preset and using it in pattern overlay. I was thrilled, really!, to see the eraser in clear mode. How great that will be. I am an intermediate user, lots of tutorials, but not a lot of practice. I watch them like soap operas. The pace was perfect for me.
MJ
Loved this class due to Khara explaining the steps so thoroughly. Pace is nice and easy and understandable for all levels. Great little course on creating a wonderful piece of multimedia in no time at all.
Karen Keegan
I learned so much in this class - so many tips and tricks. It's great to see different ways to do various tasks, including shortcuts I wasn't aware of. Khara is a great teacher - her pace is perfect, and it's easy to follow her steps. I really enjoyed this class!