How To Create The Out Of Bounds Effect
Lesson 5 from: Creating Impressive Effects with PhotoshopJesús Ramirez
How To Create The Out Of Bounds Effect
Lesson 5 from: Creating Impressive Effects with PhotoshopJesús Ramirez
Lesson Info
5. How To Create The Out Of Bounds Effect
Lessons
Lesson Info
How To Create The Out Of Bounds Effect
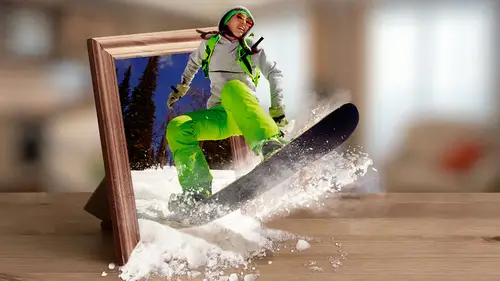
what I'm gonna do here is just it's gonna be a compositing job, really? And I'm just going to show you the different steps that I take in the different techniques that I used to put something like this together. So we're gonna be working with this photo frame here. We're gonna be working with the snowboarder, and we're gonna be working with this photo of a shovel and snow in this graphic element, which is from Adobe Stock is just snow. And what I'm gonna do is I'm going to first start out with, um what I wanted to win. I wanna make sure that this no border is inside of that frame. And one of the best ways we can achieve that is by creating a clipping mask that contains the snowboarder there and then duplicate that snowboarder Later, put it on top and mask out the elements of you one to, uh, come out of the frame. So let me show how I would go about that. I like to use, um, shapes the pencil to make a shape out of that frame. And I know that you could use the quick selection tool or eve...
n the magic wand to and just make a selection out of that and then, just, you know, create a new layer, fill it with whatever color the color really doesn't matter and then clip the snowboarder to that command option G. But the reason I'm not gonna do that I'm gonna take my time to draw out the shape with the pencil way so that we can have more control later if we need it again. I like control, so I rather spend a little bit more time setting things up. So I have more flexibility in the future if I need it. So I'm gonna make I'm gonna de select that by present command D to de select. I'm gonna click on the pencil and I'm just gonna make the shape. And by the way, let me just undo that You can press escape If you're creating a shape and you realize you made a mistake, just press escape and you're done. It gets you out of it. So I don't wanna be Don't want to create a path. I want to create a shape. So I'm gonna select shape Phil, I'm gonna use the color. Doesn't matter. But I'm gonna use red so that you could see it. I'm just gonna create a shape. Also again, I'm gonna press escape this. I want to show something cause I don't think it somebody the fault rubber band and the pencil and Photoshopped isn't on by the fault. I believe I know it is an illustrator, but notice it when you create a point and you can sort of see that outline of where my next point it's gonna be, Um, if you don't see that in the options panel, you have this check box your rubber band watch what happens when a when I uncheck it by click, it don't see that line any more, so makes it a little more confusing when you're tweeting shape. So make sure you turn that on, so click on this little gear icon and check rubber band. There it is. So click on the corner pulled the space part of pan as hers lane than your points. And there it is. And if I need to make an adjustment just at the a key on the keyboard or hold shift A to swap between the path selection toe winded, their ex election told The one that I want now is that they're ex election tool and I can click on an individual point and click and drag it so you need to adjustment adjusted. Click on in clicking dragon or, once a selected, use the arrow keys on the keyboard to adjust that point. Another reason why I wanted to use a shape instead of a regular pixel layer is that we can go into the properties panel. So Windows, properties and under a mask I have the feather watch. What happens when a feather? It's no longer a sharp line. I can feather that. So I really didn't want a sharp line here on the edge. I just wanted just a tiny little bit of fetter the feather just a tiny little bit. So I'm gonna add 1.1 pixels in this case just to have a bit of feather. Then I can enable my snowboarder layer, and now I can clip it to that layer below it. So command option um G to clip it to the layer below it and I'm gonna zoom out and I'm gonna duplicate that snowboarder layer Command J and what I'm gonna do now is make a selection around her. So the quick selection tool will be good for this job. And when I just make this selection here, making us precise is you can I'm going a little bit fast right now. But when you are working on a real project, you do have to take your time so that the selection looks good and it doesn't look fake. And I'm just making sure that it's it looks good enough, at least for this example. So I think I got it there. Maybe I missed a couple parts here. I'm gonna create layer by clicking in the layer mask with selection active. And what I'm gonna do now is I can select both layers. Shift click, select both V on the keyboard for the move tool. Now it can move them around, and I cannot suppress command to transform, to scale them shift option to constraint the scale. So maybe a place where There. So now it looks like ask use popping out of the frame. Obviously, I would have to work a little bit more on my, um, layer mask here, so I'll do that now. Just started to show you how would refine that just with the when he's a welcome. Tell it for this. Just with a black brush, I'm gonna decrease the size of the brush of the layer mask active. And I can just paint with more opacity, more flow and just go ahead and refined the rest of the the rest of the mask. Obviously, I'm not gonna do that for this class, but that's how you would go about that. And actually, this is really bothering me. So what? I'll do it. So I just make a quick selection with the ah polygonal lasso tool here. Just so that is not there. And I was gonna fill that with black. So foreground color option backspace to fill. That's old backspace on the PC. So there you go. That looks at least better for now. So I'm gonna fit this a screen, and that's what we have so far. So now we have to bring in Morrell laments from different photographs to make this effect more realistic. I have this snow layer here, so we have to first of all, get rid of the shovel and then mask out the bricks so that we can lay that snow on the table, so it makes it look as if the snow's coming out of the frame. So what you can try to do to get rid of this shovel is used the content aware fill. It's not always perfect, but we'll try it and see how it works. I'm gonna make a selection around the shovel and then go into the film menu. You can bring it up by holding, shift and delete. It brings it up, or you could go into edit and Phil, to bring it up under contents. You can select the content aware fill press okay. And we'll see a photo shop. Yeah, did a decent job. We can try the fill again. Just make that selection here. Shift backspace press, OK? And Photoshopped really doesn't want to get rid of it. You can just clone it out. So I'm just gonna select a soft brush and I'm gonna select the source, So option click and just mask it out. There you go. So now that's gone, and now we can just focus on the snow that's here. We can now go into the channels panel and we can use channels to help us get rid of that snow. So look for the channel has got more contrast between the foreground and background between the thing you're trying to keep in the thing you're trying to mask out. In this case, we want to keep the snow and we want to get rid of the ground. So the Blue Channel has most of the contrast out of the three channels, so we'll use that one. I'm gonna click and drag the channel onto the new layer or a new channel icon to duplicate it. And then I can adjust it. Image adjustment levels. What we're gonna do now is use levels to make the ground darker and make the snow brighter. So then we can use that as this election in the next step. So when I click and drag this point to the right as far as I can without affecting too much of the snow and at this point over to the left, the white point to make the snow is broadest possible. So something like that, then I can paint with a brush tool on the areas that I know for sure. I'm not gonna not gonna want to keep so what? Black? I'm gonna paint on these areas here, and it doesn't have to be perfect. As long as we get a good selection, we can come back and refine it later. So there's going to be good for for now, and we probably will have to refine it and thats okay, so I'm also gonna press the X key on the keyboard to swap for from foreground and background color. And I'm gonna paint with white on the top here. So we keep all this now because I really want to keep this now. Well, there we go. Now, if you hold command control and click on the layer thumbnail is gonna make a selection around the contents of the layer. In this case, white is your content in black? It's not so we keep whites, you get rid of blacks so I can go back into the snow layer here and create a layer mask and notice how the ground is gone. And now this No is there and also noticed another thing. The ground. It's a similar color as a table, so we can actually get away with having an in perfect a mask because the colors are so close to each other, they're not gonna matter. And if you transfer, this is already pretty big. We need to make it a lot smaller. Once we transform it. Those imperfections, we're gonna be pretty much unnoticeable. So I'm gonna hold shift, option, click and drag and Aiken place this somewhere here. Now, at this point, I really I'm really happy with my mask. I don't think I'm gonna need any other adjustments. I'm just gonna apply the layer mask. But I never liked Teoh. Have no way out. So I'm just gonna duplicate that layer, disable it. And if I in case I need to use that layer for something else, I can always come back to that to that point. But I usually don't like to apply layer mask, which means get rid of the layer mask, apply it to the later in a more layer mask. But I always like to give myself a little out, or at least have a few steps that I can go back to in case I made the wrong decision. So I have my snow snow layer here. I compress command T to transform this control T on the PC and I can distort it in a lot of different ways by clicking and dragging these corner handles by warping it but whatever I need. But whatever method I use, I need to make sure that it's somehow looks like it's coming out of this area here. So what I'm gonna do is I'm just gonna find a place that I like. Maybe something, something like that. I think that looks good. And I'm just gonna hold option that's all T on the PC and click on the layer mask icon to hide everything. Then with white using a self brush, I'm gonna paint on that layer, Master, bring in the contents of that layer. So now it sort of looks as if the snow is falling out of the frame. And in this case, actually to I have a hard brush, I'm actually gonna go all the way harnessed to paint with black. Black is my background color. So I'm gonna swap those by pressing the X key on the keyboard, notice how they swap so black foreground color. And now I can just style this snow a little bit, so it sort of looks as if it's coming out of the out of the frame. And for something like that, a welcome tablet will be, um, will be, ah, better tour than in the mouse. But that's how you would make it seem as if the snow is falling out. Another thing that you may want to do is at a little bit of shadow to that, so you can double click on the layer, just click on drop, shadow the shadows. I need to be too strong. Just bring it way, way down. Just just a hint of that shadow. So that's before and after, maybe even a little more, actually. So maybe about that much. And also I never really liked to have shadows that are blacks. I'm just gonna change the color to, like maybe one of these dark browns just what matches the shadows that are already on the scene and we compress. Okay, so now it looks as if the snow is falling out. Of course, you may want to take a more time and perhaps duplicate this layer and find a different angle to ADM or snow around the frame and things like that. But the techniques will be the same. You just repeating the same step over and over again, making sure that it looks pleasing to the eye. But I think that for this example, that already seems as if the snow is just coming right out of there. Um, what I'm gonna do now is, um, at another element to this image so that it seems as if it's coming out of the snow. So you know what? We've been talking about blending modes and I have a graphic that I haven't showed you yet that I think will be good, at least for this example. So I have this graphic here is very simple. Nothing too exciting is just the start. How blend modes work. We have different groups. Whenever you work with a blend mode and you click on the blend mode dropped down, you get a list, and you always have these dividers. But you never really know what those dividers, So the normal blend most of two top ones. I'm essentially don't blend the layer unless you adjust the opacity. Darken means you keep the dark pixels. Not the bright lighten means to keep the bright pixels and not the dark contrast to keep both dark and lights, but 50% gray. You don't keep so um, in the majors, show you what 50% gray is. Create a new layer shift delete. That's the film menu. Here you select 50% gray, and that's 50% gray. Notice that if I go into overlay or any one of the blend modes in this group here, it just becomes invisible. So that's what that means. And also in case you need some visual, more visual representation of what, 50% get great is, you can just click on, be here in type in 50% and that's 50% gray. So black is here. White is here 50% grades right in the middle, so this group here contrast keeps both lights and darks. But the grace right in the center are is what this appears. Inversion just inverts pixels. Different ways and component is probably the easiest one to understand, and it's got the weirdest name, but we're all familiar with hue, saturation, color and luminosity. You've already seen me use some of these blend modes and the examples earlier today and the previous class, even in this class with color with the, um the color double exposure. So this is Ah, good reference for you When you're thinking of using a blend mode. Just think, What do I want this blend mode to do? I want to make things darker than you know what group you need to go to. Because light and just simply one happened. You can't make things darker with lighten. So, um so now we have this snow element. We want to keep the brights, but we want to get rid of the darks. Well, we go back into this list. We want to keep the brights so lightened. So one of these blend modes will do the work for us. The one that we want to use is scream. There it is. Black is gone, and we only keep this. No. I can click and drag this into position. So command to transform. I could rotated. I could scale it in. And I could just make sure that's sure it sort of follows the path of the snow that's already there. So maybe something like that you can add a layer mask, paint with black on that layer mask, but with a soft brush So let me get a soft brush here. Just click and drag the hardness all the way down to zero. And I can just bland those pixels better. I can duplicate that same layer Command J control J to duplicate and place it behind, um, snowboarder here. So now we have some snow coming from behind like that. And of course, you can rotate it in, scale it and maybe even flip it, like maybe flip it horizontally. Just so it's the snow. Doesn't look exactly the same as the other cell. So maybe you got something like this, and of course, it would take your time creating this effect. I'm gonna duplicate it one more time. So now we have this snow splashing out of the frame with her and onto the surface.
Class Materials
Bonus Materials
Bonus Materials with Purchase
Ratings and Reviews
JIll C.
Creating Impressive Effect With Photoshop is another action-packed class filled with really useful information. It includes how to do fun (or even useful) face swaps, How to create shallow DOF in images even if you didn't use the right lens and f-stop combo, how to create the golden sun flare effect, how to do a double exposure effect, how to create a duotone/graphic effect, and others. There is so much info packed into this short course that you will need to play it over and over to absorb all of the keyboard shortcuts and layer techniques, but there is surely something for everyone in this course.
Phreakgirl Photography
Whew! I watched it live and he goes so fast I couldn't even write down simple steps to refer back to later. SO MUCH great information packed into this course, but I'll have to buy it and use Pause and Rewind a LOT!
user-1c544c
Great class & instructor. As soon as I was done with the class, I wanted to try what I learned on my photos.