Workflow in Photoshop
Lesson 2 from: Creating Cinemagraphs with Photoshop and After EffectsChris Converse
Workflow in Photoshop
Lesson 2 from: Creating Cinemagraphs with Photoshop and After EffectsChris Converse
Lessons
Lesson Info
Workflow in Photoshop
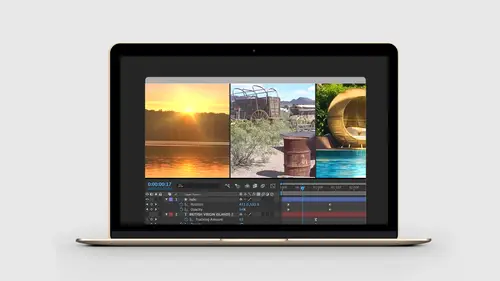
What I wanna do now is walk you through a workflow in Photoshop, show you how we can create cinemagraphs in Photoshop starting from video, and then we're gonna look at the same workflow in After Effects. So that's gonna give us a chance to see two different ways to create these. Both of them have their strengths and weaknesses and we're going to use each tool for some of the things that it does best. And so to begin, let's start with opening up our project in Photoshop. And by the way, the project files included with this course include five folders where we're gonna be doing two in Photoshop and then three in After Effects, and a folder six where we're going to include the video that we're gonna shoot later today and our After Effects file to composite that, Joe sitting up here and having his hair blowing from the area here. So all this work was shot by us. We didn't use any super fancy cameras. These are videos from either iPhones or like a Sony a6300. So we're not using any Hollywoo...
d-level equipment. So this is something that people could certainly do pretty easily. And let's begin by jumping into Photoshop and looking at a workflow for how we would get this together. So inside of Photoshop, what I typically do is I start off with the design comp. So this is the Heritage Museum in Clark County, Nevada. And so what I did is I started off by importing an Illustrator file. So we have this on a layer by itself. I have a clip area here, this is simply just a rectangle. And above it I have just a still frame from the video. So I got the video from my camera, opened it up, scrubbed through, picked a particular frame and just simply pasted this in here for our design. And then we just have a simple black background. So typically, we'll do this, especially if this is gonna be an advertisement for someone, get approval on the design, this is what this is gonna look like. So this is basically (mumbles) gonna be like a moving postcard, and then we're ready to start working in our process here. So the reason I'm spending time talking about the Photoshop files is it's important to see that we're working in Photoshop exactly the way we would work with any other composite or design in Photoshop. Okay, so to begin, we go back to the exercise files, I have a folder called assets. Inside of assets, I'm gonna hit the spacebar and just preview the video. So I just set up a tripod, it was a pretty windy day. I love this old truck, it looked great with the fan spinning around. We also see all the bushes in the background moving as well, so what we're gonna do is basically isolate or stop the entire photo and just move the fan of the truck. And so I'll show you what that process looks like. There's also some audio in here as well, which we're gonna turn off in Photoshop. The title is just this vector artwork here that we have imported already. So to begin, in Photoshop, we come down to the Window menu and we're gonna come down to the Timeline panel and we're gonna open up the timeline. So now there are two timelines that you can activate inside of Photoshop. There's a frame by frame-based timeline, which is how you can do a frame-by-frame animation to create an animated gif; and you can create a video timeline, which will give you some keyframes, just like we would have in a tool like After Effects. And the nice thing is we're going to be creating an animated gif out of this, as well as a video. So I'll show you both workflows. And Photoshop is the only tool right now in the Creative Cloud suite that can create an animated gif from a video. So we don't actually have to pick the frame by frame to actually use this for animated gifs as well. Okay, so when I have the Timeline panel open, I have this button in the center. This is where you can switch this between frame-based animation or video-based. So I'm gonna keep it on video-based and I'm simply gonna click create timeline. As soon as I click create timeline, this activates all of the layers in the Timeline panel. And these layers are exactly a mirror of the Layers panel. And so this might take a little bit of getting used to as we add some artwork and add video into this. The Timeline panel will change a little bit because it's based on time as opposed to all of the items in the Layers panel. However, everything in the Timeline panel is represented from the Layers panel. So let's come over here to the right-hand side, we see these little plus signs. The duration is just set by default. It's about five seconds here. You can come down here to the flyout menu and change the duration of the entire Photoshop file. But one of the things that Photoshop will do is constantly change the duration of the entire image. So we'll let Photoshop do it first and then we'll scale it back. So I'll come over here and click on the plus sign on the right-hand side of the Timeline panel. We're gonna go into our assets folder. We're gonna grab the old truck and we're going to click Open. So now what will happen here is immediately it'll look like we didn't actually import anything into the timeline. We can see the old truck video showing up in the Layers panel, but in the timeline, it's over here on the right-hand side. If I scroll to the right, I can see this. By default, when you add clips to Photoshop, it puts the clips in a line so you can use it like a nonlinear editing tool, which is great because you can edit video and do a lot of things in Photoshop that you might do in a tool like After Effects. Not everything, but some of it. But in this case, I actually wanna use the video as a piece of design. And so all I need to do is come over to the Layers panel and select this video group, which is really just a folder, it just has a little video icon on it. I'm gonna hit Command + Shift + G or Control + Shift + G in Windows, or ungroup. And once I ungroup this, I can now see that the old truck is showing up on the layer by itself here and not in that group. But if I come over to the Timeline panel, this now has its own layer. So by ungrouping that video group, I now have this as an object that I can work with. So now I can come over here and click and drag and I'm gonna drag this old truck video back to the beginning. I'll collapse my Timeline panel down a little bit. So now when I click and drag, I can now see the video playing on top of the background there. Let me zoom out on my canvas a little bit, I wanna see everything at once here. So now as I drag the timeline back and forth, I can see what's happening in the video. So the first thing that I wanna do is I want to scale the video to fit my design. Now if I come up and hit Command or Control + T to transform this video, the first thing Photoshop's gonna do is give me the option to wrap this into a smart object. The video file is right in the Layers panel by itself and in the Timeline panel, but it's not wrapped in anything that will allow me to transform this. So I can transform the video itself. I have to transform a smart object that contains the video inside. And if you try to do it, like I hit Command + T to scale this, Photoshop will come up and tell me that I need to put this into a smart object first. So I'll come over here and click Convert. Once that's converted, the icon will change from a little video icon to the document link icon. And it's worth noting that, that smart object is linked to the original video file. So I'm not embedding the entire video into Photoshop, it's referencing this out. So if I go back and change the video for some reason, it will get loaded back into Photoshop. So now, we can see all of our transforms. So I can click, hold the Option key, I'll just scale this down a little bit. Now to figure out how big I need it, I can come in here and set the transparency to this to maybe about 50%. Hit Command + T, so now I can scale this, move it around so I can match the design comp. I happen to know that this is 65%, So I'm gonna come up here to be transform and hit 65%. Once that's in place, I'll press Return. I'll hit the M key for the marquee, and then press zero to make it 100%. Now in the Layers panel, I'll drag this down. I'll drag it above the fpo. I'm going to click group this in. So I can hold Option on the Mac or Alt in Windows to clip this into the clipping area. Or move the fpo and then I'll just grab the old truck and move this to the layout that I want. So now I like to make my clip colors, colors that are obviously green, for example, so I can see if I have this in the right spot. Okay, so I have this in place, my video is now wrapped in a smart object. Now what I need to do is click the video and pick a point where I can create a loop. Now there's two types of techniques here. In this first example, we're going to simply do a hard cut on the video. Because our animation is moving so quickly, I don't need to worry about blending frames from the beginning of one video to the next so I can get a seamless loop. I can do a really quick cut because again, it's so fast, we're not gonna be able to notice that. So what I'm gonna do first is scrub through here and I wanna find an area in the video where the bushes aren't moving too much. I want it to look like the wind is not blowing. So if I scrub the timeline back here, we can see the wind up here is really blowing off toward the left. Same thing with the bushes here on the right. If I keep going, there's a point about right here where the bushes are sort of straight up and down. So this might look like there's no wind blowing at all, and that's sort of the effect I want. I want the blade spinning, but I don't want the bushes to look like they're being blown around. So once I find the point that I like, I'm gonna come over here to the Layers panel, I'm gonna hit Command or Control + J to duplicate the clip, the smart object. I'll click group it back in. Let's rename this to photo. And just to make this organized, let's name the other smart object video. Now I'll select the photo layer, I'm gonna right-click and I'm gonna choose rasterize layer. So now I've just basically taken all the video aspects of that smart object away, and now it's just pixels on the desktop. In my Timeline panel, depending on where my playhead was, that's where the beginning of this layer is gonna be beginning, so now I need to click this and let's just drag it back to the beginning. So now when I scrub the timeline, I'm not seeing any motion happening because I have the static photograph above the video. Now let's come over to the Layers panel, let's make a new layer. I'll call this reveal, and what I wanna do here is put some color into my Photoshop file above the video so that when I mask parts of the photo I can actually see where I'm painting. So for the reveal layer, let's bring this back to the beginning. Let's click on our color swatch and I'll come in here and just pick something that'll be really obvious to see. I'll fill that layer with that color. Go to my marquee selection tool, let's bring the opacity down. We'll bring it down to about 80%. Now if I turn off my photo layer, I can now see this blue layer above my video. So when I'm scrubbing these back and forth, I can see what's moving. So again, this is really just so I can see what I'm doing. So now when I'm scrubbing the video back and forth, I'm gonna pay attention to the things that are moving and what I wanna mask out. So there's actually a few spots here where we can see the video moving. We have the main fan, but if I continue to move this, we'll see that there's a spot right here where there's a reflection; there's a spot over here and in between the wheel spokes where there's a reflection; and also over here on the sand, I can see another reflection. So I wanna make sure that I get all of those in there so that it looks believable that this is moving, but I don't want any of the bushes or anything else moving around. So I'll come back here, turn on reveal, turn on photo. Now we'll select the photo layer. Let's add a new layer mask. Next I'll select my brush tool. Press the letter B key. Come up to the brush settings, I want a soft brush. Let's hit the D key to put white and black on my foreground and background. I'll hit the X key to put black on the foreground. And now I'm going to hit Option + Delete. Or no I'm not, I'm sorry. I'm going to grab my brush tool and now I wanna come in here and start to paint the area that I wanna see. So I'll zoom up here a little bit and I'm gonna start painting, make sure that my opacity and flow are set to 100%. And what I'm doing is I'm painting out this area. Now what's interesting here is as I start to paint, I'm seeing the state of the video that's underneath. So if I move this around, you can start to see what's happening here. I'm basically revealing the video underneath. And so now I'm gonna paint around in a circle. I know this animates roughly about this size. So I'll come in here and I'll start painting this area. This blue is indicating to me the areas that I've painted and seen through to the video. Once I get something close, I can come in and move this back and forth and make sure that I have enough of a mask showing through for this area. If I go too far, I can hit the X key, get white on the foreground and paint this out. I try not to have as much animation, or try to have little animation rather as I can. I don't wanna have too much moving, I wanna keep it at a minimum. That's gonna give me a smaller file size and just help sell the effect a little bit more. So with that in place, I'll hit the spacebar. Let's click and drag. I'll come down here and I'll drag the video. Let me hide the photo, let's drag the video a little bit. So right in here, I can see a little bit of a reflection. So I'll turn the photo layer back on. With the B key, let's come in here and just paint a little spot right there. Let's come over here and just paint this little spot that's above the wheel shadow here. And then there's a little spot in here and a little spot up here. So now as I move this back and forth, we can see all this movement. So this one here doesn't need to be quite as big so I'll just come down here and remove that, it just goes on the spoke. Now if I click and play this, we can see all that moving. So to get the full effect, let's come over here and just simply hide and reveal layer in between. Now when we scrub the timeline, we're getting that effect. None of the bushes are moving, none of the clouds are moving, but we're getting the fan, we're getting all the reflections and shadows. So we're getting something that looks pretty cool and pretty believable. All right. So now we have our effect working, now we need to find a good looping point. And one thing that I wanna do, if I'm gonna be saving this as an MPEG-4 or a video format, I need to make sure that I have at least six seconds in the video file. Sites like Facebook and Twitter, Facebook mostly, won't loop a video that's less than about five and a half seconds. And these sites are always changing their parameters. I suspect one day Facebook will lower that. Twitter just recently lowered their looping video to about four seconds because since they're killing Vine, and Vine would do these looping cinemagraphs as well, they're trying to give people an alternative for their very small videos. So we can go down to about four pixels, or I'm sorry, four second on Twitter. But just to be safe, let's make this about six seconds. So in the bottom of the Timeline panel in Photoshop, there's a little scale here. This scale just indicates how much of the timeline we can see at once. So I'm going to drag this scale down so that we can see all of the seconds showing up here. So this is one second, two seconds, three seconds. The video that we brought in is a little bit longer than this. So what I'm gonna do is bring the playhead to about six seconds, which is right here. And one thing that'll happen in Photoshop is as we bring in content, the photo layer for example, when we created the photo layer, we had all of the duration of the video. So that's why the duration goes further. But all the original artwork stayed at its original state. So when you see this and your whole screen goes blank, look at the duration of all of the items in the Timeline panel. So all I need to do is come down here and select the title. I'll just drag this out somewhere past my six-second mark. Come down to the reveal layer, I'll drag this out. Come down to the clip area. Once I drag the clip area out, these items are clipped into that, they'll show up. And then I'll come in here and select the background layer as well. So now we have everything on the screen for that six seconds. The other thing I'm gonna do in the Timeline panel is we're gonna change something called the work area. So right above all of the layers, we have this little indicator here. And this is the work area. And basically, what this means is this is the area of the Timeline panel we're going to have Photoshop pay attention to. By default, the work area will be the width of the longest item in the Timeline panel. So if I scroll over here to the right, we can see the end of the work area is at the end of the video because this video is about 14 seconds. So with the playhead here at six seconds, I'm gonna come in here and grab the work area and just drag this back to six seconds. When I render this from Photoshop, it'll only render up to six seconds. So this is really nice, this gives me the ability to add or remove a duration to Photoshop if I want to. But this is gonna give me a place where I can sort a lock this down. So now I'll zoom back. So now let's go back to the beginning of the video. So to pick a good looping point, again we're not gonna do a cross fade, but this fan is the thing that we really wanna pay attention to. So what I wanna do is scrub to the video and I wanna find a point in this animation where I think I can kinda match the different pieces. So if we take a look at the composition here, I'm gonna set it up so that one of the fan blades is just touching the very top here. So it's key to just sort of go through here and just pick a spot where we can remember what's going on, and we're gonna pick another point where the fan blade is gonna be just before the point where it's can go there. Again, since this is playing so fast, we're not going to notice the difference when we do that jump cut. So that's the point I wanna start at. So I'm gonna come back down to the work area and drag the beginning of the work area to where the playhead is right now. So when we render this, Photoshop will ignore the first couple of frames there and start right where the work area is. So now I need this to be, again, at least five or six seconds. So I'm actually gonna extend my work area on the right, I'm gonna extend all of these frames out. And once we get past the six seconds, I'm gonna go frame-by-frame. So I'm actually gonna come in here and zoom up a little bit so I can get frame by frame control. Let's move this back. So this keeps on spinning. And again, it's not spinning in exactly the same rate because of the wind and everything. So let's keep going, and what I'm looking for is I'm looking for a frame where the fan blade is just touching the top, similar to what we had before. And if I get to about right here, that's pretty close. So what I'm gonna do is backup one frame. So I'll click and drag this back to here, that's gonna be my ending point. So that fan blade is spinning so fast that we're gonna stop on this one, and then when it loops, it's gonna go back to the beginning where we're gonna have that other blade right at the top and we're gonna get this constant, seamless loop. So I'm gonna leave the playhead where it is, zoom out the timeline, grab the work area and just drag this back to here. And so now I have that full area for the loop that I need. At this point, I'll save my Photoshop file. And to export this, we're simply gonna come down to the File menu, choose Export, and we're gonna choose Render Video. So from this dialog box here, this is actually gonna use the media encoder. And if you watched our other class, intro to After Effects for Designers, in After Effects when we render out with the media encoder, it actually loads the media encoder as a separate application and then loads our After Effects composition in there. Photoshop is using the media encoder, as we can see here, but Photoshop will actually do this sort of behind the scenes. It'll send it off to the media encoder and let us stay within the Photoshop environment. So we'll choose MPEG-4, select folder, I'll just choose the desktop. The rest of these settings I'll keep, H.264 is the most common file format. This is the MPEG-4 popular encoding format for putting video on the web. Everything else I'm gonna keep the same, the document size, 30 frames per second, that all sounds great. And I'll simply come down here and hit Render. So this will go through, take all of the layers from the Layers panel, adhere to all of the settings that we set up in the Timeline panel, adhering this to the work area and give us an MPEG-4 out on the desktop. So here we are on the desktop I will go into my View menu, I'll turn on loop and then I'll hit Command + F to just play our final cinemagraph here. So when we're watching this, you can't actually see the looping point. That blade is moving so fast. And the fact that we picked a frame before, the next frame had something close to the first frame, we'll never actually see that. And so we can see all the shadows working, everything is moving, but all of the trees and everything in the background are static. So we're getting that really sort of nice effect. The size I'm working with here is 1,000 by 562. That is a proportion of the 16:9 ratio. Most of the social media sites, when they specify their video formats, are all picking sizes within the 16.9 ratio. Some will ask for smaller sized videos, maybe 760 instead of a thousand, but the proportion will always be the same. So I tend to start with a thousand because I could always sort of scale this down a little bit if I needed to run this on a site if it was too big or for any other reason I needed it to be smaller. We rendered this out as an MPEG-4. The other option I wanna show you as an animated gif. So what I'm gonna do is close my Photoshop file, I'm gonna select it and duplicate it and I will name this museum and I'll put underscore gif in here. And then I'm gonna open this one up. So with an animated gif, they don't have a time limitation. I mentioned that Facebook, for example, has a limitation of about six or seven seconds before they won't loop a video. But an animated gif, the idea here is we want these to be as small as possible. So what we're gonna do is we're gonna come in here and just pick the minimum number of frames that we need to make a believable animation. So let's go back to our beginning work areas. So we have this fan blade touching the top here. So I'm gonna drag this out a little bit. I could go to right here, but that's only gonna give me three frames, and it's gonna give me this sort of palindrome effect, which I don't like. So I'm gonna come out here just a little bit to get at least seven or eight frames in here. So I come to about right here. Then I'll scroll over to the side, we'll grab the work area. This is gonna be significantly smaller. So now we have just a couple of frames here. Save our work, then we'll go to the File menu, we're gonna go down to Export and then we're gonna choose save for web. Save for web gives us the ability inside of this dialog box to come over to the upper right-hand corner, choose the gif format. And like I mentioned before, even though we're using a video-based timeline, Photoshop will take all of the frames of the video and still create an animated gif for us. So in the lower left hand corner, we can see this is 512 kilobytes. We can choose the number of colors. Let me zoom up here. We can take a look at the dithering effects. One of the limitations of (mumbles), sorry, one of the limitations of gifs is that they only have 216 colors, but it can have blending amongst the pixels so they have these sort of effects like dithering with either pattern or noise. They can have transparency, but not semi-transparency like a png file. And every frame that has a pixel that's changed gets redrawn frame by frame. So this means animated gifs end up being larger in a lot of times than a video file. This one won't because this one only has six or seven frames. But if you have a longer video and you convert it to an animated gif, chances are the gif will be larger than the video file. Anyway, let's come up and change the number of colors. If I wanna bring this up to 128, I can select this. When you make changes in this save for web, the reason it takes so long is Photoshop actually creates the animated gif every time you make these changes. So if you have a really large animated gif, it'll take a few seconds. The nice thing is once you like it, you can hit Save and it'll go right out. So for the looping options, let's choose forever. And now I'll simply hit Save, choose the desktop, we'll hit Save again. Photoshop's gonna take all that data, save it back out. And now in the desktop, I have an animated gif as well. So if I look at this, this is actually smaller than the video. This is one of the few times this will be the case, but we have this great looking animated gif. This will work great in text messaging, again, PlayOn, all the different platforms, be a lot smaller and just give us that effect that we're after. There's not a lot of times I find that the animated gifs will be smaller or more desirable, but that is the workflow inside of Photoshop to create that. Later on, when we start working in After Effects, I'll choose Save, if we wanted to create an animated gif from our After Effects video, we would have to bring them into Photoshop to save them out. We don't have any way in After Effects to create animated gifs. So right now, that's the only workflow we have in the Creative Suite environment.
Class Materials
Bonus Materials with Purchase
Ratings and Reviews
Jeff S
Fascinating course for anyone who wants to know how to make a cinemagraph. I thought Chris went a little fast for me but I could replay those parts over and over until I got it. This is not a general knowledge course but more of a niche course for obtaining specific know-how on making a cinemagraph. Overall very good!
Randy Spears
For anyone having to create a poster or a book cover or anything creative with Photoshop, this is a great course. I refer back to it again and again when I start some of my projects.
Teresa Piccioni
Chris is really a great teacher: the after effects tricks explained in this class are very interesting indeed!