Top Down Photography: Shine & Reflection
Lesson 33 from: Craft Photography FundamentalsCandice Stringham
Top Down Photography: Shine & Reflection
Lesson 33 from: Craft Photography FundamentalsCandice Stringham
Lessons
Session 1
1Introduction to Craft Photography Fundamentals
04:59 2What Your Visuals Say About Your Brand
04:56 3How to Become a Photographic Author
10:44 4How to Use Natural Light for Your Product Photography
10:00 5Setting Up Your Photo: The Basic Rules
09:07 6Becoming the Viewer to Take Better Photos
10:30 7Shooting 3 Setups: Creating the Backstory with Images
34:32Shooting from Top Down with an iPhone
19:49 9Shooting Paper Products with an iPhone
10:54 10Shooting Jewelry with an iPhone
19:01 11Editing on your iPhone
15:28 12Finding Your Brand's Aesthetic
18:39 13Find Your Product and Customer Target: Exercises
11:12 14Figuring Out Your Audience
08:46 15Interview with Gilit Cooper of The Bannerie
08:45 16Branding Beyond Instagram
19:47 17Looking for Natural Light in Your Home
19:36 18Building a Styling Prop Collection
08:22 19Creative Backdrops
13:52 20The Essential Product Photography Props
11:18 21DSLR Basics
02:39 22Understanding Shutter Priority And When To Use It
26:29 23Understanding Aperture Priority And When to Use It
37:16 24The Basics of White Balance
12:52 25Photographing Jewelry
37:27 26Setting Up a Bedroom Set and Photographing Pillows
19:59 27Photographing Greeting Cards
06:53 28Shooting Products on a White Background
17:24 29Top Down Photography on a White Background
13:06 30Shooting Products on a Black Background
07:23 31Shooting Reflective Items
12:20 32Shooting with Backlight
04:01 33Top Down Photography: Shine & Reflection
24:50 34Basic Editing in Lightroom
31:37 35Batch Editing in Lightroom
06:00 36Editing Jewelry in Lightroom
10:01 37Editing White on White in Lightroom
06:54 38Editing Shine and Reflection in Lightroom
17:03Session 2
Lesson Info
Top Down Photography: Shine & Reflection
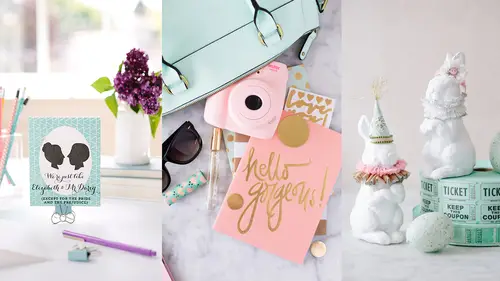
I'd like to shoot something, another top down. But where you want reflection. So we are gonna shoot these again, but I want these to show reflection and show that they are gold foiled and beautiful. If I don't show that, it doesn't show their true value, right? So I need to show reflection. So I'm going to take these away. Thank you. And I'm going to just use a white foamcore board again for my base. Actually, do we have the white wood? Yup. Let's do that. So we're gonna bring in the white wood that we painted yesterday. Or in our previous lesson. It has like that little bit of green, but it's a nice matte white. And I love parties. So we're gonna set up a little party right on our table. I am using My Mind'S party fans. So this is exactly what I would be doing for our Instagram on a daily basis. And these all have gold foiling, so it's super important to show that. So I'm gonna decide what size I want, and I kind of base that on scale and how big of a space I wanna take. And in my...
mind, I'm thinking of this probably as a square image, because it would be Instagram, so that's what I am thinking. So let's see. So these are just paperclipped together so that I can un-paperclip them and put them right back in the box, which is really nice. And I'm thinking of these in like one corner. So wherever I want the weight to be. And I'm gonna pick three different sizes because of that. So one large, one small and one in the middle. And I think that's sort of a good way. Again, I'm using an odd number, which is easier. And I wanna add in some contrast. So this is gonna be my large one. Sticking together today. Okay, so fold that out, and I try to pick ones that all had foiling. I would actually probably pick, these both have polkadots, so we'll see how we build that in. Babam! Okay, and I'm just layering these. I'm actually gonna start with that one on the base. I'm gonna start with this one on the top, and this one in. And I know they're not actually really gonna be in there. I'm just using them on the edge. And I'm gonna pull out some banners because that adds a party feel. And it adds like a flow through my image, okay? And I'm going just like I would read from my top left to my bottom right. And then even though I'm not selling cupcakes, I would add a beautiful cupcake in because to me that automatically says I'm really having a party. You got to have food or it's not a party. It's a meeting, right? Who said that, I think Ina Gartner. Okay, and then again, I want something maybe like coming in from the corners over here, so I'm just gonna take some of the tassels that we have. And this is another craft that I really love if I'm doing like a lot of party stuff. I stuck something to it. And I use it again just on the edges a lot. So I like to create lines that sort of lead into whatever I am wanting to point to. Okay, and I'm gonna leave a little bit of space in this one in case I wanted some text. Now these are all layered, but they're gonna be crooked unless I put something under them. So this would be another case where I just like flip up a frog and now I have an even stand or it's why I always keep blocks with me when I'm shooting. Because then, I can layer things and make things as tall or as short as I need them to be because I'm looking at everything now from how it's gonna be from the top. And I've decided I don't think I really want white because we're shooting on white, so I'm gonna add in a mint and a pink. And I'm just talking through this. I don't talk to myself like this at home, (audience chuckling) but I want you guys to be able to see exactly what I'm seeing and why I'm doing the things I'm doing. Okay, and then maybe I add and like... No, I don't want. One more like little element over here to sort of balance. Okay. I'm gonna go off of the tripod for this. And after this, I'm gonna show you actually how I do use that tripod in the top down, because you can if I needed to. And you can find tripods that do exactly... Oh, I already need, I already know I need to switch back to my other lens because I'm short. And I lose so many lens caps that I've started just keeping them in. I only buy pants now with back pockets so that I don't lose them. By the way, while you're doing that, we have several people whose minds you mentioned earlier. Minds being blown. Both showing how to shoot on black, showing how to block yourself with the black and then shooting on white has been golden. So thank you. I mean, these are all the things that seems so frustrating when you're first starting. And once you figure it out, it's so liberating. Okay, so this is another case where I would use live view if I could, because it really helps. And I know I said I'd start square, but I think it actually might make a really good vertical. Okay, and I have to, in this case, raise my ISO so that my camera will pick a fast enough shutter speed because I'm hand holding. So if it's too slow (shutter clicks) then oh yeah, this is looking nice. All right. So we're just going to come in from the side again. And I want the triangle to show. I don't like that it's getting cut off right now so I'm just gonna move it up a little within my image and just tighten it up. Okay. Oh, I turned it off. Okay, let's see that one. It's sideways but it's looking good, right? We're filling in those shadows, and we're really showing the foilings. Do you see that? That's what's important. And so when we add in that reflector, we can sort of choose how we wanna highlight it. So I could even like, I would actually come in from right here. And I do hold it myself a lot of the time if I need like a high angle like that while I'm shooting. And I'm super happy with that. So I would stop right there. What do you guys think? All right. What do you guys think? Grab a mic. Like, what about that is something that you, now everything you've learned, talk to us about what you're seeing. Yeah, I could see me trying that on some of my party things that I've been doing. And I love that angle, I love it. It's great. Yeah, like, I thought I was doing some of this stuff. Obviously I wasn't, but to see like the difference in just small manipulations of the light is really interesting how it impacts everything. Yeah. It makes a huge difference. And I think people sometimes watching me without really like seeing the results, it's almost funny like watching someone move something an inch and then moving something an inch again and then moving something another inch and maybe back another inch, but it really is in those tiny details that your composition comes alive. And so I do play with things a lot until it feels right. And I think you've heard me say like several time today as I look through the viewfinder. Oh yeah this is it, because you know. Because you can feel it, right? You can hear it in your heart, you know when you've got it. And that's also the beauty of digital too. I don't just have to know in my heart, I can see it and know that it looks exactly like what I want it to. So don't be afraid to play around and to take a ton of pictures until you get it. Now also, give yourself a time limit. (chuckles) So play around, but then also say okay, at this point, like, I need to be done because I can really start to overwork things too because I get so excited about it, I'll just like keep going and keep going and keep going, and I only need one shot. But with the set up like this, on days, so I do, do party setups like this a lot because it's so much easier than doing a whole real party setup in the room, but it really gives it the party feel. And so I will maybe, once a week, go to a cupcake store or go to a French bakery and buy macarons, and I'll do multiple shots that day for my Instagram when I have a prop that's going to go bad. So flowers, maybe like every couple weeks I'll buy some really beautiful flowers and I will shoot as much as I can that day with different items with the same flowers. So maybe they're in a vase, but maybe I take them out and put them on the table. So if I know I have a prop that is going to expire, I do that. Also, with macarons, I freeze them and then I'll get them back out. And they might sweat a little bit, just wipe them off. I'm not eating them, and I'm not selling them. If I was selling them, there are laws and rules about that. But because I'm selling the party products and it's just a prop, it's okay. Yes. So in this photo, what was your focal point? Because everything looks really sharp. And I notice your aperture is maybe a little higher than when you were doing the other shots. So like, what were you focusing on, was it the cupcake or-- Yes, you got it. So I was focusing on the cupcake, it was the highest thing in the image. And fall off is a lot faster in front of a subject than behind it, so I was focusing on this higher item. And then I closed my aperture to make sure that the fans and the table were in focus as well. So that is why I went up to a five, and which seems funny because in other images from the side, I was open, really open because I wanted the background to blur out. In this case, I want it to all be in focus, so I closed it down even though there was not much depth. And it's funny to point that out because that's what your iPhone does, and that's why I shoot top downs with my phone a lot because it's just gonna put everything in focus just the way I want it to. Great question, thank you. Yes, that was a good one. I think a lot of people have been asking about whether you could show us the top down with the tripod. So I think we still have time to do that. Oh yes, yes, let's do that. Okay, so you will need a sandbag when you use a tripod for a top down. And in this case, I would either have to put the tripod on the table, but a lot of times when I'm shooting that way, I will shoot on the floor just so I'm not dealing with my tripod up high. So on this particular tripod, and I don't do this very often so hopefully I'm not gonna embarrass myself; there's a button in the bottom that makes it so that now I can adjust the head. And I can place my camera here and I can rotate it so it's facing down and I can take all my top-down images. So if I'm in a lowlight situation, today I had enough light to just raise my ISO to and take those photos; but if I didn't I could put it on. Now I need to have a sandbag or some kind of item holding down the opposite leg, otherwise my camera is just gonna pull this right down. So it's really important... Just put... Yes, right here. So something like this. I've also just used, this is my hack thing, a gallon, like a milk gallon container full of water and just use elastics to elasticate on to the leg. So if I didn't have a sand bag with me, that's like a really easy way to do it. But I would kind of strap this on and hold down tha leg so that it will hold the weight of my camera when it's out like this. And so this is a little bit more expensive of a tripod. It's a Manfrotto tripod. And a lot of people like a ball head, which means you just push it and it'll go anywhere. I actually use this one in particular because we do video as well and I can pan with it. It will go like this really easily. So that's why I like using this particular head. And then all I have to do is just push the button and pop it back in. Just like that. And so if you know you're gonna be doing a lot of top down and you don't have a lot of light, that's a really, really great way to do it. Great, thank you for that. So this is a great time I think we have any more questions regarding shooting, exposing, styling, all of that. We are going to be getting into a little bit of editing later in the class, so maybe I'll do some from the Internet. But if you guys have any, do raise a hand. Yup. I'll start with one on the Internet and then we'll go to you. So this is a basic question because you showed us how to use black to block light that's in the way. Could you use a darker color sheer fabric to prevent blocking the light? I guess I was thinking they meant this dark not sheer fabric, but what else could you use? Yeah, kind of like the screens we brought down earlier. I think you could. I mean it would still have some reflection because there's still light coming in from that direction, but it would block a lot of it. That could work. I've never tried it, now I need to try it. I had a specific question, kind of a step further than the reflection because I'm working with a lot of mirrors. I definitely think it will improve if I hold the poster board, but I'm wondering if you make up for any inconsistencies like in the editing process or if you do it for the shoot. Not necessarily in editing, although every once in a while if there's like a small tiny thing that would show in the mirror, I would clone it out. I do that with spoons sometimes, like when we're shooting food top down. I haven't had a ton of experience in shooting mirrors specifically, and they are the hardest thing to photograph. So I feel for you. But that is actually when I would probably employ a light tent because then the only reflections in that mirror are going to be white. And if you can fill the whole mirror with white, then it just looks like that's what the mirror was, that white tone. And so that is when a light tent would come in really handy. And for those of you who don't know what a light tent is, it's basically like a white fabric box and it usually has like a piece of seamless in the back. And a lot of people use lights, the continuous lights that they just add into the sides, but again you could use daylight. But basically, what that does surrounding something by white makes every reflection just be pure white and it kind of takes them away, it eliminates it a little bit. And so something super reflective like a mirror, I would do that. But a lot of times, and we didn't have to do that here, it is me that's reflecting. So again, I wear black. Generally, when I photograph, if I know that it's something super reflective, I will wear black and I will not wear pattern for sure because I don't want that pattern to show up in what I'm photographing. And then the other thing is a lot of times, with a black foamcore board, I will literally cut a hole just big enough to go over my lens and then I am photographing it with that blackboard around it. And I literally can't see it, the product then, so I'm using live view again just to see what I'm actually photographing since I can't see it from the board blocking me. But that will really help as well. I have one more random question. When I was looking at different photos that I liked and trying to figure out if I like light or dark backgrounds, I noticed that I might be able to incorporate some dark backgrounds if I kinda whitewash them. So like if the light hits and it's making like the table, some of your photos have it, look a lighter gray or more white, but when I've achieved that look, it's just been by chance so I don't know if using like a shinier finish would help or anything else. Yeah, it sounds to me like that's just like a reflection on the table. And so it's just the way you angle it towards the light until you get that reflection in that catch of light. That's what it sounds like to me. And then I don't know if I'd still make it very glossy. Because you can see, even if I hold up this black board, depending on the direction that I'm holding it, it's going to still have different, still have different values, right? If I hold it flat or if I angle it, it sort of changes the tonality of it. And so it does, it just depends on the way that it's facing to the light. And one thing that we haven't shown in this class, and this is our last time shooting so I wanna show it really quick; is if I wanted deeper shadows, I wanted more contrast, I can use this in the exact same way that I would use a whiteboard. So I would just add it into the opposite direction of where my light's coming from, and then I make my shadows darker because I'm kind of sucking in that light. So I can add shadows and I can take them away depending on if I add white or black. And so I do sometimes use the black foamcore board when I'm shooting in like a dark, moody, edgy sort of light to get that darkness. And I'm gonna push this table a little bit away because I want you to see the difference in being farther away from your light source and what that will do. Okay, so we've moved probably eight feet more away from our light source. Let's try that and see if it makes a difference. This is a pretty big light source so it may not make a huge difference. If you had a smaller window, it would. So let's put this. That would be great. Right here. And this clearly is like not the image I would be going for deeper shadows in. Like it's a party high key image, but I just wanna show you the difference between the two. Okay, so that is a look we're going for. Okay, perfect. See the difference? So let's just toggle back and forth between those. We have our light and bright, and the light's much more even. And then we have like our deep, rich, darker shadows. So just depending on where we move. And also, do you see the edge of these shadows, how they get a little bit harder. So when we move away, we create a harder, a more contrasty light. And again, that can be really, really cool when we're shooting something that we want to be like a little bit edgier. Most of the things we photograph today, we want it to be soft and pretty. But there are definitely times when we want a little bit of edge, and that comes from getting away from your light source and getting that a little bit of harder light into your product. Thank you for showing us that, another great use of the blackboard as well. I have one more question for you before we go to break that is gonna be a thank you to some folks who are in the chat rooms who have been there this whole time. Can you just give us tips about photographing, say, framed artwork or something that's heavy they can't necessarily create a fake background or a fixed set up like we did with the little boy's room and the little girl's room. Okay, so if I was photographing framed art, the first thing I would do is take the glass out. That's the first thing. And photograph it without the glass. No one's gonna know that the glass isn't there, they're just gonna think you're a really good photographer. So that's my number one tip with photographing something with glass if you can. If you can't, the way they photograph framed art under glass in art museums are with copy lights, which means they take two lights that are equal distance. And if this was my painting, one would be coming from here and one would be coming from here and they kind of angle and equal each other out. So you can try that with continues light. But really, what I would do is if this was a wall behind me, I would hang up that painting in a very similar way to how I just lit everything else. It's just hanging on an actual wall. And I would photograph it that way. And again, I think perspective is really, really important. So I would hang it at my own eye level so that I'm getting the true perspective and it's not higher or lower than me. And if I had hung it higher than my eye level, then I would stand on a box or a stepstool, like I did today, to make sure that I get that correct perspective.
Class Materials
Bonus Materials with Purchase
Ratings and Reviews
a Creativelive Student
This class taught by Candice was amazing. She teaches in such a step-by-step, easy to understand pace. She shares so much of her own tips and tricks she uses to create beautiful images without spending a fortune or having all kinds of expensive equipment. Having the DSLR lessons included was really great for anyone who wants to do more than the camera phones are capable of. Learning the basics of how to use a DSLR is confusing for most people, but Candice broke it down in the simplest way possible. Social media is all about imagery, so if you want to put out the most beautiful eye-catching photos, then you want to learn how to use more than the camera phone. I don't have a business where I need to take photos of things I sell and I still enjoyed her class so much. As a photographer, I am going to use her ideas and insight when I photograph things for fun. There is so much to gain from this class. I would highly recommend taking her class. She is a wealth of great ideas and information and has that friendly personality of someone you'd want to sit and have coffee with.
yomichaela
A wonderful class to get you going with craft/product photography. Candice provides (and shows) fantastic examples and it's really fun to watch her work through a shoot, moving items, etc. to create the final image. She also covers some basic photography tips which is very helpful. Great class! I definitely recommend to others!
Melinda Malamoco
I loved this class! Candice is so personable, clear and relatable. I would want to hang out with her and be creative! I have been taking pictures for YEARS, and for my Etsy store for over two years, and I still learned a lot in her class. The lessons are set up in a way that you can follow, take what you want and don't worry about what you don't need. I will say that I got a TON of ideas for how to better display my brand, what my personal style is and how to be consistent with it. I so recommend this class for anyone who has small business or just wants to be able to take better pictures of their products. Okay, off to build a prop kit!